1. Introduction
Thank you for choosing the Maupvit Queen Bed Frame. This manual provides detailed instructions for assembly, operation, maintenance, and troubleshooting to ensure you get the most out of your new bed frame. Please read this manual thoroughly before assembly and use, and retain it for future reference.
Key Features:
- 4 Dustproof Storage Drawers: Transparent, waterproof, and dustproof drawers for convenient under-bed storage.
- Upholstered Headboard with Charging Station: Features 2-tier open storage, a hidden compartment, 2 AC outlets, 1 Type-C (Fast Charger) port, and 1 USB (Fast Charger) port.
- RGB LED Lights: Integrated LED lights at the headboard and footboard with over 60,000 colors, controllable via app or remote for brightness, color, mode, and timing functions.
- Sturdy Construction: Composed of 12 strong metal slats and 9 thickened leg supports, supporting up to 800 pounds.
- Noise-Free Design: Sound-absorbing strip beneath the center bar to prevent noise from metal-to-metal contact.
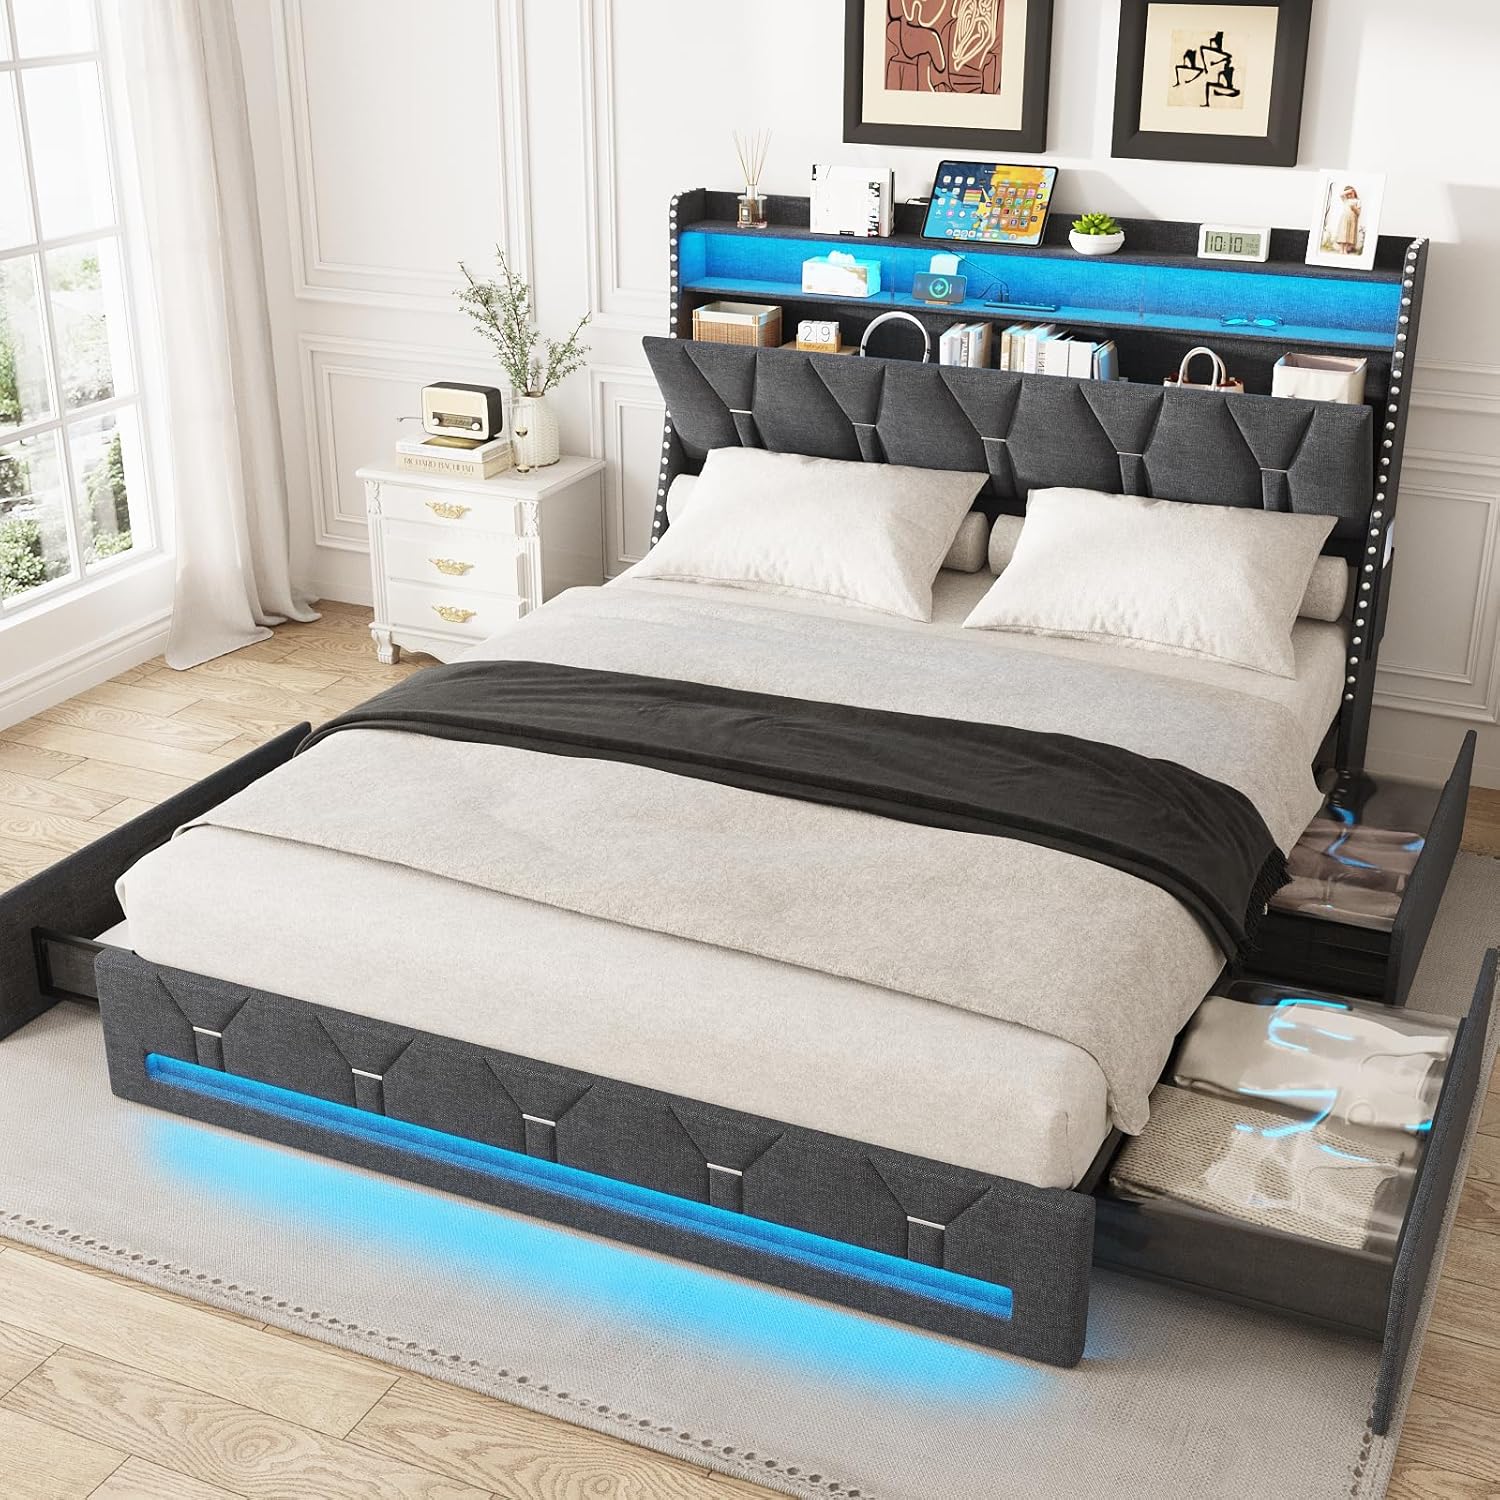
Image 1.1: Overview of the Maupvit Queen Bed Frame, showcasing its upholstered design, LED lighting, and accessible storage drawers.
2. Important Safety Information
- Always assemble the bed frame on a soft, clean surface to prevent damage.
- Ensure all bolts and screws are securely tightened before use. Periodically check and re-tighten as necessary.
- Do not exceed the maximum weight limit of 800 pounds.
- Keep small parts and packaging materials away from children to prevent choking hazards.
- Use only the provided hardware for assembly. Substituting parts may compromise structural integrity.
- Avoid placing hot items directly on the headboard's charging station surface.
- Ensure electrical connections for the charging station and LED lights are properly secured and not exposed to moisture.
3. Package Contents
Before beginning assembly, verify that all components listed below are present and undamaged. If any parts are missing or damaged, please contact customer support.
- Upholstered Headboard (with integrated LED lights and charging station)
- Side Rails (2)
- Footboard (with integrated LED lights)
- Center Support Beam
- Metal Slats (12)
- Support Legs (9)
- Dustproof Storage Drawers (4)
- Hardware Pack (screws, bolts, Allen wrench)
- LED Remote Control
- Assembly Instructions Manual
4. Setup & Assembly
Assembly typically requires two adults and approximately 1-2 hours. Ensure you have ample space and a soft surface to prevent scratching components.
Step-by-Step Guide:
- Unpack and Identify Parts: Carefully remove all components from the packaging. Lay them out and compare them against the parts list in the manual to ensure everything is present.
- Assemble the Headboard: Attach the headboard support legs and any internal shelving components as per the detailed diagrams in the included paper manual. Ensure the charging station and LED light wiring are accessible.
- Connect Side Rails to Headboard and Footboard: Securely attach the side rails to the headboard and footboard using the provided bolts and Allen wrench. Do not fully tighten all bolts until the frame is completely assembled.
- Install Center Support Beam and Legs: Place the center support beam and attach the support legs. Adjust leg height if necessary to ensure even support.
- Attach Metal Slats: Distribute the metal slats evenly across the frame and secure them to the side rails. Ensure the sound-absorbing strip is correctly positioned under the center bar.
- Install Storage Drawers: Assemble the four dustproof storage drawers according to their individual instructions. Slide them into position under the bed frame.
- Final Tightening: Once all components are in place and aligned, fully tighten all bolts and screws.
- Connect Power: Plug in the power cord for the charging station and LED lights to a wall outlet.
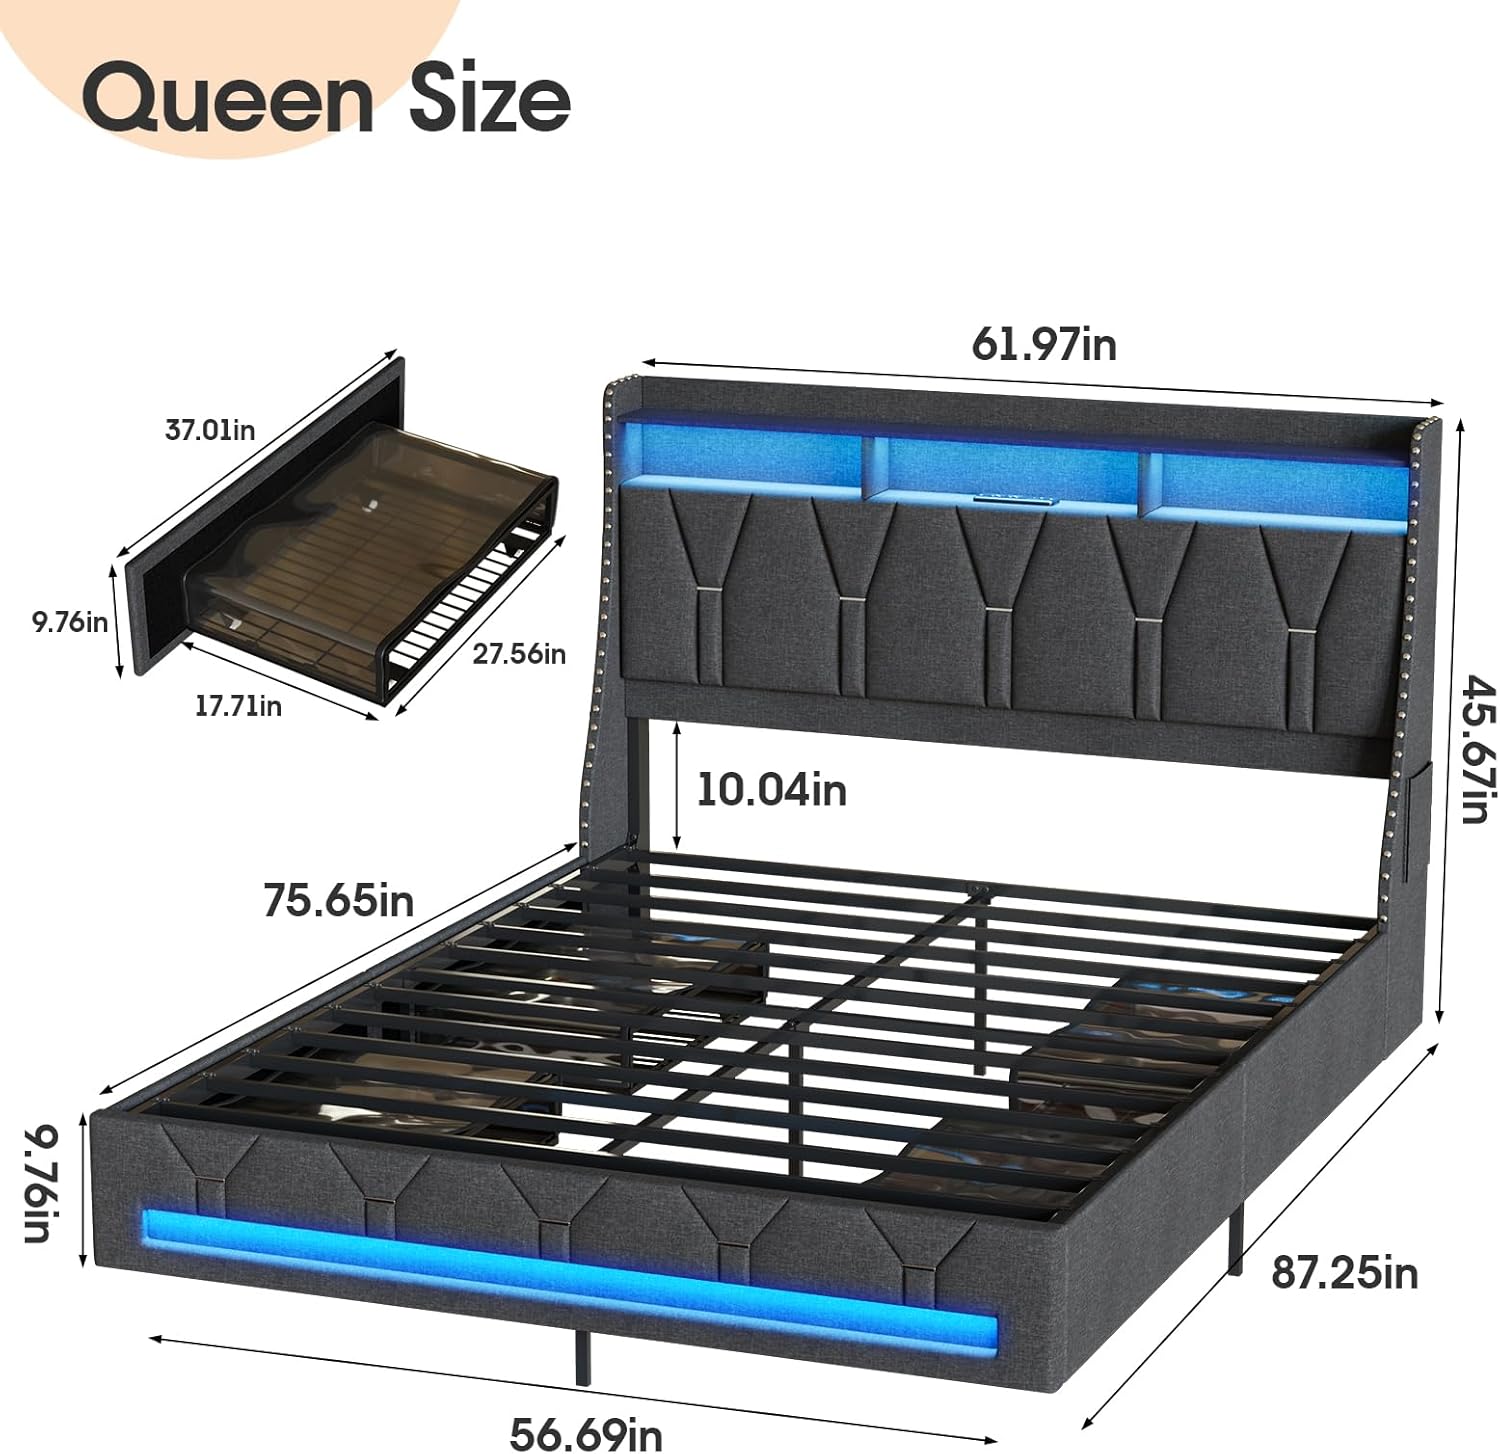
Image 4.1: Dimensional diagram of the Queen bed frame, illustrating overall length, width, and height, along with a separate view of a storage drawer's dimensions.

Image 4.2: Front view of the assembled bed frame, highlighting the headboard's charging station and LED lights, and the accessible dustproof storage drawers.
5. Operating Instructions
5.1 LED Lights Operation
The integrated RGB LED lights can be controlled via the included remote control or a dedicated smartphone application. The lights offer over 60,000 color options, dynamic modes, music sync, timing functions, and microphone control.
- Remote Control: Use the physical remote to power on/off, change colors, adjust brightness, and select preset modes.
- Smartphone App: Download the recommended app (refer to the paper manual for QR code or app name). Connect your device via Bluetooth to access advanced features like custom color creation, music synchronization, and scheduling.
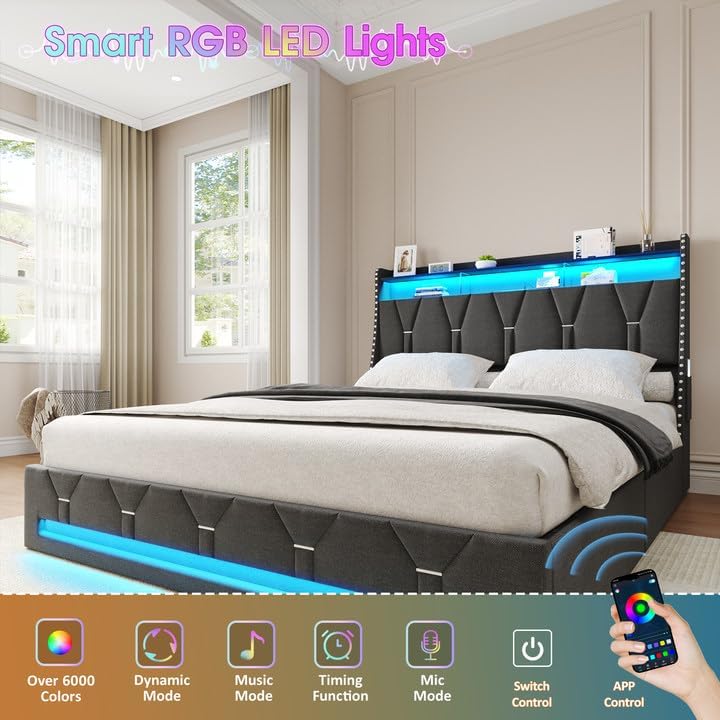
Image 5.1: Visual representation of the smart RGB LED lights features, including app control, dynamic modes, music synchronization, timing, and microphone control.
5.2 Charging Station Usage
The headboard features a built-in charging station for your electronic devices.
- AC Outlets: Two 125V/12A AC outlets are available for standard plugs.
- USB Port: One 5V/2.1A USB port for charging compatible devices.
- Type-C Port: One 5V/2.1A Type-C port for fast charging compatible devices.
Ensure the bed frame's main power cord is plugged into a functional wall outlet for the charging station to operate.
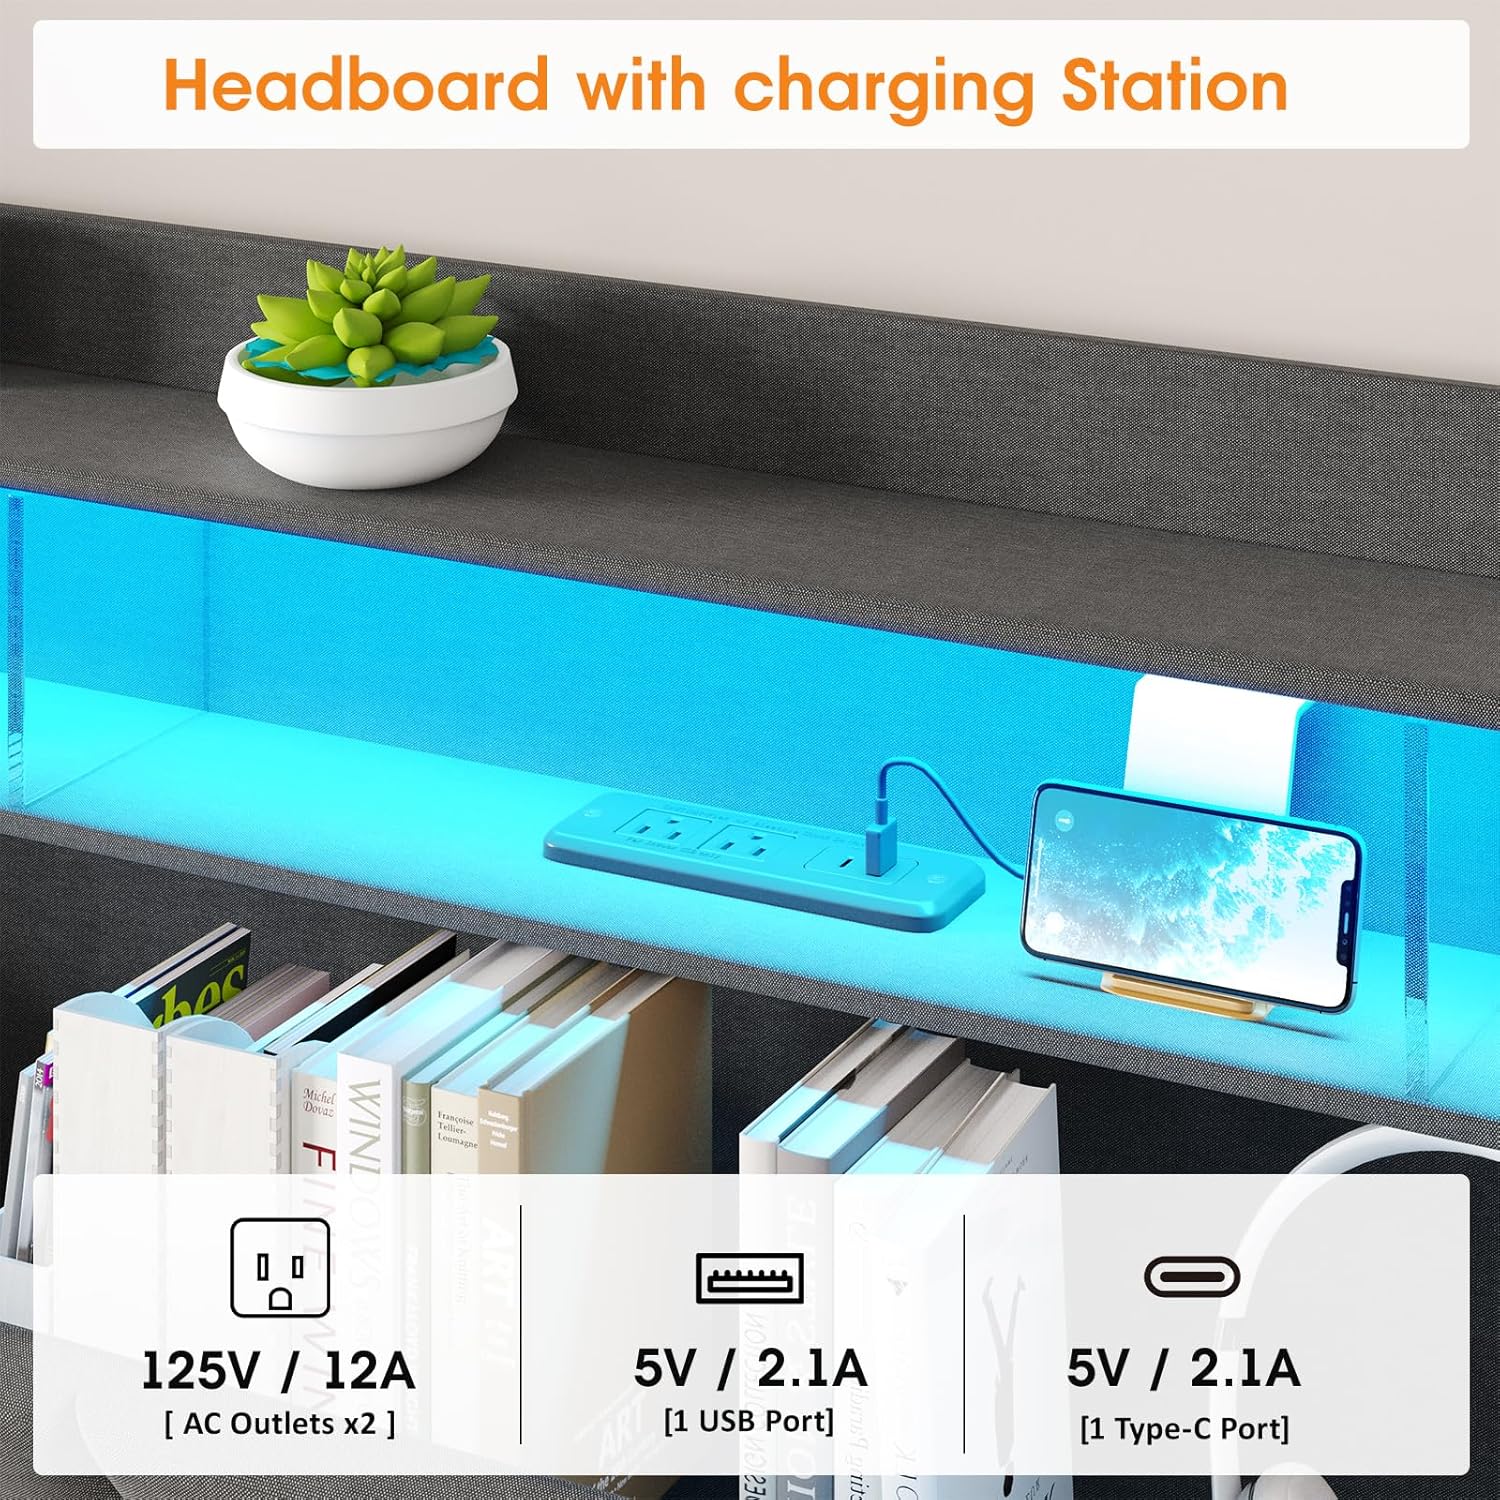
Image 5.2: Detailed view of the headboard's integrated charging station, showing the two AC outlets, one USB port, and one Type-C port.
5.3 Storage Drawers
The four sliding drawers are designed with transparent, dustproof, and waterproof material, allowing for easy visibility of contents and protection from dust.
- Simply pull the drawers out from under the bed frame to access your stored items.
- Push them back in until they are fully closed to keep contents dust-free.

Image 5.3: Comparison illustrating the dustproof design of Maupvit's storage drawers, protecting contents from dust accumulation.
5.4 Headboard Hidden Storage
The upholstered headboard includes a hidden storage compartment in addition to the open shelves.
- Lift the upholstered panels on the headboard to reveal the hidden storage space, suitable for discreetly storing various items.
- Ensure the mattress does not obstruct access to this compartment.

Image 5.4: Close-up view of the headboard, highlighting the hidden storage compartment accessible by lifting the upholstered sections.
6. Maintenance & Care
- Cleaning Upholstery: For general cleaning, use a soft cloth or vacuum cleaner with an upholstery attachment. For spills, blot immediately with a clean, dry cloth. For stubborn stains, use a mild fabric cleaner, testing on an inconspicuous area first.
- Cleaning Frame: Wipe metal and non-fabric surfaces with a damp cloth and mild detergent. Dry thoroughly.
- Drawer Care: The transparent drawer material can be wiped clean with a damp cloth. Avoid abrasive cleaners.
- Hardware Check: Periodically inspect all bolts and screws to ensure they remain tight. Re-tighten as needed to maintain stability and prevent squeaking.
- Electrical Components: Keep the charging station and LED light connections dry and free from dust. Do not attempt to repair electrical components yourself.
7. Troubleshooting
| Problem | Possible Cause | Solution |
|---|---|---|
| Bed frame squeaks | Loose hardware; metal-on-metal contact. | Tighten all bolts and screws. Ensure the sound-absorbing strip is correctly placed under the center bar. |
| LED lights not working | Power cord unplugged; remote battery low; app not connected. | Check power connection. Replace remote battery. Re-pair app via Bluetooth. |
| Charging station not providing power | Main power cord unplugged; device not compatible. | Ensure the bed frame's main power cord is securely plugged into a working wall outlet. Verify device compatibility with port specifications. |
| Drawers not sliding smoothly | Obstruction; misaligned. | Check for items blocking the drawer path. Ensure drawers are correctly assembled and aligned on their runners. |
8. Product Specifications
| Feature | Specification |
|---|---|
| Size | Queen |
| Product Dimensions | 87.2"L x 61.9"W x 45.7"H |
| Weight Limit | 800 Pounds |
| Special Feature | Squeak Resistant |
| Upholstery Fabric Type | Microfiber |
| Included Components | Drawer, Headboard |
| Assembly Required | Yes |
| Charging Station | 2 AC Outlets (125V/12A), 1 USB Port (5V/2.1A), 1 Type-C Port (5V/2.1A) |
| LED Lights | RGB, 60,000+ Colors, App/Remote Control |
9. Warranty & Support
9.1 Warranty Information
This Maupvit bed frame comes with a limited warranty. Please refer to the warranty card included in your package for specific terms, conditions, and duration of coverage. The warranty typically covers manufacturing defects and material flaws under normal use.
9.2 Customer Support
If you encounter any issues during assembly or use, or if any parts are damaged or missing, please contact Maupvit customer support. Have your purchase details and model number (B0DKF76RZF) ready when contacting support for faster assistance.
For support, please visit the Maupvit store on Amazon: Maupvit Furniture Store