1. Introduction
The WnewTools X1 Pocket Clamp Meter is a compact, 3 5/6-digit automatic digital meter designed for various electrical measurements. It offers stable performance, high precision, and reliability, with a clear display and overload protection. Powered by AAA 1.5V batteries, it features a large LCD display with high-brightness backlight and flashlight functionality, even at low battery levels. This instrument is suitable for measuring DC voltage, AC voltage, AC and DC current up to 600A, resistance, capacitance, diode, temperature, continuity, square wave output, frequency, and true RMS values. It is an ideal tool for laboratories, factories, and general household use.
2. Safety Information
To ensure safe operation and avoid damage to the meter, please read and follow all safety instructions carefully.
- Always observe local safety codes and regulations when performing electrical measurements.
- Do not exceed the maximum input limits specified for any function. Refer to the specifications section for details.
- Ensure the meter is set to the correct function and range before making any measurements.
- Exercise extreme caution when working with voltages above 30V AC RMS, 42V peak, or 60V DC, as these levels pose a significant shock hazard.
- Before measuring resistance, continuity, diodes, or capacitance, disconnect power to the circuit and discharge all high-voltage capacitors.
- Do not use the meter if it appears damaged, or if the test leads are frayed or broken.
- Replace batteries promptly when the low battery indicator appears to maintain measurement accuracy.
- Avoid operating the meter in environments containing explosive gas, vapor, or dust.
3. Package Contents
Verify that all items listed below are present in your package:
- 1 x X1 Clamp Meter (batteries not included)
- 1 x Test Leads (Red and Black)
- 1 x Temperature Probe
- 1 x English User Manual
4. Product Overview
Familiarize yourself with the components and features of your WnewTools X1 Clamp Meter.

Figure 4.1: WnewTools X1 Clamp Meter with included test leads and temperature probe.

Figure 4.2: Overview of the WnewTools X1 Clamp Meter's functions, including AC/DC voltage, current, resistance, capacitance, diode, frequency, temperature, NCV, True RMS, and backlight.

Figure 4.3: Detailed diagram highlighting key components of the WnewTools X1 Clamp Meter, such as the clamp head, display, function dial, and input jacks.

Figure 4.4: Close-up view of the WnewTools X1 Clamp Meter's jaw, illustrating its 36mm opening capacity.
5. Setup
5.1 Battery Installation
The meter requires two AAA 1.5V batteries (not included). To install or replace batteries:
- Ensure the meter is turned OFF.
- Locate the battery compartment cover on the back of the meter.
- Use a screwdriver to loosen the screw on the battery cover.
- Remove the cover and insert two AAA 1.5V batteries, observing the correct polarity (+/-).
- Replace the battery cover and secure it with the screw.
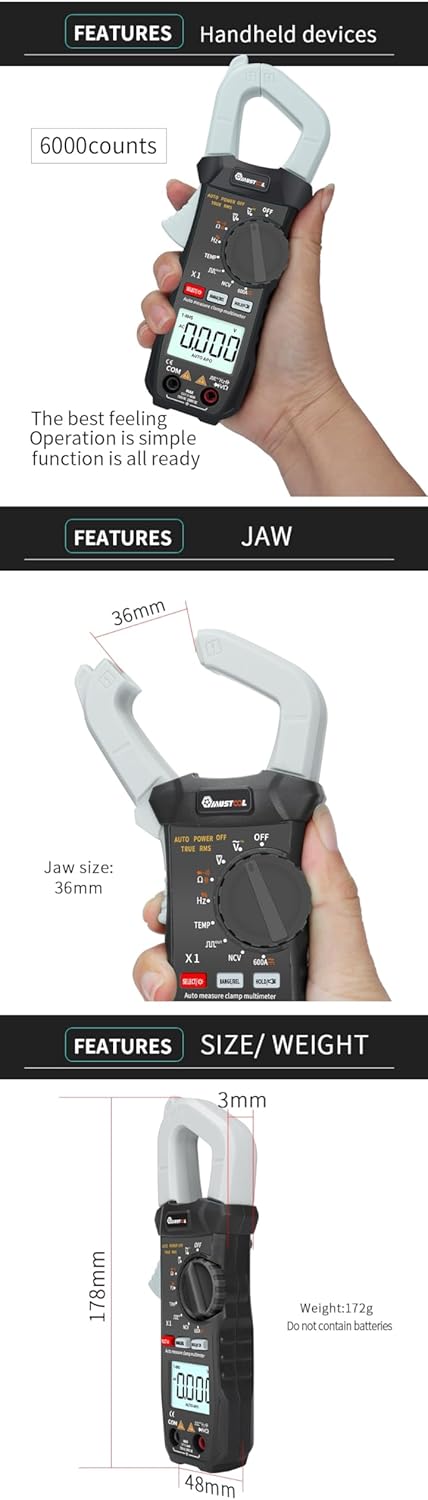
Figure 5.1: Battery compartment of the WnewTools X1 Clamp Meter.
5.2 Connecting Test Leads
For most voltage, resistance, continuity, diode, capacitance, and frequency measurements, connect the test leads:
- Insert the red test lead into the 'VΩHz' input jack.
- Insert the black test lead into the 'COM' (common) input jack.
For temperature measurements, connect the temperature probe to the 'VΩHz' and 'COM' jacks as indicated by the probe's connectors.
6. Operating Instructions
6.1 Power On/Off and General Functions
- Power On: Rotate the function dial from 'OFF' to any desired measurement function.
- Power Off: Rotate the function dial to the 'OFF' position. The meter also features an automatic power-off function after approximately 15 minutes of inactivity to conserve battery life.
- Backlight: The instrument's backlight can be turned on and off automatically after 15 seconds. Specific button for manual control might be available (refer to device markings).
- HOLD Button: Press the 'HOLD' button to freeze the current reading on the display. Press again to release.
- SELECT/RANGE/REL Button: This button typically cycles through sub-functions within a main rotary switch position (e.g., AC/DC, Diode/Continuity) or activates manual ranging or relative measurement mode.
6.2 Measurement Functions
Select the desired function by rotating the main dial.
6.2.1 DC Voltage (DCV) Measurement
- Rotate the dial to the 'V=' position.
- Connect the red test lead to the positive (+) side of the circuit and the black test lead to the negative (-) side.
- Read the voltage value on the display.
6.2.2 AC Voltage (ACV) Measurement
- Rotate the dial to the 'V~' position.
- Connect the test leads across the circuit or component to be measured.
- Read the voltage value on the display. The meter supports True RMS measurement for accurate readings of non-sinusoidal waveforms.
6.2.3 DC Current (DCA) Measurement (Clamp)
- Rotate the dial to the '600A' position. Use the 'SELECT' button if necessary to choose DC current.
- Open the clamp jaw and enclose only one conductor of the circuit. Ensure the conductor is centered within the jaw.
- Read the current value on the display.
6.2.4 AC Current (ACA) Measurement (Clamp)
- Rotate the dial to the '600A' position. Use the 'SELECT' button if necessary to choose AC current.
- Open the clamp jaw and enclose only one conductor of the circuit. Ensure the conductor is centered within the jaw.
- Read the current value on the display. The meter supports True RMS measurement.
6.2.5 Resistance (Ω) Measurement
- Rotate the dial to the 'Ω' position.
- Ensure the circuit is de-energized.
- Connect the test leads across the component to be measured.
- Read the resistance value on the display.
6.2.6 Diode Test and Continuity Test
- Rotate the dial to the 'Diode/Continuity' position. Use the 'SELECT' button to switch between diode test and continuity test.
- Diode Test: Connect the red test lead to the anode and the black test lead to the cathode of the diode. The display will show the forward voltage drop. Reverse the leads to check for open circuit.
- Continuity Test: Connect the test leads across the circuit or component. If continuity exists (resistance below a certain threshold), the buzzer will sound.
6.2.7 Frequency (Hz) Measurement
- Rotate the dial to the 'Hz' position.
- Connect the test leads across the signal source.
- Read the frequency value on the display.
6.2.8 Temperature Measurement
- Rotate the dial to the 'TEMP' position.
- Connect the temperature probe to the 'VΩHz' and 'COM' input jacks, ensuring correct polarity.
- Place the tip of the temperature probe on or near the object whose temperature is to be measured.
- Read the temperature value on the display.

Figure 6.1: WnewTools X1 Clamp Meter with temperature probe connected for measurement.
6.2.9 Square Wave Output
- Rotate the dial to the 'Square Wave Output' position.
- The meter will generate a square wave signal from the output terminals. This can be used for testing audio circuits or other applications requiring a basic signal.
6.2.10 Non-Contact Voltage (NCV) Detection
- Rotate the dial to the 'NCV' position.
- Move the top part of the meter (NCV sensor area) close to a live AC voltage source.
- The meter will indicate the presence of AC voltage through an audible beep and/or visual indicator.
7. Maintenance
7.1 Cleaning
Wipe the meter with a damp cloth and mild detergent. Do not use abrasives or solvents. Ensure the meter is completely dry before use.
7.2 Battery Replacement
Replace the batteries as described in Section 5.1 when the low battery indicator appears on the display to ensure accurate readings and proper operation.
7.3 Test Lead Inspection
Regularly inspect the test leads for any signs of damage, such as cuts, cracks, or frayed insulation. Replace damaged leads immediately to prevent electrical shock hazards.
8. Troubleshooting
If you encounter issues with your meter, refer to the following common troubleshooting steps:
- No Display or Faint Display: Check battery installation and replace batteries if necessary. Ensure the meter is turned ON.
- Incorrect Readings: Verify that the function dial is set to the correct measurement type and range. Ensure test leads are properly connected and not damaged. Check battery level.
- No Continuity Beep: Ensure the meter is in continuity mode. Check if the circuit resistance is too high for the continuity threshold.
- Clamp Measurement Issues: Ensure only one conductor is enclosed within the clamp jaw for current measurements. Verify the clamp jaw is fully closed.
- Meter Does Not Respond: Turn the meter OFF, then ON again. If the issue persists, remove batteries for a few minutes and then reinsert them.
If problems persist after attempting these steps, contact customer support for further assistance.
9. Specifications
Detailed technical specifications for the WnewTools X1 Pocket Clamp Meter.
9.1 Electrical Specifications
| Range | Accuracy | Resolution |
|---|---|---|
| 6V | ±(0.5%+3) | 0.001V |
| 60V | ±(0.5%+3) | 0.01V |
| 600V | ±(0.5%+3) | 0.1V |
| 1000V | ±(0.8%+10) | 1V |
| Range | Accuracy | Resolution |
|---|---|---|
| 6V | ±(0.8%+3) | 0.001V |
| 60V | ±(0.8%+3) | 0.01V |
| 600V | ±(0.8%+3) | 0.1V |
| 750V | ±(1.2%+10) | 1V |
| Range | Accuracy | Resolution |
|---|---|---|
| 60A | ±(2%+30) | 0.01A |
| 600A | ±(2%+30) | 0.1A |
| Range | Accuracy | Resolution |
|---|---|---|
| 60A | ±(2%+30) | 0.01A |
| 600A | ±(2%+30) | 0.1A |
| Range | Accuracy | Resolution |
|---|---|---|
| 600Ω | ±(0.8%+5) | 0.1Ω |
| 6kΩ | ±(0.8%+3) | 1Ω |
| 60kΩ | ±(0.8%+3) | 10Ω |
| 600kΩ | ±(0.8%+3) | 100Ω |
| 6MΩ | ±(0.8%+3) | 1kΩ |
| 40MΩ | ±(2.5%+3) | 10kΩ |
9.2 General Specifications
- Display: 6000 Counts
- True RMS: Yes
- Power Source: 2 x AAA 1.5V batteries (hand_powered)
- Auto Power Off: Yes (after 15 seconds for backlight, general auto-off for meter)
- Dimensions (L x W x H): 8.66 x 3.15 x 5.91 inches (220 x 80 x 150 mm)
- Item Weight: 10.6 ounces (300 Grams)
- Clamp Jaw Size: 36mm
- Included Components: Test Leads, Temperature Probe, User Manual