1. Introduction
Thank you for choosing the VELPAX 200 Ampere MIG MAG Welding Machine, model VE-250Pro. This versatile 3-in-1 welding machine supports MIG/MAG, Lift TIG, and Stick (MMA) welding processes, offering stable and efficient welding energy through its advanced inverter technology. It features an intelligent control system that automatically adjusts settings for various materials and weld strengths, simplifying operation and improving efficiency. The integrated overheating protection ensures enhanced safety and extends the service life of the unit. A digital display provides real-time operating data, allowing for easy monitoring of welding conditions. This manual provides essential information for the safe and effective operation, setup, and maintenance of your welding machine.
The VELPAX VE-250Pro 3-in-1 MIG/MMA/TIG welding machine.
2. Safety Instructions
Always prioritize safety when operating welding equipment. Failure to follow safety guidelines can result in serious injury or damage to the equipment.
General Welding Safety
- Wear Personal Protective Equipment (PPE): Always use a welding helmet with appropriate shade, flame-resistant clothing, welding gloves, and safety shoes.
- Ventilation: Ensure adequate ventilation to remove welding fumes and gases from the work area.
- Fire Prevention: Keep a fire extinguisher nearby. Remove all flammable materials from the welding area.
- Electrical Safety: Ensure the welding machine is properly grounded. Do not operate in wet conditions. Inspect cables for damage before each use.
- Eye and Skin Protection: Welding arcs emit intense UV and IR radiation that can cause severe burns to eyes and skin.
Machine-Specific Safety Features
The VELPAX VE-250Pro is equipped with multiple security protections to ensure safe operation and prolong its service life:
- Over-Heat Protection: Automatically shuts down the machine if internal temperatures exceed safe limits.
- Over-Current Protection: Prevents damage from excessive current draw.
- Over-Load Protection: Safeguards the machine from sustained high loads.
- Over-Voltage Protection: Protects against damage from voltage spikes.

Overview of the multiple security protections integrated into the welding machine, including over-heat, over-current, over-load, and over-voltage protection.
3. Product Overview
Controls and Indicators
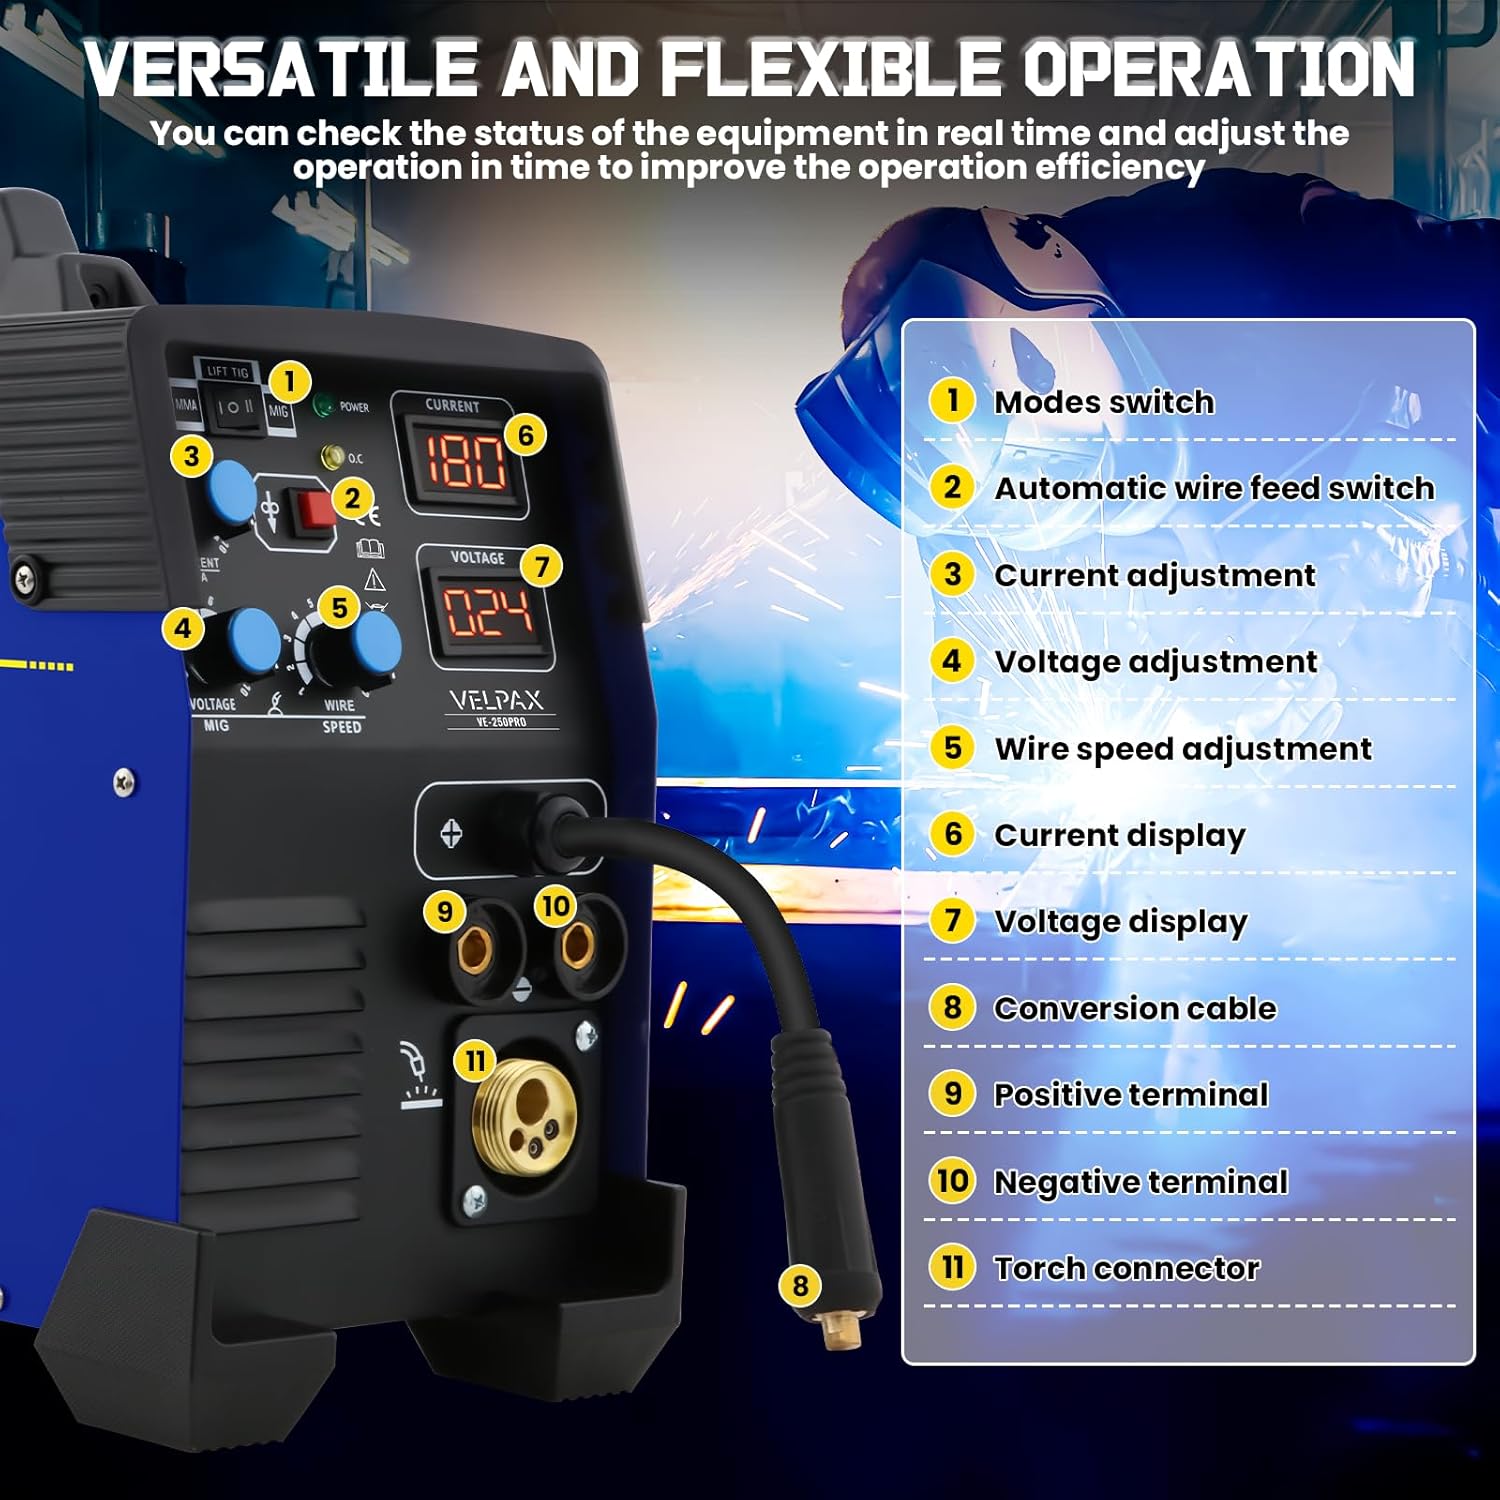
Familiarize yourself with the control panel and connection points of your VELPAX VE-250Pro welding machine for efficient and safe operation.
Front panel of the VELPAX VE-250Pro welding machine, showing the control layout and connection points.
- Modes Switch: Selects welding mode (MIG, Lift TIG, Stick/MMA).
- Automatic Wire Feed Switch: Engages or disengages automatic wire feeding.
- Current Adjustment: Knob to set the welding current (Amperes).
- Voltage Adjustment: Knob to set the welding voltage (Volts).
- Wire Speed Adjustment: Knob to control the wire feed speed for MIG/MAG welding.
- Current Display: Digital display showing the current welding amperage.
- Voltage Display: Digital display showing the current welding voltage.
- Conversion Cable: Cable for connecting accessories.
- Positive Terminal: Connection point for the positive cable.
- Negative Terminal: Connection point for the negative cable.
- Torch Connector: Quick-connect port for the welding torch.
4. Setup
Unpacking and Placement
- Carefully remove the welding machine and all accessories from the packaging.
- Place the machine on a stable, level surface, ensuring adequate space for ventilation around the unit.
Power Connection
- Ensure the power source matches the machine's requirements (AC).
- Connect the power plug to a suitable grounded outlet.
- Turn on the power control button located on the rear of the machine.
Wire Installation (MIG/MAG)
The machine features an aluminum wire feed system for smooth wire transport.

Internal view of the welding machine showing the aluminum wire feed system and flux-cored wire spool.
- Open the side panel to access the wire spool compartment.
- Mount the wire spool (e.g., 0.8mm flux-cored wire) onto the spindle.
- Feed the wire through the guide tube and into the wire feeder mechanism.
- Close the wire feeder pressure roller and ensure the wire is securely seated.
Torch and Ground Clamp Connection
The VELPAX VE-250Pro supports various connection methods depending on the welding process.

Diagram illustrating the four connection methods for Gas MIG, Gasless MIG, Lift TIG, and MMA (Stick) welding.
- Gas MIG: Connect the MIG torch to the torch connector (11). Connect the ground clamp to the negative terminal (10). Connect the gas hose from the gas cylinder to the machine's gas inlet.
- Gasless MIG: Connect the MIG torch to the torch connector (11). Connect the ground clamp to the positive terminal (9).
- Lift TIG: Connect the TIG torch to the negative terminal (10). Connect the ground clamp to the positive terminal (9).
- MMA (Stick): Connect the electrode holder to the positive terminal (9). Connect the ground clamp to the negative terminal (10).
5. Operating Instructions
The VELPAX VE-250Pro offers versatile welding capabilities for various applications.

Examples of Stick, Flux, and Lift TIG welding applications, demonstrating the versatility of the VELPAX VE-250Pro.
General Operation Principles
- Select Mode: Use the Modes Switch (1) to select the desired welding process (MIG, Lift TIG, or Stick).
- Adjust Parameters: Use the Current Adjustment (3), Voltage Adjustment (4), and Wire Speed Adjustment (5) knobs to set appropriate welding parameters for your material and desired weld. The digital displays (6, 7) show the current settings.
- Synergic Control: The integrated intelligent control system can automatically adjust settings, simplifying the process. Refer to the machine's specific synergic settings for optimal use.
MIG/MAG Welding
- Ensure correct wire installation and gas connection (if using Gas MIG).
- Select MIG mode.
- Adjust voltage, current, and wire speed.
- Press the torch trigger to initiate the arc and wire feed.
Lift TIG Welding
- Ensure the TIG torch and ground clamp are correctly connected.
- Select Lift TIG mode.
- Adjust the current.
- Touch the tungsten electrode to the workpiece and then lift it slightly to initiate the arc.
Stick (MMA) Welding
- Ensure the electrode holder and ground clamp are correctly connected.
- Select Stick mode.
- Adjust the current according to the electrode type and size.
- Strike the electrode against the workpiece to initiate the arc.
6. Maintenance
Regular maintenance ensures the longevity and optimal performance of your welding machine.
Cleaning
- Exterior: Wipe down the exterior with a clean, dry cloth. Avoid using solvents that may damage the casing.
- Internal Components: Periodically use compressed air to blow out dust and debris from inside the machine, especially around the circuit boards and cooling fan. Ensure the machine is unplugged before performing internal cleaning.
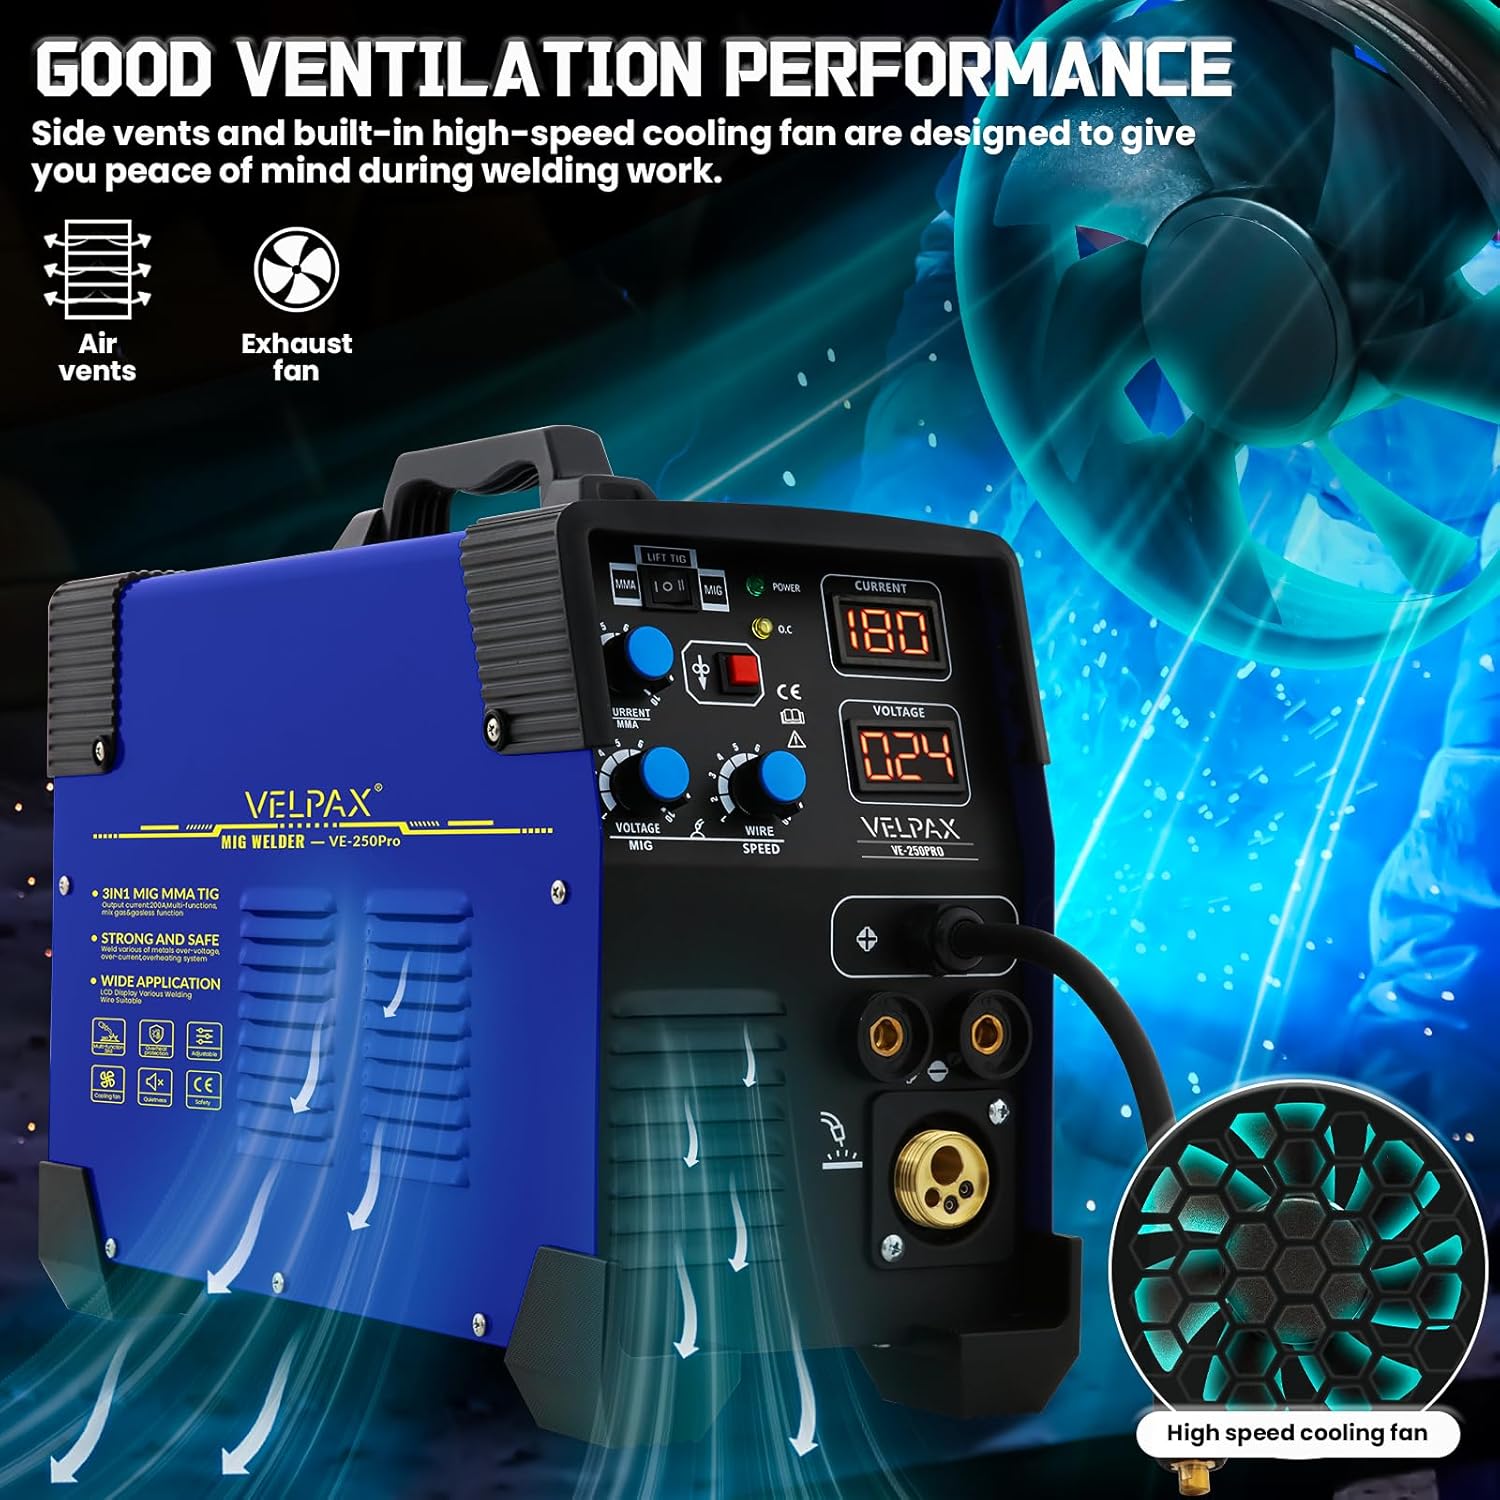
Cooling System
The machine is designed with good ventilation performance, featuring side vents and a built-in high-speed cooling fan.

Illustration of the welding machine's ventilation system, highlighting air vents and the high-speed cooling fan for optimal performance.
- Ensure air vents are clear of obstructions to allow proper airflow.
- Regularly check the cooling fan for any signs of damage or excessive noise.
Inspection
- Inspect all cables, connections, and the welding torch for wear, cuts, or damage before each use. Replace damaged components immediately.
- Check the wire feeder mechanism for smooth operation and ensure the drive rollers are clean and free of debris.
7. Troubleshooting
This section addresses common issues you might encounter with your welding machine.
| Problem | Possible Cause | Solution |
|---|---|---|
| Machine does not power on | No power supply; Power switch off; Faulty power cable | Check power outlet and circuit breaker; Ensure power switch is ON; Inspect and replace power cable if damaged. |
| No welding arc | Poor ground connection; Incorrect welding parameters; Damaged torch/electrode holder; Machine in protection mode | Ensure ground clamp has good contact; Adjust current/voltage; Inspect and replace faulty components; Check for error codes on display, allow machine to cool if overheated. |
| Wire feed issues (MIG) | Incorrect wire speed; Clogged liner; Wrong drive roller size; Wire tangled | Adjust wire speed; Clean or replace torch liner; Ensure correct drive roller for wire size; Untangle wire spool. |
| Poor weld quality | Incorrect settings; Contaminated workpiece; Improper technique; Wrong shielding gas (MIG) | Adjust welding parameters; Clean workpiece thoroughly; Practice welding technique; Verify correct shielding gas and flow rate. |
| Overheat indicator active | Exceeded duty cycle; Blocked ventilation; High ambient temperature | Allow machine to cool down; Clear all air vents; Operate in a cooler environment. |
8. Specifications
Technical details for the VELPAX VE-250Pro welding machine.

Dimensions of the VELPAX VE-250Pro welding machine and close-ups of the power control button, adjustment knob, and torch mounting interface.
| Feature | Detail |
|---|---|
| Manufacturer | VELPAX |
| Model Number | VE-250Pro |
| Welding Current | 200 Ampere |
| Power Source | AC (Alternating Current) |
| Welding Processes | MIG/MAG, Lift TIG, Stick (MMA) |
| Included Components | MIG welding machine, 0.8mm wire |
| Package Dimensions | 53 x 37 x 34.5 cm |
| Item Weight | 13.36 kg |
| Batteries Required | No |
9. Warranty and Support
For warranty information and technical support, please refer to the documentation included with your purchase or contact VELPAX customer service. Keep your purchase receipt as proof of purchase.
- Customer Service: For assistance with product operation, troubleshooting, or warranty claims, please contact VELPAX support through the retailer where the product was purchased.
- Online Resources: Check the official VELPAX website for additional support, FAQs, or updated manuals.


