Introduction
This manual provides essential information for the safe operation, assembly, maintenance, and troubleshooting of your new Electric Children's Buggy Can-am Maverick. Please read this manual thoroughly before assembly and use to ensure proper function and safety.

Image: A dynamic side view of the Electric Children's Buggy Can-am Maverick, showcasing its robust design and vibrant blue and black color scheme.
Important Safety Information
To reduce the risk of injury, adult supervision is required at all times. Never use this vehicle on roadways, near cars, near steep inclines or steps. Do not submerge the vehicle in water or other liquids.
- Always ensure the child is wearing appropriate safety gear, such as a helmet.
- Ensure all fasteners are securely tightened before each use.
- Only operate on flat, dry surfaces away from hazards.
- Keep hands, hair, and clothing away from moving parts.
Setup and Assembly
Assembly is required for this product. Please follow the steps below carefully.
Unpacking and Initial Inspection
Carefully remove all components from the packaging. Verify that all parts listed in the packing list are present and undamaged. If any parts are missing or damaged, do not proceed with assembly and contact customer support.
Assembly Steps
- Wheel Installation: Attach the wheels to the axles, ensuring they are securely fastened with the provided hardware.
- Steering Wheel Assembly: Connect the steering wheel to the steering column. Ensure it clicks into place or is secured with the designated screw.
- Seat Installation: Place the seats into the designated slots and secure them. Ensure seatbelts are accessible and functional.
- Battery Connection: Connect the battery terminals. Refer to the battery compartment for specific instructions. Ensure the connection is firm.
- First Charge: Before first use, fully charge the battery for 8-12 hours. Do not overcharge.

Image: Rear view of the electric buggy with the door open, highlighting the spacious interior and robust rear suspension components.
Operating Instructions
Controls Overview

Image: The dashboard of the electric buggy, featuring the steering wheel, a digital speedometer display, and a multimedia screen.
- Start/Stop Button: Located near the key slot, press to turn the vehicle on or off.
- Accelerator Pedal: Press to move forward. Release to brake.
- Steering Wheel: Turn left or right to steer the vehicle.
- Gear Selector: (If applicable) Switch between forward, neutral, and reverse.
- Multimedia Screen: Provides entertainment and vehicle information.
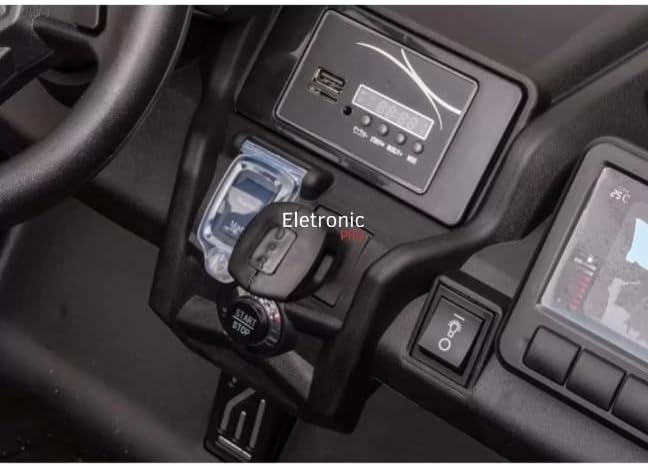
Image: A close-up view of the electric buggy's central console, showing the start/stop button and the key ignition slot.
Driving the Vehicle
- Ensure the child is seated properly and the seatbelt is fastened.
- Press the Start/Stop button to power on the vehicle.
- Gently press the accelerator pedal to move forward. Release the pedal to stop.
- Use the steering wheel to navigate.
- Always supervise the child during operation.

Image: The interior of the electric buggy, featuring two black, contoured seats equipped with safety seatbelts.
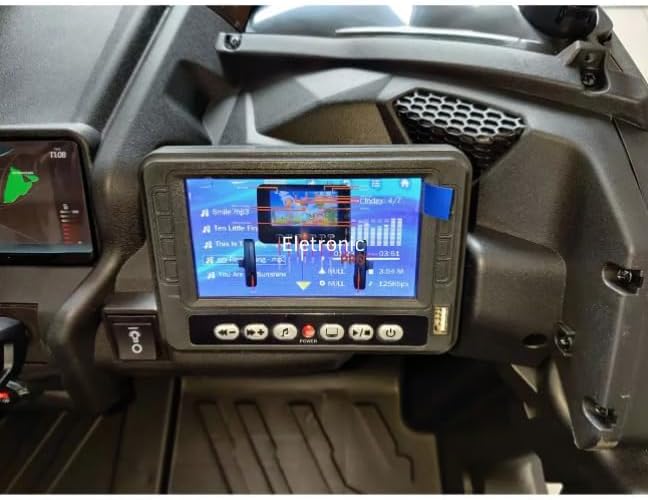
Image: A close-up of the electric buggy's multimedia screen, showing a music playback interface with song titles and an equalizer display.
Maintenance
Battery Care
- Charge the battery after each use.
- Do not allow the battery to fully discharge.
- If storing for extended periods, charge the battery once a month.
- Only use the charger provided with the vehicle.
Cleaning and Storage
- Wipe the vehicle with a damp cloth. Do not use abrasive cleaners.
- Store the vehicle in a dry, cool place away from direct sunlight and moisture.
- Protect the vehicle from extreme temperatures.
Troubleshooting
| Problem | Possible Cause | Solution |
|---|---|---|
| Vehicle does not move | Battery is low or disconnected; Loose wire connection; Blown fuse. | Charge battery; Check battery connections; Check fuse and replace if necessary. |
| Vehicle runs slowly | Battery is low; Overloaded vehicle; Operating on rough terrain. | Recharge battery; Reduce load; Operate on smoother surfaces. |
| No sound from multimedia screen | Volume is too low; Audio cable disconnected. | Increase volume; Check audio connections. |
Specifications
- Model: DK-CA001
- Brand: Generic
- Recommended Age: 36 months - 8 years
- Materials: Plastic, Rubber, Steel Alloy
- Product Dimensions: 145 x 84 x 79 cm
- Product Weight: 42 kg
- Assembly Required: Yes
- Certification: Not Applicable
Warranty and Support
This product comes with a return policy of 7 days from the date of purchase. For any issues, questions, or to claim warranty support, please contact the seller directly. Please retain your proof of purchase for any warranty claims.
Seller: ELETRONIC PRO LTDA


