1. Introduction
This user manual provides detailed instructions for the safe and effective operation of your WONEGG M12H 12-Egg Incubator. This device is designed to facilitate the hatching of various poultry eggs by maintaining optimal temperature, humidity, and automatic egg turning. Please read this manual thoroughly before initial use and retain it for future reference.
2. Product Overview
2.1 Package Contents
Upon unpacking, please verify that all the following components are included:
- Incubator Unit (Control Panel, Top Cover, Base)
- Egg Tray
- Grid
- Water Bottle (2x)
- Adaptor
- User Manual (this document)
- Polyfoam Pad
- Power Cable

Figure 1: Exploded view of the WONEGG M12H incubator showing all included components and their assembly points.
2.2 Key Features
- Automatic Temperature Control: Advanced digital system for precise and stable temperature regulation.
- Automatic Egg Turning: Simulates natural hen behavior by rotating eggs to ensure even heating and healthy embryonic development.
- Automatic Humidity Control: External water supply bottles maintain consistent and optimal humidity levels.
- Built-in LED Egg Candler: Allows for convenient observation of embryonic development without disturbing the incubation process.
- Circulating Air Duct Vent Design: Ensures uniform airflow for stable temperature and humidity distribution.
- Detachable Design: Removable trays facilitate easy cleaning and maintenance.

Figure 2: The WONEGG M12H 12-Egg Incubator, showcasing its capacity and external water bottles.

Figure 3: Physical dimensions of the WONEGG M12H incubator: 30.7 cm (12 inches) width, 28 cm (11 inches) depth, and 16.8 cm (6.6 inches) height.
3. Setup Instructions
3.1 Assembly
- Place the base of the incubator on a stable, level surface.
- Insert the grid into the base.
- Position the egg tray on top of the grid.
- Attach the adaptor for the water bottles to the side of the base.
- Secure the top cover onto the base, ensuring it is properly aligned with the control panel.
- Fill the water bottles and attach them to the adaptor.
- Connect the power cable to the incubator and then to a power outlet.
3.2 Placement
Place the incubator in a room with a stable ambient temperature, away from direct sunlight, drafts, or extreme temperature fluctuations. Ensure adequate ventilation around the unit.
4. Operation Guide
4.1 Temperature Control
The WONEGG M12H incubator features an advanced digital temperature control system to maintain a precise and stable internal temperature. The current temperature is displayed on the control panel. While the system is automatic, it is recommended to monitor the display regularly.
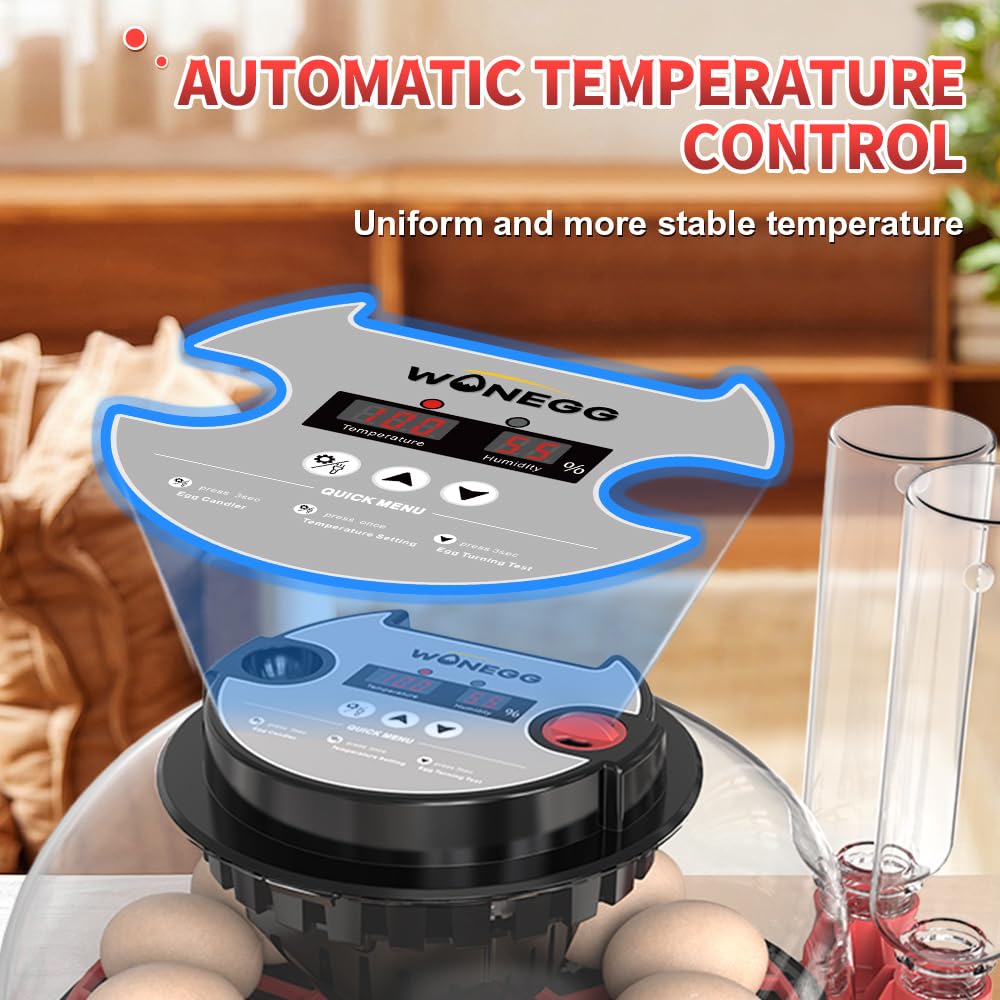
Figure 4: The control panel of the incubator, showing the digital display for temperature and humidity settings.
Note: The temperature display is in Celsius. Refer to the "Poultry Incubation Parameters" table for recommended temperatures in Fahrenheit.
4.2 Humidity Control
Maintaining correct humidity is crucial for successful hatching. The incubator includes an automatic water replenishment system using external water bottles and two internal sinks (A and B).
- Days 1-18 (Chicken Eggs): Add water to sink A only. If ambient humidity is low, you may add water to sink B as well.
- Days 19-21 (Chicken Eggs - Hatching Period): Add water to both sink A and sink B simultaneously to increase humidity for hatching.
The external water bottles ensure a consistent water level without needing to open the incubator, thus maintaining stable internal conditions.

Figure 5: Illustration of the automatic water adding system, showing how to fill sinks A and B for different incubation stages.
4.3 Automatic Egg Turning
The incubator automatically turns the eggs 360 degrees at regular intervals. This process is vital for preventing the embryo from sticking to the shell and ensures even heat distribution, promoting healthy development. The automatic turning function will typically stop in the last few days before hatching (e.g., last 4 days for chicken eggs).

Figure 6: Visual representation of the automatic 360-degree egg turning feature, crucial for even heating.
4.4 Egg Candling
A built-in LED egg candler allows you to observe the development of the embryo without opening the incubator. This helps in identifying infertile eggs or those with arrested development, which can then be removed to prevent contamination.
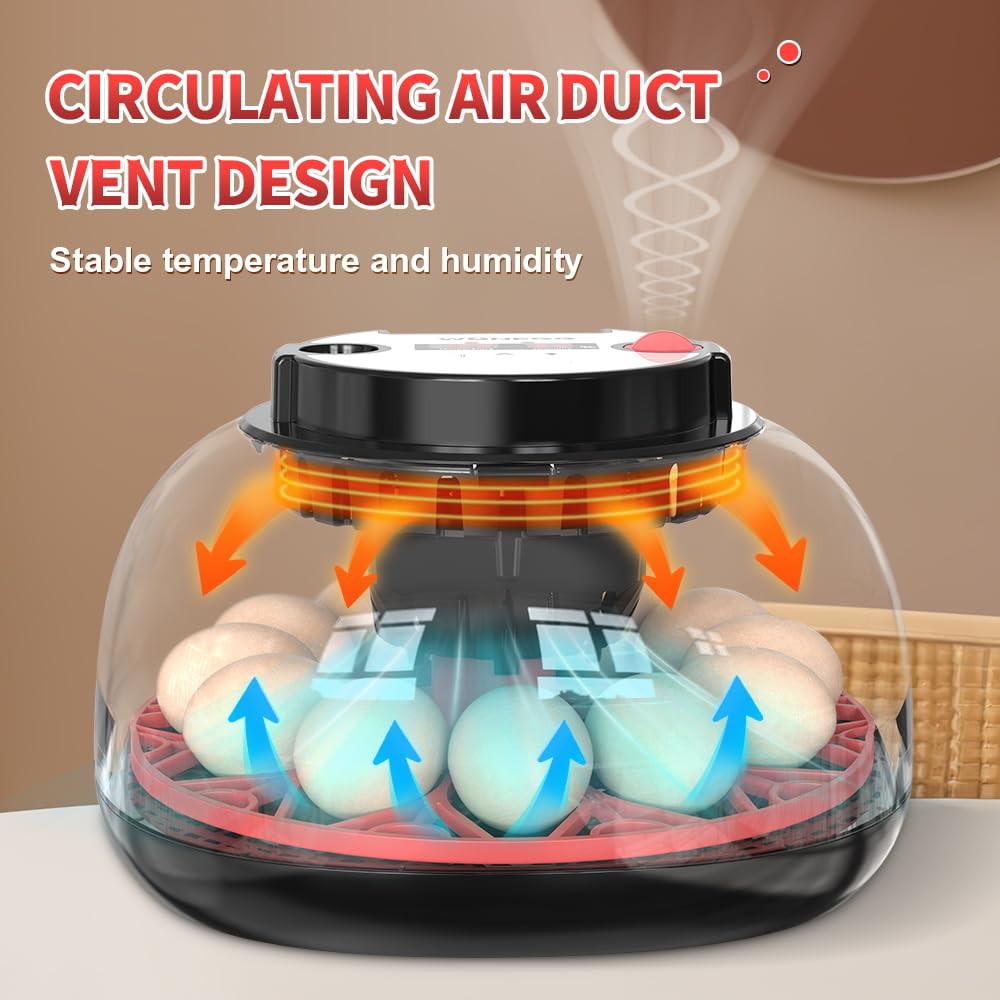
Figure 7: The integrated LED egg candler, demonstrating its use for checking embryonic development.
4.5 Poultry Incubation Parameters
The following table provides reference parameters for incubating various types of poultry eggs. These are general guidelines; specific conditions may vary based on egg quality and environmental factors.

Figure 8: Reference table for incubation days and temperatures for chicken, duck, goose, quail, and pigeon eggs.
| Bird | Total Days | Temperature (°F) (Initial Phase) | Temperature (°F) (Hatching Phase) |
|---|---|---|---|
| Chicken | 21 | 100.04 | 100.04 (Last 3 Days) |
| Duck | 28 | 100.76 (Days 1-2), 100.4 (Days 3-25) | 99.5 (Last 3 Days) |
| Goose | 30 | 100.76 (Days 1-2), 100.4 (Days 3-27) | 99.5 (Last 3 Days) |
| Quail | 18 | 100.04 | 100.04 (Last 3 Days) |
| Pigeon | 18 | 100.4 (Days 1-12) | 100.4 (Last 6 Days) |
5. Maintenance and Cleaning
The incubator's detachable design simplifies cleaning. After each incubation cycle, or if any spills occur, it is important to clean the unit thoroughly to prevent bacterial growth and ensure optimal performance for future use.
- Disconnect the incubator from the power supply.
- Carefully remove the top cover, egg tray, and grid.
- Wash all removable parts (egg tray, grid, water bottles) with a mild disinfectant solution and warm water. Rinse thoroughly and allow to air dry completely.
- Wipe the interior and exterior of the base and top cover with a damp cloth and a mild disinfectant. Avoid getting water into electrical components.
- Ensure all parts are completely dry before reassembling the incubator.
6. Troubleshooting
This section addresses common issues you might encounter with your incubator.
| Problem | Possible Cause | Solution |
|---|---|---|
| Temperature reading is in Celsius only. | The incubator's display is designed to show temperature in Celsius. | Refer to the "Poultry Incubation Parameters" table in this manual for Fahrenheit equivalents or use an online converter. Consistent monitoring of the displayed Celsius value is key. |
| Difficulty maintaining desired humidity levels. | Insufficient water in sinks A/B, ambient room humidity is too low, or incubator lid is not sealed properly. | Ensure water bottles are full and water is flowing into the correct sinks (A or A+B) as per the incubation stage. Check for proper lid closure. Consider increasing ambient room humidity if consistently low. |
| Eggs are not turning. | Power interruption, motor malfunction, or the automatic turning function has stopped for the hatching phase. | Check power connection. Verify if the incubation period is nearing the hatching stage (last 3-4 days), as turning typically ceases then. If neither, contact customer support. |
| Poor hatch rate. | Incorrect temperature/humidity, infertile eggs, poor egg quality, or improper handling. | Double-check temperature and humidity settings against recommended parameters. Ensure eggs are fresh and from a reliable source. Handle eggs gently. Use the egg candler to check fertility early in the cycle. |
7. Specifications
- Model Number: M12H
- Brand: WONEGG
- Capacity: 12 Eggs (standard chicken eggs)
- Package Dimensions: 12.52 x 12.05 x 7.72 inches (31.8 x 30.6 x 19.6 cm)
- Item Weight: 3.57 Pounds (1.62 kg)
- Features: Automatic Temperature Control, Automatic Egg Turning, Humidity Control, Built-in LED Egg Candler
- Power Source: Electric (via Adaptor and Power Cable)
8. Warranty and Support
WONEGG is committed to providing quality products. If you encounter any issues with your M12H chicken egg incubator, please contact our customer support team. We will endeavor to respond to your inquiries and provide assistance as soon as possible.
For support, please refer to the contact information provided with your purchase or visit the official WONEGG store page on Amazon: WONEGG Store.


