1. Introduction
Thank you for purchasing the Audizio Genua DAB Radio. This manual provides essential information for the safe and efficient operation of your device. Please read it thoroughly before use and retain it for future reference. The Audizio Genua is a versatile DAB+/FM stereo radio featuring Bluetooth connectivity, USB playback, and an alarm function, designed for both home and portable use.
2. Safety Information
- Power Source: Only use the provided power adapter. Ensure the voltage matches the requirements of your region.
- Water and Moisture: Do not expose the unit to rain, moisture, or dripping/splashing liquids. Do not place objects filled with liquids, such as vases, on the apparatus.
- Ventilation: Ensure adequate ventilation. Do not block ventilation openings.
- Heat: Keep the unit away from heat sources such as radiators, heat registers, stoves, or other apparatus (including amplifiers) that produce heat.
- Cleaning: Clean only with a dry cloth.
- Servicing: Do not attempt to service this product yourself. Refer all servicing to qualified service personnel.
- Antenna: Do not bend or force the antenna.
3. Package Contents
Please check that all items are present and in good condition upon unpacking:
- Audizio Genua DAB Radio
- Remote Control
- Power Adapter
- Quick Start Guide (language not guaranteed)
4. Product Overview
4.1 Front Panel Controls and Display

Figure 4.1: Front view of the Audizio Genua DAB Radio.
The front panel features a clear color TFT display, two speaker grilles, and an array of control buttons and a central rotary knob. The display shows station information, track details, time, and menu options. Buttons include Menu, Preset, Scan, Dimmer, Alarm, and playback controls (Play/Pause, Skip). The central knob is used for volume adjustment, tuning, and selection.
4.2 Rear Panel Connections
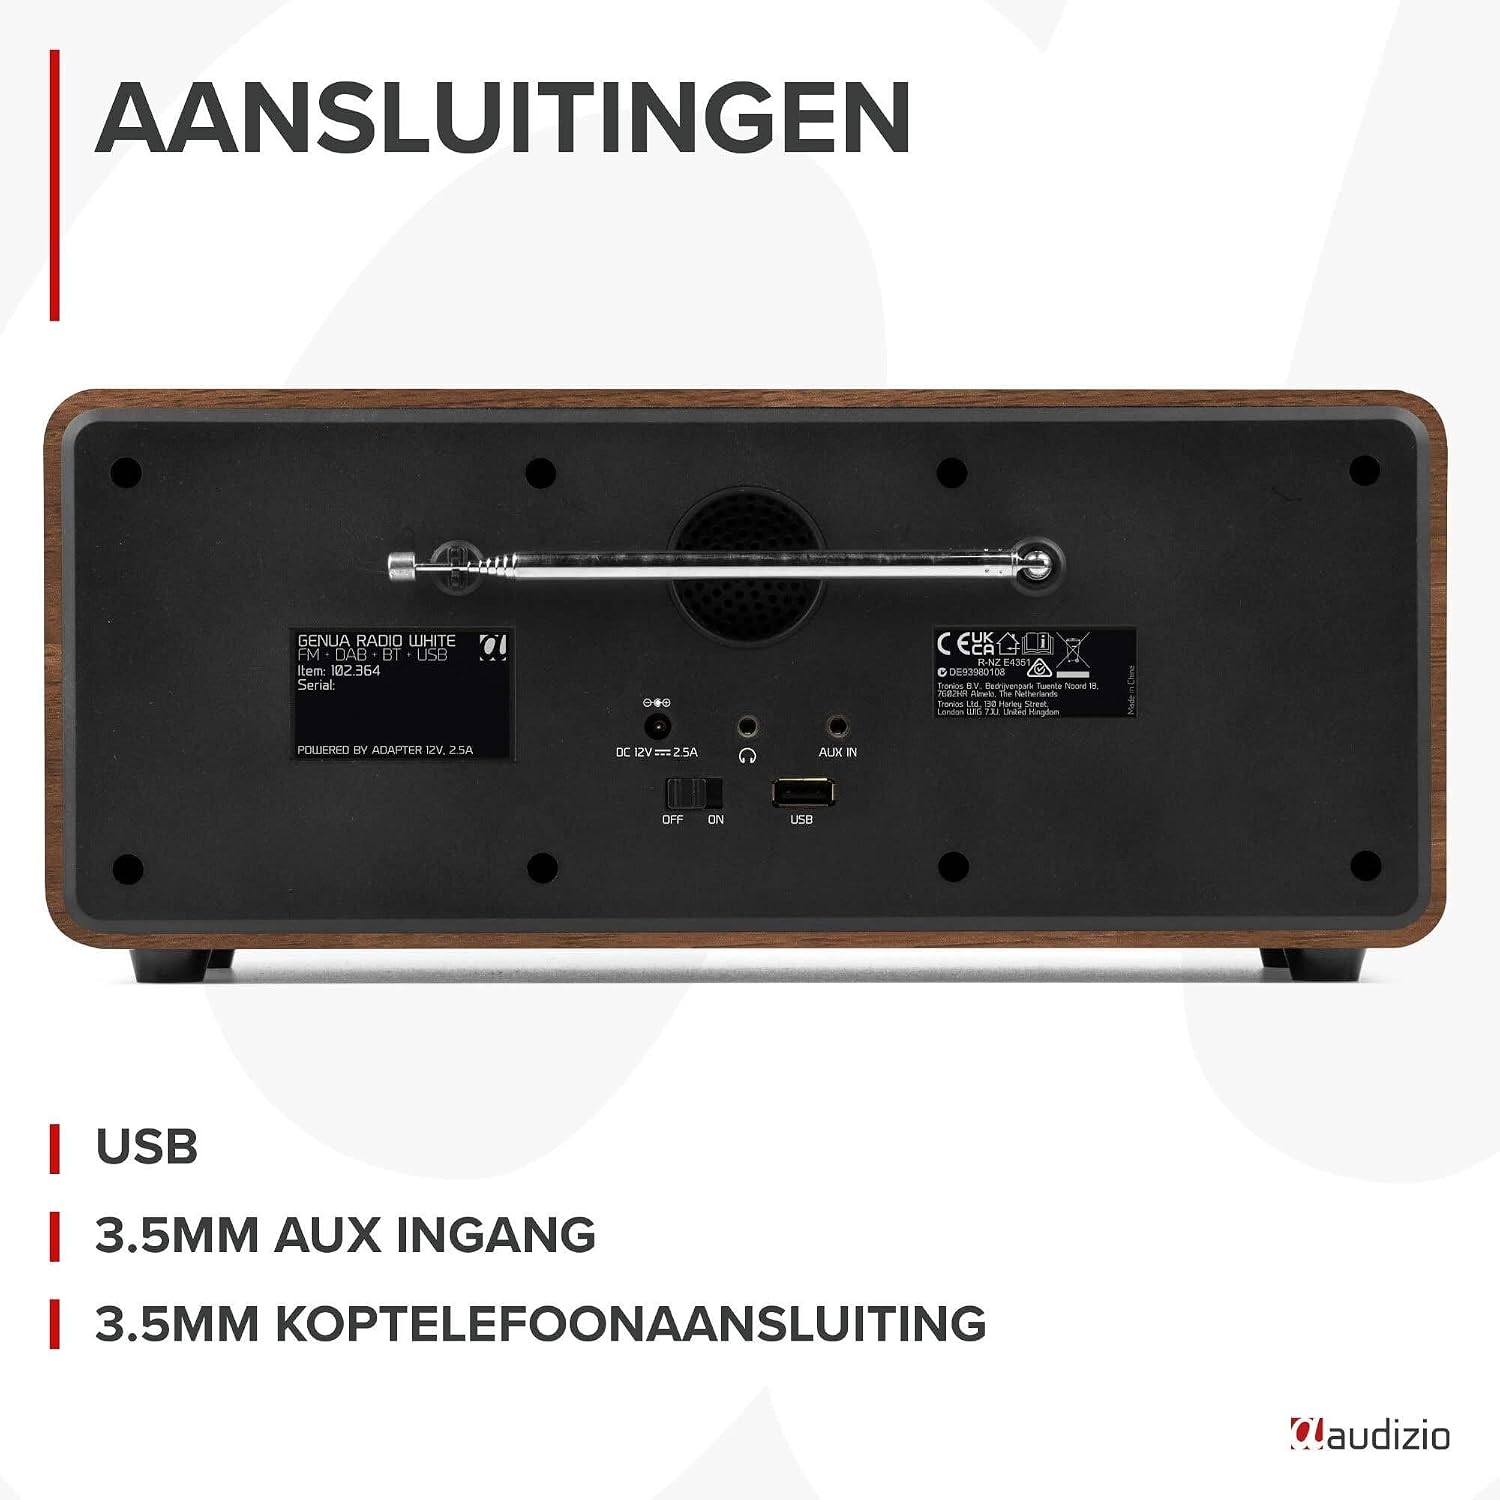
Figure 4.2: Rear view of the Audizio Genua DAB Radio with connections.
The rear panel includes the telescopic antenna for radio reception, a USB port for media playback, a 3.5mm AUX input for external audio devices, a 3.5mm headphone output, a DC 12V power input, and a main power ON/OFF switch.
4.3 Remote Control

Figure 4.3: Remote control for the Audizio Genua DAB Radio.
The included remote control provides full functionality, allowing you to power on/off, adjust volume, change modes, navigate menus, set alarms, and control playback from a distance.
5. Setup
5.1 Power Connection
- Connect the power adapter to the DC 12V input on the rear of the radio.
- Plug the power adapter into a suitable wall outlet.
- Flip the main power switch on the rear panel to the 'ON' position.
5.2 Antenna Adjustment
Extend the telescopic antenna fully for optimal DAB+ and FM radio reception. Adjust its position for the best signal quality.
5.3 Initial Setup and Auto Scan
- Upon first power-on, the radio may prompt you to perform an auto-scan for DAB+ stations. Select 'Yes' or press the 'Scan' button.
- The radio will scan for available DAB+ stations and store them. This process may take a few minutes.
- Once the scan is complete, the radio will tune to the first available station.
6. Operating Instructions
6.1 Mode Selection
Press the 'Mode' button on the remote control or the 'Menu' button on the unit to cycle through available modes: DAB+, FM, Bluetooth, USB, and AUX In.
6.2 DAB+ Radio Operation
- Select DAB+ mode.
- If no stations are found or you wish to rescan, press the 'Scan' button to perform a full scan.
- Use the 'Tune/Select' knob or the navigation buttons on the remote to browse through the list of available stations.
- Press the 'OK' button (on remote) or push the 'Tune/Select' knob to select a station.
- Storing Presets: To store a favorite station, press and hold the 'Preset' button until the preset menu appears. Use the knob/navigation to select a preset number (1-30) and press 'OK' to confirm.
- Recalling Presets: Briefly press the 'Preset' button, then use the knob/navigation to select the desired preset and press 'OK'.
6.3 FM Radio Operation
- Select FM mode.
- Auto Scan: Press the 'Scan' button to automatically scan for and store available FM stations.
- Manual Tuning: Use the 'Tune/Select' knob to manually tune to a specific frequency.
- Storing Presets: Similar to DAB+ mode, press and hold 'Preset', select a number, and confirm.
- Recalling Presets: Briefly press 'Preset', select the desired preset, and confirm.
6.4 Bluetooth Connectivity
- Select Bluetooth mode. The display will show "Pairing" or "Waiting for connection".
- On your smartphone or other Bluetooth-enabled device, enable Bluetooth and search for available devices.
- Select "Audizio Genua" from the list of devices.
- Once paired, the radio will confirm the connection, and you can start playing audio from your device.
6.5 USB Playback
- Insert a USB flash drive containing MP3 files into the USB port on the rear panel.
- Select USB mode. The radio will automatically detect the USB drive and begin playing the first compatible audio file.
- Use the playback control buttons (Play/Pause, Skip Forward/Backward) on the unit or remote to manage your music.
6.6 AUX Input
- Connect an external audio device (e.g., MP3 player, smartphone) to the 3.5mm AUX IN port on the rear panel using an audio cable (not included).
- Select AUX mode.
- Control playback and volume from your external device.
6.7 Alarm and Sleep Timer
- Setting Alarm: Press the 'Alarm' button on the unit or remote. Follow the on-screen prompts to set Alarm 1 and Alarm 2, including time, source (DAB/FM/Buzzer), and volume.
- Snooze Function: When the alarm sounds, press any button (except Power) to activate snooze. The alarm will sound again after a set interval.
- Sleep Timer: Press the 'Sleep' button on the remote to set a sleep timer (e.g., 15, 30, 60 minutes). The radio will automatically turn off after the selected time.
6.8 Display Dimmer
Press the 'Dimmer' button on the unit or remote to adjust the brightness of the display. This is useful for different lighting conditions or for use in a bedroom.
7. Maintenance
- Cleaning: Use a soft, dry cloth to clean the exterior of the radio. Do not use abrasive cleaners, waxes, or solvents.
- Antenna: Handle the telescopic antenna with care to prevent damage.
- Storage: If storing the radio for an extended period, disconnect it from the power supply.
8. Troubleshooting
| Problem | Possible Cause | Solution |
|---|---|---|
| No power | Power adapter not connected; Main power switch off | Ensure power adapter is securely connected and plugged in; Turn main power switch to 'ON' |
| Poor radio reception (DAB+/FM) | Antenna not extended; Weak signal area; Interference | Fully extend and adjust the telescopic antenna; Try repositioning the radio; Move away from other electronic devices |
| Bluetooth not pairing | Radio not in Bluetooth mode; Device not discoverable; Already paired with another device | Select Bluetooth mode on the radio; Ensure Bluetooth is enabled on your device and it's in pairing mode; Disconnect from other Bluetooth devices |
| USB playback not working | USB drive not inserted correctly; Incompatible file format; USB drive corrupted | Ensure USB drive is fully inserted; Check if files are in MP3 format; Try a different USB drive |
| No sound | Volume too low; Mute activated; Incorrect source selected | Increase volume; Check if mute is active; Ensure correct input source (DAB/FM/BT/USB/AUX) is selected |
9. Specifications

Figure 9.1: Audizio Genua DAB Radio dimensions.
- Brand: Audizio
- Model Number: Genua
- Color: White
- Special Feature: Bluetooth Connectivity, DAB+ Radio
- Connectivity Technology: Aux, Bluetooth, USB
- Product Dimensions (L x W x H): 13.5 x 31 x 13.3 cm
- Tuner Technology: DAB+
- Style: Modern
- Power Source: Corded Electric
- Supported Radio Bands: FM, DAB+
- Compatible Devices: Smartphone, Tablet, Laptop, MP3 Player, Headphones, Speaker
- Voltage: 220 Volts
- Max Speaker Output Power: 50 Watts
- Number of Batteries: 1 Non-standard battery (Type of battery required)
- Screen Type: TFT
- Item Weight: 2.25 Kilograms
10. Warranty and Support
This product is covered by a standard manufacturer's warranty. For detailed warranty terms and conditions, please refer to the documentation provided at the time of purchase or contact your retailer. For technical support or service inquiries, please contact the Audizio customer support team through their official website or your point of purchase.


