1. Introduction
This manual provides comprehensive instructions for the Senfot Smart Toilet, Model WZ2801U-5. This one-piece smart toilet integrates modern design with advanced features for enhanced comfort and hygiene. Key functions include a foot sensor, automatic flush, heated seat, night light, feminine wash, and remote control. Please read this manual thoroughly before installation and use to ensure proper operation and longevity of your product.
2. What's Included
Carefully unpack your Senfot Smart Toilet and verify that all components are present. Refer to the image below for a visual guide to the included parts.

Image: All components laid out for the Senfot Smart Toilet installation.
- Smart Toilet Unit
- Gloves
- Flange Plate
- Toilet Floor Bolts
- Toilet Angle Valve
- User Manual
- Warranty Card
- Flange Ring
- Backup Battery Pack
- Thank-you Card
- Remote Control
3. Installation Guide
Proper installation is crucial for the optimal performance of your smart toilet. We recommend professional installation if you are unfamiliar with plumbing work. Please watch the installation video and follow the steps carefully.
Video: Detailed product installation process for the Senfot Smart Toilet.
Installation Steps:
- Prepare the Water Valve: Wrap Teflon tape around the threads of the toilet angle valve. Ensure the valve is securely tightened and properly aligned to prevent leaks.
- Install the Flange: Assemble the flange with the provided screws. Secure the flange tightly to the floor over the drain opening.
- Apply Sealing Ring: Firmly apply the sealing ring around the toilet outlet to ensure a proper, watertight seal.
- Position the Toilet: Carefully align the toilet with the drain and gently place it onto the installed flange.
- Secure the Toilet: Install and tighten the floor mounting bolts to firmly secure the toilet to the floor.
- Connect Water Supply: Connect the water supply hose from the angle valve to the toilet's water inlet. Ensure all connections are tight.
- Install Backup Battery Pack: Securely install the Backup Battery Pack. This provides power during outages for basic flushing.
- Test Functions: After installation, open the water supply and test all functions (flushing, bidet, seat heating, etc.) to confirm proper operation and check for any leaks.
4. Operating Instructions
Your Senfot Smart Toilet offers a range of intelligent features designed for convenience and hygiene. Below are instructions for using its primary functions.
4.1. Automatic Flushing
The toilet features multiple automatic flushing options:
- Off-Seat Auto Flush: The toilet automatically flushes when you stand up and move away from the seat, eliminating the need to manually flush.
- Foot Sensor Flush: A foot sensor allows for hands-free flushing. Simply activate the sensor with your foot.

Image: The toilet automatically flushes as a user walks away, demonstrating the off-seat auto flush feature.

Image: A user activates the foot sensor at the base of the toilet for hands-free flushing.
4.2. Heated Seat & Night Light
Enjoy enhanced comfort with the heated seat, adjustable to 6 levels of warmth. The integrated night light provides gentle illumination for nighttime use.

Image: The ergonomic heated seat with 6 adjustable temperature levels for personalized comfort.

Image: The toilet features a soft night light for visibility in the dark.
Video: Demonstrates various smart toilet functions including heated seat and night light.
4.3. Feminine Wash Function
The self-cleaning curved nozzle provides a feminine wash function with adjustable spray shape, position, water pressure, temperature, pulsation, and oscillation. Both front and rear wash modes offer warm water cleaning.
4.4. Remote Control & Side Button Operation
The smart remote control provides easy access to all functions. Additionally, a side button control offers convenient manual operation.
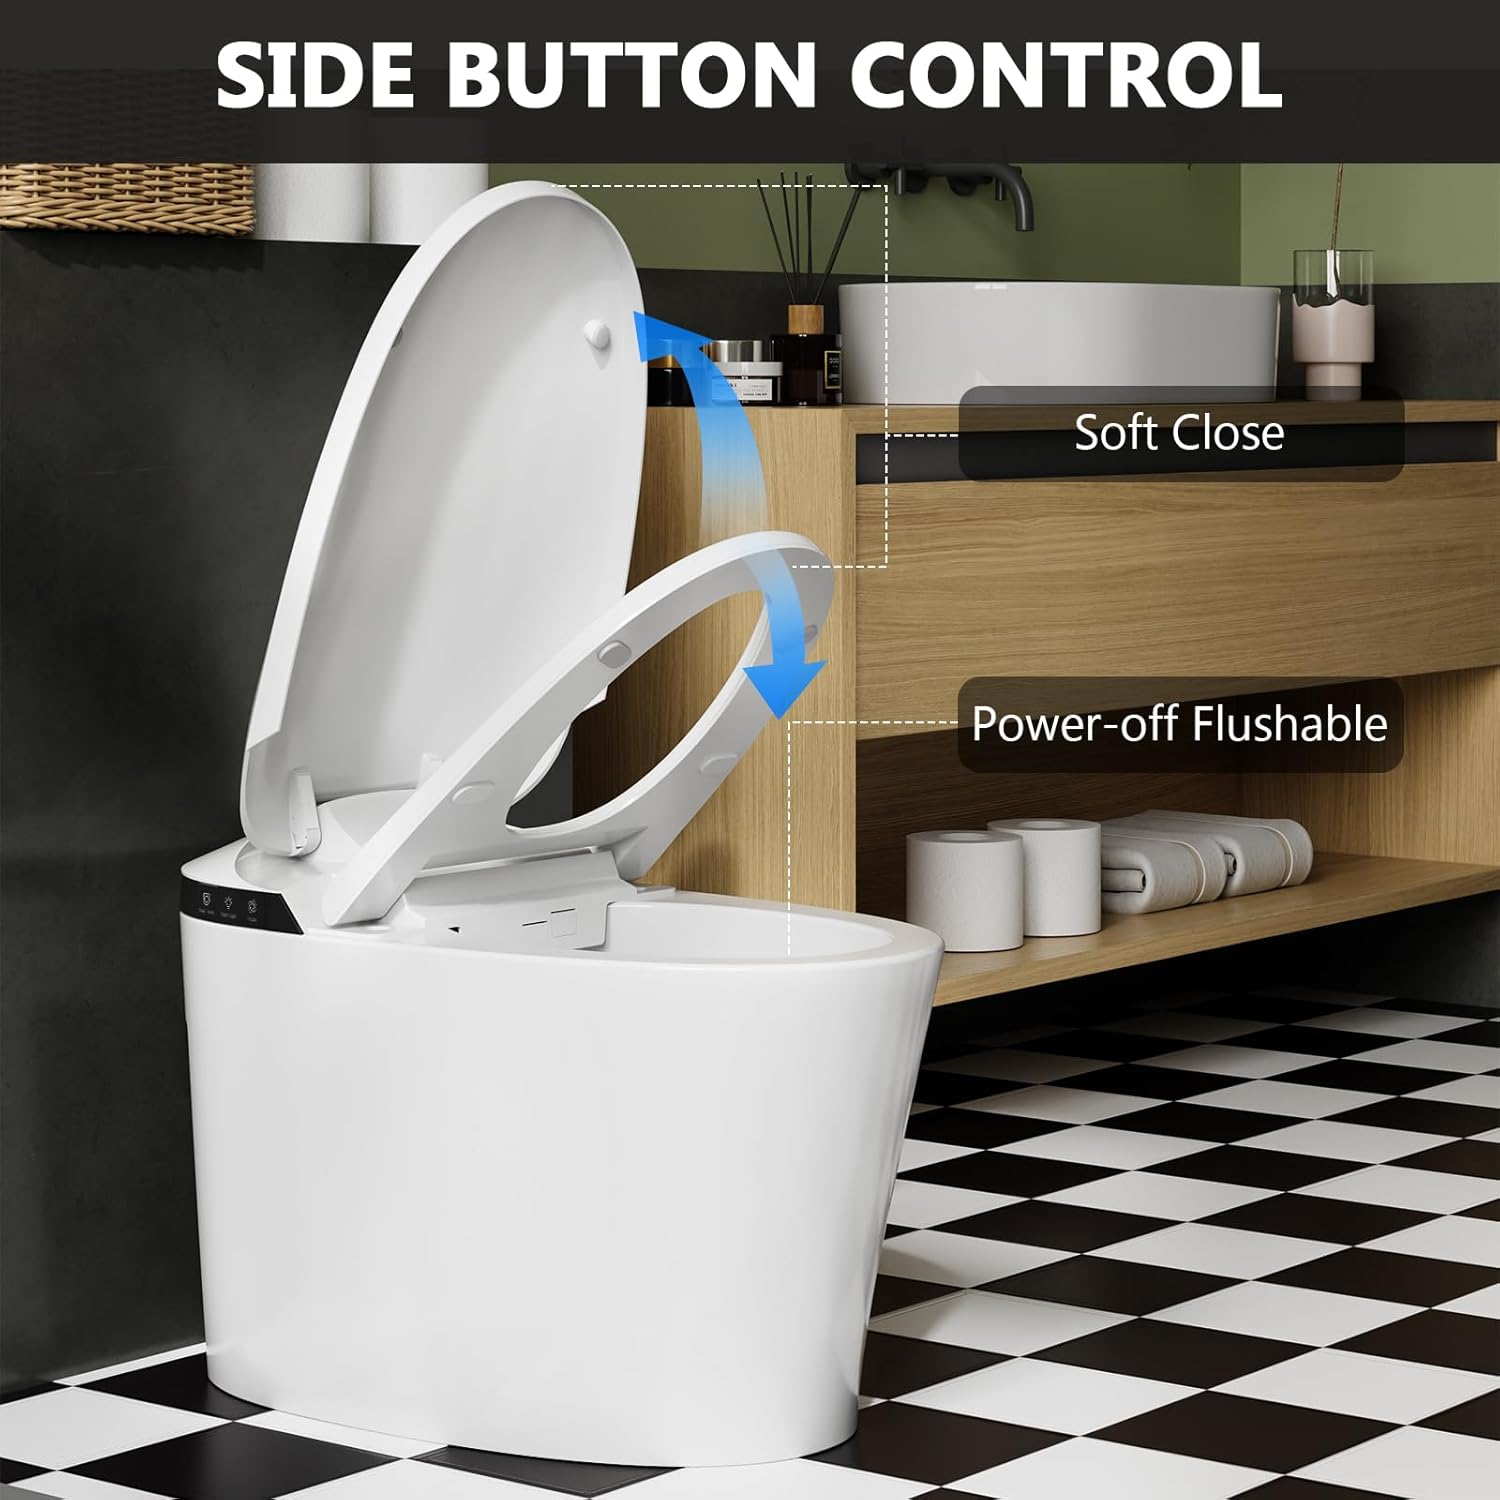
Image: Close-up of the side button controls for flushing and other functions.

Image: The toilet can be controlled by a remote or the integrated side buttons.
Video: Introduction to the button functions on the Senfot Smart Toilet.
4.5. Dual Siphon Jet Cleaning
The dual flushing system combines siphon and jet flush technologies for thorough and efficient cleaning. This energy-saving mode allows for full or half flush options, conserving water.

Image: The powerful dual siphon jet cleaning system in action, ensuring a complete flush.
4.6. Soft Close Lid & Seat
The toilet features a soft-close lid and seat mechanism, preventing slamming and ensuring quiet operation. A built-in light sensor can automatically turn the night light on or off.

Image: The soft-close lid and seat feature for quiet and gentle closing.
5. Maintenance
Regular cleaning and maintenance will ensure the longevity and hygienic operation of your Senfot Smart Toilet.
- General Cleaning: Use a soft cloth and mild, non-abrasive cleaner to wipe down the exterior surfaces. Avoid harsh chemicals that could damage the finish.
- Nozzle Cleaning: The self-cleaning nozzle automatically rinses before and after each use. For deeper cleaning, refer to the remote control instructions for manual nozzle cleaning cycles.
- Seat Cleaning: Clean the heated seat with a damp cloth and mild soap. Do not immerse the seat in water.
- Power Outage Flush: The backup battery pack allows for flushing during power outages. Ensure it is properly installed and maintained.
6. Troubleshooting
If you encounter any issues with your Senfot Smart Toilet, refer to the following common problems and solutions. If the problem persists, please contact customer service.
| Problem | Possible Cause | Solution |
|---|---|---|
| Toilet does not flush automatically. | Sensor obstruction, power issue, or feature disabled. | Ensure sensors are clean and unobstructed. Check power connection. Verify auto-flush feature is enabled via remote. |
| Heated seat not warming. | Power issue, temperature setting too low, or sensor not detecting user. | Check power. Adjust seat temperature setting. Ensure proper contact with the seat sensor. |
| Bidet spray not working or weak. | Water supply off, nozzle clogged, or water pressure setting too low. | Check water supply valve. Perform nozzle self-cleaning. Adjust water pressure setting. |
| Remote control not responding. | Batteries low/dead, remote not paired, or signal obstruction. | Replace remote batteries. Re-pair the remote control with the toilet (refer to remote pairing instructions). Remove obstructions between remote and toilet. |
7. Specifications
Detailed technical specifications for the Senfot Smart Toilet Model WZ2801U-5.

Image: Technical drawing illustrating the dimensions of the smart toilet.
| Feature | Detail |
|---|---|
| Model Number | WZ2801U-5 |
| Color | White |
| Product Dimensions (D x W x H) | 28.1"D x 16.34"W x 15.74"H |
| Material | Plastic |
| Item Weight | 100.2 Pounds |
| Shape | Rectangular |
| Seat Material | Plastic |
| Installation Method | Floor Mounted |
| Included Components | Toilet seat |
| UPC | 198723890784 |
8. Warranty & Customer Support
Senfot is committed to providing high-quality products and excellent customer service. All components undergo rigorous testing to ensure quality and stability.
If you encounter any issues or have questions regarding your Senfot Smart Toilet, please do not hesitate to contact our customer service team. We are committed to responding within 24 hours to provide you with top-quality service.
Contact Information:
- For support, please refer to the contact details provided in your warranty card or on the official Senfot website.