1. Safety Information
Warning: The blades of the 3D Hologram Fan are sharp when in operation. Always ensure the fan is powered off and stationary before handling. Keep hands and objects clear of the rotating blades. If using the fan in an accessible area, consider using a protective cover (sold separately) to prevent accidental contact, especially with children.
2. Package Contents
Verify all components are present before assembly:
- HoloSpin 3D Hologram Fan Stand (Main Pole with Tripod Base)
- Acrylic Adapter Plate
- Hexagonal Wrench
- Long Screw and Nut
- Safety Pin
- Instruction Manual

Image: All components of the HoloSpin 3D Hologram Fan Stand laid out, showing the main pole, tripod legs, adjustment mechanisms, and non-slip feet.
3. Setup and Assembly
3.1. Unfolding the Tripod Base
- Place the folded tripod stand on a flat, stable surface.
- Loosen the thumb bolt located at the base of the main pole.
- Gently pull the tripod legs outwards until they are fully extended and stable.
- Tighten the thumb bolt securely to lock the legs in place.

Image: Visual guide demonstrating the two-step process of unfolding the tripod stand.
3.2. Adjusting the Height
- Loosen the upper thumb bolt on the main pole.
- Extend the inner pole to the desired height (adjustable from 39.4 to 69 inches).
- Insert the safety pin through the corresponding hole in the inner pole for added security.
- Tighten the upper thumb bolt firmly to secure the pole at the chosen height.

Image: Detailed view of the height adjustment features, including the safety pin and tension locking mechanism.
3.3. Attaching the Hologram Fan
- Insert the long screw into the pendant hole of the acrylic adapter plate, ensuring the gold thread faces up.
- Align the holes on the triangular bracket of the fan with the adapter plate and insert the screw.
- Securely tighten the rotary nut using the provided hexagonal wrench.
- Hang the assembled hologram fan onto the top bracket of the stand. Ensure the fan's U-shaped pendant aligns correctly with the stand's bracket.
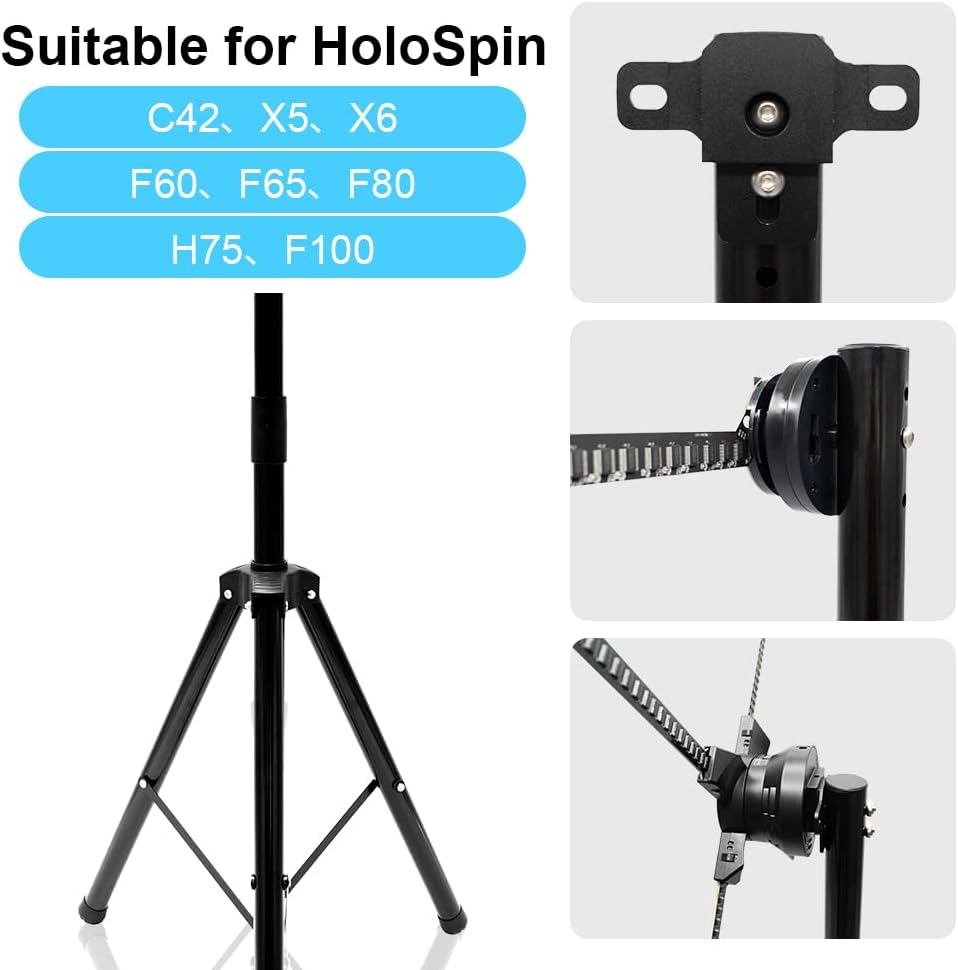
Image: An illustration showing the stand's compatibility with HoloSpin C42, X5, X6, F60, F65, F80, H75, and F100 models.

Image: A visual guide demonstrating the two-step process of installing the buckle on the stand and then holding the hologram fan on the buckle.
Video: A seller-provided video demonstrating the assembly of the 3D hologram fan stand, including attaching the fan.
4. Operating Instructions
4.1. Powering On/Off
Connect the hologram fan to a power source. Use the remote control or mobile application to power the fan on or off.
4.2. Content Management
Content for the hologram fan is typically loaded via an SD card or a dedicated mobile application. Refer to your specific hologram fan's manual for detailed instructions on uploading and managing content.
Video: A seller-provided video showcasing the hologram LED fan in operation, demonstrating various visual effects.
5. Maintenance
5.1. Cleaning
To clean the stand, wipe it with a soft, dry cloth. For the hologram fan's acrylic cover (if applicable) or blades, use a soft, lint-free cloth and a mild, non-abrasive cleaner. Avoid harsh chemicals that may damage the surface.
When handling the fan blades or acrylic cover, it is recommended to wear gloves to prevent fingerprints and smudges.
5.2. Storage
When not in use, the stand can be folded for compact storage. Ensure the fan is detached and stored safely in its original packaging or a protective case.
6. Troubleshooting
If the stand is unstable:
- Ensure all tripod legs are fully extended.
- Verify that the thumb bolts and safety pin are securely tightened.
- Check that the stand is placed on a level surface.
If the hologram fan is not displaying correctly:
- Confirm the fan is properly attached to the stand's bracket.
- Check the power connection to the fan.
- Refer to the hologram fan's specific manual for display-related troubleshooting.
7. Specifications
| Feature | Detail |
|---|---|
| Brand | HoloSpin |
| Model Name | HoloSpin Stand |
| Material | Aluminum |
| Mounting Type | Tripod Mount |
| Adjustable Height | 39.4 inches to 69 inches |
| Item Weight | 3.54 pounds |
| Max Load Capacity | Up to 220 lbs |
8. Warranty and Support
For warranty information and technical support, please refer to the documentation provided with your HoloSpin 3D Hologram Fan or contact HoloSpin customer service directly.