1. Introduction
The Brrnoo RD72-DC-12V Infinite Cycle ON Off Relay Module is designed to provide precise, adjustable delay timing for various applications. This module allows for continuous cycling of a connected device, turning it ON and OFF according to user-defined time intervals. It features separate adjustments for ON time and OFF time, an external start/stop function, and low power consumption, making it suitable for industrial and scientific control systems.
2. Product Overview
The RD72-DC-12V module integrates a relay, control circuitry, and user-adjustable components on a compact PCB. Key components include power input terminals, relay output terminals, time adjustment potentiometers, and time unit selection DIP switches.

Figure 2.1: Labeled diagram of the RD72-DC-12V module. This image highlights the 'RUN TIME' (ON time) and 'STOP TIME' (OFF time) potentiometers, their corresponding 'Sec.' (seconds) and 'Min.' (minutes) DIP switches, the module power input, and the relay output terminals (NO, COM, NC). It also indicates the green light for 'ON' and red light for 'OFF' status, and the external wiring start button connection point.
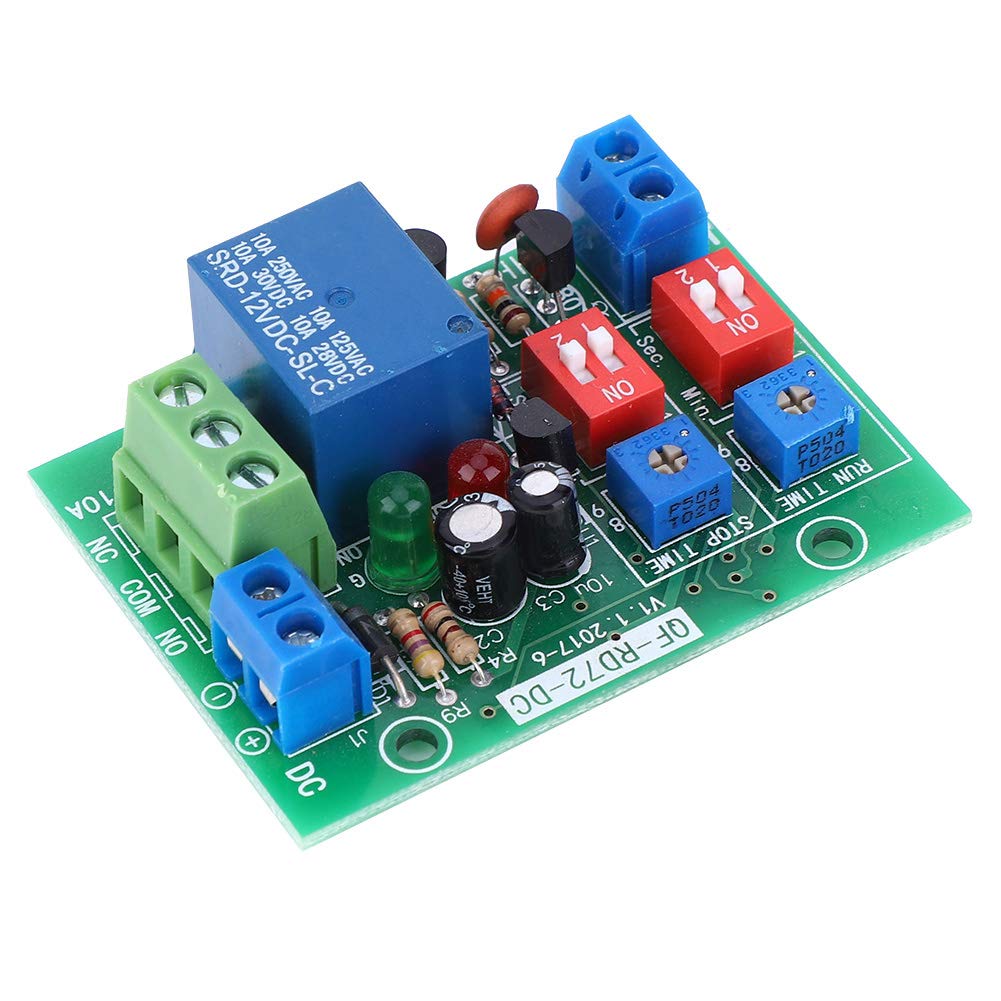
Figure 2.2: Top-down view of the RD72-DC-12V module. This image provides a clear perspective of the module's layout, showing the blue relay, terminal blocks, potentiometers, and DIP switches.
3. Specifications
| Feature | Specification |
|---|---|
| Voltage | DC 12V |
| Power Consumption | Less than 1W |
| Output Type | Passive output (dry contact), 1 group Normally Open (NO) + Normally Closed (NC) |
| Maximum Output Current | 10A |
| Relay Life | 100,000 operations |
| Time Range | 0.5 seconds - 1000 minutes |
| Time Accuracy | Maximum value of range * 0.001 (1000-level resolution) |
| External Start Button Input | Passive switch input (self-resetting button required). Can also use external voltage: <2V (low level), >2V (high level). Max input 30V. |
| Product Dimensions | 4.33 x 3.15 x 1.18 inches |
| Product Weight | 0.99 ounces |
4. Setup
4.1 Power Connection
Connect a DC 12V power supply to the designated DC input terminals on the module. Ensure correct polarity: '+' for positive and '-' for negative. The module's power consumption is less than 1W.
4.2 Load Connection
The module provides passive relay output (dry contact). This means the relay acts as a switch and does not supply power to the load. Connect your device's power circuit through the relay terminals:
- COM (Common): Connect one side of your load's power circuit here.
- NO (Normally Open): Connect the other side of your load's power circuit here if you want the circuit to be closed (power ON) when the relay is activated.
- NC (Normally Closed): Connect the other side of your load's power circuit here if you want the circuit to be open (power OFF) when the relay is activated. This terminal is generally not connected for typical ON/OFF cycling applications.
Ensure the connected load does not exceed 10A.
4.3 External Start/Stop Button Connection
An external passive switch (self-resetting button) can be connected to the designated terminals to start and stop the infinite cycle. Alternatively, an external voltage can be used: a low level (below 2V) acts as OFF, and a high level (above 2V, maximum 30V) acts as ON.

Figure 4.1: Side view of the RD72-DC-12V module, illustrating the terminal blocks for power input and relay output connections.
5. Operating Instructions
The module operates in an infinite cycle mode once started, with the relay switching ON and OFF according to the set time intervals.
5.1 Setting ON Time (RUN TIME)
- Locate the potentiometer labeled "RUN TIME".
- Adjust the potentiometer clockwise to increase the ON duration, and counter-clockwise to decrease it.
- Use the adjacent DIP switches to select the time unit:
- Set to "Sec." for seconds (range 0.5 to 1000 seconds).
- Set to "Min." for minutes (range 0.5 to 1000 minutes).
5.2 Setting OFF Time (STOP TIME)
- Locate the potentiometer labeled "STOP TIME".
- Adjust the potentiometer clockwise to increase the OFF duration, and counter-clockwise to decrease it.
- Use the adjacent DIP switches to select the time unit:
- Set to "Sec." for seconds (range 0.5 to 1000 seconds).
- Set to "Min." for minutes (range 0.5 to 1000 minutes).
5.3 Start/Stop Function
- Once the module is powered and times are set, press the external start button (or apply a high-level voltage) to initiate the infinite cycle.
- The green indicator light will turn ON when the cycle starts.
- To stop the cycle, press the external button again (or remove the high-level voltage). The red indicator light will remain ON, indicating the module is stopped.
6. Maintenance
The Brrnoo RD72-DC-12V module is designed for reliable operation with minimal maintenance. Follow these guidelines to ensure longevity:
- Keep the module clean and free from dust and debris.
- Avoid exposing the module to moisture or extreme temperatures.
- Periodically check all wiring connections to ensure they are secure.
- Do not attempt to modify the internal circuitry, as this may damage the module and void any potential warranty.
7. Troubleshooting
If you encounter issues with your RD72-DC-12V module, consider the following:
- Module not powering on: Verify the DC 12V power supply is correctly connected and providing the specified voltage. Check polarity.
- Relay not switching: Ensure the ON and OFF times are set correctly and the module has been started via the external button. Check the load connections (COM, NO, NC).
- Incorrect timing: Double-check the potentiometer settings and the DIP switch selections for seconds or minutes for both RUN TIME and STOP TIME.
- External start/stop not working: Confirm the external button is a self-resetting type and properly wired. If using external voltage, ensure it meets the <2V (low) and >2V (high) thresholds and does not exceed 30V.
- Load not receiving power: Confirm the load itself is functional and its power source is active. Ensure the relay output terminals are correctly wired to the load's circuit.
8. Safety Information
Please observe the following safety precautions:
- Always disconnect power before making any wiring changes to the module or connected devices.
- Ensure all wiring is correctly insulated and secured to prevent short circuits.
- Do not exceed the maximum voltage (DC 12V) or current (10A) ratings for the module and its relay output.
- This module is an electronic component; handle it with care to avoid damage from static electricity or physical impact.
- If you are unsure about any wiring or operation, consult a qualified electrician or technician.