1. Introduction
This manual provides detailed instructions for the installation, operation, and maintenance of your Roinvou 5G WiFi Car Radio, model B0DK1C2LJS. This head unit is specifically designed for Toyota CHR models manufactured between 2016 and 2019. It features a 9-inch IPS touch screen, integrated 5G WiFi, Apple CarPlay, Android Auto, EQ, DSP, Bluetooth, GPS navigation, FM RDS radio, 2GB RAM, and 64GB ROM, enhancing your in-car entertainment and connectivity experience.

Image: The Roinvou 5G WiFi Car Radio unit with included accessories such as a backup camera, external microphone, and 5G WiFi antenna.
2. Setup: Package Contents
Please verify that all items listed below are included in your package. If any components are missing or damaged, contact customer support immediately.
- Roinvou Car Stereo for Toyota CHR
- Power Cable
- Canbus Decoder
- Original USB Cable
- RCA Harness
- GPS Antenna
- AHD Backup Camera
- External Microphone
- Rear Camera Input Cable
- Dual USB Cable
- Installation Tool & Accessories

Image: A visual representation of all components included in the package, such as the main unit, various cables, GPS antenna, backup camera, and installation tools.
3. Setup: Vehicle Compatibility & Pre-Installation Check
Before proceeding with installation, it is crucial to confirm that your vehicle's central control panel matches the compatible configuration. This product supports 'Option A' for Toyota CHR 2016-2019 (Left-Hand Drive) models. If your vehicle's dashboard configuration resembles 'Option B', this unit may not be compatible, and you should contact customer service for alternative recommendations.

Image: A visual guide illustrating two different central control panel layouts for the Toyota CHR, indicating which one is compatible with this car radio unit.
4. Setup: Installation Guide
Professional installation is recommended. Ensure the vehicle's power is disconnected before beginning installation. Refer to your vehicle's service manual for specific dashboard disassembly instructions.
General Installation Steps:
- Carefully remove the original car radio and dashboard trim.
- Connect the main power cable harness from the new unit to the vehicle's wiring. Ensure all connections are secure.
- Connect the Canbus decoder if your vehicle requires it for steering wheel controls or other integrated functions.
- Connect the GPS antenna and position it in a location with a clear view of the sky (e.g., on the dashboard).
- Connect the external microphone for hands-free calling. Position it near the driver for optimal voice pickup.
- If installing the backup camera, route the rear camera input cable to the rear of the vehicle and connect the camera. Ensure the camera's power is connected to the reverse lamp for automatic activation.
- Connect any additional USB cables or RCA harnesses as needed.
- Test all functions of the unit before fully reassembling the dashboard.
- Carefully reassemble the dashboard trim and secure the new head unit.
Rear View Camera Wiring Diagram:

Image: A detailed diagram illustrating the connections for the reversing camera, including power, ground, and video input, as well as the Canbus wiring.
Important: The reverse input cable must be plugged into the unit even if a reverse camera is not being used. Failure to do so may affect Bluetooth and WiFi signal reception.
5. Setup: Initial Configuration
After successful installation and powering on the unit, perform the following initial configurations:
- Language Settings: Navigate to 'Settings' to select your preferred language.
- Time and Date: Adjust the time zone and set the correct date and time. This can often be synchronized automatically via GPS or network connection.
- WiFi Connection: Go to 'Settings' > 'Network & Internet' > 'Wi-Fi' to connect to an available 5G WiFi hotspot (e.g., from your mobile phone) for internet access, online navigation, and app downloads.
- GPS Setup: The unit comes pre-equipped with a North America map. Ensure the GPS antenna is properly connected and positioned for optimal signal reception.
6. Operating Instructions
6.1. Touch Screen Interface
The 9-inch IPS touch screen provides a clear and responsive interface. Navigate through menus and applications by tapping, swiping, and pinching gestures, similar to a smartphone or tablet.
6.2. Apple CarPlay & Android Auto
The unit supports both wired and wireless Apple CarPlay and Android Auto. This allows seamless integration of your smartphone for navigation, communication, and entertainment.
- Connection: Connect your iPhone via USB or wirelessly via Bluetooth/WiFi for CarPlay. Connect your Android phone via USB or wirelessly via Bluetooth/WiFi for Android Auto.
- Functions: Access phone calls, messages, music, podcasts, and navigation apps directly from the car radio display. Use voice commands (Siri/Google Assistant) for hands-free operation.

Image: Displays the user interfaces for Wireless CarPlay and Wireless Android Auto, highlighting their respective app layouts and connectivity options.

Image: A side-by-side view of the Apple CarPlay and Android Auto interfaces, showing their distinct designs and app icons.
6.3. GPS Navigation
The unit includes offline maps for North America. For real-time traffic updates and online navigation, connect to WiFi and download preferred online map applications from the Play Store.
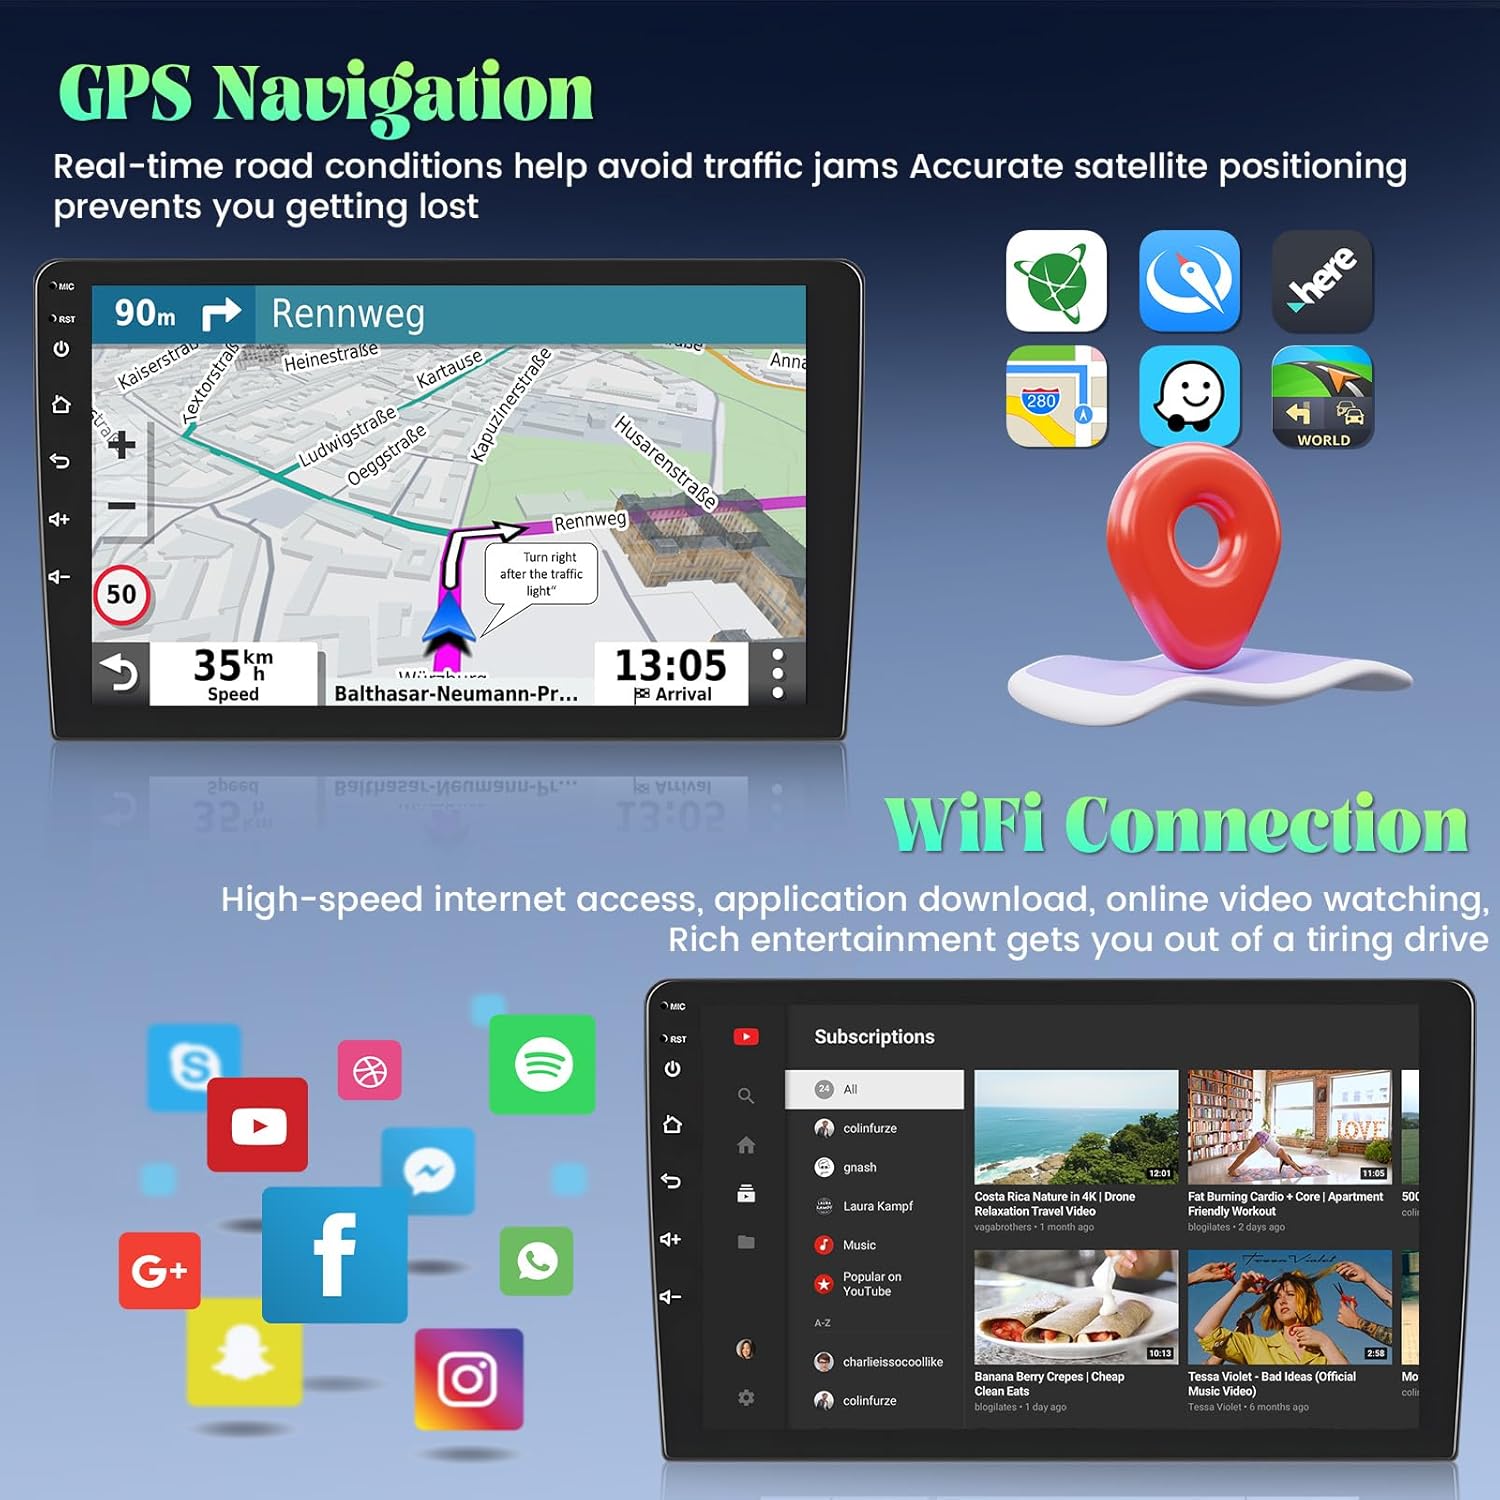
Image: The GPS navigation screen showing a route, estimated arrival time, and current speed, alongside icons for various navigation and social media apps.
6.4. Radio (FM/RDS)
Access the FM radio tuner to listen to local stations. The RDS (Radio Data System) feature displays station information where available. You can save up to 18 preset stations. Utilize the built-in EQ settings to customize audio output.
6.5. Bluetooth Connectivity
Pair your smartphone via Bluetooth for hands-free calling and audio streaming. Navigate to 'Settings' > 'Bluetooth' to search for and connect to devices.
6.6. Mirror Link
Mirror Link functionality allows you to display your smartphone screen on the car radio. For iOS devices, this is typically a one-way display via WiFi. For Android devices, it can offer two-way control via WiFi or USB connection.

Image: A visual explanation of Mirror Link, showing how iOS devices connect via WiFi for one-way mirroring and Android devices connect via WiFi/USB for two-way control.
6.7. Steering Wheel Control (SWC)
The unit supports integration with your vehicle's steering wheel controls for convenient operation.
- Without CANBUS Decoder: Connect the steering wheel control wires (Key1, Key2) from the power cable to the corresponding port or wire of your original car. Then, navigate to 'SteeringWheelKey' in the unit's settings to manually map and activate the buttons.
- With CANBUS Decoder: Connect the Canbus decoder before powering on the machine. Go to 'Settings' > 'Factory Setup' (Password: 000000) > 'Can Settings'. Select the brand of the Canbus decoder and then the matching model and year according to your vehicle's specifications to ensure proper functionality.

Image: The car radio display showing the steering wheel control learning interface, with instructions for both CANBUS and non-CANBUS setups.
6.8. Rear View Camera Input
When the vehicle is shifted into reverse, the car radio screen will automatically display the image from the connected rear view camera, aiding in safe parking and maneuvering.
6.9. User Interface Themes
The unit offers 26 different user interface themes, allowing you to customize the visual appearance of your car radio to your preference.

Image: A collage of various user interface themes, demonstrating the customization options for the car radio's display.
7. Maintenance
To ensure the longevity and optimal performance of your Roinvou car radio, follow these maintenance guidelines:
- Screen Cleaning: Use a soft, lint-free cloth slightly dampened with water or a screen-cleaning solution. Avoid harsh chemicals or abrasive materials that could damage the touch screen.
- Software Updates: Periodically check for available software updates through the unit's settings (if applicable) or the manufacturer's website to ensure you have the latest features and bug fixes.
- General Care: Avoid exposing the unit to extreme temperatures, direct sunlight for prolonged periods, or excessive moisture. Ensure all connections remain secure.
8. Troubleshooting
This section addresses common issues you might encounter. If the problem persists, contact customer support.
| Problem | Possible Cause | Solution |
|---|---|---|
| Unit does not power on | Loose power connection, blown fuse, vehicle power issue. | Check power cable connections. Inspect vehicle fuses. Consult a professional installer. |
| No sound output | Speaker wires disconnected, volume too low, incorrect audio source. | Verify speaker connections. Increase volume. Select correct audio source. |
| GPS signal loss or inaccuracy | GPS antenna obstructed or improperly connected. | Ensure GPS antenna has a clear view of the sky and is securely connected. |
| Bluetooth connection issues | Device not in pairing mode, interference, incorrect reverse input cable connection. | Ensure device is discoverable. Re-pair device. Verify reverse input cable is connected even if camera is not used. |
| Rear camera not displaying | Camera not powered, video cable loose, reverse trigger not connected. | Check camera power and video cable connections. Ensure reverse trigger wire is correctly connected to the reverse lamp. |
General Tip: If experiencing unexpected behavior, try restarting the unit. As a last resort, a factory reset may resolve software-related issues, but this will erase all personal settings and data.
9. Specifications
| Feature | Detail |
|---|---|
| Model Number | B0DK1C2LJS |
| Display Size | 9 Inches |
| Resolution | 1024 x 600 |
| Processor | 4-core |
| RAM | 2GB |
| ROM | 64GB |
| Connectivity Technology | Bluetooth, USB, Wi-Fi (5G) |
| Special Features | Wireless and Wired CarPlay & Android Auto, IPS Touchscreen, FM RDS Radio, EQ Settings, Mirror Link, GPS Navigation, DSP, Steering Wheel Control, 26 Desktop Themes |
| Map Type | North America (pre-installed) |
| Audio Output Mode | Stereo |
| Item Weight | 3.32 pounds |
| Package Dimensions | 14.17 x 8.27 x 3.15 inches |

Image: A visual representation of the internal components, highlighting the 4-core CPU, 2GB RAM, and 64GB ROM, indicating the unit's processing capabilities.
10. Warranty Information
The Roinvou 5G WiFi Car Radio comes with a 1-Year Warranty from the date of purchase, covering manufacturing defects and malfunctions under normal use. For extended protection, additional plans may be available:
- 2-Year Protection Plan: Available for purchase.
- 3-Year Protection Plan: Available for purchase.
Please retain your proof of purchase for warranty claims. For detailed terms and conditions, refer to the warranty documentation included with your product or contact Roinvou customer support.
11. Support
For any questions, technical assistance, or support regarding your Roinvou 5G WiFi Car Radio, please contact our customer service team. We are committed to providing professional technical support and ensuring your satisfaction.
- Email Support: roinvouservices@163.com
- Online Support: You can also reach us through the Amazon platform by clicking on the seller name 'Roinvou' and then selecting 'Ask a question'.
All inquiries will receive a response within 24 hours, excluding holidays.

Image: A graphic displaying the email address for customer support and instructions on how to contact the seller via the Amazon platform.