Dannilong 8012
Dannilong Farmhouse Ceiling Fan User Manual
Model: 8012
Brand: Dannilong
Introduction
Thank you for purchasing the Dannilong Farmhouse Ceiling Fan. This manual provides detailed instructions for the safe installation, operation, and maintenance of your new ceiling fan. Please read this manual thoroughly before installation and keep it for future reference. Proper installation and operation are essential for optimal performance and safety.
Important Safety Information
Always follow basic safety precautions when installing and operating electrical appliances. Failure to do so may result in fire, electric shock, or personal injury.
- Read all instructions: Before beginning installation, read all instructions carefully.
- Electrical Safety: All electrical work must be performed by a qualified, licensed electrician. Disconnect power at the main circuit breaker before installation or servicing.
- Mounting: Ensure the mounting structure can support the weight of the fan (approximately 15.22 pounds).
- Blade Clearance: Maintain a minimum clearance of 7 feet from the floor to the fan blades.
- Wiring: Connect wiring according to local electrical codes and the instructions provided.
- Light Bulbs: Use only E26 base bulbs as specified. Ensure power is off before changing bulbs.
- Cleaning: Always disconnect power before cleaning the fan. Use a soft, damp cloth; never use abrasive cleaners.
- Children and Pets: Keep children and pets away from the fan during operation and installation.
Package Contents
Verify that all components are present before beginning installation. If any parts are missing or damaged, contact Dannilong customer support.
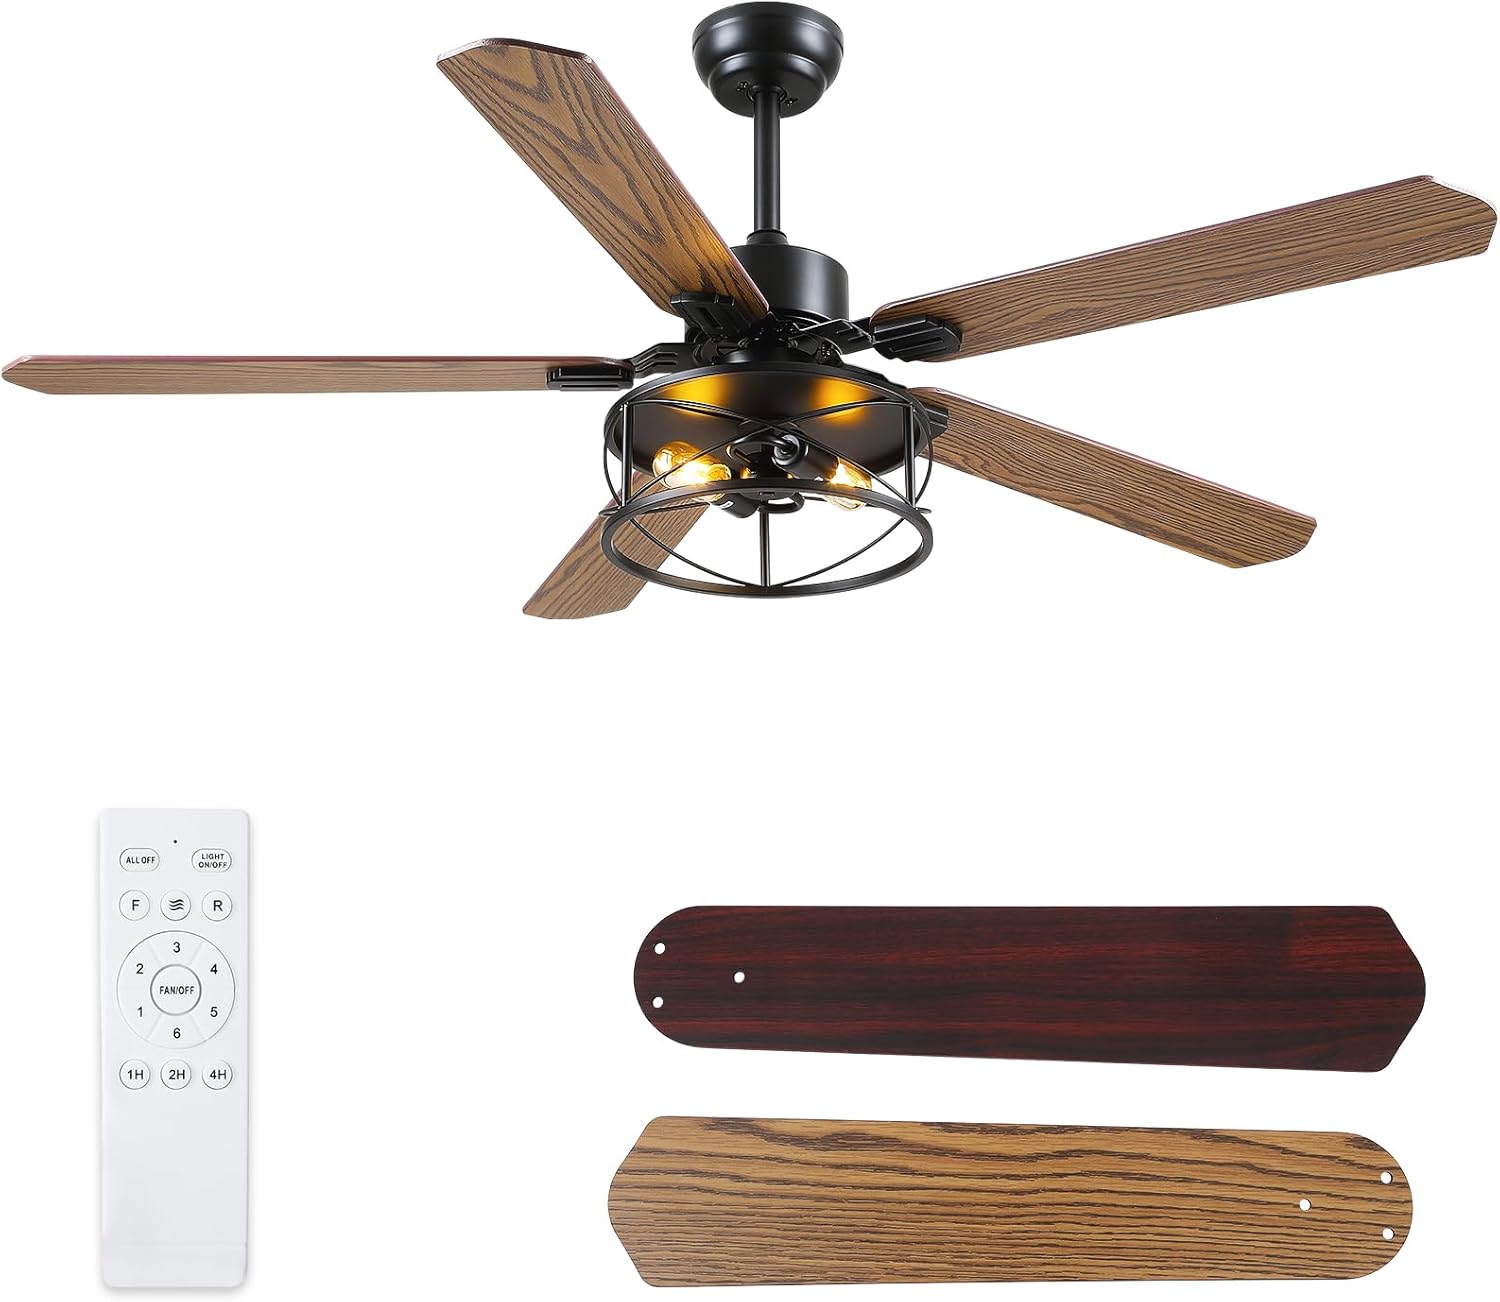
Figure 1: Overview of the Dannilong Farmhouse Ceiling Fan, including the main fan unit, remote control, and reversible fan blades (pine/dark maple).
- Ceiling Fan Motor Housing
- Fan Blades (5, dual-sided: pine/dark maple)
- Light Kit with Caged Design
- Remote Control and Receiver
- Downrod (various lengths may be included)
- Mounting Bracket
- Hardware Pack (screws, wire nuts, washers)
- Instruction Manual
- E26 Bulb Sockets (bulbs not included)
Specifications
| Feature | Detail |
|---|---|
| Brand | Dannilong |
| Model Name | 8012 |
| Color | 56"wood |
| Electric Fan Design | Ceiling Fan |
| Power Source | AC |
| Style | Farmhouse |
| Product Dimensions | 27"D x 12"W x 20"H |
| Room Type | Bedroom, Living Room, Patio |
| Special Feature | Bladeless (refers to the motor housing design, not actual lack of blades), Reversible Function, Timer |
| Recommended Uses | Air Circulation |
| Finish Type | Rustic |
| Voltage | 120 Volts (AC) |
| Indoor/Outdoor Usage | Indoor |
| Control Method | Remote |
| Light Type | E26 (bulbs not included) |
| Number of Power Levels | 6 |
| Size | 56" |
| Item Weight | 15.22 pounds |
Installation and Setup
Before starting, ensure the power is disconnected at the circuit breaker. It is recommended to have two people for installation.
1. Prepare the Mounting Location
Ensure the ceiling joist or outlet box is securely mounted and capable of supporting the fan's weight. The fan supports both downrod and angled mounting options.

Figure 2: Fan dimensions and available mounting options (downrod and angled). Ensure adequate clearance from the ceiling and walls.
2. Assemble the Fan Components
Attach the fan blades to the motor housing. The blades are dual-sided, allowing you to choose between a pine or dark maple finish. Install the light kit and ensure all connections are secure.
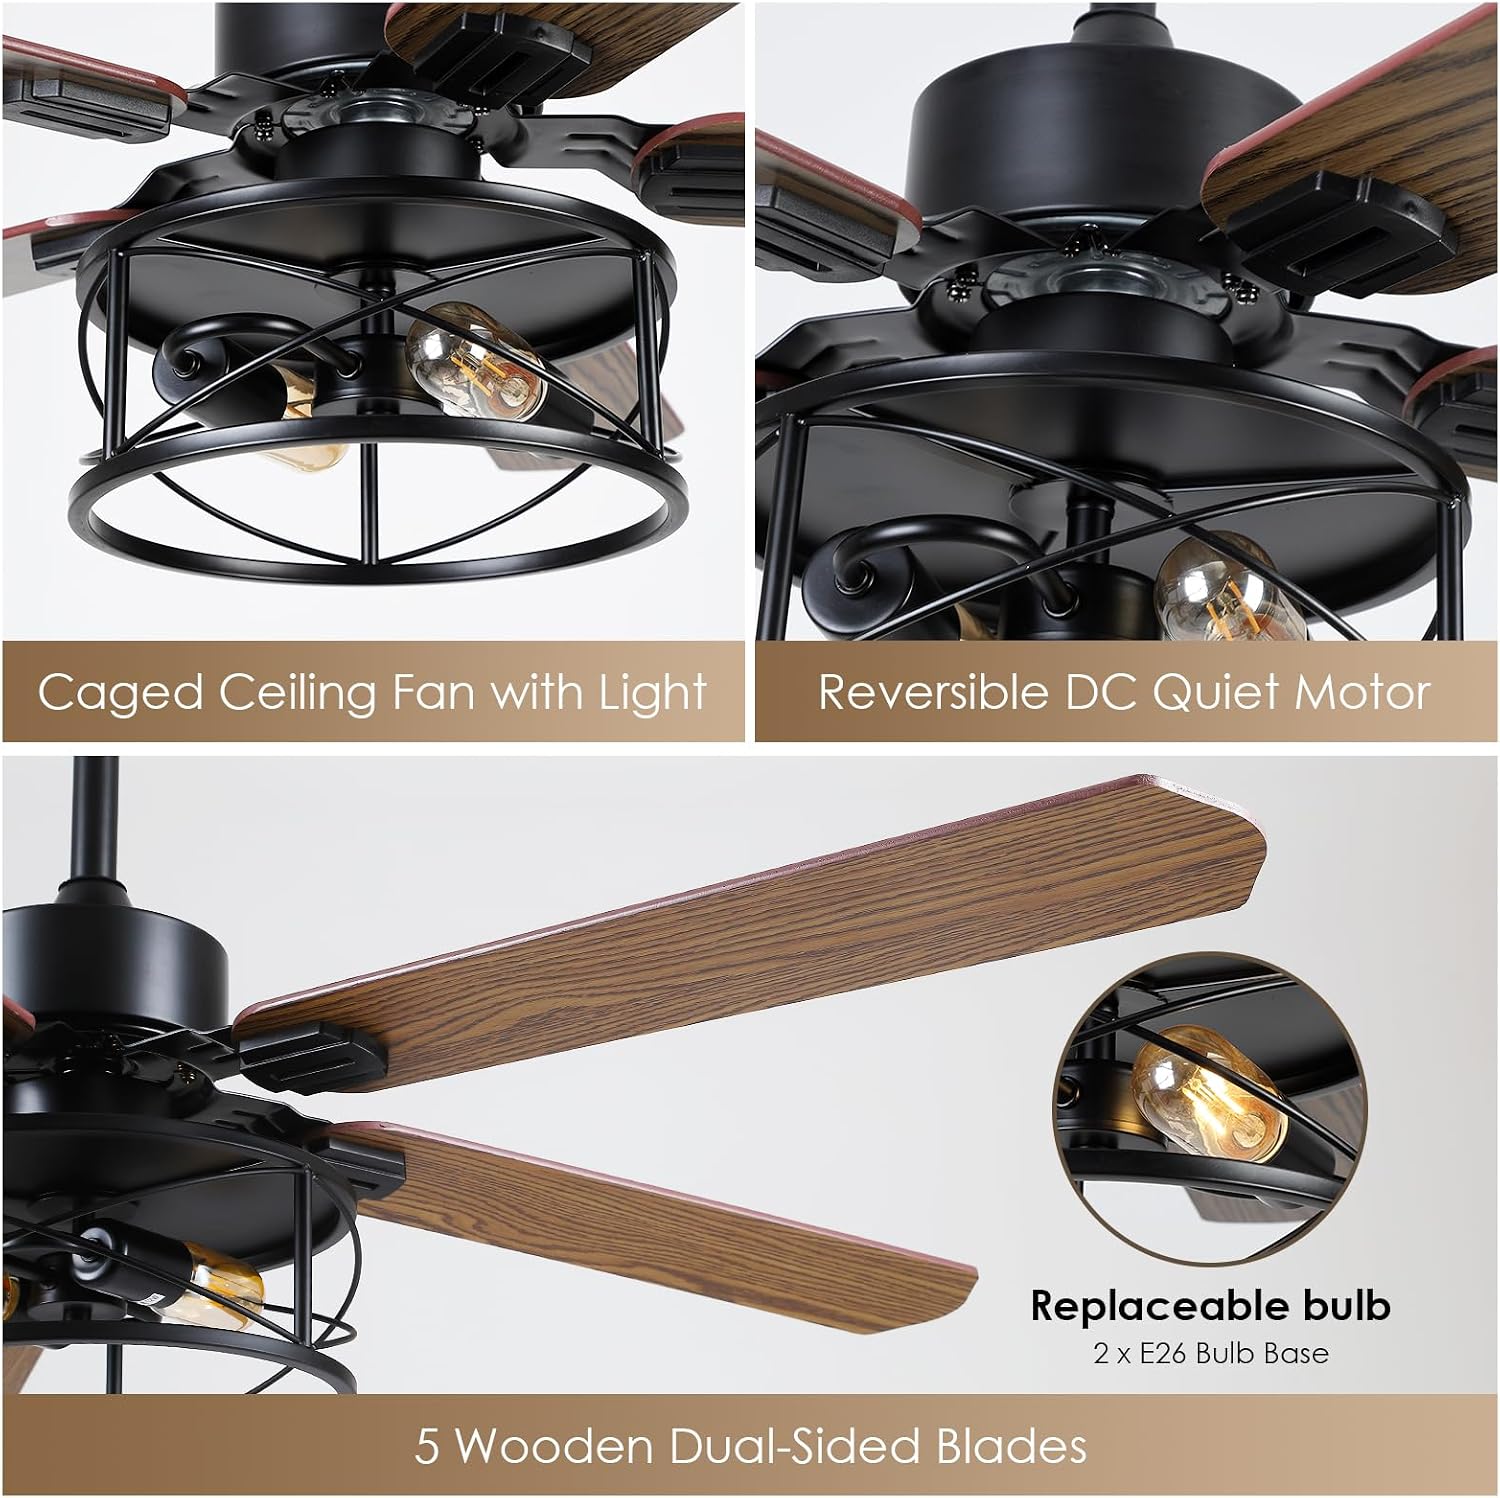
Figure 3: Detailed view of the fan's components, including the caged light fixture, the reversible DC quiet motor, the E26 bulb sockets, and the dual-sided wooden blades.
3. Wiring and Mounting
Follow the wiring diagram provided in the separate wiring guide (if applicable) or on the product packaging. Connect the fan's wires to the household electrical supply wires using wire nuts. Secure the fan to the mounting bracket.
- Install the mounting bracket to the ceiling outlet box.
- Hang the fan motor assembly onto the mounting bracket.
- Connect the electrical wires: Live (Black), Neutral (White), Ground (Green/Bare Copper).
- Carefully tuck the wires and the remote receiver into the canopy.
- Secure the canopy to the mounting bracket.
- Attach the fan blades to the motor.
- Install the light kit and screw in E26 bulbs (not included).
Note: Ensure all connections are tight and secure to prevent electrical hazards.
Operating Instructions
Your Dannilong ceiling fan is operated via the included remote control.
Remote Control Functions
- ALL OFF: Turns off both fan and light.
- LIGHT ON/OFF: Toggles the light on or off.
- R (Reverse): Changes the fan's rotation direction.
- Fan Speed Buttons (1-6): Adjusts fan speed from 1 (lowest) to 6 (highest).
- Timer Buttons (1H, 2H, 4H, 8H): Sets the fan to turn off automatically after the selected duration.

Figure 4: The 6-speed settings provide versatile airflow options, from a gentle breeze to strong cooling wind.

Figure 5: The timer function allows for automatic shut-off, and the fan operates quietly at approximately 25dB, suitable for sleeping environments.
Reversible Function (Summer/Winter Mode)
The fan features a reversible motor for year-round comfort. Use the "R" button on the remote to switch directions.
- Summer Mode (Forward Rotation): Blades rotate counter-clockwise, pushing air downwards to create a cooling effect.
- Winter Mode (Reverse Rotation): Blades rotate clockwise, drawing air upwards to circulate warm air trapped near the ceiling.

Figure 6: Visual representation of the fan's reversible function for optimal air circulation in both summer and winter seasons.
Maintenance
Regular maintenance ensures the longevity and optimal performance of your ceiling fan. Always disconnect power before performing any maintenance.
- Cleaning: Use a soft, lint-free cloth to clean the fan blades and motor housing. Do not use water directly on the fan or abrasive cleaners, as this can damage the finish or electrical components.
- Blade Care: Periodically check the blade screws for tightness. Loose blades can cause wobbling and noise.
- Light Bulb Replacement: Ensure the power is off before replacing E26 bulbs. Allow bulbs to cool before handling.
- Motor Lubrication: The fan's DC motor is permanently lubricated and does not require additional oiling.
Troubleshooting
If you experience issues with your fan, consult the following common problems and solutions before contacting customer support.
| Problem | Possible Cause | Solution |
|---|---|---|
| Fan does not start | No power to the fan; Loose wire connections; Remote control battery low or not paired. | Check circuit breaker; Ensure all wire connections are secure; Replace remote battery or re-pair remote. |
| Fan wobbles | Loose blade screws; Unbalanced blades; Loose mounting bracket. | Tighten all blade screws; Use balancing kit (if included) to balance blades; Ensure mounting bracket is securely fastened. |
| Light does not work | Bulb faulty or loose; Loose wire connection in light kit; Remote control issue. | Replace bulb or tighten; Check light kit wiring; Ensure remote battery is good and light button is pressed. |
| Remote control not working | Low battery; Not paired with receiver; Obstruction. | Replace battery; Follow pairing instructions (usually power cycle fan and press remote button); Remove obstructions between remote and fan. |
| Excessive noise | Loose screws; Motor housing rubbing; Bearings issue. | Check and tighten all screws; Ensure no parts are rubbing; If noise persists, contact customer support. |
Warranty and Customer Support
Dannilong is committed to providing high-quality products and customer satisfaction. Your ceiling fan comes with a full warranty. If you encounter any issues or are not satisfied with your purchase, please contact Dannilong customer support directly.
For assistance, please visit the official Dannilong store on Amazon or refer to the contact information provided with your purchase documentation.
Seller: Dannilong (View Seller Information)
Ask a question about this manual
Ask about setup, troubleshooting, compatibility, parts, safety, or missing instructions. Manuals+ will review the question and use this page’s manual context to help answer it.