Introduction
This manual provides essential instructions for the proper installation, operation, and maintenance of your CROSSHIP Adjustable Trailer Hitch. Please read this manual thoroughly before using the product to ensure safe and efficient operation. Retain this manual for future reference.
Product Overview
The CROSSHIP Adjustable Trailer Hitch is designed for versatile towing applications, featuring an integrated dual-ball system and adjustable drop/rise settings. It is constructed from durable alloy steel with a corrosion-resistant finish.
Key Features:
- Integrated Dual Hitch Balls: Includes a 2-inch ball rated for 14,000 lbs capacity and a 2-5/16-inch ball rated for 25,000 lbs capacity.
- Adjustable Drop/Rise: Offers a precise and rapid 6-inch drop or rise adjustment to accommodate various trailer heights.
- Universal Compatibility: Designed to fit all standard 2-inch receivers.
- Durable Construction: Made from alloy steel with a zinc powder coat finish and corrosion-resistant zinc plating for enhanced longevity.
- Hitch Tightener Included: Solid steel anti-rattle stabilizer compatible with Class I, II, III, or IV hooks, sized for 1-1/4" and 2" hitches, with over 10,000 lbs capacity.
Product Components:
The package includes the adjustable ball mount, dual hitch balls, hitch pin, and hitch tightener assembly.

Figure 1: Product Components
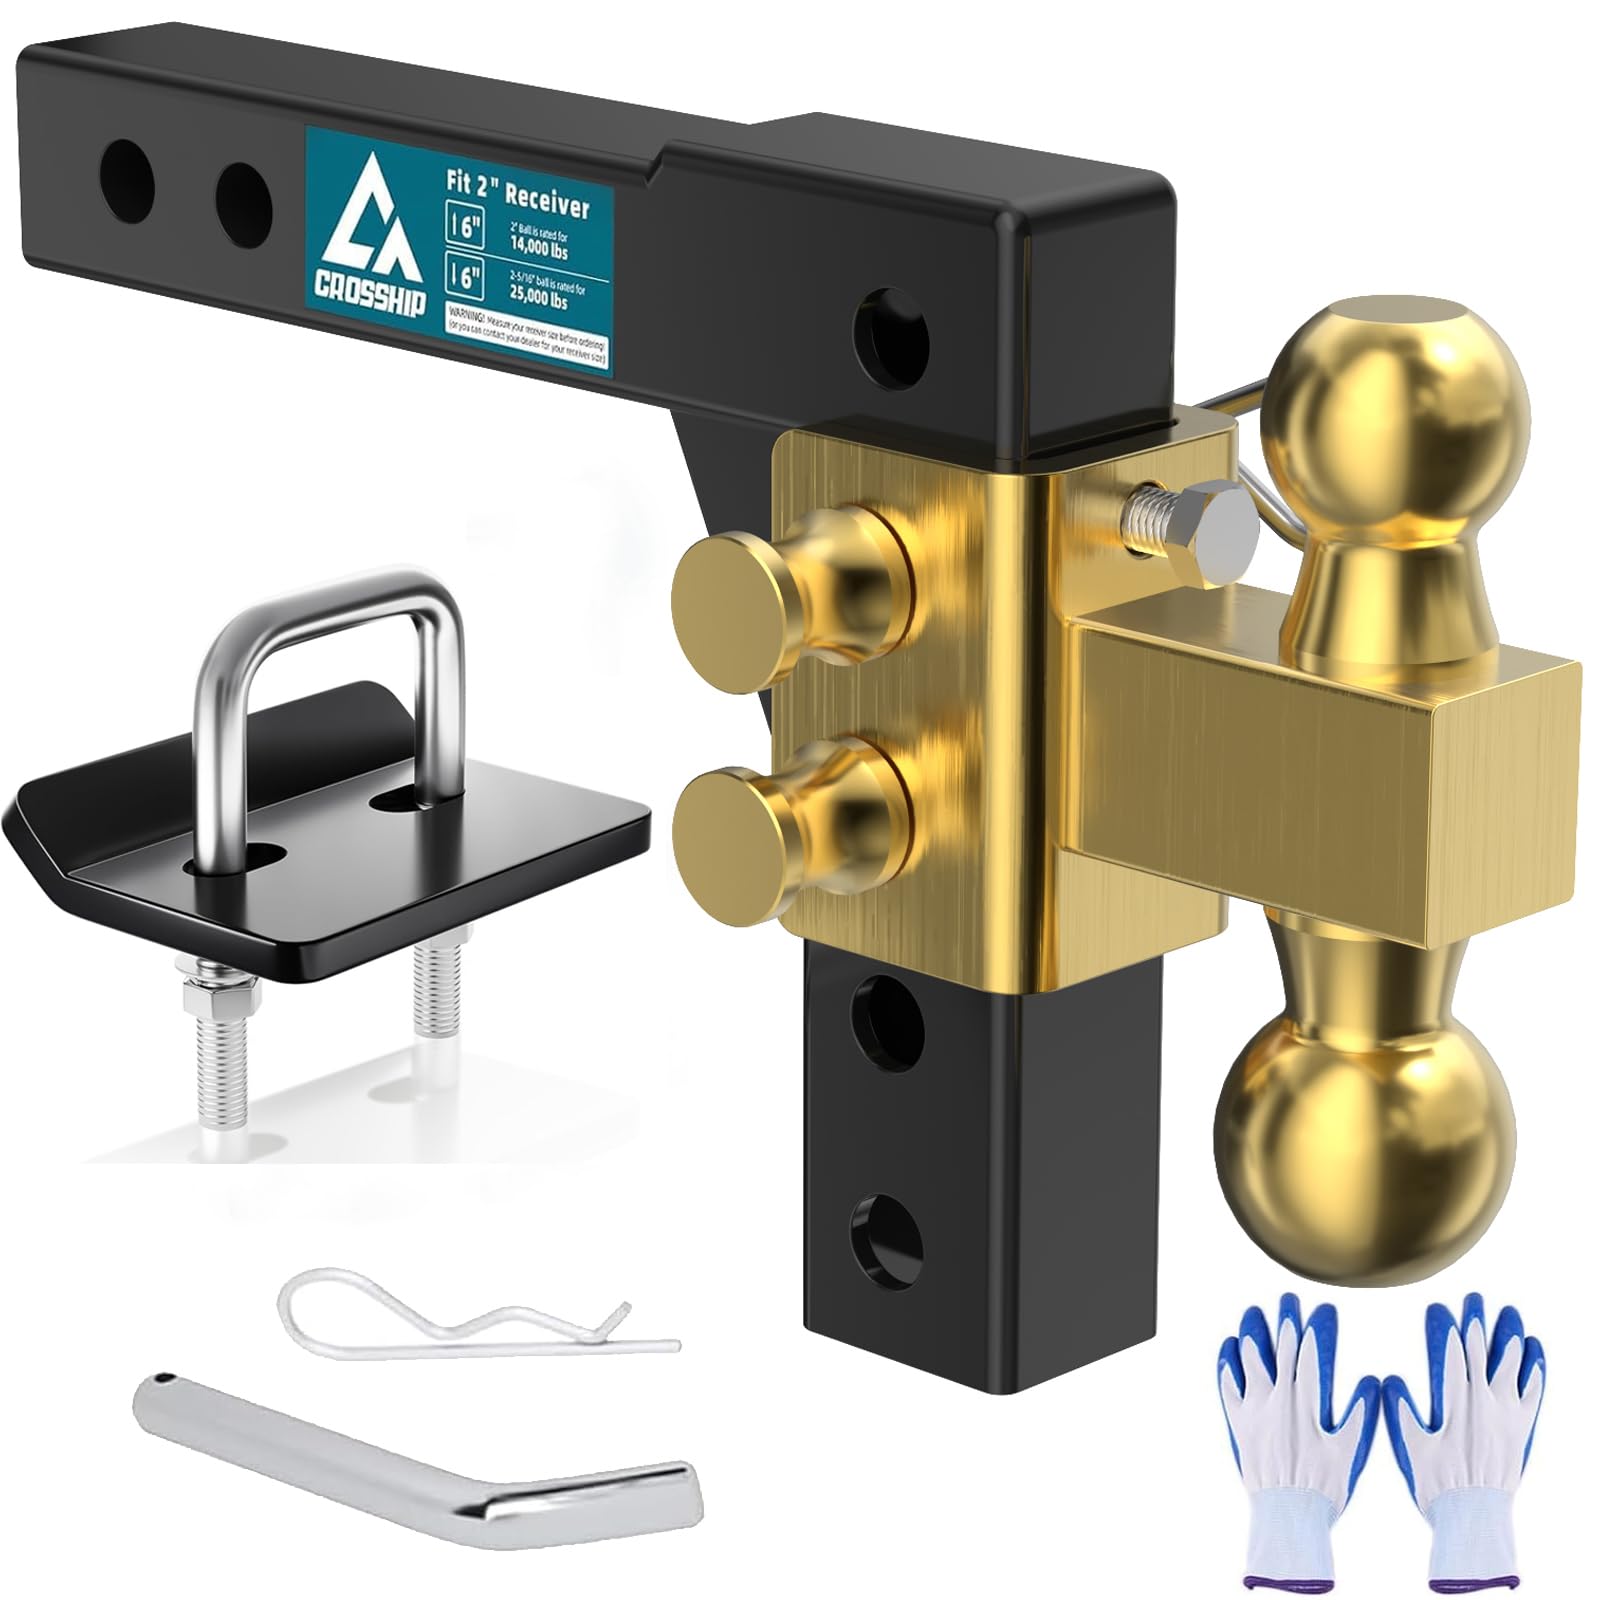
Figure 2: Galvanized Layer for Durability
Specifications
| Specification | Detail |
|---|---|
| Material | Alloy Steel |
| Receiver Compatibility | 2-inch receivers only |
| Hitch Ball Sizes | 2-inch and 2-5/16-inch (integrated) |
| 2-inch Ball Capacity | 14,000 lbs |
| 2-5/16-inch Ball Capacity | 25,000 lbs |
| Drop/Rise Adjustment | 6 inches |
| Hitch Tightener Compatibility | 1-1/4" and 2" hitches (Class I, II, III, IV) |
| Vehicle Service Type | Car, Truck, Trailer, RV, ATV |
Hitch Tightener Dimensions:

Figure 3: Hitch Tightener Dimensions
Setup and Installation
1. Verify Receiver Size:
Ensure your vehicle's receiver is a standard 2-inch square receiver. This hitch is designed exclusively for 2-inch receivers.

Figure 4: Confirming 2-inch Receiver Size
2. Adjusting Drop or Rise:
The ball mount can be inverted to provide either a 6-inch drop or a 6-inch rise, depending on your trailer's coupler height. Select the appropriate height by positioning the ball mount in the desired orientation and securing it with the provided pins.
- For Drop Position: Insert the adjustable shank into the receiver with the ball platform facing downwards.
- For Rise Position: Invert the adjustable shank and insert it into the receiver with the ball platform facing upwards.

Figure 5: Drop and Rise Installation Methods
3. Installing the Hitch Tightener:
The included hitch tightener helps eliminate noise, wobble, and rattle between the receiver and the ball mount.
- Insert the adjustable ball mount into your vehicle's 2-inch receiver.
- Place the U-bolt of the hitch tightener over the hitch receiver, ensuring it surrounds the receiver tube.
- Insert the tightener plate underneath the receiver, aligning the holes with the U-bolt ends.
- Securely tighten the U-bolt with the included fasteners (washers and nuts). Ensure the tightener is installed correctly to prevent movement.
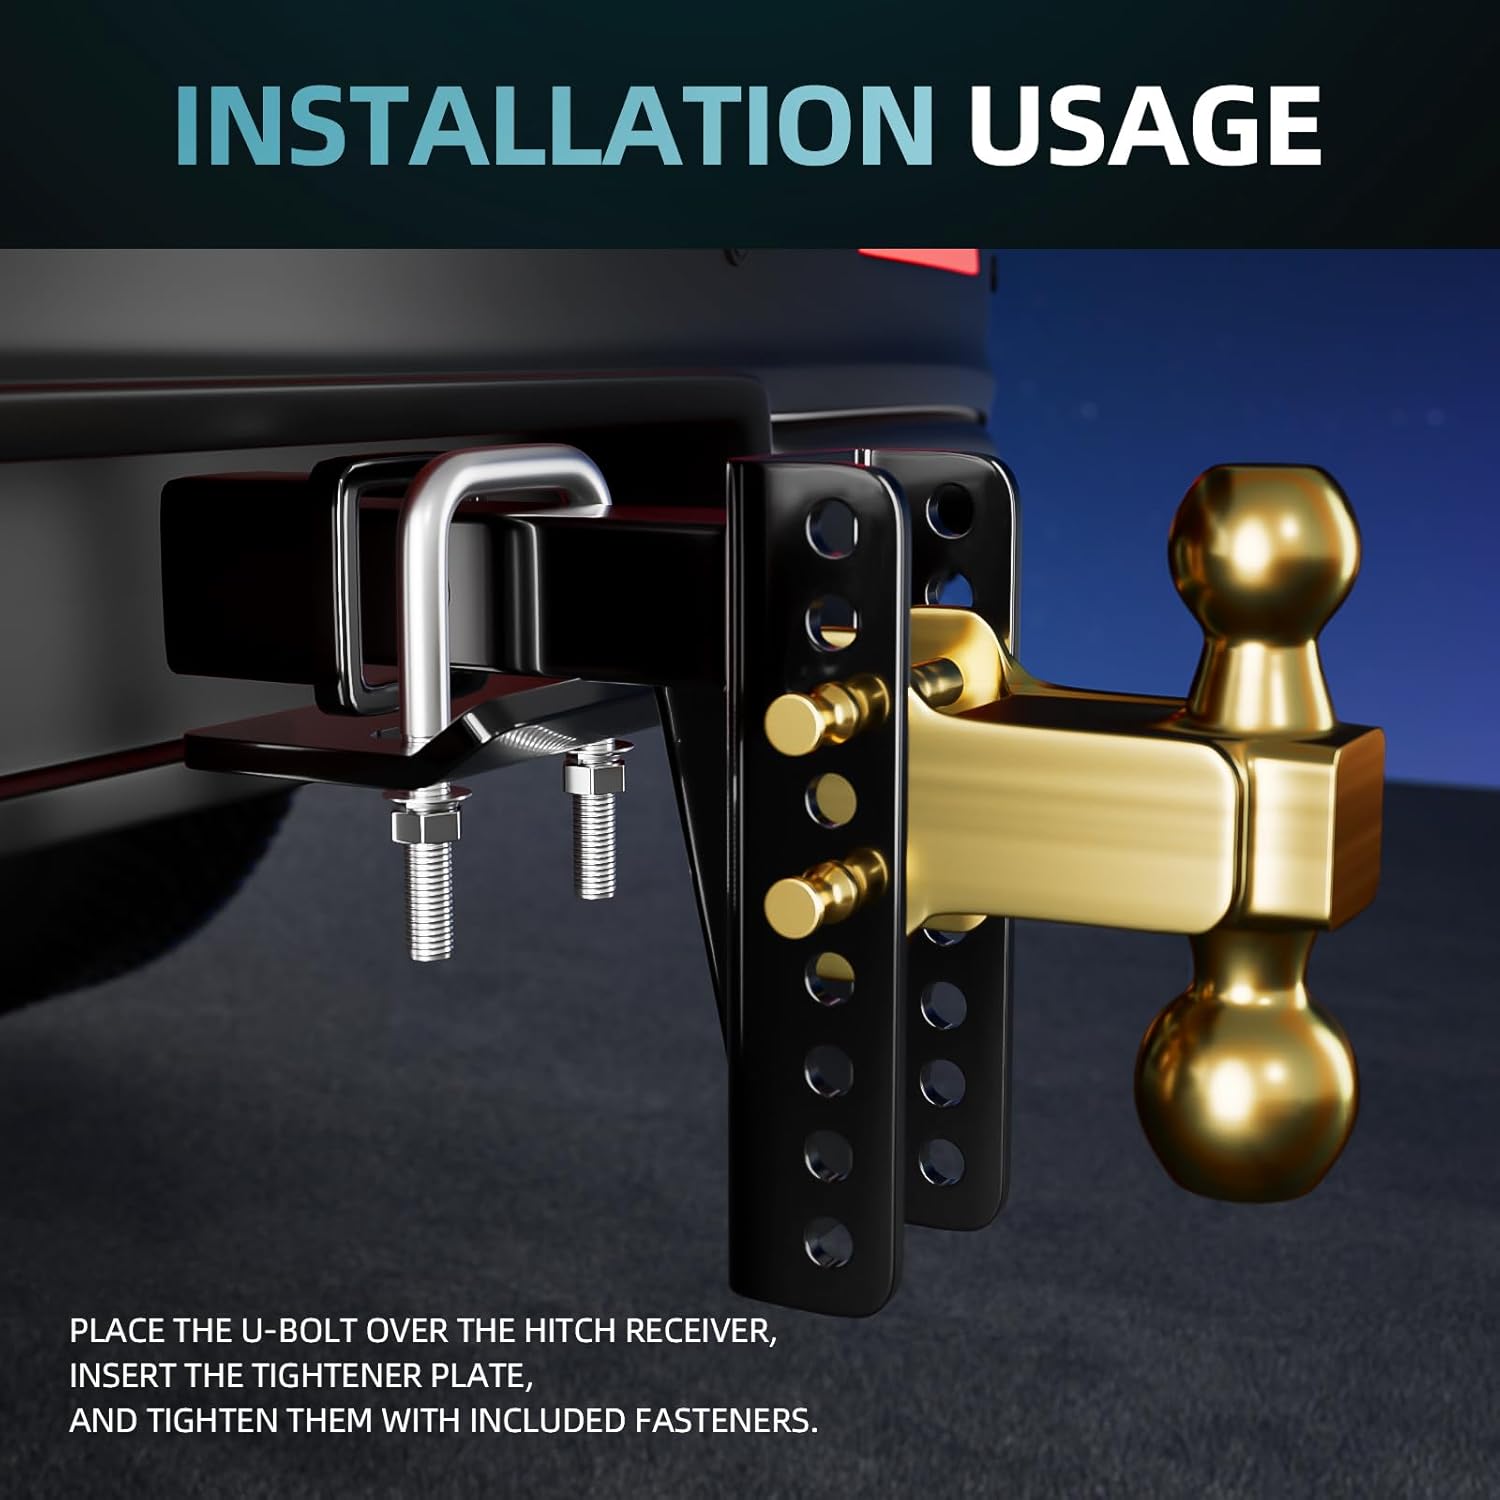
Figure 6: Hitch Tightener Installation Steps

Figure 7: Correct vs. Incorrect Hitch Tightener Installation
Operating Instructions
1. Selecting the Correct Ball Size:
Use the 2-inch hitch ball for trailers with a 2-inch coupler and a maximum gross trailer weight of 14,000 lbs. Use the 2-5/16-inch hitch ball for trailers with a 2-5/16-inch coupler and a maximum gross trailer weight of 25,000 lbs. Always match the hitch ball size to your trailer's coupler size.
2. Connecting the Trailer:
- Ensure the hitch ball is clean and free of debris.
- Position your vehicle so the hitch ball is directly beneath the trailer coupler.
- Lower the trailer coupler onto the hitch ball, ensuring it is fully seated.
- Engage the coupler latch and insert the safety pin or lock to secure the coupler.
- Attach safety chains from the trailer to the vehicle's hitch receiver or frame, crossing them under the coupler.
- Connect any necessary electrical wiring for trailer lights and brakes.
3. Pre-Towing Checklist:
- Verify all connections are secure and properly latched.
- Check trailer lights (running, brake, turn signals) are functioning correctly.
- Ensure trailer brakes (if applicable) are operational.
- Confirm proper tongue weight and load distribution.
- Inspect tires on both the vehicle and trailer for proper inflation and condition.
Maintenance
Regular maintenance ensures the longevity and safe operation of your trailer hitch.
- Inspection: Before each use, visually inspect the hitch for any signs of wear, damage, cracks, or corrosion. Pay close attention to the hitch balls, pins, and receiver connection.
- Cleaning: Clean the hitch balls and receiver opening regularly to remove dirt, grime, and rust. Use a wire brush if necessary.
- Lubrication: Apply a thin layer of grease to the hitch balls to reduce friction and wear between the ball and the trailer coupler.
- Fasteners: Periodically check all bolts and fasteners, including those for the hitch tightener, to ensure they are securely tightened. Re-tighten as needed.
- Storage: When not in use, store the hitch in a dry place to prevent corrosion.
Troubleshooting
1. Hitch Wobble or Rattle:
If you experience excessive movement or noise between the hitch and receiver, ensure the hitch tightener is correctly installed and securely tightened. Refer to "Installing the Hitch Tightener" in the Setup section.
2. Difficulty Connecting Coupler:
Ensure the hitch ball is clean and free of rust or debris. Verify that the trailer coupler is fully open and aligned correctly with the hitch ball. Check for any obstructions or damage to the coupler mechanism.
3. Visible Wear or Damage:
If any part of the hitch shows significant wear, cracks, bending, or severe corrosion, discontinue use immediately. Replace damaged components or the entire hitch as necessary. Do not attempt to repair structural damage.
Warranty Information
For detailed warranty information regarding your CROSSHIP Adjustable Trailer Hitch, please refer to the manufacturer's official website or the warranty card included with your product packaging. Keep your proof of purchase for warranty claims.
Customer Support
If you have any questions, require technical assistance, or need further support regarding your CROSSHIP Adjustable Trailer Hitch, please contact CROSSHIP customer service through their official channels. Contact information can typically be found on the product packaging or the brand's official website.