1. Introduction
This manual provides detailed instructions for the installation, operation, and maintenance of your AUXITO H1 LED Light Bulbs. These bulbs are designed to replace standard H1 halogen bulbs, offering enhanced brightness, a focused beam pattern, and a longer lifespan for improved visibility and driving safety.
2. Product Features
- Compact Design: Features an all-in-one wireless design, mirroring the size of halogen stock bulbs for true plug-and-play installation without additional adapters.
- Optimal Beam Pattern: Utilizes a 1:1 halogen beam design with 360° full illumination and CSP chips for a super focused beam, eliminating dark spots and glare.
- Enhanced Visibility: Emits 6000K white light, providing significantly brighter and clearer vision compared to standard halogen bulbs.
- Extended Lifespan: Constructed with an all-aluminum body and a temperature control circuit system for excellent heat dissipation, extending bulb life to over 50,000 hours.
- Canbus Ready: Built-in intelligent IC driver ensures compatibility with 99% of vehicle systems, preventing errors or flickering.
3. Package Contents
Your package should contain the following items:
- 2 x AUXITO H1 LED Light Bulbs
4. Safety Information
Please read and follow these safety guidelines before installation:
- Ensure your vehicle's engine is off and has cooled down before attempting installation.
- Wear appropriate protective gear, including gloves and eye protection.
- Avoid touching the LED chips directly, as oils from your skin can affect performance and lifespan.
- Do not look directly into the illuminated LED bulb, as it can cause eye strain or damage.
- If you are unsure about any step of the installation process, consult a qualified automotive technician.
5. Installation Guide
The AUXITO H1 LED bulbs are designed for a straightforward, plug-and-play installation. No additional adapters or modifications are typically required.
5.1. Identifying Your Bulb Size
Before installation, confirm that your vehicle uses H1 or H1LL bulbs. You can do this by:
- Checking your vehicle's owner's manual.
- Using an online automotive bulb lookup tool.
- Inspecting your existing halogen bulb for its type marking.

Figure 5.1: Methods for identifying the correct bulb size for your vehicle.
5.2. Installation Steps
- Access the Bulb: Locate the H1 bulb housing in your vehicle. This may require opening the hood and accessing the back of the headlight or fog light assembly.
- Remove Old Bulb: Carefully disconnect the electrical connector from the existing halogen bulb. Then, unclip or twist to remove the old bulb from its housing.
- Insert New LED Bulb: Insert the AUXITO H1 LED bulb into the housing. The non-polarity design means it can be inserted in either orientation. Ensure it is seated firmly.
- Connect Power: Reconnect the electrical connector to the new LED bulb.
- Test Functionality: Turn on your vehicle's lights to ensure the new LED bulbs illuminate correctly. Check for any flickering or error messages on your dashboard.
- Secure Housing: If applicable, replace any dust caps or covers to seal the headlight assembly.

Figure 5.2: Non-polarity design simplifies installation, requiring no adapters.
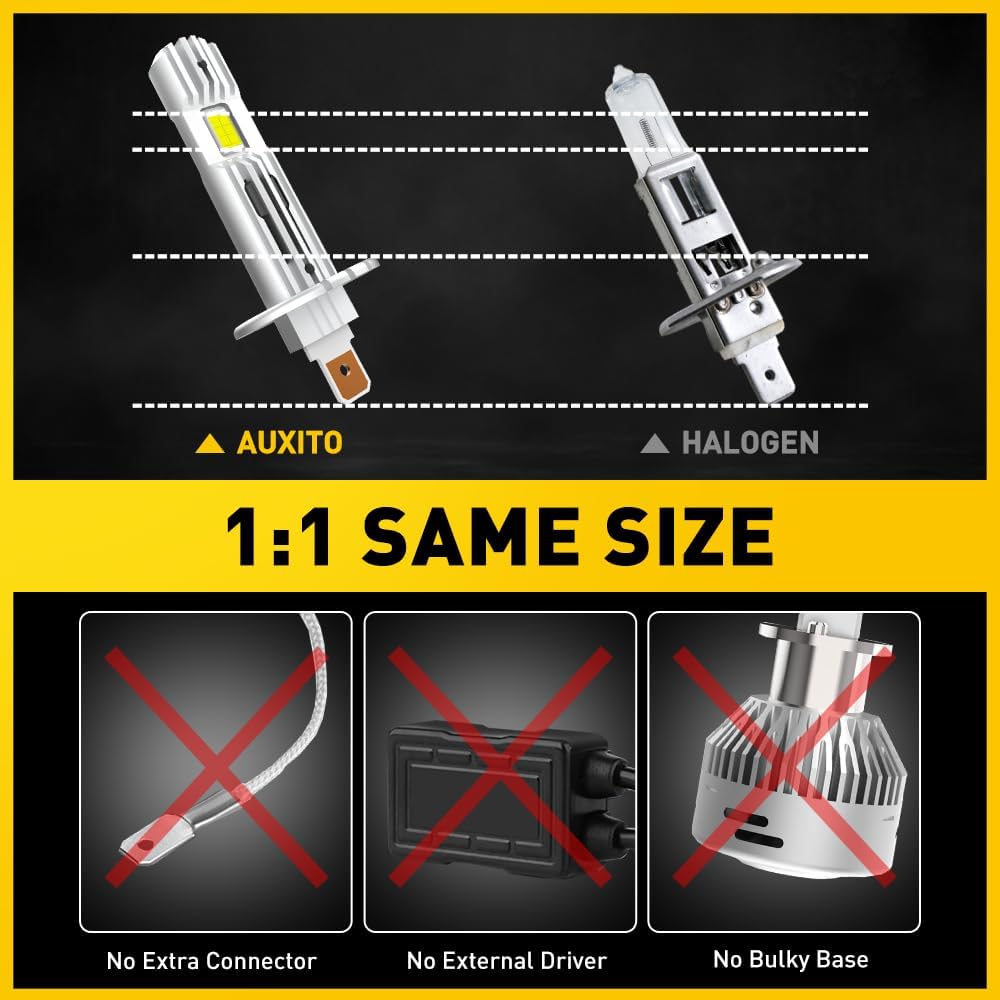
Figure 5.3: The 1:1 mini size ensures direct fitment without additional components.
6. Operation
Once properly installed, your AUXITO H1 LED Light Bulbs will operate automatically with your vehicle's existing lighting controls. The 6000K white light provides a clear and wide illumination pattern, enhancing visibility during nighttime driving conditions.

Figure 6.1: AUXITO LED bulbs provide significantly brighter and farther illumination than halogen bulbs.
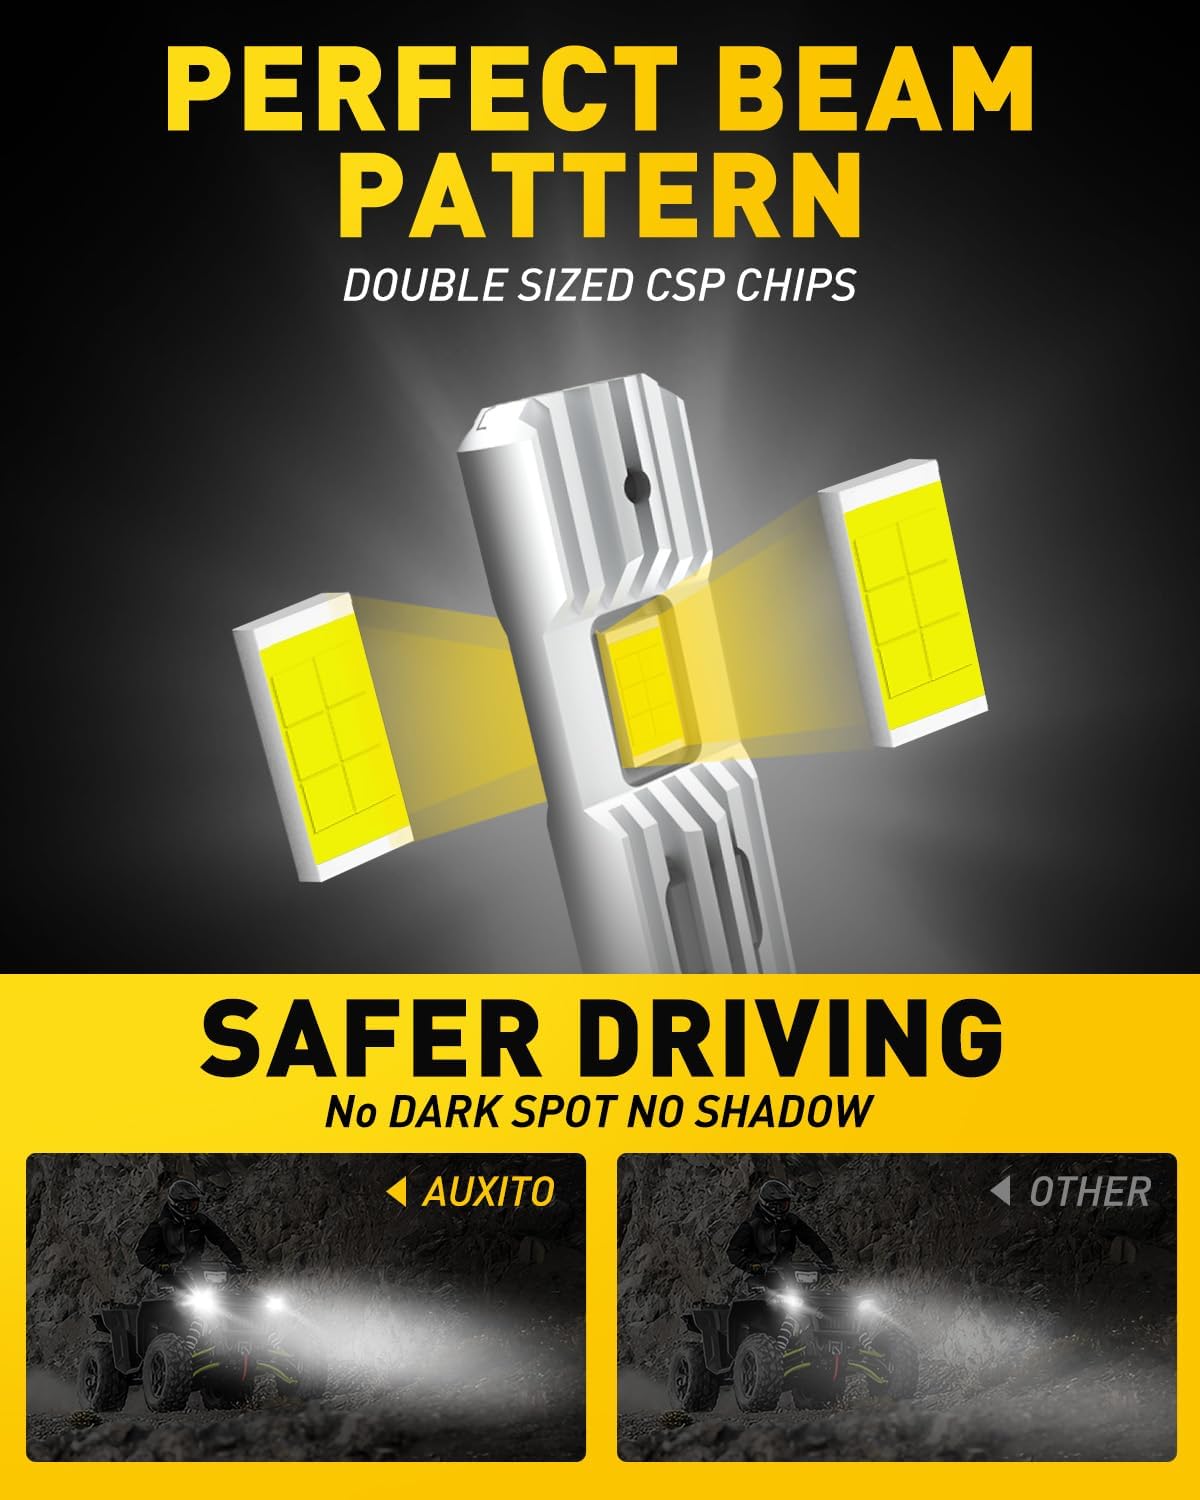
Figure 6.2: The precise beam pattern ensures clear visibility without glare.
7. Troubleshooting
The AUXITO H1 LED bulbs are designed with a built-in intelligent IC driver to be Canbus ready, minimizing common issues. However, if you encounter problems, consider the following:
- Bulb Not Lighting Up: Ensure the electrical connector is securely attached. Due to the non-polarity design, incorrect orientation is unlikely, but re-check connections.
- Flickering or Error Codes: While compatible with 99% of vehicles, some highly sensitive models may still trigger dashboard warnings or cause flickering. For these specific cases, AUXITO offers external Canbus decoders (sold separately) to resolve compatibility issues. Contact AUXITO customer support for assistance.
- Dim Light Output: Verify that the bulb is correctly seated in the housing and not obstructed.

Figure 7.1: Canbus Ready design minimizes common electrical issues.
8. Specifications
| Brand | AUXITO |
| Model | H1 |
| Color Temperature | 6500K (Cool White) |
| Operating Life | Over 50,000 Hours |
| Fit Type | Universal Fit |
| Item Weight | 2.89 ounces |
| Package Dimensions | 3.94 x 3.5 x 1.85 inches |
| Heat Dissipation | All-aluminum body, temperature control circuit system |

Figure 8.1: The advanced cooling system contributes to the extended lifespan.
9. Maintenance
AUXITO H1 LED Light Bulbs are designed for durability and a long operating life, requiring minimal maintenance.
- Cleaning: Periodically inspect the bulb and housing for any accumulation of dirt or debris. Gently clean with a soft, dry cloth if necessary. Do not use abrasive cleaners or solvents.
- Inspection: Occasionally check the electrical connections to ensure they remain secure.
- Replacement: With a lifespan exceeding 50,000 hours, regular replacement is not anticipated. If a bulb fails prematurely, refer to the troubleshooting section or contact customer support.
10. Warranty and Support
For technical assistance, warranty inquiries, or to purchase compatible accessories like Canbus decoders, please contact AUXITO customer support through their official website or the retailer where the product was purchased. Please have your purchase information and product model number (H1) ready when contacting support.


