1. Safety Information
Always read and understand all instructions before operating this digital torque wrench. Failure to follow safety guidelines may result in injury or damage to the tool or workpiece.
- Wear appropriate personal protective equipment (PPE), including safety glasses.
- Ensure the workpiece is stable and secure before applying torque.
- Do not exceed the maximum torque value specified for this tool.
- Keep the tool clean and dry. Store in a safe place away from moisture and extreme temperatures.
2. Product Overview
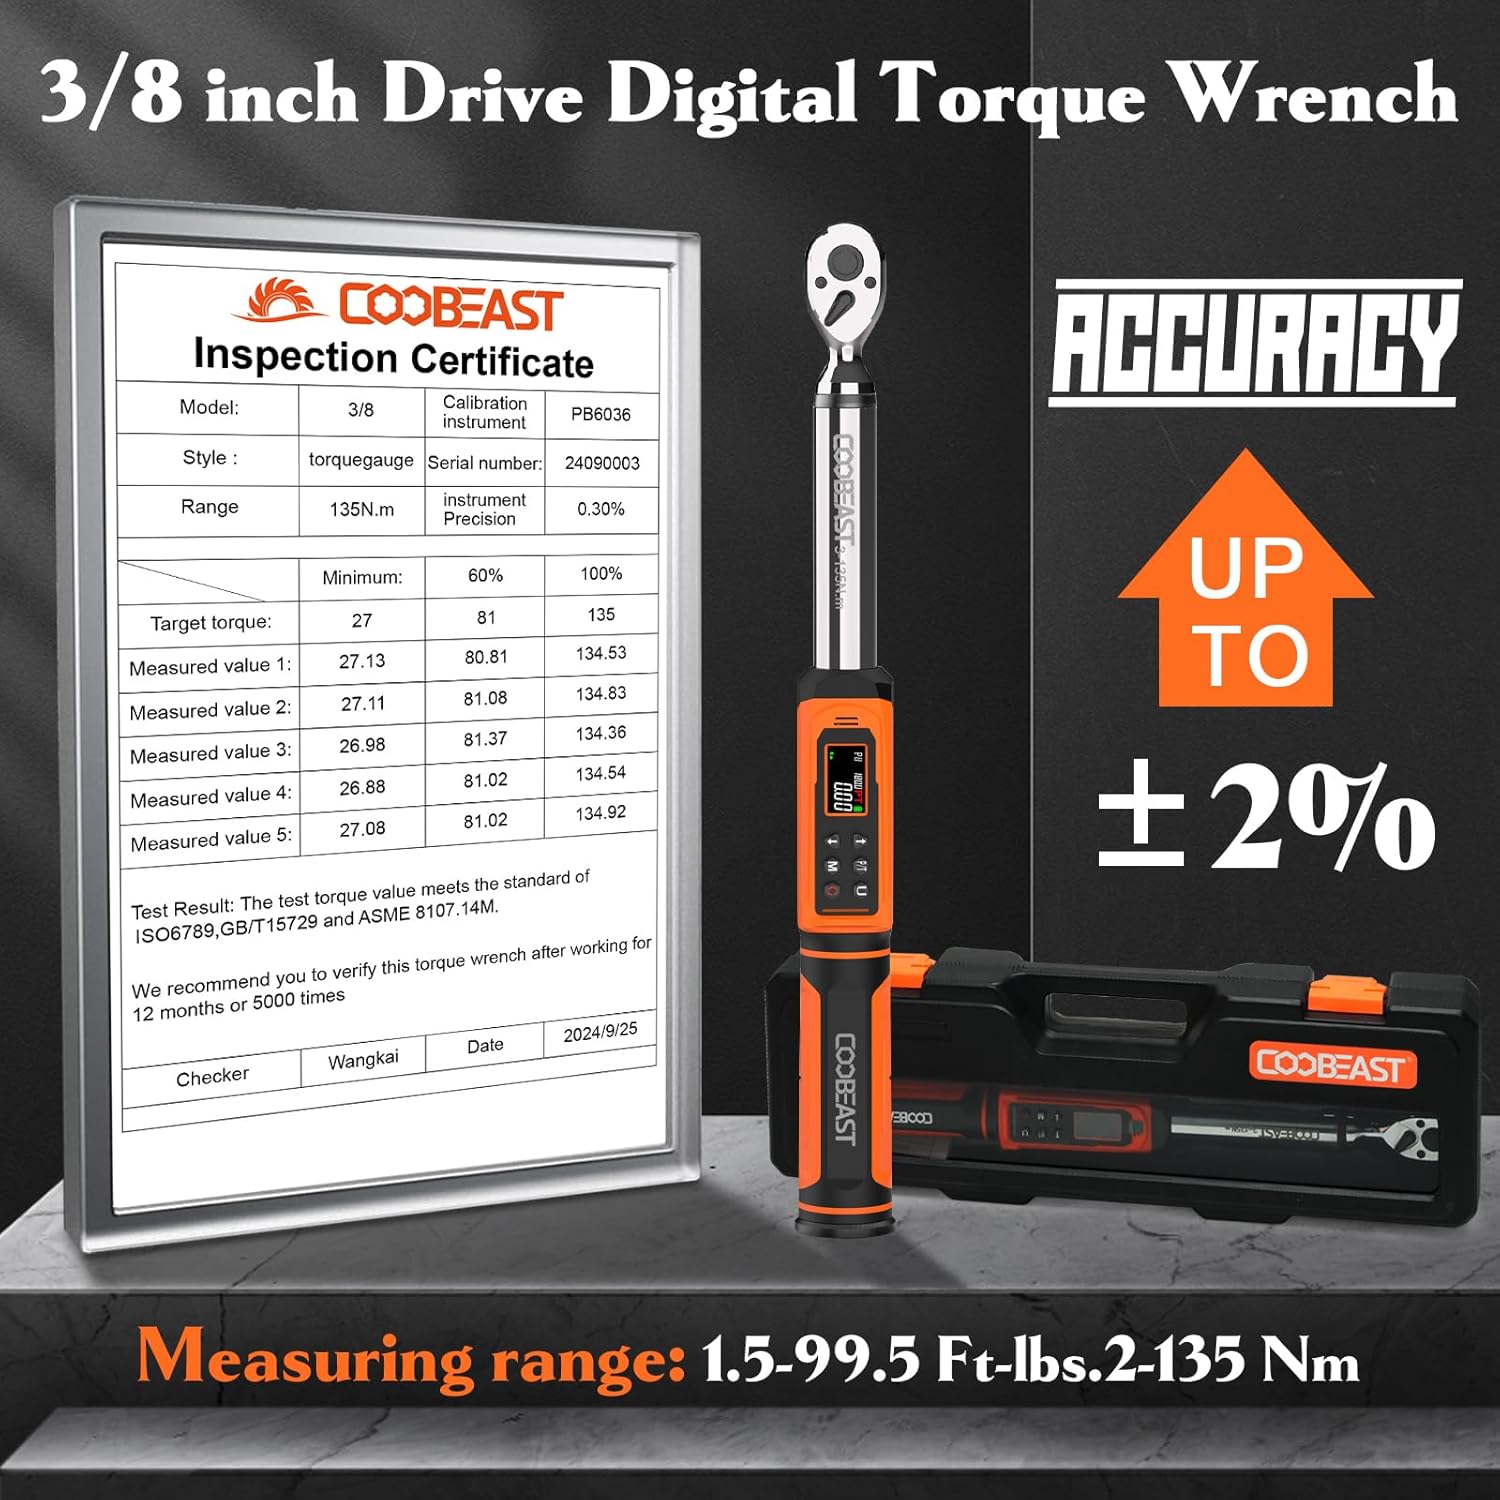
The coobeast 3/8-inch Digital Torque Wrench provides precise torque measurement with advanced features for various applications, including automotive, motorcycle, and bicycle maintenance.
Key Features:
- High Accuracy: ±2% accuracy in clockwise direction, tested over 20,000 cycles.
- Dual-Direction Ratchet Head: Allows for effortless accessory changes with a quick-release design.
- Multiple Measurement Units: Supports ft-lbs, in-lbs, Nm, kg-cm, and kg-m.
- Preset Values & Data Storage: 9 groups of preset values and 500 groups of data storage.
- Large Color LCD Display: Easy to read, even in dim environments, with high backlight.
- Audible & Visual Alerts: Vibrates, buzzes, and uses LED indicators (green at 85-90%, red at 100%) to alert when approaching or reaching the preset torque.
- Ergonomic Design: Soft grip handle for comfort and secure control.
Product Components:


3. Setup
Battery Installation:
The digital torque wrench requires batteries for operation. Ensure correct polarity during installation.
- Locate the battery compartment, typically at the base of the handle.
- Insert the batteries, ensuring the positive (+) terminal is oriented correctly, usually facing upwards or as indicated by the compartment markings.
- Close the battery compartment securely.
Power On:
To power on the device, briefly press the 'C' (Power) button.
4. Operating Instructions
4.1. Unit Selection
The wrench supports five units of measure. To switch between units (ft-lbs, in-lbs, Nm, kg-cm, kg-m), press the 'U' button.

4.2. Mode Selection (Peak/Track)
The wrench offers two reading modes: Peak mode and Track mode. Peak mode records the highest torque applied, displaying it until cleared, while Track mode continuously updates the torque reading as it's applied.
- To switch between modes, long press the 'U' button.

4.3. Setting Torque Value
Use the up and down arrow keys to adjust the desired torque value. The 'M' key can be used to preset operational values (M0-M9 for 10 memory stores).
4.4. Applying Torque
As you apply force, the wrench will provide visual and audible alerts:
- Green LED light illuminates at 85%-90% of the preset torque.
- Red LED light illuminates and the wrench vibrates and buzzes at 100% of the preset torque.

4.5. Accessory Installation and Removal
The quick-release design allows for easy attachment and detachment of sockets and other accessories.
- To install an accessory, press the quick-release button on the ratchet head and insert the accessory. Release the button to secure.
- To remove an accessory, press the quick-release button and pull the accessory out.
- The ratchet head can be switched to change the direction of force application (clockwise/counter-clockwise).
5. Maintenance
Cleaning and Storage:
- Wipe the wrench clean with a soft, dry cloth after each use. Do not use abrasive cleaners or solvents.
- For prolonged periods of non-use, remove the batteries to prevent leakage and damage to the electronic components.
- Store the torque wrench in its protective case in a dry, cool place.
Calibration:
To maintain accuracy, it is recommended to verify the calibration of this torque wrench after working for 12 months or 5000 times of use.
6. Troubleshooting
If you encounter issues with your digital torque wrench, please refer to the following common solutions:
- No Power/Display: Check battery installation and ensure batteries are not depleted. Replace if necessary.
- Inaccurate Readings: Ensure the wrench is properly calibrated. Avoid dropping or subjecting the tool to harsh impacts.
- Buttons Unresponsive: Ensure the screen is not locked. Long press the 'M' key to unlock if necessary.
7. Specifications
| Feature | Specification |
|---|---|
| Model Number | 3-135NM |
| Drive Size | 3/8-inch |
| Torque Range | 1.5-99.5 Ft-lbs / 2-135 Nm |
| Accuracy | ±2% (Clockwise) |
| Measurement Units | ft-lbs, in-lbs, Nm, kg-cm, kg-m |
| Operation Mode | Battery |
| Material | Chrome Vanadium Steel |
| Finish Type | Polished |
| Item Weight | 1.5 kg |
| Color | Orange |
8. Warranty and Support
Warranty Information:
This product is designed for durability and precision. For optimal performance, it is recommended to verify the torque wrench's calibration after 12 months or 5000 uses, whichever comes first. Please retain your proof of purchase for any warranty claims.
Customer Support:
For technical assistance, troubleshooting, or warranty inquiries, please contact coobeast customer support through the retailer's platform or the official coobeast website.