1. Introduction
This manual provides essential information for the safe operation, assembly, maintenance, and troubleshooting of your MAXLANDER 15-Amp Electric Wood Chipper Shredder Mulcher, Model WR3002-2500-15. Please read this manual thoroughly before operating the machine to ensure proper use and to prevent injury or damage. Keep this manual for future reference.
The MAXLANDER Electric Wood Chipper is designed for home gardening tasks, efficiently processing branches up to 1.8 inches (45mm) in diameter. It features a powerful 15-amp motor, a 50L collection bin, and a 15:1 reduction ratio for effective mulching and composting of yard waste.

Figure 1: MAXLANDER Electric Wood Chipper Shredder Mulcher
2. Safety Information
Operating power tools requires careful attention to safety. Always follow these guidelines to minimize risks:
- Personal Protective Equipment (PPE): Always wear safety glasses, hearing protection, gloves, and sturdy footwear when operating the chipper.
- Clear Work Area: Ensure the operating area is clear of bystanders, children, and pets. Maintain a safe distance from the machine during operation.
- Stable Surface: Operate the chipper on a firm, level surface to prevent tipping.
- Power Connection: Use a grounded extension cord suitable for outdoor use and the machine's power requirements. Ensure the cord is free from damage.
- Collection Bin: The chipper will not start if the collection bin is not correctly installed. This is a safety feature to prevent accidental injury from flying debris. Ensure the bin is securely in place before starting.
- Safety Knob: A safety knob is located under the handle. Before starting the chipper, confirm that this knob is fully tightened. The machine will not operate if it is loose.
- Feeding Material: Only feed dry branches and dead tree limbs. Avoid feeding wet material, leaves, or other soft debris that can cause clogging. Do not overfeed the machine.
- Anti-Clogging Design: While designed to prevent clogs, always monitor the discharge chute. If a clog occurs, immediately turn off and unplug the machine before attempting to clear it.
- Unplug When Not in Use: Always unplug the chipper from the power source before performing any adjustments, maintenance, cleaning, or when leaving the machine unattended.

Figure 2: Safety Locking Button

Figure 3: Safety Lock Mechanism
3. Product Overview and Components
Familiarize yourself with the main components of your MAXLANDER Wood Chipper:
- Motor Housing: Contains the 15-amp electric motor.
- Feeding Hopper: The opening where branches are inserted.
- Cutting Blades: Internal blades responsible for shredding material.
- Discharge Chute: Where processed material exits.
- Collection Bin (50L): Gathers shredded material.
- Frame with Wheels: Provides stability and mobility.
- Safety Knob: Ensures the machine is securely assembled before operation.
- Power Switch: On/Off control.
- Plunger: Used to guide branches into the cutting mechanism.
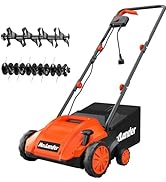
Figure 4: Key Components
4. Setup
Follow these steps to set up your wood chipper:
- Unpacking: Carefully remove all components from the packaging. Check for any damage during transit.
- Assembly: Assemble the frame and attach the wheels. Ensure all bolts and fasteners are securely tightened.
- Install Collection Bin: Slide the 50L collection bin into its designated slot beneath the discharge chute. Ensure it clicks securely into place. The machine will not start without the bin properly installed.
- Positioning: Place the chipper on a stable, level surface in a clear outdoor area.
- Power Connection: Connect the chipper to a suitable outdoor-rated extension cord, ensuring the cord is in good condition and rated for 15 amps. Plug the extension cord into a grounded outlet.

Figure 5: Easy Movement with Wheels
5. Operating Instructions
Before each use, perform a quick safety check:
- Verify the collection bin is correctly installed.
- Ensure the safety knob under the handle is fully tightened.
- Confirm the work area is clear and you are wearing appropriate PPE.
- Starting the Chipper: Once all safety checks are complete, press the power switch to the 'ON' position. The motor will start.
- Feeding Material: Carefully feed branches into the feeding hopper. The maximum recommended branch diameter is 1.8 inches (45mm). Feed material slowly and steadily.
- Using the Plunger: For shorter or stubborn pieces, use the provided plunger to guide the material into the cutting mechanism. Never use your hands or feet to push material into the hopper.
- Monitor Collection Bin: Periodically check the collection bin and empty it when full to prevent clogging of the discharge chute.
- Stopping the Chipper: When finished or if a problem occurs, press the power switch to the 'OFF' position. Allow the blades to come to a complete stop before unplugging the machine.

Figure 6: Operating the Chipper

Figure 7: Feeding Branches

Figure 8: Using the Plunger
6. Maintenance
Regular maintenance ensures the longevity and safe operation of your chipper. Always unplug the machine before performing any maintenance.
- Cleaning: After each use, clean the exterior of the machine with a damp cloth. Clear any debris from the feeding hopper, discharge chute, and around the motor vents.
- Blade Inspection: Periodically inspect the cutting blades for sharpness and damage. Dull or damaged blades can reduce performance and increase motor strain. Refer to the manufacturer's guidelines for blade replacement.
- Collection Bin: Keep the collection bin clean and free of compacted debris.
- Storage: Store the chipper in a dry, secure location, away from moisture and extreme temperatures. Ensure the power cord is neatly coiled and stored.
7. Troubleshooting
If you encounter issues with your chipper, refer to the following table:
| Problem | Possible Cause | Solution |
|---|---|---|
| Chipper does not start | 1. Collection bin not installed correctly. 2. Safety knob is loose. 3. Power cord not plugged in or damaged. 4. Overload protection activated. | 1. Ensure collection bin is securely in place. 2. Tighten the safety knob clockwise. 3. Check power connection and cord for damage. Reset circuit breaker if tripped. 4. Unplug, wait a few minutes, then restart. Reduce load. |
| Material is not shredding efficiently or machine clogs | 1. Blades are dull or damaged. 2. Feeding too much material too quickly. 3. Material is too wet or soft. 4. Discharge chute is blocked. | 1. Inspect and replace blades if necessary (unplug first). 2. Feed material slowly and steadily. 3. Only feed dry, woody material. 4. Turn off and unplug the machine, then carefully clear the blockage. |
| Excessive vibration or noise | 1. Unbalanced blades. 2. Loose components. 3. Foreign object inside. | 1. Inspect blades for damage or imbalance. Replace if needed. 2. Check all fasteners and tighten as required. 3. Turn off and unplug, then inspect for and remove any foreign objects. |
8. Specifications
Detailed specifications for the MAXLANDER Electric Wood Chipper Shredder Mulcher:
| Feature | Specification |
|---|---|
| Model Number | WR3002-2500-15 |
| Power | 15 Amps |
| Cutting Diameter (Max) | 1.8 inches (45mm) |
| Collection Bin Capacity | 50 Liters (13 Gallons) |
| Reduction Ratio | 15:1 |
| Item Weight | 28.3 pounds |
| Product Dimensions | 17.5 x 36.8 x 22 inches |
| Speed | 4000 RPM |

Figure 9: Product Dimensions and Specifications
9. Warranty and Support
For warranty information and customer support, please refer to the documentation included with your product or contact MAXLANDER directly. Keep your purchase receipt as proof of purchase for warranty claims.
For any questions or assistance, please visit the official MAXLANDER website or contact their customer service department.