1. Introduction
Thank you for choosing the coobeast 1/2-inch Drive Digital Torque Wrench. This electronic torque wrench is designed for precise torque application in various automotive, motorcycle, and industrial repair tasks. It offers high accuracy, multiple measurement units, and advanced features such as preset values, peak/track modes, and data storage. Please read this manual thoroughly before use to ensure proper operation and to maximize the lifespan of your tool.

Image 1.1: The coobeast 1/2-inch Drive Digital Torque Wrench and its protective storage case.
2. Safety Information
Always observe the following safety precautions to prevent injury or damage to the tool and workpiece:
- Wear appropriate personal protective equipment, such as safety glasses, when operating the torque wrench.
- Ensure the workpiece is securely fastened before applying torque.
- Do not exceed 120% of the maximum torque value specified for this tool. Overloading can cause sensor damage and inaccurate readings.
- Keep the tool clean and dry. Avoid exposure to moisture, dust, or corrosive substances.
- Do not use the torque wrench as a pry bar or hammer.
- For prolonged periods of non-use, remove the batteries to prevent leakage and damage.
- Store the torque wrench in its protective case when not in use to prevent damage.
3. Product Overview and Components
Familiarize yourself with the main components and features of your digital torque wrench:
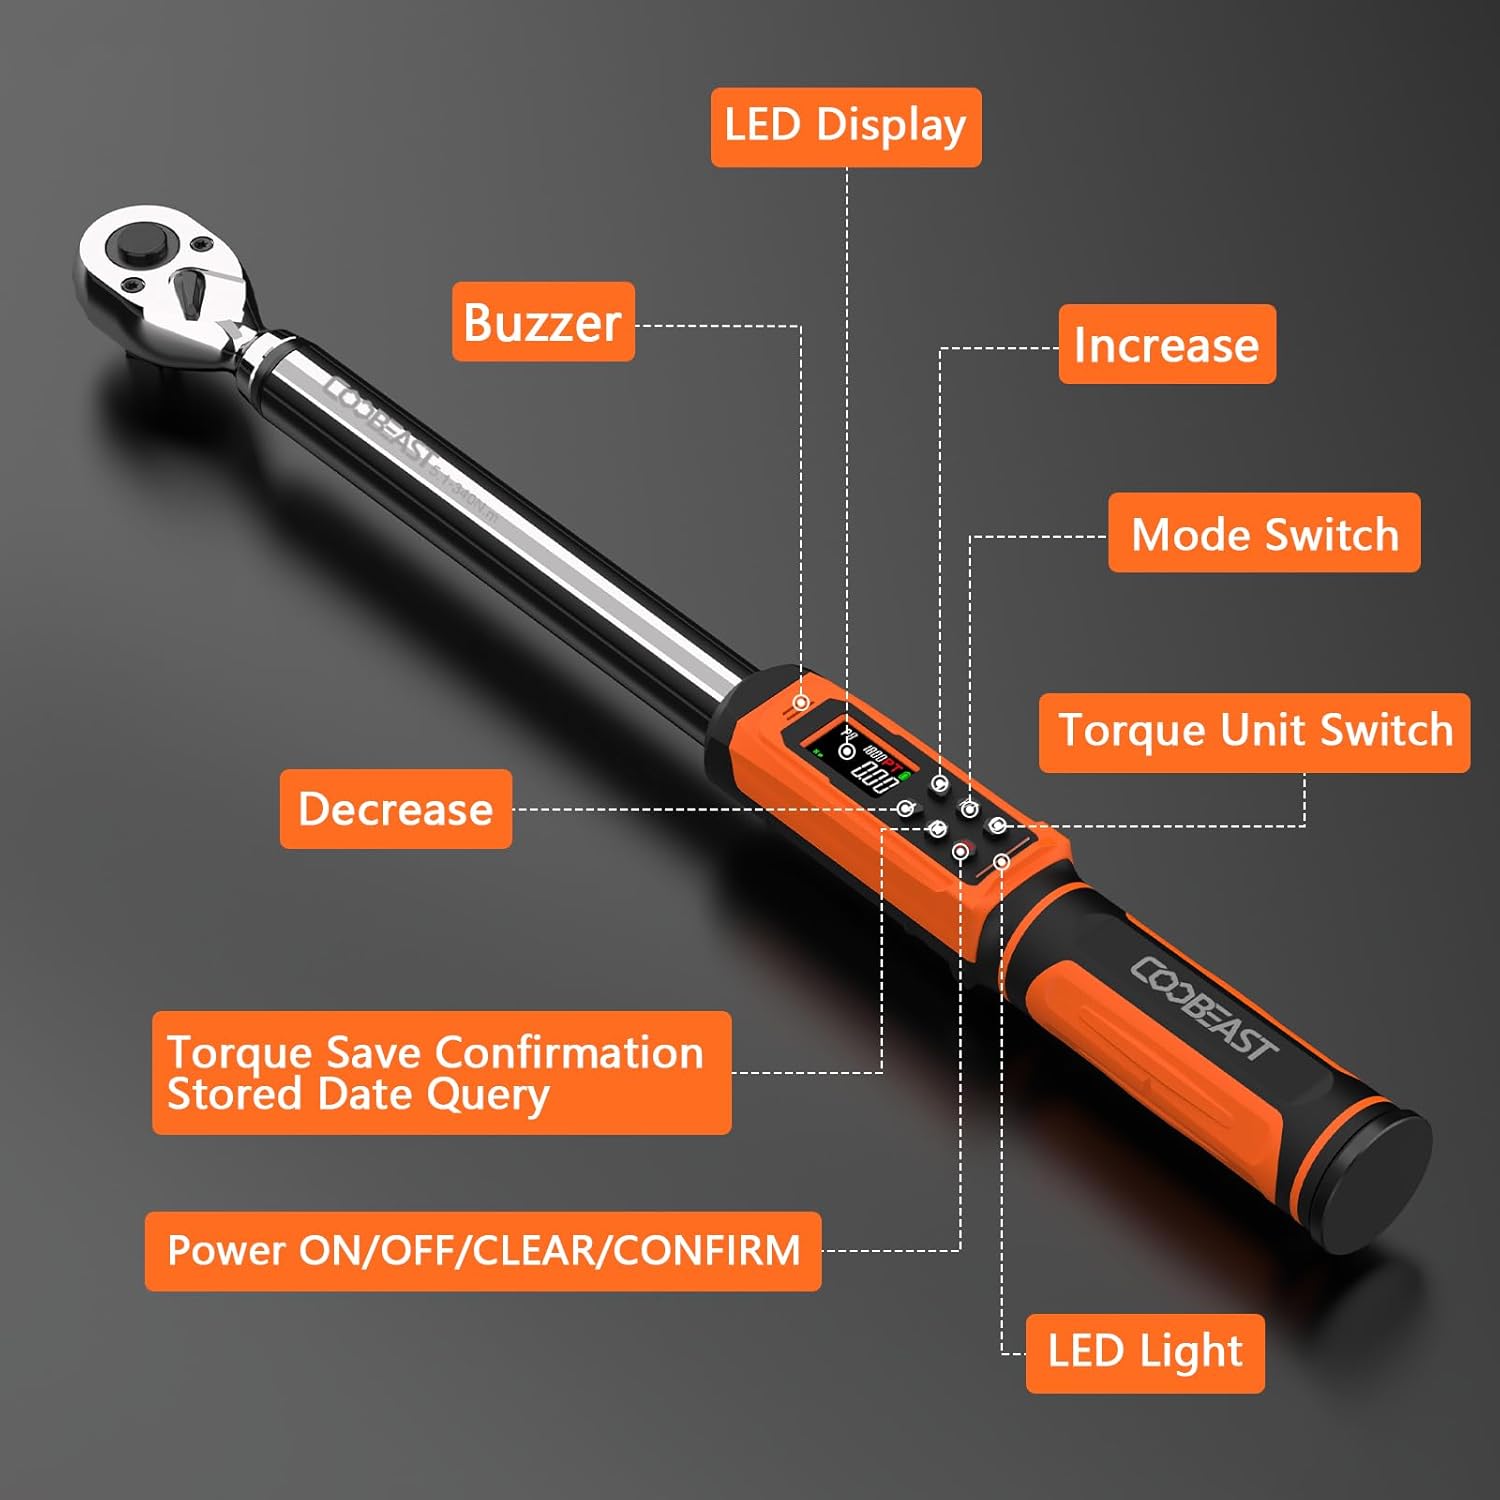
Image 3.1: Key components of the digital torque wrench, including the LED display, buzzer, LED light, and control buttons.
- LED Display: Shows torque values, units, and mode.
- Buzzer: Provides audible alerts when approaching or reaching target torque.
- LED Light: Visual indicator for torque status (green for 85-90%, red for 100%).
- Increase Button: Adjusts values upwards.
- Decrease Button: Adjusts values downwards.
- Mode Switch (M): Toggles between Peak and Track modes, and accesses preset values.
- Torque Unit Switch (U): Changes measurement units (ft-lbs, in-lbs, Nm, kg-cm, kg-m).
- Power ON/OFF/CLEAR/CONFIRM (C) Button: Powers the device, clears data, and confirms settings.
- Quick-Release Head: Allows for effortless accessory changes.
- Reversible Ratchet Head: Enables use in both clockwise and counter-clockwise directions.
- Non-slip Handle: Ergonomically designed for comfort and secure grip.

Image 3.2: Detailed view of the quick-release mechanism and reversible ratchet head.
4. Setup
4.1 Battery Installation
The torque wrench requires two AA batteries (included). Follow these steps to install them:
- Locate the battery cover at the base of the handle.
- Rotate the battery cover counter-clockwise to open it.
- Insert two AA batteries, ensuring correct polarity (+/-).
- Replace the battery cover and rotate it clockwise to secure.
- Press the 'C' button to power on the device.

Image 4.1: Step-by-step guide for installing AA batteries into the torque wrench handle.
5. Operating Instructions
5.1 Power On/Off
- To power on: Press the C button.
- To power off: Press and hold the C button for a few seconds until the display turns off. The wrench will also automatically power off after a period of inactivity.
5.2 Selecting Measurement Units
The wrench supports five units of measure: ft-lbs, in-lbs, Nm, kg-cm, and kg-m.
- Press the U button to cycle through the available units. The selected unit will be displayed on the screen.

Image 5.1: Display examples for different torque measurement units.
5.3 Setting Torque Values (Preset Mode)
The wrench allows for setting up to 9 groups of preset torque values.
- Press the M button to enter preset mode (indicated by 'P' on the display, e.g., P1, P2).
- Use the Up and Down arrow buttons to select the desired preset group (P1-P9).
- Press the C button to confirm the selected preset group.
- Use the Up and Down arrow buttons to adjust the target torque value for that preset.
- Press the C button again to save the value and exit setting mode.
5.4 Operating Modes: Peak and Track
The wrench offers two operating modes:
- Track Mode: Displays the torque value in real-time as it is being applied.
- Peak Mode: Captures and displays the maximum torque value achieved during the application.
To switch between modes, press the M button until the desired mode (Track or Peak) is indicated on the display.

Image 5.2: Visual representation of Track Mode (real-time display) and Peak Mode (maximum value display).
5.5 Applying Torque
Once your desired torque value and unit are set:
- Attach the appropriate socket or accessory to the quick-release head.
- Place the wrench onto the fastener.
- Apply steady, smooth force. The display will show the real-time torque (in Track mode) or the peak torque (in Peak mode).
- As you approach the preset torque value, the wrench will provide visual and audible alerts:
- Green LED: Illuminates when 85%-90% of the target torque is reached.
- Red LED & Buzzer: Activates when 100% of the target torque is reached.
- Stop applying force immediately when the red LED illuminates and the buzzer sounds to avoid over-torquing.

Image 5.3: Visual alerts (green and red LEDs) indicating torque progression.
5.6 Data Storage and Recall
The wrench can store up to 500 groups of data. To check historical data:
- In operating mode, press and hold the M button to enter data query mode.
- Use the Up and Down arrow buttons to scroll through stored data records.
- Press the C button to exit data query mode.
- To clear all stored data, press and hold the C button while in data query mode until "CLR" appears on the display.
6. Maintenance
- Cleaning: Wipe the wrench with a clean, dry cloth after each use. Do not use abrasive cleaners or solvents.
- Storage: Store the wrench in its original protective case in a dry, cool place, away from direct sunlight and extreme temperatures.
- Battery Care: Remove batteries if the wrench will not be used for an extended period to prevent corrosion. Replace batteries when the low battery indicator appears on the display.
- Calibration: For optimal accuracy, it is recommended to have the torque wrench calibrated periodically, especially after 12 months or 5000 uses.
7. Troubleshooting
| Problem | Possible Cause | Solution |
|---|---|---|
| Wrench does not power on. | Dead or incorrectly installed batteries. | Check battery polarity. Replace with new AA batteries. |
| Inaccurate torque readings. |
|
|
| Buzzer/LED alerts not working. | Low battery or internal malfunction. | Replace batteries. If problem persists, contact customer support. |
| Display shows "ERO" or error message. | Overload condition detected. | Reduce applied force. Do not exceed 120% of the maximum torque value. |
8. Specifications
| Feature | Detail |
|---|---|
| Model | 6-340NM |
| Drive Size | 1/2-inch |
| Torque Range | 6-340 Nm (3.76-250.8 Ft.lbs) |
| Accuracy | ±2% (clockwise) |
| Measurement Units | ft-lbs, in-lbs, Nm, kg-cm, kg-m |
| Operating Modes | Peak, Track |
| Data Storage | Up to 500 records |
| Preset Values | 9 groups |
| Power Source | 2 x AA Batteries (included) |
| Material | Chrome Vanadium Steel |
| Item Weight | 4.4 Pounds |
| Dimensions | Approx. 560 mm (22 inches) length |

Image 8.1: The wrench is tested for accuracy, achieving ±2% in clockwise direction.
9. Warranty and Support
For warranty information, technical support, or service inquiries, please refer to the contact information provided with your purchase or visit the official coobeast website. Keep your purchase receipt as proof of purchase for warranty claims.
Manufacturer: coobeast
Part Number: 24090004


