G-MARK DGNOG R4-PRO (Studio 6)
G-MARK DGNOG R4-PRO 4-Channel Audio Mixer (Studio 6 Series) Instruction Manual
Model: DGNOG R4-PRO (Studio 6) | Brand: G-MARK
1. Safety Instructions
Please read and understand all safety instructions before operating this device. Keep this manual for future reference.
- Power Source: Use only the specified 5V power supply. Ensure the power adapter is compatible with your local power grid.
- Water and Moisture: Do not expose this device to rain, moisture, or any liquids. Avoid placing objects filled with liquids on the device.
- Heat: Keep the device away from heat sources such as radiators, heat registers, stoves, or other heat-producing appliances.
- Ventilation: Ensure proper ventilation. Do not block any ventilation openings.
- Cleaning: Unplug the device before cleaning. Use a dry, soft cloth. Do not use liquid cleaners or aerosol cleaners.
- Servicing: Do not attempt to service this device yourself. Refer all servicing to qualified service personnel.
- Placement: Place the device on a stable, flat surface to prevent damage from falling.
2. Package Contents
Verify that all items listed below are included in your package:
- 1 x G-MARK DGNOG R4-PRO 4-Channel Mixer
- 2 x Handheld Wireless Microphones
- 2 x USB Charging Cables (for microphones)
- 2 x Microphone Protection Rings
- 1 x USB-A to USB-C Power Cable (for mixer)
- 1 x 3.5mm to Dual RCA Audio Cable
- 1 x User Manual (this document)
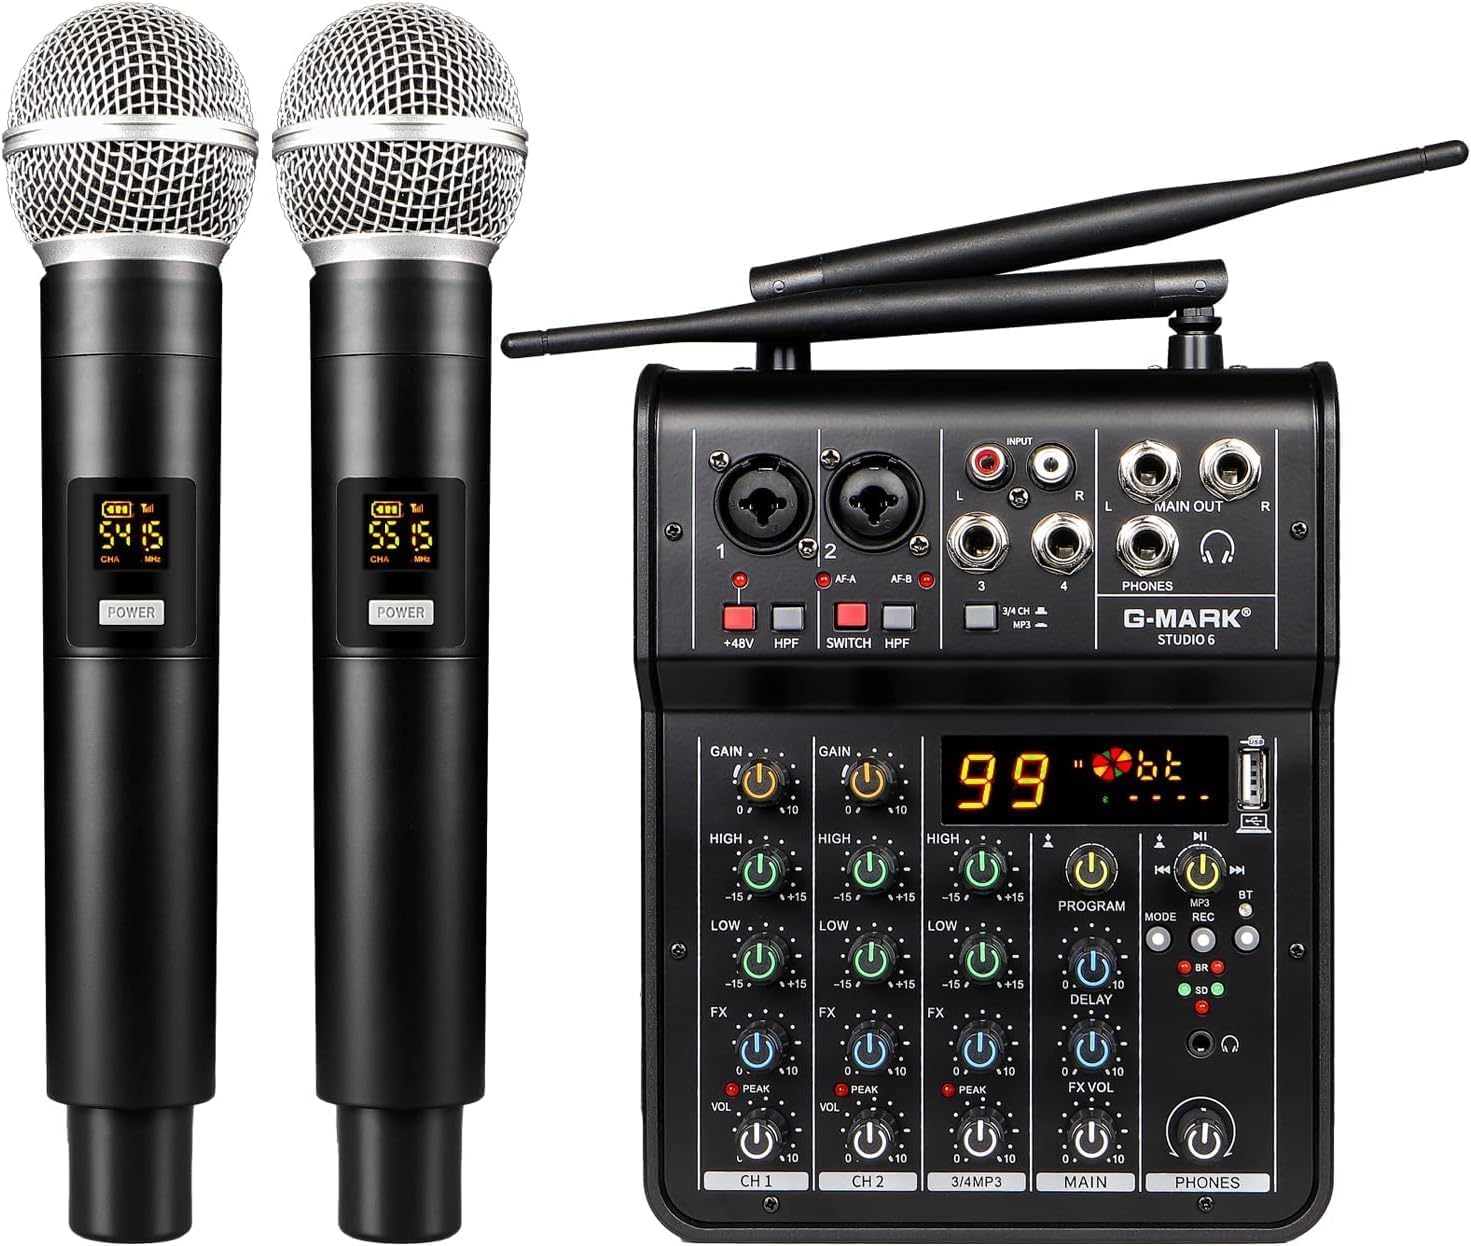
Image: The G-MARK DGNOG R4-PRO 4-Channel Audio Mixer, accompanied by two wireless microphones, cables, and microphone accessories.
3. Product Overview
3.1 Mixer Controls and Interfaces
The DGNOG R4-PRO mixer features a comprehensive set of controls for managing audio inputs, outputs, and effects. Familiarize yourself with the layout:

Image: A close-up of the mixer's control surface, highlighting the XLR/AUX 6.5 interface, input interface, main output (L/R), 48V/HPF/Switch function buttons, individual channel effect adjustment knobs, USB/MP3 play controls, REC/MODE switch button, and 3.5mm earphone interface/volume knob.
- MIC/LINE 1 & 2 Inputs: Combo XLR/6.35mm jacks for microphones or line-level instruments.
- PAD Button: Attenuates input signal by -20dB for high-level sources.
- +48V Phantom Power: Supplies power to condenser microphones. Activate via the dedicated button.
- UHF Wireless Microphone Receiver: Built-in receiver for the included wireless microphones. Indicators show connection status (A/B).
- Gain Knobs: Adjust input sensitivity for each channel.
- EQ Controls (HIGH, MID, LOW): Three-band equalizer for tone shaping on each channel.
- FX Knobs: Control the amount of effect (e.g., echo/reverb) applied to each channel.
- Level Faders: Adjust the volume of individual channels.
- Digital Audio Player: USB port for MP3 playback from flash drives and Bluetooth connectivity. Includes play/pause, skip, and mode buttons.
- Main Output (L/R): 6.35mm jacks for connecting to main speakers or amplifiers.
- REC Output (L/R): RCA jacks for connecting to a recording device.
- 2-TK Input (L/R): RCA jacks for connecting external audio sources (e.g., CD player).
- AUX Input: 3.5mm jack for connecting external audio devices like smartphones.
- Phones Output: 3.5mm jack for headphone monitoring with dedicated volume control.
3.2 Wireless Microphones
The mixer includes two high-quality UHF wireless microphones designed for clear vocal reproduction.

Image: A close-up of the wireless microphone, illustrating its cardioid directional pickup for noise reduction, durable metallic mesh head, and an HD screen displaying functional parameters like channel and battery level.
- Cardioid Directional Pickup: Effectively reduces ambient noise and highlights the human voice.
- Metallic Material: Enhances microphone durability.
- High Sensitivity: Easily captures natural and balanced sound.
- Adjustable Frequency: Allows selection from 15 groups of channels to avoid interference.
- Power: Each microphone requires 2 AA batteries (not included).
4. Setup
4.1 Power Connection
Connect the provided USB-A to USB-C power cable to the 5V power input on the mixer and plug the USB-A end into a compatible USB power adapter (not included) or a computer USB port. The mixer will power on automatically.
4.2 Microphone Connection
The mixer supports both wired and wireless microphones.
- Wireless Microphones: Insert 2 AA batteries into each wireless microphone. Turn on the microphones. The mixer's UHF indicators (A/B) will light up when connected.
- Wired Microphones: Connect XLR or 6.35mm wired microphones to the MIC/LINE 1 or MIC/LINE 2 inputs.
- Phantom Power: For condenser microphones, press the '+48V' button to supply phantom power. Ensure dynamic microphones do not have phantom power enabled.

Image: The G-MARK DGNOG R4-PRO mixer demonstrating the use of 48V phantom power with a condenser microphone, indicating its compatibility for professional audio setups.
4.3 Audio Input Sources
Connect various audio sources to the mixer:
- Line Inputs: Use the 6.35mm LINE inputs for instruments or other line-level devices.
- 2-TK Inputs: Connect external playback devices (e.g., CD players) using RCA cables to the 2-TK inputs.
- AUX Input: Connect smartphones or other portable devices via the 3.5mm AUX input.
- USB Audio: Connect the mixer to a computer via USB for digital audio input/output.
- Bluetooth: Pair your smartphone or tablet via Bluetooth for wireless audio streaming.
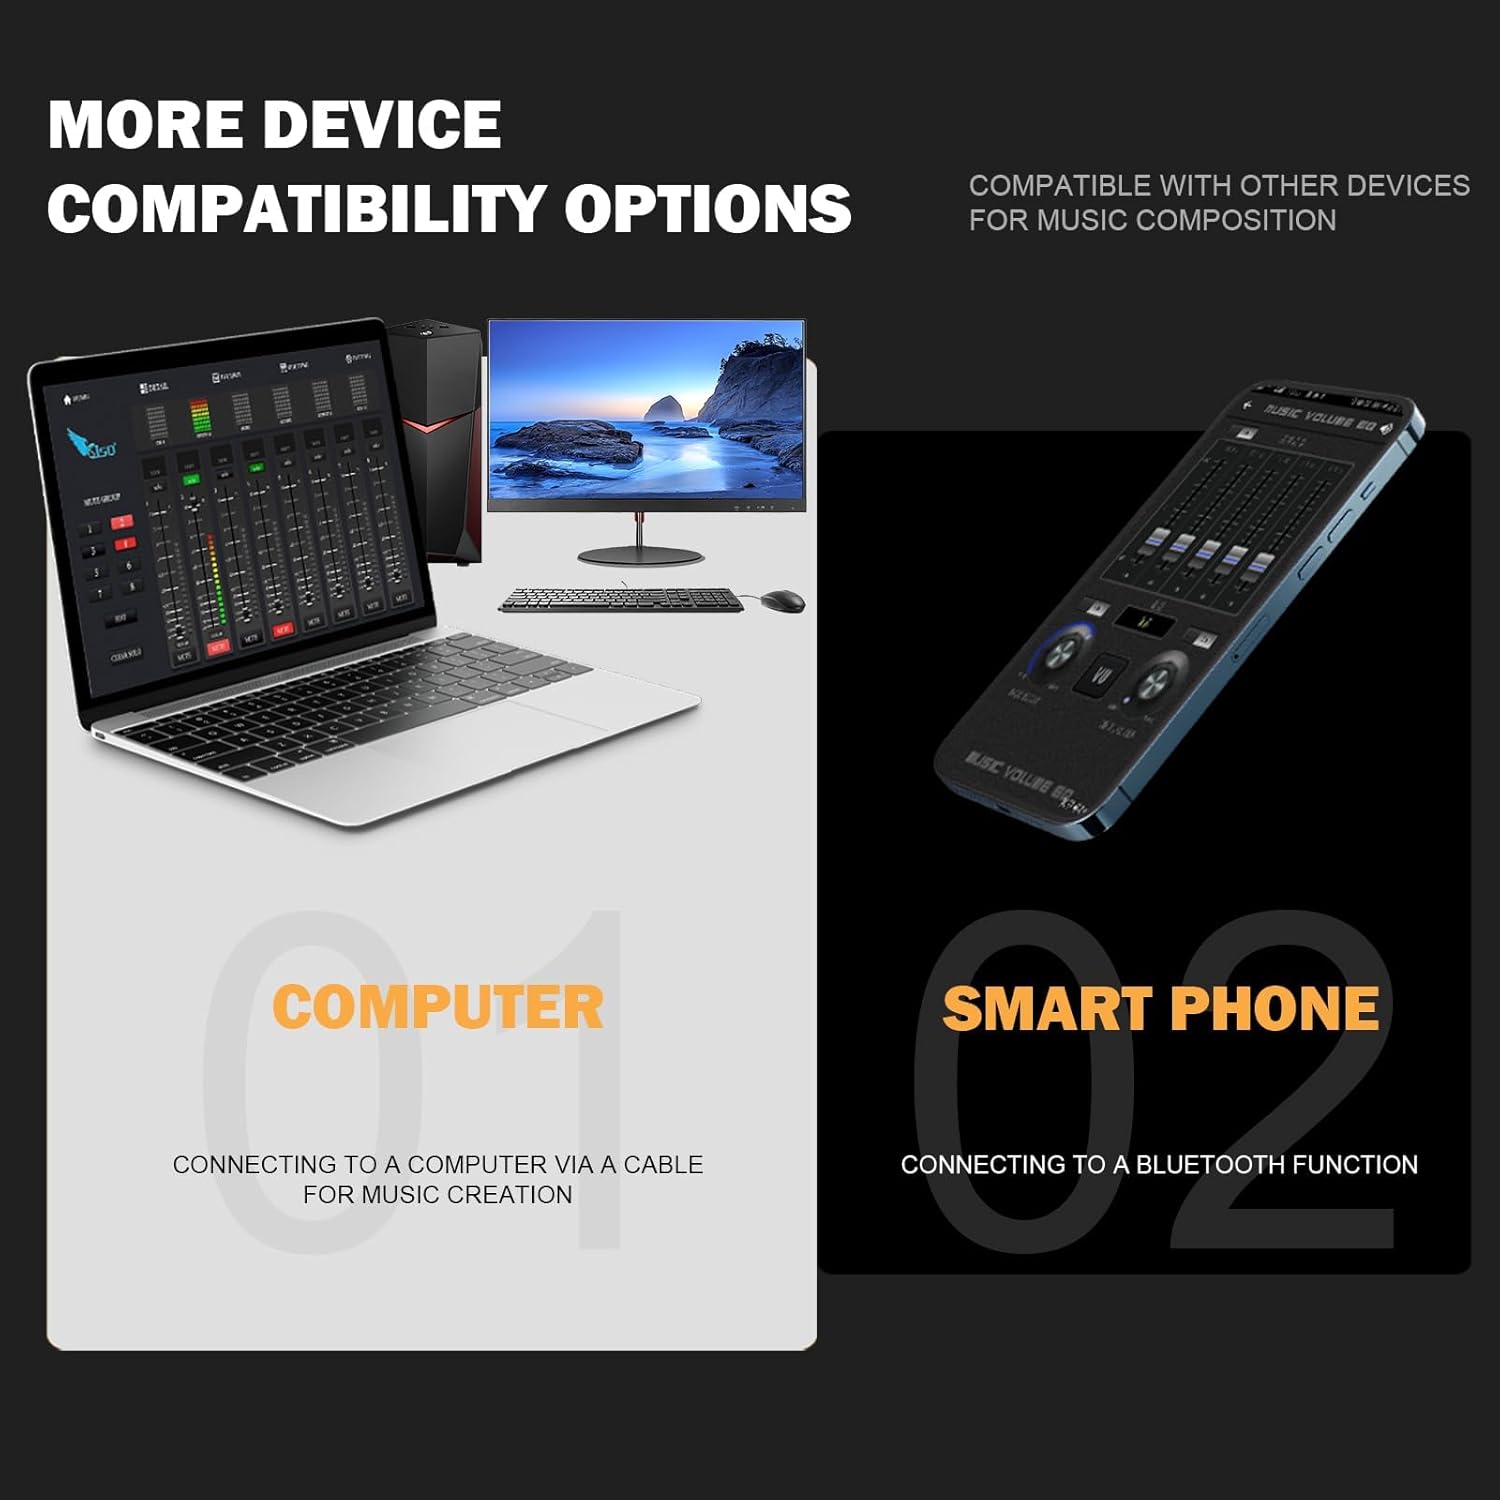
Image: The mixer connected to a computer via cable for music creation and to a smartphone via Bluetooth for audio streaming, illustrating its versatile device compatibility.
Video: This video demonstrates the various input and output connections of the 4-channel audio mixer, including wired microphones, instrument inputs, and connecting to external devices.
5. Operating Instructions
5.1 Adjusting Channels
- Gain: Adjust the GAIN knob for each channel to achieve an optimal input level without clipping (indicated by the PEAK LED).
- Equalization (EQ): Use the HIGH, MID, and LOW knobs to adjust the treble, midrange, and bass frequencies for each channel.
- Effects (FX): Turn the FX knob on each channel to send a portion of that channel's signal to the built-in effects processor.
- Level: Use the channel faders to set the overall volume for each input.

Image: The mixer showcasing its built-in reverb/echo effect function, which adds depth and dynamism to audio compositions.
5.2 USB/MP3 Playback
Insert a USB flash drive with MP3 files into the USB port. Use the controls in the Digital Audio Player section to play, pause, skip tracks, and select modes.
5.3 Bluetooth Connectivity
To stream audio wirelessly:
- Ensure the mixer is powered on.
- On your smartphone or tablet, enable Bluetooth and search for available devices.
- Select the mixer (usually named 'BT-MIX' or similar) from the list to pair.
- Once connected, you can play audio from your device through the mixer. Adjust the Bluetooth volume using the dedicated knob on the mixer.
Video: This video provides a quick overview of the G-MARK DGNOG R4-PRO mixer's features, including its 4-channel mixing capabilities, dual wireless microphones, and various input/output options like Bluetooth and USB connectivity.
5.4 Monitoring and Main Output
- Headphones: Connect headphones to the PHONES output for real-time monitoring. Adjust the headphone volume using the PHONES knob.
- Main Mix: Adjust the MAIN LEVEL fader to control the overall output volume of the mixed audio.
- Recording: Connect a recording device to the REC outputs to capture your mix.
6. Maintenance
Proper maintenance ensures the longevity and optimal performance of your mixer.
- Cleaning: Regularly wipe the mixer's surface with a soft, dry cloth. Avoid using harsh chemicals or abrasive materials.
- Storage: Store the mixer in a cool, dry place away from direct sunlight and extreme temperatures. When not in use for extended periods, disconnect the power.
- Microphone Care: Remove batteries from wireless microphones if not used for a long time to prevent leakage. Store microphones in a protective case.
7. Troubleshooting
If you encounter issues, refer to the following common problems and solutions:
- No Power: Ensure the power cable is securely connected and the power source is active.
- No Sound Output: Check all cable connections (inputs, main output, headphones). Verify channel faders and main level fader are up. Ensure GAIN knobs are adjusted correctly.
- No Microphone Sound: For wireless mics, check batteries and ensure they are paired (UHF A/B indicators lit). For wired mics, confirm connection and check if +48V phantom power is needed/enabled correctly. Adjust channel GAIN.
- Static or Noise: Ensure all cables are properly shielded and connected. Move away from potential sources of electromagnetic interference (e.g., Wi-Fi routers, power cables). Check for loose connections.
- Bluetooth Connection Issues: Ensure the mixer is in Bluetooth mode. Forget the device on your smartphone and try pairing again. Ensure no other devices are actively connected to the mixer via Bluetooth.
- USB Playback Not Working: Ensure the USB flash drive is formatted correctly (FAT32) and contains compatible MP3 files. Try a different USB drive.
8. Specifications
| Brand | G-MARK |
| Model | DGNOG R4-PRO (Studio 6) |
| Number of Channels | 4 |
| Connectivity Technology | Bluetooth, USB |
| Power Source | Battery Powered (Microphones), USB 5V (Mixer) |
| Voltage | 5 Volts |
| Item Weight | 3.41 pounds (1.55 Kilograms) |
| Package Dimensions | 13.58 x 12.4 x 3.54 inches |
| Phantom Power | 48V |
9. Warranty and Support
For warranty information and technical support, please refer to the official G-MARK website or contact your retailer. Keep your purchase receipt as proof of purchase.
- Warranty: Standard manufacturer's warranty applies. Details can be found on the G-MARK official website.
- Customer Support: For assistance with setup, troubleshooting, or product inquiries, please contact G-MARK customer service or your authorized dealer.