LIBODD KWS-302
LIBODD KWS-302 8-in-1 AC Energy Meter User Manual
Model: KWS-302
1. Introduction
This manual provides comprehensive instructions for the installation, operation, and maintenance of the LIBODD KWS-302 8-in-1 AC Energy Meter. This device is designed to monitor various electrical parameters including voltage, current, power, timing, electric energy, temperature, frequency, and power factor. Please read this manual thoroughly before installation and use to ensure safe and efficient operation.
Note on Models:
- KWS-302WF: Includes WiFi connectivity and power-off function.
- KWS-302L: Does not include WiFi, but has a power-off function.
- KWS-302 (This Model): Does not include WiFi connectivity or power-off function.
2. Safety Information
WARNING: Electrical shock hazard. Installation and servicing should only be performed by qualified personnel.
- Always disconnect power before installing or servicing the device.
- Ensure all wiring connections are secure and comply with local electrical codes.
- Do not operate the device in wet or damp conditions.
- Do not exceed the specified voltage and current ratings of the device.
- Keep the device away from children.
3. Product Overview
The LIBODD KWS-302 is an 8-in-1 energy meter designed for comprehensive electrical monitoring. It features a multi-color screen for clear data display and is built for standard guide rail installation.
Key Features:
- Multi-color Screen Interface: Provides a high-definition interface for accurate data display and user-friendly operation.
- Multi-functional Design: Monitors voltage, current, power, timing, electric energy (kWh), temperature, frequency, and power factor.
- Power-off Memory: Retains data even after power loss.
- Guide Rail Slot Installation: Designed for standard DIN rail mounting, allowing for screw-free, snap-on installation.

Figure 3.1: Front view of the KWS-302 Energy Meter displaying voltage, current, power, and other metrics.
4. Setup and Installation
The KWS-302 meter is designed for easy installation on a standard DIN rail. Ensure power is disconnected before proceeding with installation.
4.1 Mounting
The device features a snap-on mechanism for guide rail installation. Simply align the meter with the DIN rail and press firmly until it clicks into place. No screws are required for mounting.

Figure 4.1: Illustration of DIN rail mounting and electrical connections.
4.2 Wiring Connections
Refer to the labels on the device for correct wiring. The meter typically has "N IN", "L IN" for input neutral and live, and "N OUT", "L OUT" for output neutral and live connections. Ensure a secure and safe connection for all wires.
- N IN: Neutral input terminal.
- L IN: Live input terminal.
- N OUT: Neutral output terminal.
- L OUT: Live output terminal.
Always double-check wiring before restoring power.
5. Operating Instructions
Once installed and powered on, the KWS-302 meter will automatically display various electrical parameters on its multi-color screen.
5.1 Display Interpretation
The screen simultaneously displays up to 8 parameters. Common parameters include:
- Voltage (V): Instantaneous AC voltage.
- Current (A): Instantaneous AC current.
- Power (KW): Instantaneous active power.
- Timing (Hrs): Accumulated operating time.
- Electric Energy (Kwh): Accumulated total energy consumption.
- Temperature (°C): Ambient temperature measured by the device.
- Frequency (Hz): AC line frequency.
- Power Factor (PF): Power factor of the load.
Figure 5.1: Example of data displayed on the KWS-302 screen.
5.2 Button Functions
The KWS-302 model typically features buttons for navigating display modes or resetting certain parameters. Refer to the device's physical buttons for specific functions:
- "+" / "-" Buttons: These buttons are usually for navigating through different display screens or adjusting settings if available.
- "M" Button: Often used to switch between display modes or confirm selections.
- Reset Button (if present): May be used to reset accumulated energy (Kwh) or timing data. Consult the on-screen prompts.
5.3 APP Control (KWS-302WF Model Only)
The KWS-302WF variant supports remote monitoring and control via a mobile application. This functionality is NOT available on the KWS-302 model.
For KWS-302WF users:
- Download the "SmartLife" or "Tuya Smart" app from your mobile device's app store.
- Register or log in to your account.
- Add the device by following the in-app instructions. This typically involves putting the meter into pairing mode (refer to KWS-302WF specific instructions if available) and connecting it to your WiFi network.
- Once connected, you can remotely monitor electrical parameters, set timing switches, and manage power settings from your smartphone.

Figure 5.2: KWS-302WF model demonstrating mobile app control (feature not available on KWS-302).

Figure 5.3: Multi-person control feature for KWS-302WF (feature not available on KWS-302).
6. Maintenance
The LIBODD KWS-302 energy meter requires minimal maintenance.
- Cleaning: Use a soft, dry cloth to clean the device. Do not use abrasive cleaners or solvents.
- Inspection: Periodically check the wiring connections to ensure they remain secure.
- Environment: Ensure the operating environment remains within the specified temperature and humidity ranges.
Always disconnect power before performing any cleaning or inspection.
7. Troubleshooting
If you encounter issues with your KWS-302 meter, refer to the following common problems and solutions:
| Problem | Possible Cause | Solution |
|---|---|---|
| No display/No power | No power supply to the device; incorrect wiring. | Check the main power supply. Verify all wiring connections (L IN, N IN) are correct and secure. |
| Incorrect readings | Improper wiring; device malfunction. | Re-check wiring according to the diagram. If the problem persists, contact customer support. |
| Buttons unresponsive | Temporary software glitch; physical damage. | Try power cycling the device (disconnect and reconnect power). If unresponsive, contact customer support. |
If the problem persists after attempting these solutions, please contact LIBODD customer support for further assistance.
8. Specifications
Detailed technical specifications for the LIBODD KWS-302 Energy Meter:
| Parameter | KWS-302 | KWS-302L (for comparison) | KWS-302WF (for comparison) |
|---|---|---|---|
| Voltage Measurement Range | 170-270V | 170-270V | 170-270V |
| Current Measurement Range | 0-63A | 0-63A | 0-63A |
| Power Measurement Range | 0-17KW | 0-17KW | 0-17KW |
| Timing Measurement Range | 0-999Hrs | 0-999Hrs | 0-999Hrs |
| Electricity Measurement Range | 0-9999Kwh | 0-9999Kwh | 0-9999Kwh |
| Temperature Range | -20°C to 150°C | -20°C to 150°C | -20°C to 150°C |
| Frequency Measurement Range | 50-60Hz | 50-60Hz | 50-60Hz |
| Power Factor | 0.00-1.00PF | 0.00-1.00PF | 0.00-1.00PF |
| Power Failure Memory | Yes | Yes | Yes |
| Under-voltage Protection | None | Yes | Yes |
| Over-voltage Protection | None | Yes | Yes |
| WiFi Functionality | None | None | Yes |
| Item Size | 66 * 66 * 82mm (2.60 * 2.60 * 3.23in) | ||
| Package Weight | 182g (6.42oz) | 213g (7.51oz) | 215g (7.58oz) |

Figure 8.1: Comparative table of specifications for KWS-302 variants.
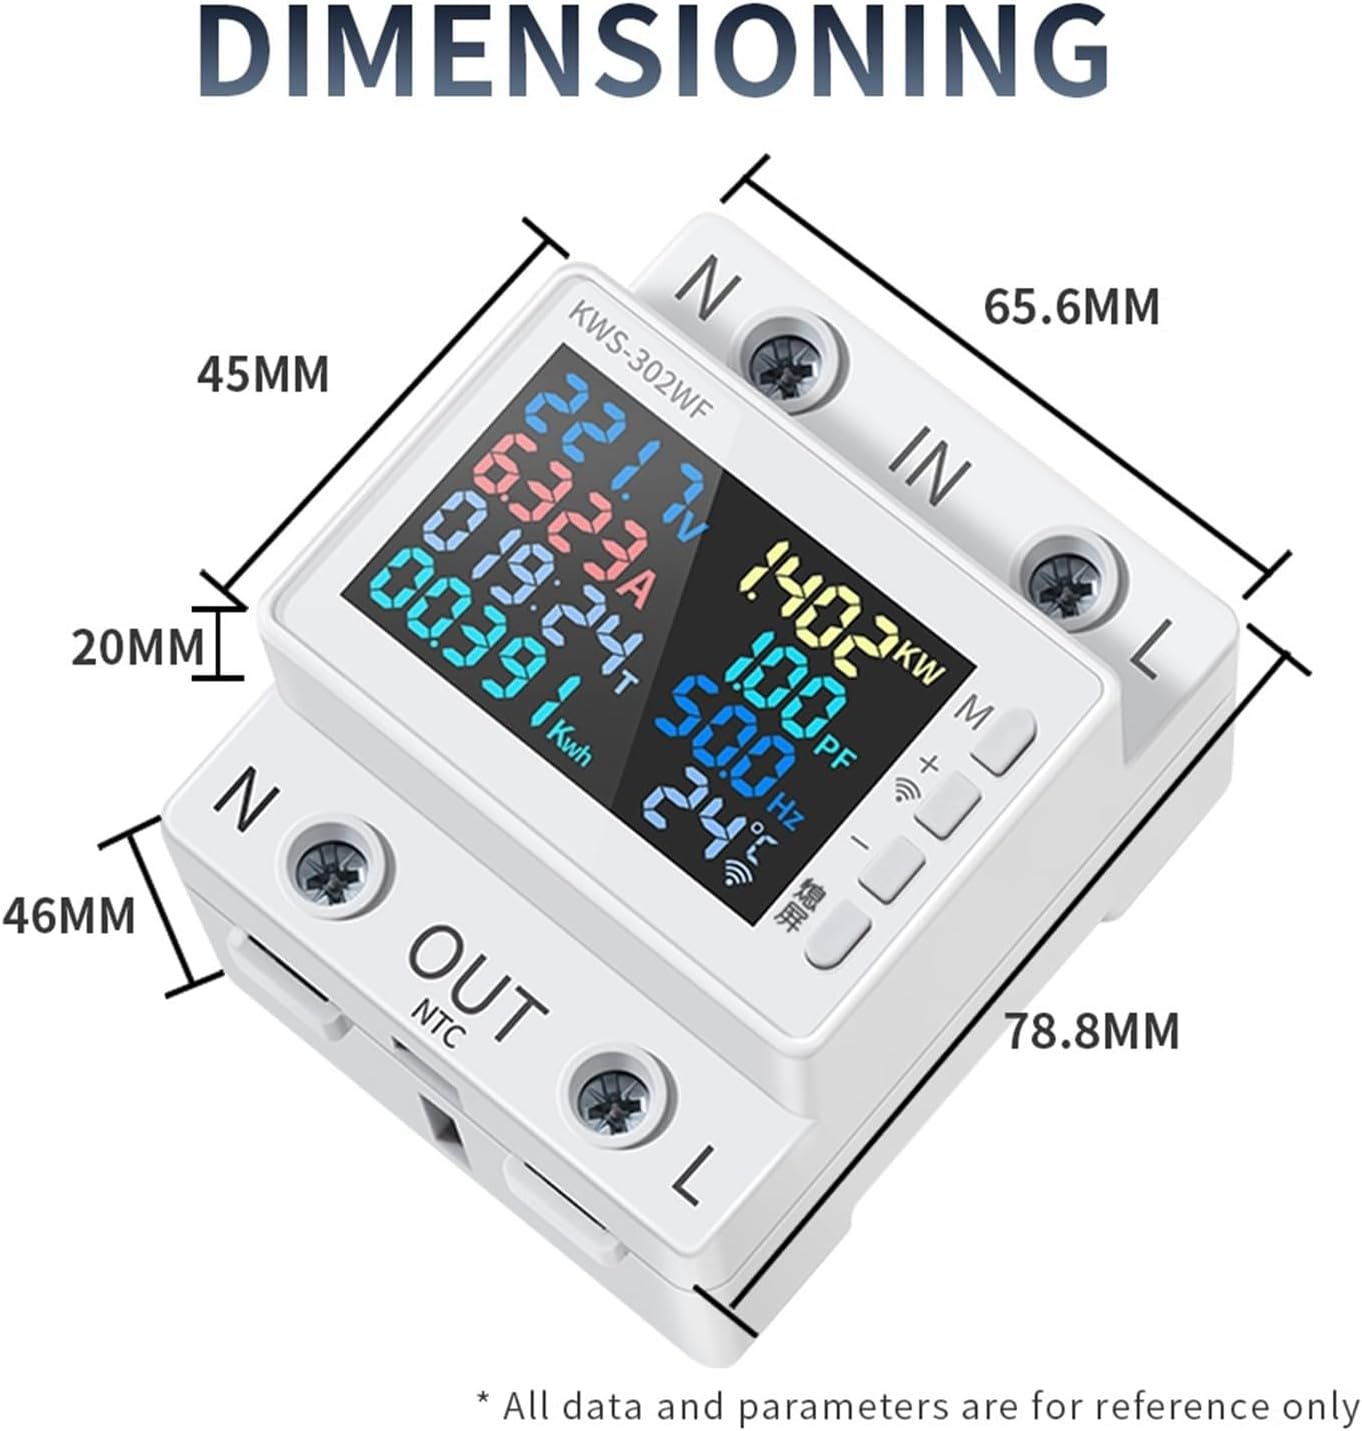
Figure 8.2: Dimensional drawing of the energy meter.
9. Warranty and Support
For warranty information and technical support, please refer to the documentation provided with your purchase or contact the manufacturer directly.
Manufacturer: LIBODD
Please retain your proof of purchase for any warranty claims.