VEVOR Chicken Nest Box
VEVOR 10-Compartment Chicken Nest Box Instruction Manual
Model: Chicken Nest Box (51.9"L x 20.6"W x 31.1"H)
1. Introduction
This manual provides detailed instructions for the assembly, operation, and maintenance of your VEVOR 10-Compartment Chicken Nest Box. Please read this manual thoroughly before installation and use to ensure proper function and longevity of the product. This nest box is designed to provide a comfortable and secure egg-laying environment for poultry, facilitating easy egg collection and protection.
2. Safety Information
- Always wear appropriate personal protective equipment, such as gloves, during assembly to prevent cuts from sharp edges on metal components.
- Ensure all screws and fasteners are securely tightened to maintain the stability of the structure.
- Place the nest box on a stable, level surface or securely mount it to a wall using appropriate hardware for the wall type.
- Keep children and pets away from the assembly area.
- Regularly inspect the nest box for any loose parts or damage and address them promptly.
3. Package Contents
Verify that all components listed below are present before beginning assembly:
- 1 x Chicken Nest Box (Main Frame Components)
- 1 x Accessory Kit (Includes screws, nuts, expansion sleeves, Phillips screwdriver, hex key)
- 1 x User Manual (This document)

Figure 3.1: Overview of included accessories and product dimensions. The accessory kit contains 50 M6 x 8 mm screws, 50 M6 nuts, 5 M5 x 35 mm self-tapping screws, 5 expansion sleeves, 1 Phillips screwdriver, and 1 hex key.
4. Assembly Instructions
Follow these steps to assemble your VEVOR Chicken Nest Box. It is recommended to have a second person assist with assembly for easier handling of components.

Figure 4.1: Visual guide for the assembly process.
- Step 1: Assemble Top Cover and Side Panels. Invert the top cover. Attach the side panels to the top cover using the provided screws and nuts. Tighten them securely.
- Step 2: Attach Bottom Crossbar. Connect the bottom crossbar to the side panels. Ensure all connections are firm.
- Step 3: Install Pull-Out Covers. Install the red pull-out covers onto the plastic egg collection trays.
- Step 4: Insert Trays. Slide the assembled plastic nesting trays into their respective compartments within the metal frame.
- Step 5: Prepare for Wall Mounting (Optional). If wall mounting, use the pre-drilled holes on the back of the nest box to mark positions on the wall. Insert expansion screws into the wall at these marked points.
- Step 6: Mount to Wall. Carefully lift and mount the assembled nest box onto the installed expansion screws. Ensure it is level and stable.
5. Operating Instructions
The VEVOR Chicken Nest Box is designed for efficient and hygienic egg collection.
5.1 Placement and Usage
- Position the nest box in a quiet, dimly lit area of the coop to encourage hens to lay eggs.
- The inclined design of the nesting boxes allows eggs to roll safely into the front collection compartment, preventing breakage and keeping them clean.
- The resting platform provides easy access for hens to enter and exit the nesting compartments.

Figure 5.1: Inclined nesting boxes facilitate easy and safe egg collection.
5.2 Egg Collection
- Eggs will automatically roll into the covered collection trays located at the front of each compartment.
- To collect eggs, simply lift the red handle on the front of each tray and retrieve the eggs.
- This design protects eggs from being pecked by hens and keeps them free from dirt and debris.
6. Maintenance
Regular cleaning and inspection will ensure the longevity and hygiene of your nest box.
6.1 Cleaning
- The plastic nesting trays are removable for easy cleaning. Slide them out from the front.
- The trays feature small holes at the bottom to prevent water accumulation and allow small debris to fall through, aiding in cleanliness.
- Wash the trays with mild soap and water, then rinse thoroughly and allow them to dry completely before reinserting.
- Wipe down the galvanized steel frame with a damp cloth as needed.
- The ventilation holes on the sides promote air circulation, reducing moisture and odors. Ensure these remain unobstructed.
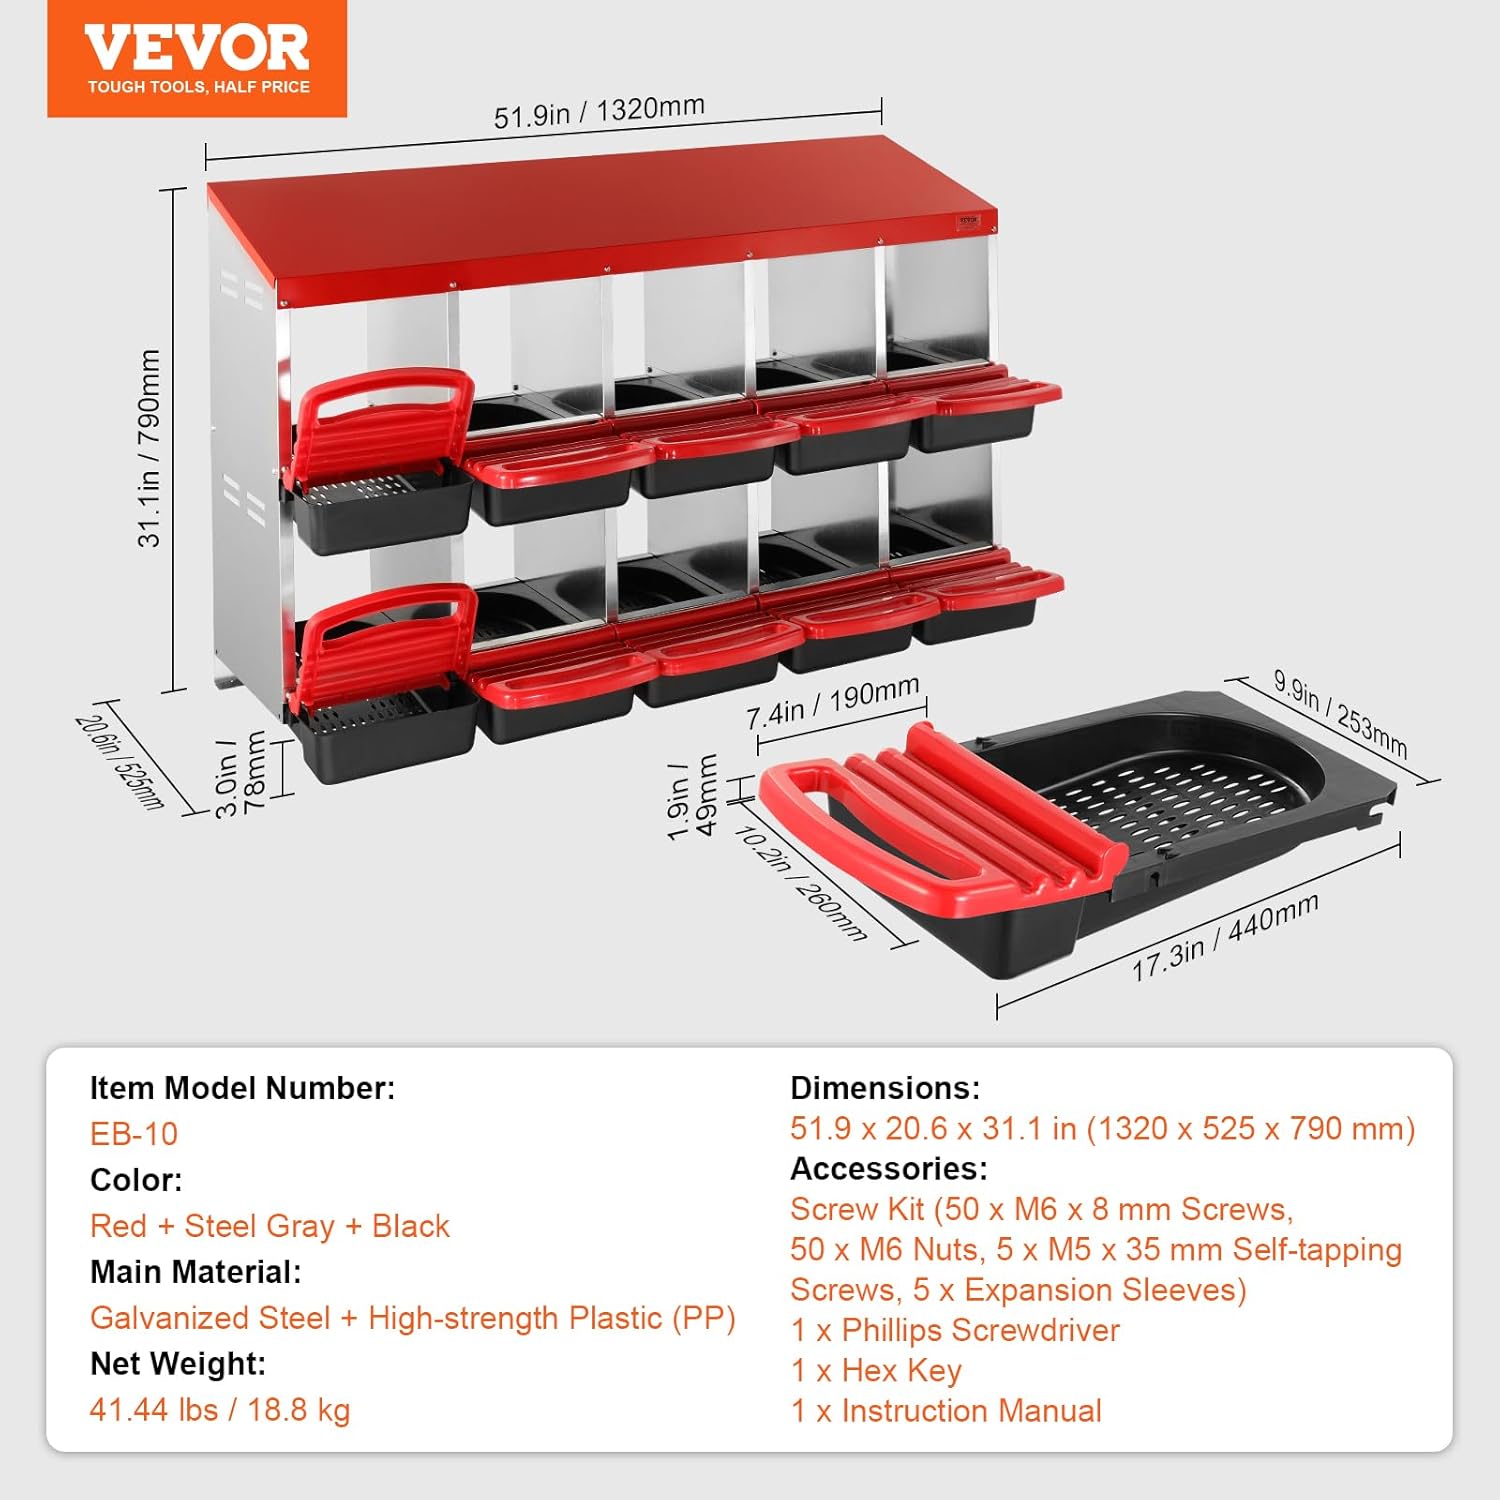
Figure 6.1: Removable trays with bottom holes and side ventilation for easy cleaning and air flow.
6.2 Inspection
- Periodically check all screws and connections to ensure they remain tight.
- Inspect the galvanized steel for any signs of damage or corrosion, although the material is designed to be corrosion-resistant.
- Ensure the plastic trays are not cracked or broken, which could affect egg collection.
7. Troubleshooting
- Issue: Eggs are not rolling into the collection tray.
Solution: Ensure the nest box is installed on a level surface. Verify that the plastic trays are correctly seated and not obstructed. - Issue: Hens are not using the nest box.
Solution: Ensure the nest box is placed in a quiet, private, and dimly lit area. Introduce a ceramic egg or golf ball into a compartment to encourage use. Ensure the nest box is clean and free of strong odors. - Issue: Nest box feels unstable after assembly.
Solution: Recheck all screw connections and tighten them firmly. If wall-mounted, ensure the wall anchors are appropriate for your wall type and securely installed.
8. Specifications
| Feature | Detail |
|---|---|
| Model Number | Chicken Nest Box (EB-10) |
| Dimensions (L x W x H) | 51.9" x 20.6" x 31.1" (1320 x 525 x 790 mm) |
| Weight | 41.45 lbs (18.8 kg) |
| Material | Galvanized Steel, High-strength Plastic (PP) |
| Color | Red + Steel Gray + Black |
| Number of Compartments | 10 |
| Breed Recommendation | Hens, Ducks, Chickens |
| Special Features | Inclined Nesting Boxes, Bottom Holes, Resting Platform, Ventilation Holes, Corrosion-Resistant, Rainproof |
9. Warranty and Support
For warranty information and customer support, please refer to the official VEVOR website or contact your retailer. Keep your purchase receipt for any warranty claims.
Related Documents - Chicken Nest Box
 |
Holymus Chicken Nesting Box: Installation, Maintenance, and Guide Comprehensive guide for installing and maintaining the Holymus Chicken Nesting Box. Includes specifications, warnings, parts list, step-by-step installation instructions, placement methods, and frequently asked questions. |
 |
VEVOR 8-Compartment Chicken Nest Box (CNB-08) - Assembly & Product Guide Comprehensive assembly instructions and product details for the VEVOR CNB-08 8-compartment chicken nest box. Learn about its features, parts, and how to assemble it. |
 |
VEVOR CNB-03-Leg 3-Compartment Chicken Nest Box Installation Guide Comprehensive installation guide for the VEVOR CNB-03-Leg 3-compartment chicken nest box. Learn how to assemble and mount your poultry nesting solution. |
 |
Chicken Nesting Box Pads - Product Manual Product manual for Chicken Nesting Box Pads, detailing features such as shock-absorbing design, easy-to-clean materials, and anti-slip functionality for poultry coop maintenance. |
 |
Cattiehoney Chicken Nesting Box User Guide: Assembly and Features Comprehensive user guide for the Cattiehoney Chicken Nesting Box, detailing specifications, warnings, maintenance, parts list, step-by-step installation, and placement methods. Learn how to assemble and use your chicken nesting box for optimal egg-laying conditions. |
 |
VEVOR Chicken Nest Box CNB-08-Leg Installation Guide Comprehensive installation guide for the VEVOR Chicken Nest Box, model CNB-08-Leg. Learn how to assemble and set up your 8-compartment poultry nest box with clear instructions and helpful resources. |
Ask a question about this manual
Ask about setup, troubleshooting, compatibility, parts, safety, or missing instructions. Manuals+ will review the question and use this page’s manual context to help answer it.