KAFRI C1pro
KAFRI PS5 / PS5 Slim Stand and Cooling Station User Manual
Model: C1pro
Brand: KAFRI
1. Introduction
Thank you for choosing the KAFRI PS5 / PS5 Slim Stand and Cooling Station. This multifunctional accessory is designed to enhance your gaming experience by providing efficient cooling for your PlayStation 5 console (both Disc and Digital Editions, including PS5 Slim), convenient charging for your PS5 controllers and PS Portal, and an organized storage solution. It also features customizable RGB lighting to complement your gaming setup. Please read this manual carefully before use to ensure proper installation and operation.
2. Package Contents
Please verify that all items listed below are included in your package:
- Multifunctional Charging and Storage Stand x 1
- Headset Holder x 1
- 3M Adhesive x 1 (for headset holder)
- Screws x 3
- Bolts x 3
- Charging Cable x 1
- Safety Lock Screw x 1
- Magnetic Head x 2

Figure 2.1: Contents of the KAFRI PS5 / PS5 Slim Stand and Cooling Station package, including the main stand, headset holder, various screws, charging cable, safety lock screw, and magnetic heads.
3. Product Overview
Familiarize yourself with the various components and controls of your KAFRI Cooling Stand:

Figure 3.1: Labeled diagram of the KAFRI PS5 / PS5 Slim Stand, highlighting key features such as the USB Output Port, Cooling Fan Control Button, Ambient Light Control Button, PS Portal Charging Indicator, Controller Charging Indicator, and Type-C Power Input Port.
- USB Output Port: For connecting external USB devices.
- Cooling Fan Control Button: Toggles fan on/off and cycles through fan speeds.
- Ambient Light Control Button: Toggles RGB lighting on/off and cycles through light modes.
- PS Portal Charging Indicator: LED indicator for PS Portal charging status.
- Controller Charging Indicator: LED indicator for PS5 controller charging status.
- Type-C Power Input Port: Connect the provided charging cable here to power the stand.
- Safety Lock Screw Slot: Secures the PS5 console to the stand.
- Magnetic Heads: Used for charging PS5 controllers.
- Headset Holder Slot: For attaching the headset holder.
4. Setup
Place the Stand: Position the KAFRI Cooling Stand on a stable, flat surface with adequate ventilation.
Connect Power: Insert the provided USB-C charging cable into the Type-C Power Input Port on the stand and connect the other end to a suitable USB power source (e.g., PS5 console USB port, USB wall adapter). The stand will power on.
Install PS5 Console: Carefully place your PlayStation 5 console (Disc or Digital Edition, or PS5 Slim) onto the stand. Ensure it is seated correctly in the designated slot.
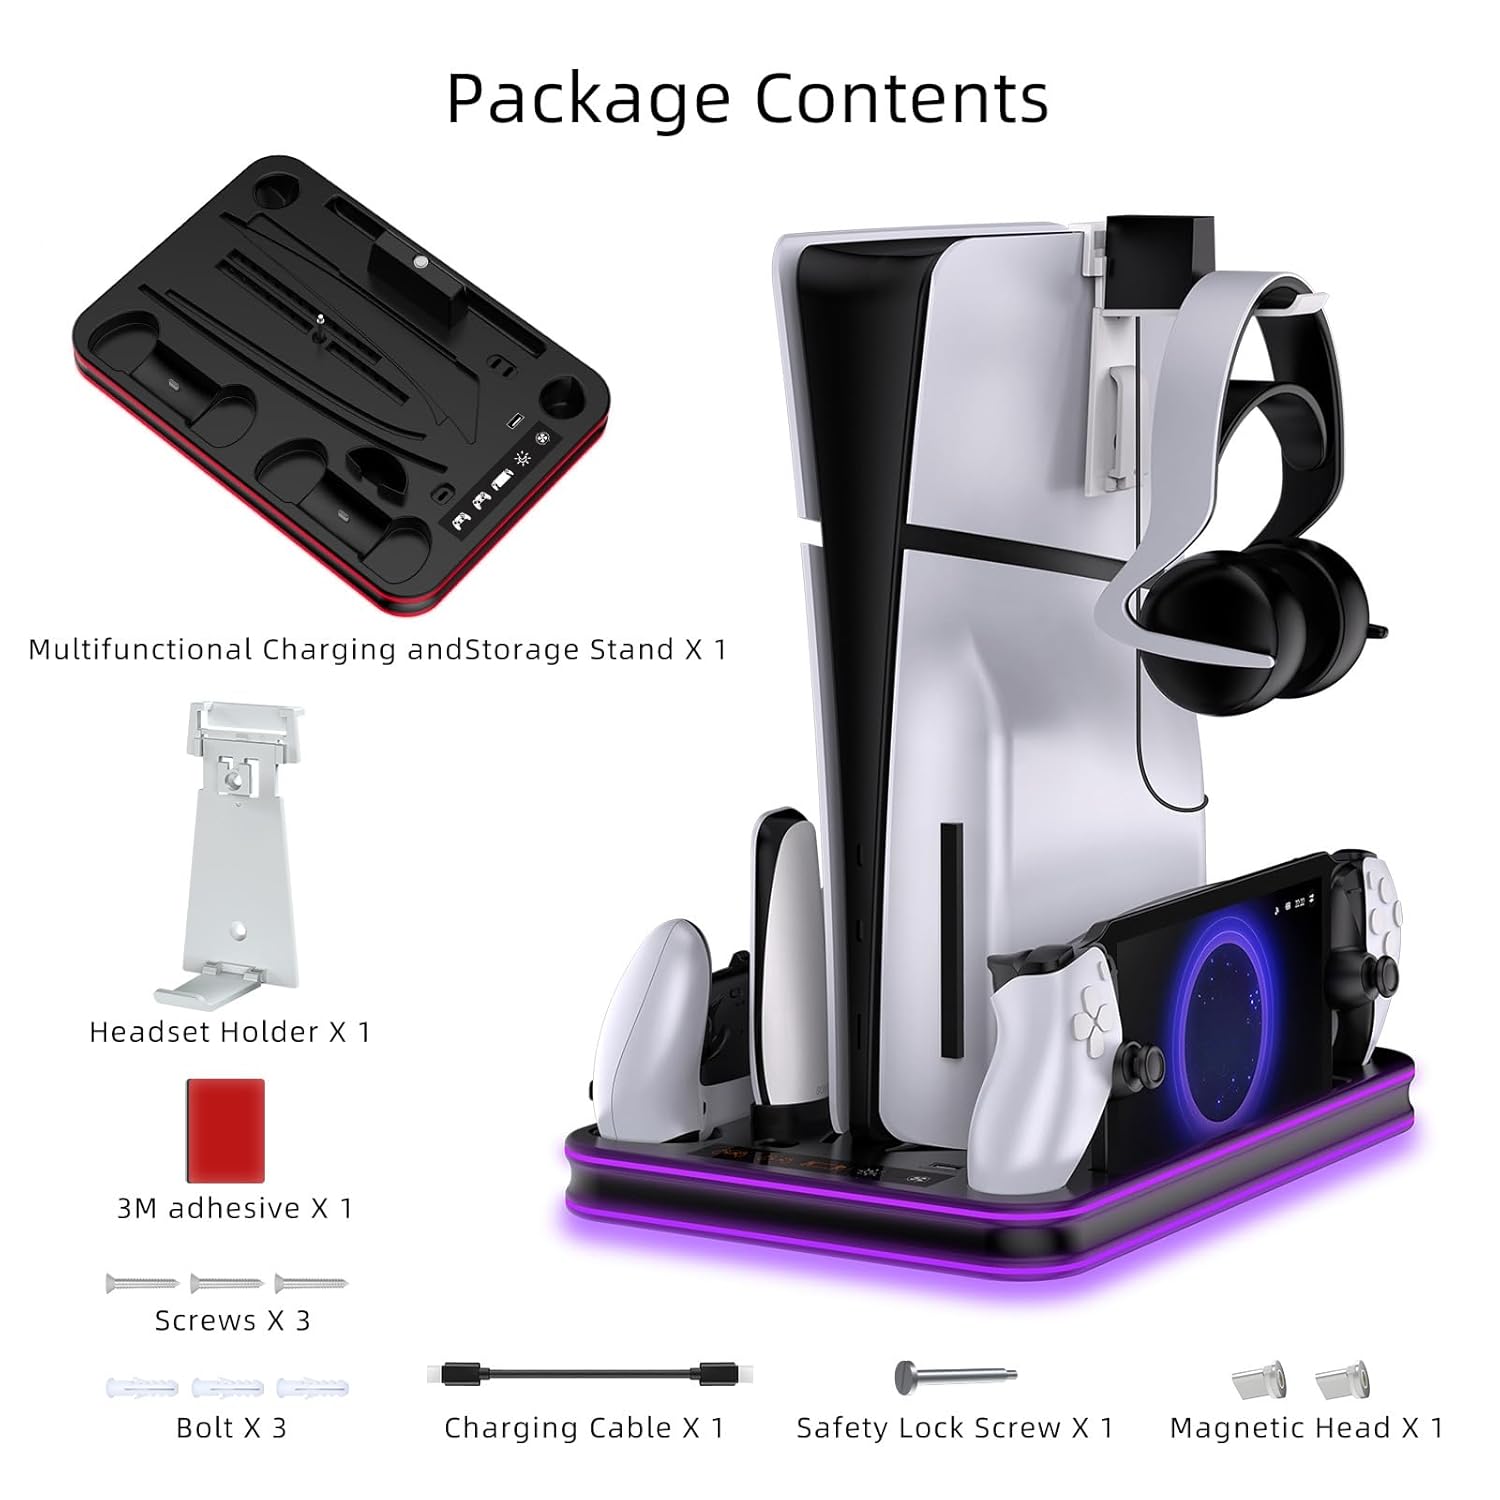
Figure 4.1: Securing the PS5 console with the safety lock screw for stability.
Secure Console (Optional but Recommended): Use the included Safety Lock Screw to firmly secure your PS5 console to the stand. Insert the screw into the bottom of the console and tighten it into the stand's screw slot. This provides enhanced stability.
Attach Headset Holder: Insert the headset holder into its designated slot on the stand. For added stability, you may use the provided 3M adhesive to secure it.
5. Operating Instructions
5.1 Cooling Fan Operation
The integrated cooling fan helps dissipate heat from your PS5 console, prolonging its lifespan and maintaining optimal performance. The fan has three adjustable speeds.

Figure 5.1: Illustration of the efficient cooling system with air flowing from the bottom of the PS5 console, and indicators for the three fan speed levels (3500 RPM, 3900 RPM, 4500 RPM).
- Turning On/Off: Press the Cooling Fan Control Button once to turn the fan on. Press and hold for 3 seconds to turn it off.
- Adjusting Speed: While the fan is on, press the Cooling Fan Control Button repeatedly to cycle through the three speed settings: Low, Medium, and High. The fan speed is indicated by changing lights on the stand.
5.2 RGB Lighting Control
The stand features dynamic RGB lighting with five fantastic lighting effects.

Figure 5.2: Examples of the 5 RGB lighting modes available on the KAFRI stand, including solid colors (Red, Green, Blue, Purple) and a dynamic Gradient Light mode.
- Turning On/Off: Press the Ambient Light Control Button once to turn the RGB lights on. Press and hold for 3 seconds to turn them off.
- Changing Modes: While the lights are on, press the Ambient Light Control Button repeatedly to cycle through the 5 different lighting effects.
5.3 Controller and PS Portal Charging
The stand provides dedicated charging docks for two PS5 DualSense/Edge controllers and one PS Portal.

Figure 5.3: Visual guide to charging PS5 controllers and PS Portal simultaneously, indicating orange light for charging and blue light for fully charged status. Full charge typically takes 2.5-3.5 hours.
- Charging PS5 Controllers: Attach the magnetic heads to your PS5 DualSense or DualSense Edge controllers. Place the controllers onto the charging ports. The Controller Charging Indicator will illuminate orange during charging and turn blue when fully charged or in standby.
- Charging PS Portal: Place your PS Portal onto its dedicated charging dock. The PS Portal Charging Indicator will illuminate orange during charging and turn blue when fully charged or in standby.
- Charging Time: A full charge for PS5 controllers typically takes approximately 2.5-3 hours. The PS Portal can be fully charged from empty within 3 hours.
6. Maintenance
To ensure the longevity and optimal performance of your KAFRI Cooling Stand, follow these maintenance guidelines:
- Cleaning: Regularly wipe the stand with a soft, dry cloth to remove dust and fingerprints. Do not use abrasive cleaners or solvents.
- Ventilation: Ensure the fan vents are not obstructed to allow for proper airflow.
- Storage: When not in use for extended periods, store the stand in a cool, dry place away from direct sunlight.
7. Troubleshooting
If you encounter any issues with your KAFRI Cooling Stand, please refer to the following common problems and solutions:
| Problem | Possible Cause | Solution |
|---|---|---|
| Stand does not power on / Fans or lights do not work. | No power connection or insufficient power. | Ensure the USB-C cable is securely connected to both the stand and a working USB power source. Try a different USB port or power adapter. |
| Controllers or PS Portal not charging. | Improper placement, magnetic heads not attached (for controllers), or stand not powered. | Ensure controllers/PS Portal are correctly seated on their respective charging ports. Verify magnetic heads are attached to controllers. Check if the stand is powered on (lights/fans working). |
| Cooling fan is noisy or ineffective. | Vents obstructed, dust buildup, or incorrect fan speed. | Ensure no objects are blocking the fan vents. Clean any dust from the vents. Cycle through fan speeds to find the desired level. Note that the PS5's primary exhaust is from the back, and this stand assists with bottom intake cooling. |
| RGB lights not changing or stuck. | Button malfunction or temporary glitch. | Press the Ambient Light Control Button firmly. Try unplugging and re-plugging the power cable to reset the stand. |
8. Specifications
- Model: C1pro
- Materials: Plastic (ABS & PC) + Metal (Aluminum)
- AC Rated Input: 110-240V, 50/60Hz (via USB power source)
- Dimensions: Approximately 13.4 x 2.9 x 9.6 inches (340 x 73 x 244 mm)
- Weight: Approximately 32.4 oz (920g) / 2.03 pounds
- Fan Speeds: 3 levels (approx. 3500 RPM, 3900 RPM, 4500 RPM)
- RGB Lighting: 5 modes
- Controller Charging Time: Approx. 2.5-3 hours (PS5 original & Edge controller)
- PS Portal Charging Time: Approx. 3 hours
- Compatibility: PlayStation 5 Disc Edition, PlayStation 5 Digital Edition, PlayStation 5 Slim
9. Warranty and Support
KAFRI products are manufactured with high-quality standards. If you experience any quality issues with your KAFRI PS5 / PS5 Slim Stand and Cooling Station or are not satisfied with your purchase, please do not hesitate to contact our customer support team. We are committed to providing assistance and resolving any concerns you may have.
Please retain your proof of purchase for warranty claims.
For support, please refer to the contact information provided on the product packaging or the retailer's website where you made your purchase.
Ask a question about this manual
Ask about setup, troubleshooting, compatibility, parts, safety, or missing instructions. Manuals+ will review the question and use this page’s manual context to help answer it.