1. Introduction
This manual provides detailed instructions for the installation, operation, and maintenance of your BOIFUN Motorcycle Smart Monitor. Please read this manual thoroughly before using the product to ensure proper functionality and safety. This device is designed to enhance your riding experience by integrating smartphone features like navigation, music, and calls directly onto your motorcycle's handlebar.
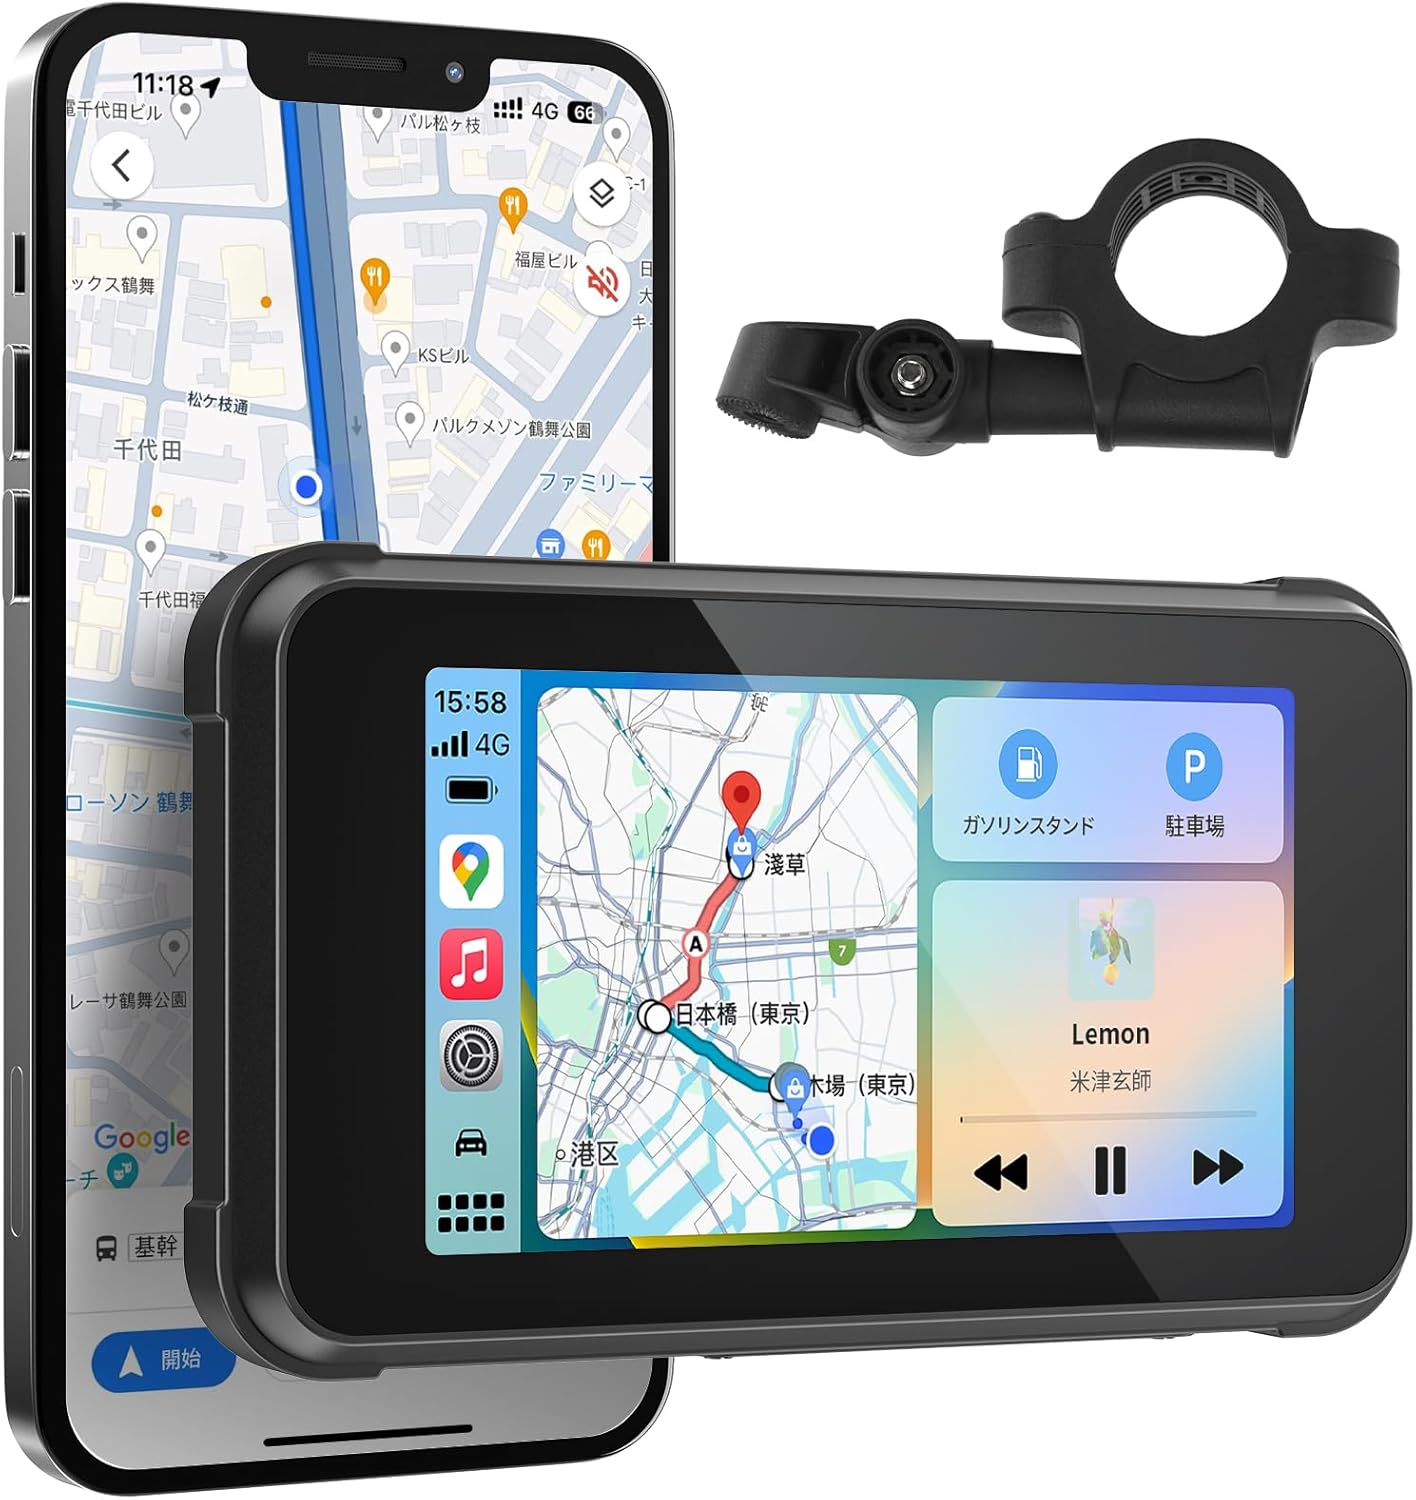
Image: The BOIFUN Motorcycle Smart Monitor displayed alongside a smartphone showing navigation and a separate mounting bracket.
2. Safety Information
- Always prioritize safe riding. Do not operate the device in a way that distracts you from the road.
- Ensure the device is securely mounted before riding.
- Avoid prolonged exposure to direct sunlight when the motorcycle is parked to prevent overheating, although the device is designed for high-temperature resistance.
- Do not attempt to disassemble or modify the device. This may void the warranty and pose safety risks.
- Keep the device away from strong magnetic fields.
3. Package Contents
Verify that all items listed below are included in your package:
- Smart Monitor Unit
- Main Unit Mount
- Sunshade Cover
- Tool Set (Allen wrench, screwdriver)
- USB Cable (5V/1A or higher input required)
- ACC Cable (12V-30V input, DC5V/2A output)
- Main Unit Stand Screws and Anti-vibration Pads
- Decorative Strips x2
- Instruction Manual

Image: A visual representation of all components included in the product package, such as the monitor, various cables, mounting hardware, and tools.
4. Product Overview
The BOIFUN Motorcycle Smart Monitor features a 5-inch high-resolution IPS display, offering clear visibility even in bright sunlight. It supports both Apple CarPlay and Android Auto for seamless smartphone integration. The device is built with robust durability, including IPX65 waterproof and dustproof ratings, and resistance to high/low temperatures and shocks, making it suitable for various riding conditions.

Image: An exploded view illustrating the layers of the high-brightness IPS display and its anti-scatter enhancement for improved visibility.
Key Features:
- 5-inch IPS Touch Screen: Provides a clear and responsive interface for easy operation.
- Apple CarPlay & Android Auto Support: Seamlessly integrates your smartphone for navigation, music, calls, and voice assistant functions.
- IPX65 Waterproof & Dustproof: Designed to withstand various weather conditions, ensuring reliable performance.
- High/Low Temperature & Shock Resistance: Operates stably in extreme temperatures (-25°C to 55°C) and is built to endure vibrations and minor impacts during riding.
- Manual Brightness Adjustment: Allows users to optimize screen visibility based on ambient light conditions.
- Voice Control: Supports Siri and Google Assistant for hands-free operation.
- Easy Installation: Simple power connection with minimal wiring.
5. Setup
5.1 Mounting the Monitor
The monitor comes with an adjustable mounting holder that can be attached to your motorcycle's handlebar. The holder is designed to be sturdy and adaptable, allowing for multi-directional adjustment.
- Select a suitable position on your handlebar for optimal viewing and accessibility.
- Attach the mounting bracket to the handlebar using the provided gaskets (22mm, 25.4mm, 28mm) and secure it with the screws. If the handlebar size does not match, adjust with spacers.
- Attach the monitor unit to the mounting holder. The holder allows for left/right and up/down adjustments to achieve the desired angle.

Image: A diagram showing the adjustable components of the monitor holder, indicating how it can be adjusted left/right and up/down, along with handlebar gasket options.
5.2 Power Connection
The monitor offers two connection methods:
- Direct to Motorcycle Battery (ACC Cable): For stable power supply during long rides without worrying about battery drain. Connect the ACC cable to your motorcycle's battery (12V-30V input).
- USB Connection: For simple power supply using a USB port (5V/1A or higher input required). This allows for simultaneous use with other devices.
The setup is designed to be very simple, requiring only one power cable connection to minimize troublesome wiring work.

Image: A diagram illustrating the two power connection methods: direct to the motorcycle battery via ACC cable and via USB cable, showing how the monitor integrates with the motorcycle's power system.
6. Operating Instructions
6.1 Initial Setup and Smartphone Connection
- Power on the monitor.
- On your smartphone, enable Bluetooth.
- On the monitor, navigate to the Bluetooth settings and pair with your smartphone.
- Once paired, select either Apple CarPlay or Android Auto on the monitor to initiate the wireless connection.

Image: A visual showing the monitor connected to an iPhone via Bluetooth 5.2, demonstrating Apple CarPlay functionality.

Image: A visual showing the monitor connected to an Android phone via Bluetooth 5.2, demonstrating Google Android Auto functionality.
6.2 Touch Operations
The 5-inch touch screen allows for intuitive control. You can tap to select items and swipe to navigate between different screens or functions, similar to a smartphone.

Image: A visual representation of the touch interface, showing how a user can tap and swipe to switch between phone calls, navigation, and music playback screens.

Image: A dynamic view demonstrating the ease of operation through tapping and swiping, showcasing various functions like music playback, phone calls, and navigation.
6.3 Brightness Adjustment
You can manually adjust the screen brightness to ensure optimal visibility in varying light conditions, from bright daylight to nighttime.

Image: The monitor mounted on a motorcycle, showing a brightness adjustment slider on the screen and the physical sunshade cover, indicating clear visibility even in sunlight.
6.4 Voice Control
Utilize voice assistants like Siri (for iPhone) or Google Assistant (for Android) for hands-free control of navigation, music playback, and phone calls, enhancing safety while riding.

Image: A motorcyclist riding with the monitor, showing voice command bubbles like "Hey Siri, navigate to Mt. Fuji" and "Hey Siri, play music," emphasizing hands-free operation.

Image: A motorcyclist using voice commands with the monitor, highlighting Bluetooth 5.2 connectivity for hands-free music, calls, and navigation.
6.5 Rain Mode (Anti-Touch Function)
To prevent accidental touches during rain, you can activate the rain mode. In this mode, the touchscreen operation is disabled, allowing you to focus on driving without unintended inputs.
- To activate Rain Mode: Long press the [Settings] or [Home] button for 5 seconds.
- To deactivate Rain Mode: Repeat the same action.

Image: A comparison showing the monitor in normal mode (touch enabled) versus rain mode (touch disabled), illustrating the anti-touch function for safe operation in wet conditions.
6.6 Screen Saver and Battery Protection
The monitor features a screen saver function that automatically turns the screen black after a period of inactivity. This helps conserve power and protect your motorcycle's battery.

Image: A graphic illustrating the screen saver feature, showing the monitor screen turning off to conserve power and protect the motorcycle's 12V-10Ah battery.
6.7 TPMS (Tire Pressure Monitoring System) Compatibility
The monitor is compatible with TPMS sensors (sold separately) to monitor tire pressure and temperature in real-time. This feature helps prevent issues caused by low tire pressure, such as reduced fuel efficiency, decreased ride comfort, accelerated tire wear, and increased risk of blowouts.

Image: A visual explaining the benefits of TPMS compatibility, showing the monitor displaying tire pressure data and a close-up of a tire pressure sensor.
7. Maintenance
- Cleaning: Use a soft, damp cloth to clean the screen and body. Avoid abrasive cleaners or solvents.
- Storage: When not in use for extended periods, store the monitor in a cool, dry place away from direct sunlight.
- Cable Inspection: Periodically check all cables for any signs of wear or damage.
8. Troubleshooting
| Problem | Possible Cause | Solution |
|---|---|---|
| Monitor does not power on. | No power supply or loose connection. | Check power cable connection to the motorcycle battery or USB port. Ensure the motorcycle's ignition is on if connected to ACC. |
| Cannot connect to CarPlay/Android Auto. | Bluetooth not enabled, phone not paired, or software issue. | Ensure Bluetooth is on and paired. Restart both the monitor and your smartphone. Check for software updates for your phone's OS. |
| Screen is too dim/bright. | Brightness setting is incorrect. | Adjust the brightness manually via the monitor's settings. |
| Touchscreen is unresponsive. | Rain mode activated or temporary software glitch. | Deactivate rain mode by long-pressing the [Settings] or [Home] button. Restart the monitor. |
| No audio from monitor. | Volume too low, or no connection to intercom/earphones. | Increase monitor volume. Ensure your intercom or earphones are properly connected and paired via Bluetooth. |
9. Specifications
| Feature | Detail |
|---|---|
| Screen Size | 5 inches |
| Compatible Devices | Android, iPhone |
| Connectivity Technology | Bluetooth 5.2 |
| Special Features | Bluetooth, Touchscreen, CarPlay, Android Auto, Manual Brightness Adjustment, IPX65 Waterproof/Dustproof, High/Low Temperature Resistance, Shock Resistance |
| Operating Temperature | -25°C to 55°C (-13°F to 131°F) |
| Product Dimensions | 20.4 x 13.2 x 8.9 cm |
| Product Weight | 630 g |
| Model Number | MT04 |
| Japan Technical Conformity Mark | R210-181571 |

Image: Two images depicting the monitor's resistance to extreme temperatures, showing a motorcyclist in a hot, dusty environment and another in a snowy, cold environment.

Image: The monitor on a motorcycle handlebar, showing water droplets on its screen, emphasizing its IP65 waterproof rating and overall durability against dust and wear.
10. Warranty and Support
Your BOIFUN Motorcycle Smart Monitor comes with a 12-month product warranty from the date of purchase. If any issues arise within this period, please contact our customer support for assistance. In case of initial defects, a new product will be provided.
The BOIFUN monitor has obtained Japan's Technical Conformity Certification (GITEKI Mark Certification Number: R210-181571), ensuring its compliance with Japanese technical standards for wireless communication devices, guaranteeing quality and safety for use within Japan.
Customer Support:
For any inquiries or support, please contact us at: admin@boifun.net

Image: A visual representation of the 12-month warranty and the Japan Technical Conformity (PSE) certification, symbolized by a shield and a certificate, alongside the monitor.