1. Introduction
Thank you for choosing the Generic Pro Wireless Microphone System BL-8800-4H4H. This 8-channel UHF cordless microphone system is designed to deliver clear, robust, and optimal sound for various applications, including church events, conferences, schools, singing performances, and DJ gigs. This manual provides essential information for the proper setup, operation, and maintenance of your new wireless microphone system.
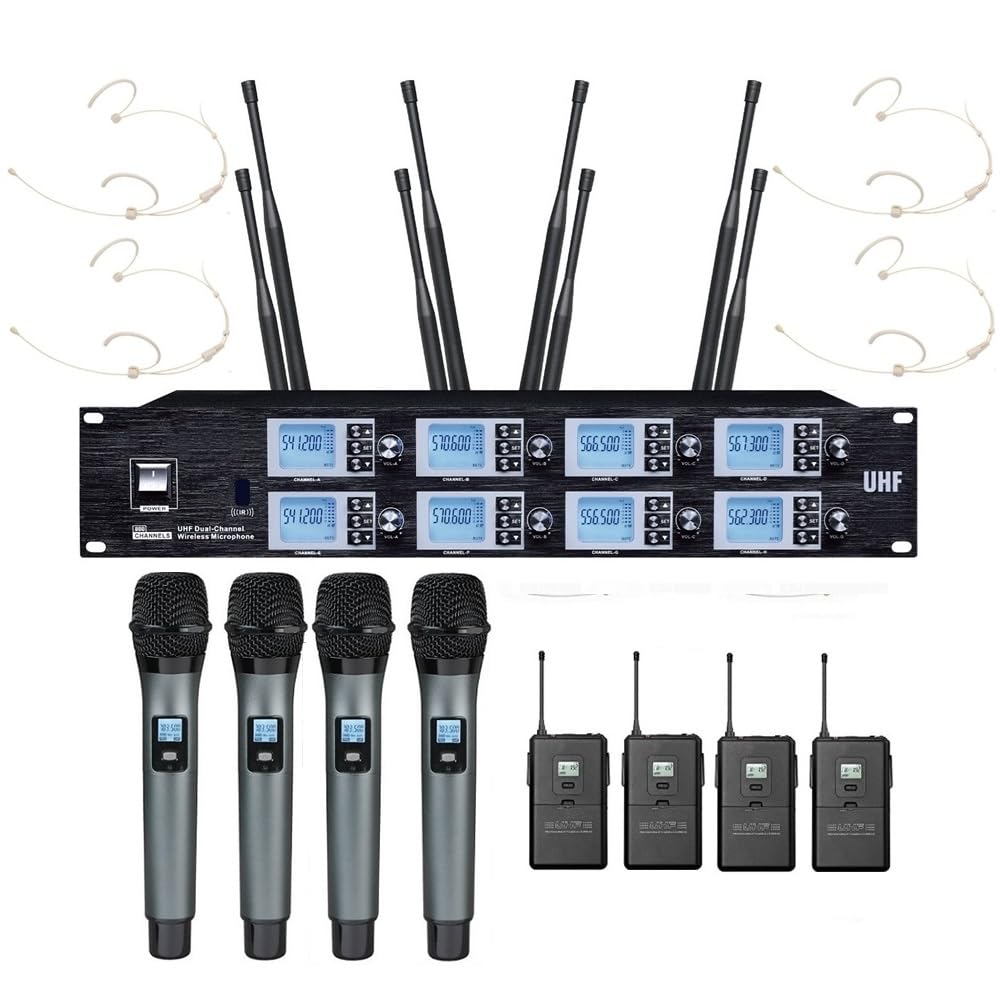
Image: The Generic Pro Wireless Microphone System, showcasing the receiver unit and various microphones.
2. Package Contents
Please inspect the package carefully to ensure all items are present and in good condition:
- 1 x 8-Channel UHF Wireless Receiver
- 4 x Metal Handheld Microphones
- 4 x Bodypack Transmitters
- 4 x Headset Microphones (for use with bodypack transmitters)
- 1 x 1/4" Audio Cable
- 1 x AC-DC Power Adapter
- 8 x Antennas
- 8 x Anti-Rolling Rings (for handheld microphones)
- 1 x User Manual (this document)
3. Product Overview
3.1 Receiver Unit
The receiver unit is the central component of your wireless microphone system, processing audio signals from the microphones and outputting them to your sound system. It features multiple input/output ports and controls for optimal performance.
Receiver Rear Panel Description:
The rear panel of the receiver unit provides all necessary connections for audio output, antenna input, and power. From left to right, the connections are as follows:
- Antenna A Connections: Two ports for connecting Antenna A.
- D XLR Output: Balanced XLR output for channel D.
- C XLR Output: Balanced XLR output for channel C.
- Antenna C Connection: Port for connecting Antenna C.
- 6.35mm MIX Output: Unbalanced 1/4" (6.35mm) mixed audio output for all channels.
- Antenna B Connection: Port for connecting Antenna B.
- B XLR Output: Balanced XLR output for channel B.
- A XLR Output: Balanced XLR output for channel A.
- Antenna A Connection: Another port for connecting Antenna A.
- Power Input (12V DC): Connection for the AC-DC power adapter.
Note: A visual representation of the receiver's rear panel would typically be included here, illustrating the described ports. Please refer to the product's detailed images for a visual guide.
3.2 Microphones
The system includes four metal handheld microphones and four bodypack transmitters with accompanying headset microphones. All microphones feature a cardioid dynamic cartridge for clear sound capture.
- Handheld Microphones: Ideal for vocal performances, speeches, and interviews.
- Bodypack Transmitters & Headset Microphones: Suitable for hands-free operation, such as presentations, fitness instructors, or theatrical performances.
4. Setup Guide
4.1 Antenna Installation
- Locate the 8 antennas provided in the package.
- Screw each antenna firmly into its corresponding antenna port on the rear panel of the receiver. Ensure they are securely tightened for optimal signal reception.
- Position the antennas vertically or at a 45-degree angle for best performance.
4.2 Power Connection
- Connect the AC-DC power adapter to the 12V DC power input port on the receiver's rear panel.
- Plug the power adapter into a suitable electrical outlet.
4.3 Audio Output Connection
Connect the receiver to your mixer, amplifier, or sound system using one of the following methods:
- Individual XLR Outputs: For separate control over each microphone channel, connect XLR cables (not included) from the A, B, C, and D XLR outputs on the receiver to the corresponding input channels on your mixer.
- Mixed 1/4" Output: For a combined output of all microphone channels, use the provided 1/4" audio cable to connect the 6.35mm MIX output on the receiver to a 1/4" input on your mixer or amplifier.
4.4 Microphone Battery Installation
Each handheld microphone and bodypack transmitter requires batteries for operation. The specific battery type is typically AA. Please refer to the microphone's compartment for exact battery requirements.
- Unscrew the bottom cap of the handheld microphone or open the battery compartment of the bodypack transmitter.
- Insert the required batteries, ensuring correct polarity (+/-).
- Securely close the battery compartment or screw the cap back on.
5. Operating Instructions
5.1 Powering On/Off
- Receiver: Press the power button on the front panel of the receiver. The display should illuminate.
- Microphones: Turn on each handheld microphone or bodypack transmitter using its respective power switch.
5.2 IR Synchronization
The system uses IR synchronization to pair the microphones with the receiver channels.
- Ensure both the receiver and the desired microphone are powered on.
- On the receiver, select the channel you wish to pair.
- Activate the IR sync function on the receiver (refer to the receiver's front panel controls for the specific button).
- Align the IR window on the microphone (usually near the display or battery compartment) with the IR sensor on the receiver (typically on the front panel).
- The receiver and microphone will synchronize automatically within seconds. The microphone's display should show the same frequency as the receiver channel.
5.3 Frequency Selection (Auto Scan)
The auto-scan feature helps find the clearest available frequency to avoid interference.
- On the receiver, select the channel for which you want to change the frequency.
- Press the 'Auto Scan' button (or similar) on the receiver. The receiver will search for an interference-free frequency.
- Once a new frequency is found, perform IR synchronization (as described in Section 5.2) to pair the microphone with the new frequency.
5.4 Volume Adjustment
Each channel on the receiver typically has an individual volume control knob on the front panel. Adjust these knobs to set the desired output level for each microphone. Further volume adjustments can be made on your connected mixer or amplifier.
5.5 Using Bodypack and Headset Microphones
- Connect the headset microphone's cable to the input jack on the bodypack transmitter.
- Secure the bodypack transmitter to your belt or clothing.
- Position the headset microphone comfortably, ensuring the microphone element is close to your mouth for optimal sound capture.
- Power on the bodypack transmitter and synchronize it with the receiver as described in Section 5.2.
6. Maintenance
6.1 Cleaning
- Wipe the receiver and microphones with a soft, dry cloth.
- For stubborn dirt, use a slightly damp cloth and then dry thoroughly.
- Do not use harsh chemicals, solvents, or abrasive cleaners.
6.2 Battery Replacement
- Replace microphone batteries when the low battery indicator appears on the microphone's display or when performance degrades.
- Always use fresh, high-quality batteries of the correct type.
- Remove batteries from microphones if they will not be used for an extended period to prevent leakage.
6.3 Storage
- Store the system in a cool, dry place away from direct sunlight and extreme temperatures.
- Keep components in their original packaging or a protective case to prevent damage.
7. Troubleshooting
| Problem | Possible Cause | Solution |
|---|---|---|
| No sound from microphone | Microphone or receiver not powered on; Batteries low/dead; Microphone not paired; Audio cable disconnected; Mixer/amplifier input issues. | Ensure all devices are powered on. Replace batteries. Perform IR synchronization. Check audio cable connections. Verify mixer/amplifier settings. |
| Interference or static | Nearby electronic devices; Other wireless systems; Frequency conflict. | Move away from sources of interference. Use the auto-scan feature to find a clear frequency and re-sync. |
| Short operating range | Antennas not properly installed/positioned; Obstructions; Low microphone battery. | Ensure antennas are securely attached and positioned correctly. Minimize obstructions between microphone and receiver. Replace microphone batteries. |
| Microphone display not working | Low/dead batteries; Microphone fault. | Replace batteries. If problem persists, contact support. |
8. Specifications
- Model Name: BL-8800-4H4H
- Brand: Generic
- Number of Channels: 8
- Frequency Band: 500MHz UHF (selectable frequencies)
- Operating Range: Up to 328ft (line of sight)
- Synchronization: IR (Infrared)
- Receiver Outputs: 8 x XLR Balanced, 1 x 1/4" (6.35mm) Mixed Unbalanced
- Microphone Type: Cardioid Dynamic
- Connectivity Technology: XLR
- Compatible Devices: Amplifier
- Special Feature: Volume Control, Auto Scan
- Item Weight: 6.5 Kilograms (Receiver and accessories)
- Power Input: 12V DC (via AC-DC adapter)
- Recommended Uses: Church, Conference, School, Singing, Stage Performance
9. Warranty and Support
This product typically comes with a manufacturer's warranty. Please refer to the warranty information provided at the time of purchase or contact your retailer for details regarding warranty coverage and duration. For technical support, troubleshooting assistance beyond this manual, or inquiries about replacement parts, please contact the manufacturer or your authorized dealer.