1. Safety Information
Always read and follow the instructions provided in the user manual. Before painting, ensure the suction tube is inserted tightly to avoid ineffective spraying. Never point the spray gun at people or animals. Keep the spray gun away from heat sources and open flames. In case of accidental ingestion or contact with eyes, seek medical attention immediately. Dispose of the product and its packaging in accordance with local, state, and federal regulations.
The AZZUNO portable paint spray gun has passed FCC and UL certification to ensure a safe product experience. The motor is equipped with a temperature protection fuse, which will automatically cut off the power supply when overheating to extend the service life. The brass nozzle is better than the plastic nozzle, durable and easy to clean. The double insulation design ensures safe operation.
2. What's in the Box
Your AZZUNO HVLP Paint Sprayer package includes the following components:
- 1x Paint Sprayer Unit
- 4x Nozzles (1.2mm, 1.5mm, 2.5mm, 3.0mm - one pre-installed)
- 1x Nozzle Cleaning Needle
- 1x Cleaning Brush
- 1x Safety Glasses
- 1x Viscosity Cup
- 1x Paint Filter (Bonus 5 paint paper)
- 1x User Manual

Image: All included components of the AZZUNO HVLP Paint Sprayer.
3. Setup Instructions
Follow these steps to assemble and prepare your paint sprayer for use:
- Attach the Spray Gun to the Motor Unit: Align the spray gun assembly with the main motor unit. Push them together firmly until you hear a click, ensuring the connection is secure.
- Attach the Paint Container: Screw the paint container onto the bottom of the spray gun assembly. Ensure it is tightened securely to prevent leaks.
- Insert Milwaukee 18V Battery: Slide a fully charged Milwaukee 18V lithium-ion battery into the battery slot at the base of the motor unit. Ensure it locks into place. (Note: Battery is not included and must be purchased separately.)

Image: Fully assembled AZZUNO HVLP Paint Sprayer, ready for operation.
4. Operating Instructions
4.1 Paint Preparation and Thinning
Proper paint preparation is crucial for optimal spray results. Use the included viscosity cup to test the paint's thickness. Different paints require different thinning ratios. Refer to the paint manufacturer's guidelines for specific thinning instructions.

Image: General paint thinning guide. Always consult your paint manufacturer's recommendations.
4.2 Nozzle Selection
The sprayer comes with four different nozzle sizes (1.2mm, 1.5mm, 2.5mm, 3.0mm) to accommodate various painting projects and paint viscosities. Smaller nozzles are ideal for fine finishes and thinner materials, while larger nozzles are suitable for thicker paints and larger areas.
- 1.2mm Nozzle: For very fine finishes, thin materials, and small details.
- 1.5mm Nozzle: For general purpose, medium viscosity paints, and furniture.
- 2.5mm Nozzle: For thicker paints, railings, and window frames.
- 3.0mm Nozzle: For very thick paints, large surfaces like walls, decks, and fences.

Image: The four interchangeable nozzles for various applications.
4.3 Spray Pattern Adjustment
The sprayer allows you to adjust the spray pattern to horizontal, vertical, or circular, depending on your project needs. Rotate the air cap to select the desired pattern.
- Horizontal Pattern: Ideal for spraying vertical surfaces.
- Vertical Pattern: Ideal for spraying horizontal surfaces.
- Circular Pattern: Best for small objects or intricate details.
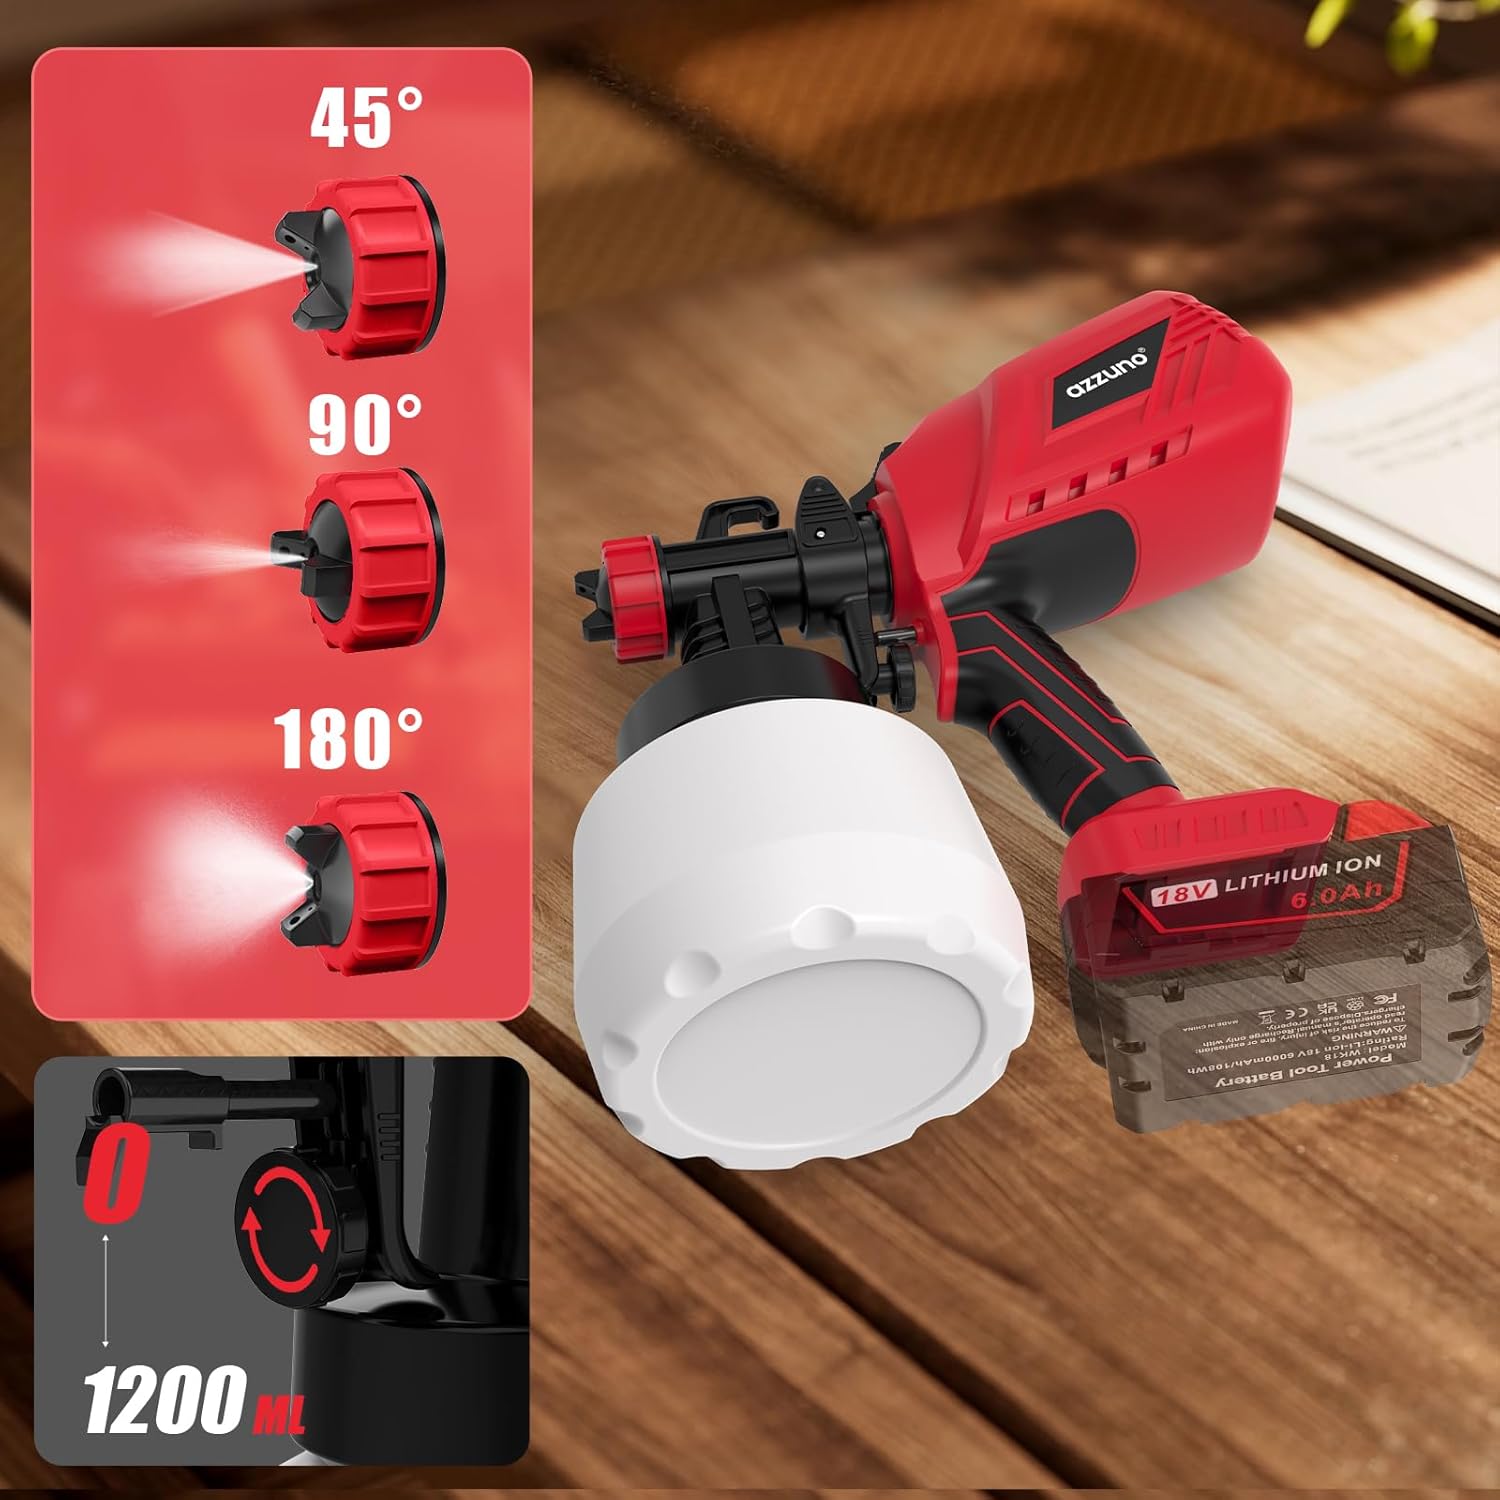
Image: Adjusting the spray pattern by rotating the nozzle.
4.4 Flow Control
Adjust the material flow rate by turning the flow control knob. Turn clockwise for more flow and counter-clockwise for less flow. This allows for precise control over paint output.

Image: Flexible flow control knob for adjusting paint output.
4.5 Spraying Technique
Maintain a consistent distance from the surface (approximately 6-8 inches) and move the sprayer in smooth, even strokes. Overlap each pass by about 50% to ensure even coverage. Always test on a scrap piece of material first to adjust settings.

Image: Demonstrating proper spraying technique for even coverage.
5. Maintenance and Cleaning
Thorough cleaning after each use is essential to maintain the sprayer's performance and longevity.
- Empty and Rinse Container: Empty any remaining paint from the container. Fill it with an appropriate cleaning solution (water for water-based paints, mineral spirits for oil-based paints) and spray it through the gun until clear.
- Disassemble: Remove the paint container, then detach the spray gun assembly from the motor unit.
- Clean Components: Carefully clean the nozzle, air cap, and suction tube using the provided cleaning brush and needle. Ensure all paint residue is removed.
- Wipe Down: Wipe the exterior of the sprayer with a damp cloth.
- Reassemble: Once all parts are clean and dry, reassemble the sprayer.

Image: Visual guide for disassembling and cleaning the paint sprayer components.
6. Troubleshooting
If you encounter issues with your AZZUNO paint sprayer, consider the following common solutions:
- No Spray or Weak Spray:
- Check if the battery is fully charged and properly inserted.
- Ensure the suction tube is fully submerged in paint and securely attached.
- Verify the nozzle and air cap are clean and free of clogs.
- Confirm the paint is thinned to the correct viscosity.
- Uneven Spray Pattern:
- Clean the nozzle and air cap thoroughly.
- Adjust the spray pattern setting.
- Ensure consistent distance and movement during spraying.
- Paint Leaking:
- Check that the paint container is tightly screwed on.
- Ensure all connections are secure.
- Overheating:
- If the motor overheats, the temperature protection fuse will automatically cut power. Allow the unit to cool down before resuming use.
For further assistance, please contact AZZUNO customer support.
7. Specifications
| Feature | Detail |
|---|---|
| Brand | AZZUNO |
| Model Name | Cordless Paint Sprayer |
| Model Number | DC-RED |
| Power Source | DC (Compatible with Milwaukee 18V batteries) |
| Tank Volume | 1200 Milliliters (approx. 41 fl oz) |
| Maximum Pressure | 12 PSI |
| Nozzle Sizes | 1.2mm, 1.5mm, 2.5mm, 3.0mm |
| Max Viscosity | 120 Din-s |
| Material | Plastic (Brass nozzle) |
| Item Weight | 2.5 Pounds |
| Item Dimensions (W x H) | 4.5"W x 11.8"H |
8. Warranty and Support
AZZUNO offers a 36-month quality support commitment for your paint sprayer. In case of manufacturing defects, you are eligible for a free replacement within 36 months of purchase.
For customer service and support, please contact us via Amazon.

Image: AZZUNO's 36-month quality support commitment for manufacturing defects.