Goyappin HC 3800 PRO
Goyappin 2500 W Pressurized Handheld Steam Cleaner User Manual
Model: HC 3800 PRO | Brand: Goyappin
1. Introduction
Thank you for choosing the Goyappin 2500 W Pressurized Handheld Steam Cleaner. This high-temperature steamer is designed to provide powerful and chemical-free cleaning for a wide range of surfaces in your home and vehicle. Please read this manual thoroughly before first use to ensure safe and optimal operation of your device.

Image 1.1: The Goyappin 2500 W Pressurized Handheld Steam Cleaner with its various attachments.
2. Important Safety Instructions
To reduce the risk of fire, electric shock, or injury, always follow basic safety precautions when using an electrical appliance. This includes:
- Read all instructions before using the appliance.
- Do not direct steam at people, animals, or electrical appliances. Steam is extremely hot and can cause burns.
- Use only clean tap water. Do not add cleaning solutions, perfumes, or other chemicals to the water tank, as this can damage the unit and void the warranty.
- Always unplug the steam cleaner from the electrical outlet when not in use and before performing any maintenance or cleaning.
- Keep the appliance out of reach of children and pets.
- Ensure proper ventilation when using the steam cleaner.
- Do not operate the appliance with a damaged cord or plug. If the appliance is not working as it should, has been dropped, damaged, left outdoors, or dropped into water, return it to a service center.
- Never immerse the steam cleaner in water or other liquids.
3. Package Contents
Please check the box for the following items:
- Goyappin Steam Cleaner Main Unit
- Spray Gun Handle with Steam Tube
- Nozzle
- Big Round Brush
- Glass Clean Tool
- Fabric Clean Tool
- Nylon Brush
- Steel Brush
- Extended Power Cord
- Extension Pole
- Rubber Ring (for sealing)
- Heat-Resistant Gloves
- User Manual

Image 3.1: All included accessories for the Goyappin Steam Cleaner.
4. Setup
4.1 Adding Water
- Ensure the steam cleaner is unplugged from the power outlet.
- Open the water tank cap on the main unit.
- Carefully pour clean tap water into the tank. The tank has a capacity of 1200ML. Do not overfill.
- Securely close the water tank cap.
4.2 Attaching Brush Heads / Nozzles
Select the appropriate brush head or nozzle for your cleaning task. Ensure the rubber ring is properly placed at the nozzle or extension rod connection to prevent water leakage.

Image 4.1: Illustration of attaching various brush heads and the critical placement of the rubber ring to prevent leaks.
- Align the chosen brush head or nozzle with the end of the spray gun handle or extension pole.
- Twist or push firmly until it clicks securely into place.
- If using the flat scraper, ensure the rubber strip is at the front end to avoid scratching surfaces.

Image 4.2: Visual steps for adding water, installing brush heads, and connecting power.
5. Operating Instructions
5.1 Powering On and Heating
- After adding water and attaching the desired accessory, connect the power cord to a suitable electrical outlet.
- Press the power button on the main unit. The device will begin heating.
- The steam cleaner features a fast heating time of approximately 15 seconds. Wait until the indicator light signals it's ready for use.
5.2 Adjusting Steam Volume
The steam cleaner offers 6 gears (levels) of steam control, allowing you to adjust the steam output based on the cleaning task and surface. Use the '+' and '-' buttons on the main unit to select your desired steam level (1-6).

Image 5.1: The steam cleaner operating at high temperature and pressure, ideal for tough grime.
5.3 Cleaning Various Surfaces
Hold the spray gun handle and direct the steam jet towards the surface you wish to clean. Move the nozzle slowly over the area to allow the steam to penetrate and loosen dirt. For stubborn stains, you may need to apply steam for a longer duration or use a brush attachment.

Image 5.2: The steam cleaner is designed for easy use, allowing operation from a distance with its long steam tube and power cable.
- Floor Tile & Grout: Use the steel brush or nylon brush for deep cleaning grout lines and tile surfaces.
- Bathroom & Shower: The high temperature steam is effective for sanitizing and removing soap scum from bathroom fixtures and tiles.
- Microwave & Oven: Use the steel brush or nozzle to loosen baked-on food and grease.
- Mattress & Couch: The fabric clean tool or nylon brush can be used to refresh fabrics and help eliminate dust mites and bed bugs.
- Windows & Glass: Attach the glass clean tool for streak-free window cleaning.
- Car Detailing: Ideal for cleaning car interiors, including upholstery, dashboards, and vents.
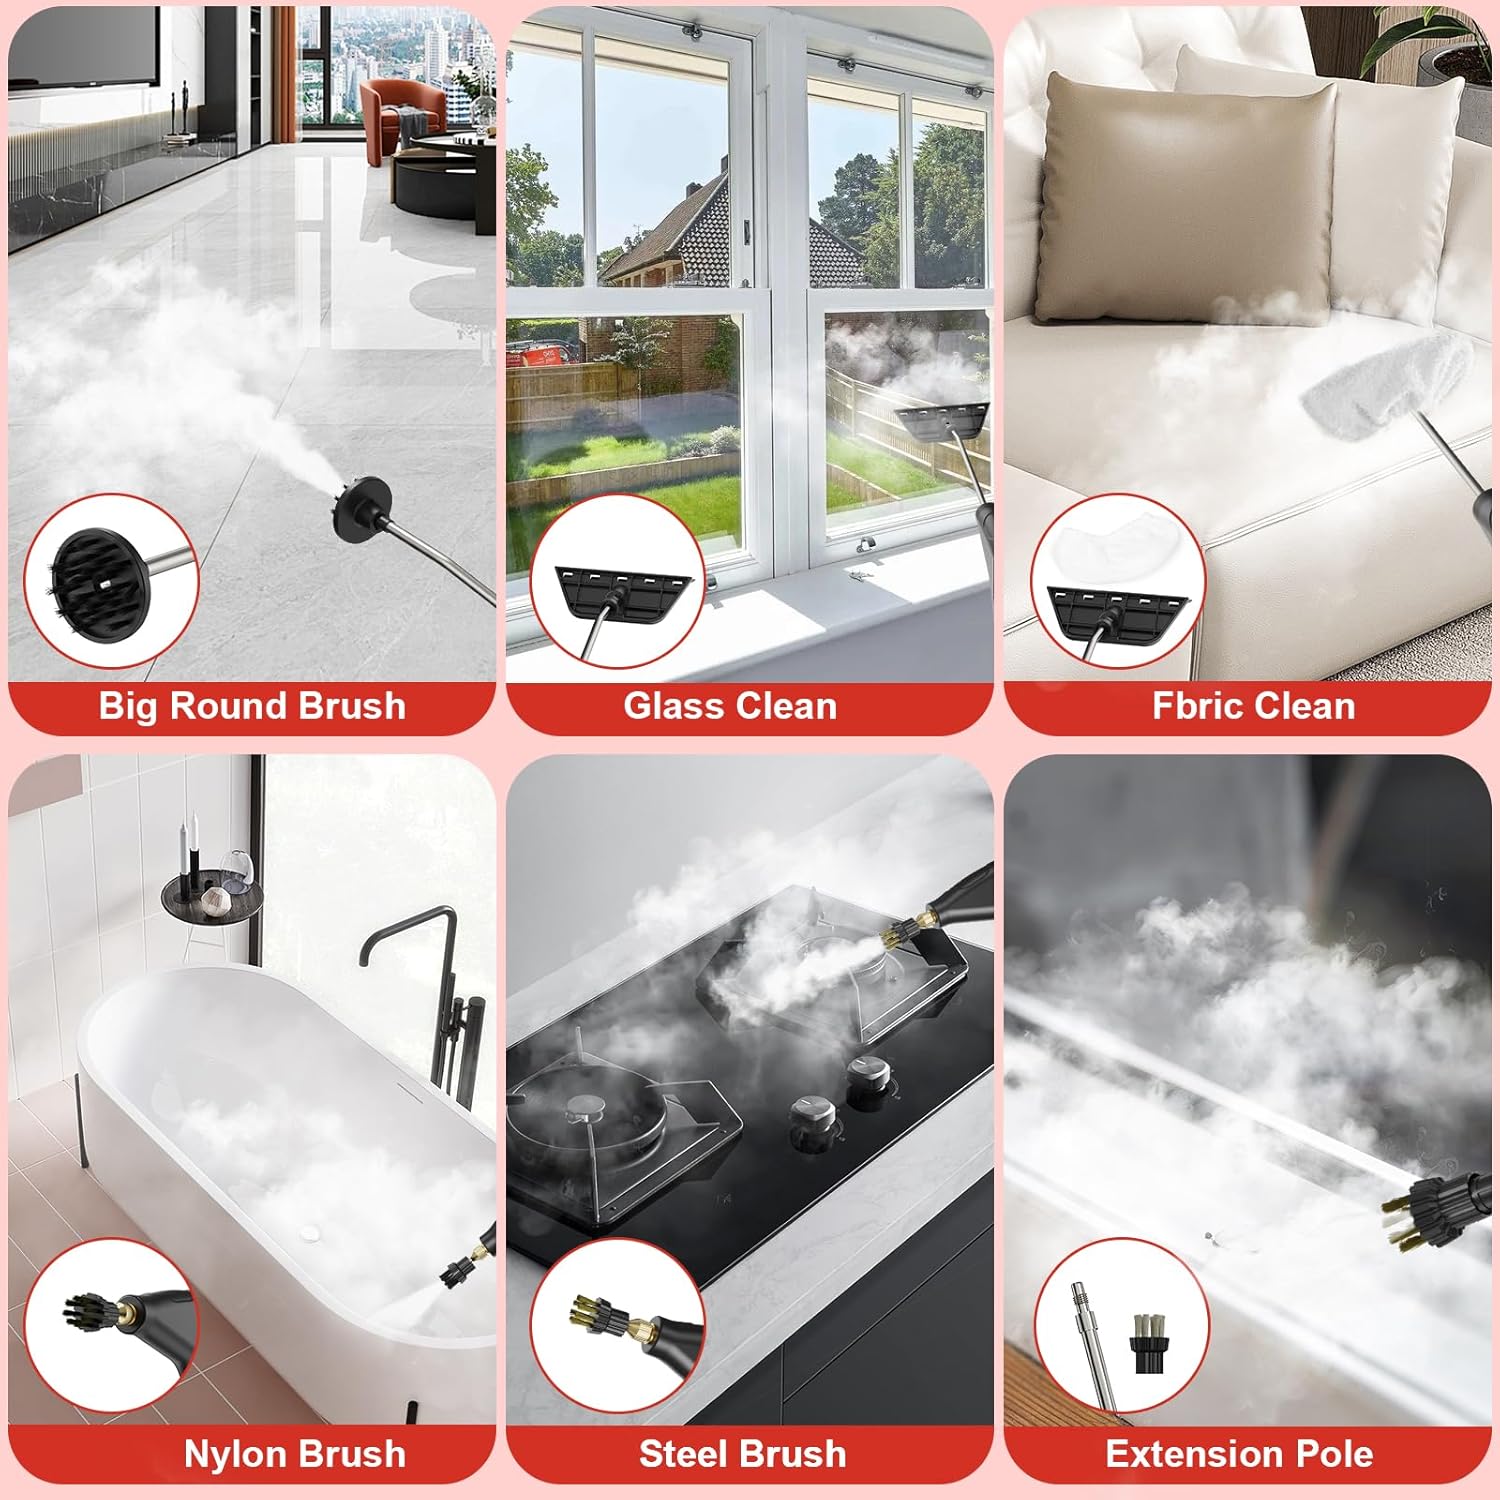
Image 5.3: Examples of multipurpose use, including cleaning stovetops, floors, windows, and couches.
6. Maintenance
6.1 Draining Water
After each use, or when storing the unit for an extended period, it is recommended to drain any remaining water from the tank.
- Ensure the unit is unplugged and completely cooled down.
- Locate the bottom drain plug on the main unit.
- Carefully open the drain plug and allow all water to empty into a sink or bucket.
- Close the drain plug securely.
6.2 Cleaning the Unit and Accessories
- Wipe the exterior of the main unit with a damp cloth. Do not use abrasive cleaners.
- Clean brush heads and nozzles with water and mild soap if necessary. Ensure they are dry before storing.
- Regularly check the nozzle for any mineral buildup. If necessary, use a small brush or pin to clear any blockages.
6.3 Storage
Store the steam cleaner and its accessories in a cool, dry place, away from direct sunlight and extreme temperatures. Ensure all components are dry before storage.
7. Troubleshooting
If you encounter issues with your steam cleaner, please refer to the following table before contacting customer support.
| Problem | Possible Cause | Solution |
|---|---|---|
| No steam or low steam output. | Water tank is empty or low. Unit not heated sufficiently. Nozzle/hose is blocked. | Refill water tank. Allow 15 seconds for heating. Check for blockages and clean. |
| Water leaking from connections. | Accessories not securely attached. Rubber ring is missing or misplaced. | Ensure accessories are firmly twisted/pushed into place. Check and correctly position the rubber ring. |
| Power indicator light not on. | Unit not plugged in. Power outlet malfunction. | Ensure power cord is securely plugged into a working outlet. Try a different outlet. |
| Steam is not hot enough. | Unit not fully heated. Steam level set too low. | Allow more time for heating. Increase steam level using '+' button. |
8. Specifications
| Feature | Detail |
|---|---|
| Brand | Goyappin |
| Model Number | HC 3800 PRO |
| Power Source | Electric (2500 W) |
| Water Tank Capacity | 1200 ML |
| Heating Time | Approx. 15 seconds |
| Steam Temperature | Up to 221°F (105°C) |
| Steam Pressure | Up to 3 Bar |
| Form Factor | Handheld |
| Product Dimensions | 5.2 x 5.9 x 7.2 inches |
| Item Weight | 4.2 pounds |
| Surface Recommendation | Floor Tile, Bathroom, Microwave, Mattress, Windows, Car Detailing, Grout, Couch |
9. Warranty and Support
For warranty information and customer support, please refer to the documentation included with your purchase or contact Goyappin directly through their official website or the retailer where the product was purchased. Keep your purchase receipt as proof of purchase.