Introduction
This manual provides detailed instructions for the installation, operation, and maintenance of your Altix CL3 LVD Smart Lock Cylinder. Please read this manual thoroughly before using the product to ensure proper function and safety. This smart lock offers multiple convenient access methods including fingerprint, passcode, smart key card, Bluetooth, and traditional metal key.
Safety Information
- Battery Safety: Use only 4 x AAA batteries. Do not mix old and new batteries. Remove batteries if the lock will not be used for an extended period to prevent leakage.
- Environmental Conditions: The lock is IP64 rated for water resistance, making it suitable for outdoor use. However, avoid prolonged exposure to extreme weather conditions or direct water submersion.
- Installation: Ensure the lock is installed correctly according to the instructions to prevent malfunction and ensure security. Improper installation may void the warranty.
- Emergency Access: Always keep the metal backup keys in a secure, accessible location outside the property for emergency entry.
Package Contents
Verify that all components are present before beginning installation:
- Altix CL3 LVD Smart Lock Cylinder (Main Unit)
- 2 x Metal Keys
- 2 x Smart Key Cards
- Installation Tools (e.g., Screwdriver, retaining screw)
- User Manual (This document)
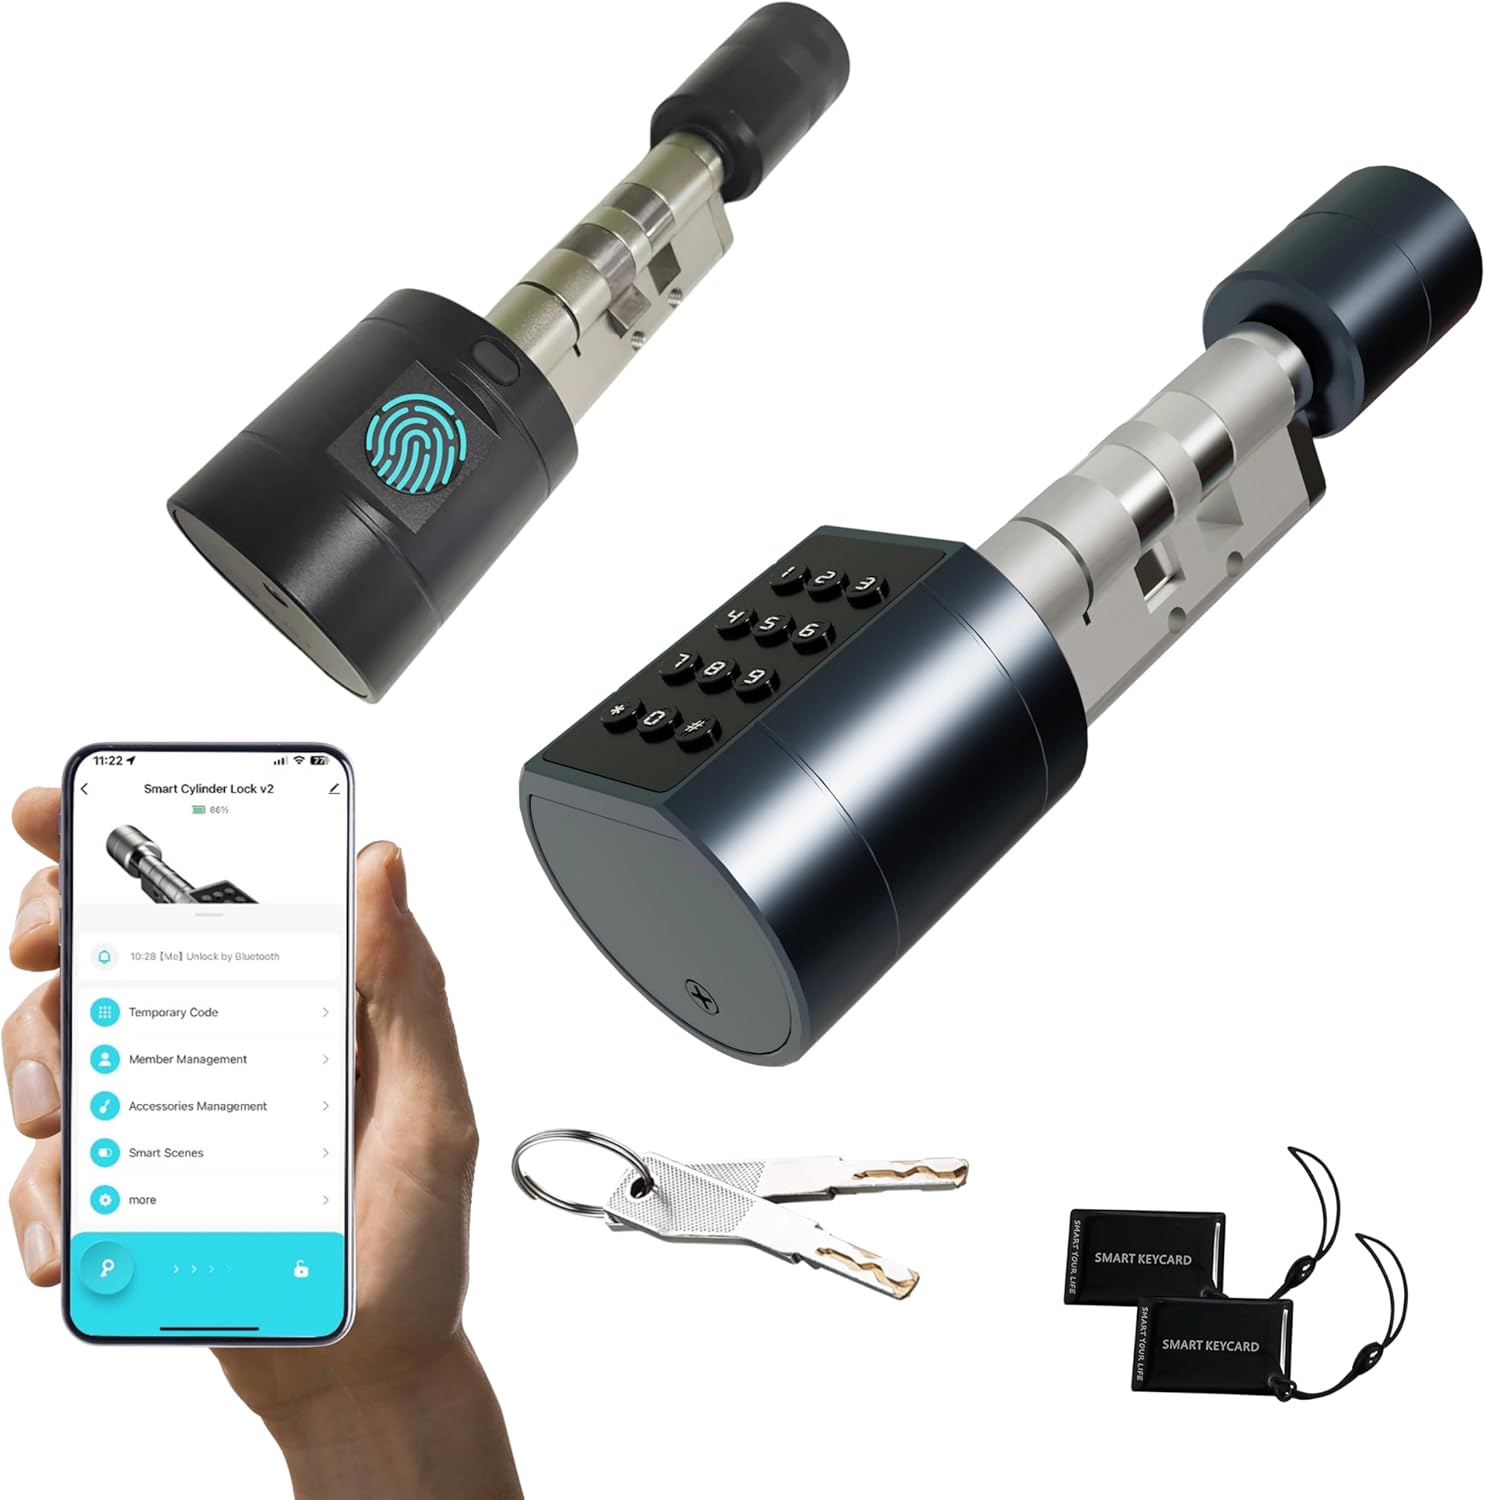
Image: Altix CL3 LVD Smart Lock Cylinder, showing the main unit, two metal keys, and two smart key cards.
Product Overview
Components

Image: Labeled diagram of the smart lock cylinder components, including the lock knob, fingerprint reader, battery box, cylinder hole, and password keyboard.
- Lock Knob: Used for manual locking/unlocking from the inside.
- Fingerprint Reader: For biometric access.
- Password Keyboard: For passcode entry.
- Battery Box: Houses 4 x AAA batteries.
- Cylinder Hole: For emergency metal key access.
- USB Charging Port: For emergency power recovery using a power bank (located on the bottom of the outer unit).
Key Features
- Multiple Unlock Methods: Fingerprint, Tuya App, Passcode, Metal Key, Smart Key Card.
- Adjustable Cylinder Length: Fits doors ranging from 35mm to 90mm thick.
- Tuya Smart App Integration: Seamlessly manage and monitor your lock from anywhere (requires Tuya Gateway for remote unlock).
- Fingerprint Storage: Stores up to 100+ unique fingerprints for multiple users.
- Bluetooth Access: Lock and unlock your door using Bluetooth from your smartphone when in close proximity.
- Waterproof Rating: IP64 rated for robust protection against dust and water splashes, ideal for outdoor use.
- Durable Construction: Built with a robust anti-pry aluminum alloy unibody design for enhanced security and longevity.

Image: Visual representation of the five available unlock methods for the smart lock.
Installation
The Altix CL3 LVD Smart Lock Cylinder is designed for DIY installation and typically does not require drilling or modification of your door. It is compatible with Euro profile cylinder locks.
Compatibility Check
Before installation, ensure your door thickness is between 35mm and 90mm. Measure your existing cylinder to confirm compatibility and select the appropriate length setting for the Altix CL3.

Image: Guide for measuring door thickness and cylinder dimensions to ensure compatibility.
Step-by-Step Installation
- Remove Old Cylinder: Locate the retaining screw on the side of your door (usually near the latch). Unscrew it completely and carefully slide out the existing lock cylinder.
- Adjust Cylinder Length: The Altix CL3 cylinder features an adjustable design. Refer to the included diagrams or the product's visual guides to adjust the cylinder's length to precisely match your door's thickness.
- Insert New Cylinder: Insert the Altix CL3 smart lock cylinder into the door's mortise, ensuring it aligns correctly with the existing lock mechanism. The outer unit (with keypad/fingerprint) should be on the exterior side of the door.
- Secure Cylinder: Re-insert the retaining screw into the side of the door and tighten it firmly to secure the new smart lock cylinder in place. Do not overtighten.
- Install Batteries: Open the battery compartment on the inner unit and insert 4 x AAA batteries (not included), ensuring correct polarity (+/-). Close the compartment securely.
- Test Functionality: Test the lock using a metal key from both sides (if applicable) and by manually turning the knob to ensure smooth operation and proper engagement of the deadbolt.

Image: Step-by-step visual guide for replacing an existing lock cylinder with the Altix smart lock.

Image: Illustration emphasizing the ease of installation and compatibility with various door types.
Operation
Initial Setup and App Integration (Tuya Smart App)
- Download App: Download the "Tuya Smart" app from your smartphone's app store (available for iOS and Android).
- Register/Login: Create a new account or log in to your existing Tuya Smart account.
- Add Device: In the Tuya Smart app, tap "Add Device" or the "+" icon. Select "Security & Video Surveillance" > "Lock (Bluetooth)" or allow the app to auto-discover the device. Ensure Bluetooth is enabled on your phone and the lock is powered on. Follow the on-screen prompts to pair your Altix CL3 Smart Lock.
- Remote Access (Optional): For remote unlock capabilities and advanced smart home integrations, a Tuya Gateway (sold separately) is required. Connect the gateway to your home Wi-Fi network and link it to your smart lock through the Tuya app.

Image: Tuya Smart app interface for managing the smart lock.

Image: Illustration of remote unlocking via the Tuya app and Tuya Gateway.
Unlocking Methods
- Fingerprint Unlock: Place your registered finger flat on the fingerprint reader. The lock will unlock with a confirmation sound/light if the fingerprint is recognized.
- Passcode Unlock: Enter your registered passcode on the keypad and press the '#' key to confirm.
- Smart Key Card Unlock: Tap the smart key card against the designated card reading area on the lock.
- Bluetooth Unlock: With your smartphone near the lock (within Bluetooth range), open the Tuya Smart app and tap the unlock icon.
- Metal Key Unlock: Insert the metal key into the cylinder hole and turn to unlock. This method is primarily for emergency backup.
Managing Users (Fingerprints, Passcodes, Key Cards)
All user management, including adding, modifying, and deleting access credentials, is performed through the Tuya Smart app.
- Adding Fingerprints: In the app, navigate to "Member Management" or "Fingerprint Management" and follow the prompts to register new fingerprints. You can store over 100 fingerprints.
- Adding Passcodes: Generate temporary, one-time, or permanent passcodes through the app's "Temporary Code" or "Passcode Management" section. You can set validity periods for temporary codes.
- Adding Key Cards: Register the included smart key cards via the app's "Accessories Management" or "Card Management" section.
- Tracking Access: The Tuya app allows you to view a detailed log of who locked/unlocked the door and when, providing enhanced security monitoring.
Image: Demonstrating fingerprint access and app integration.
Maintenance
Battery Replacement
The lock requires 4 x AAA batteries (not included). With normal use (approximately 8 lock/unlock cycles per day), the batteries can last up to 1 year.
- Monitor battery life regularly through the Tuya Smart app. The app will provide notifications when the battery level is low.
- When the battery is low, the lock may provide an audible or visual alert (e.g., flashing light, beeping sound).
- To replace, open the battery compartment on the inner unit, remove the old batteries, and insert new ones, ensuring correct polarity.
- In case of complete battery depletion, use the metal backup key or connect a power bank to the USB charging port for emergency power to open the lock.
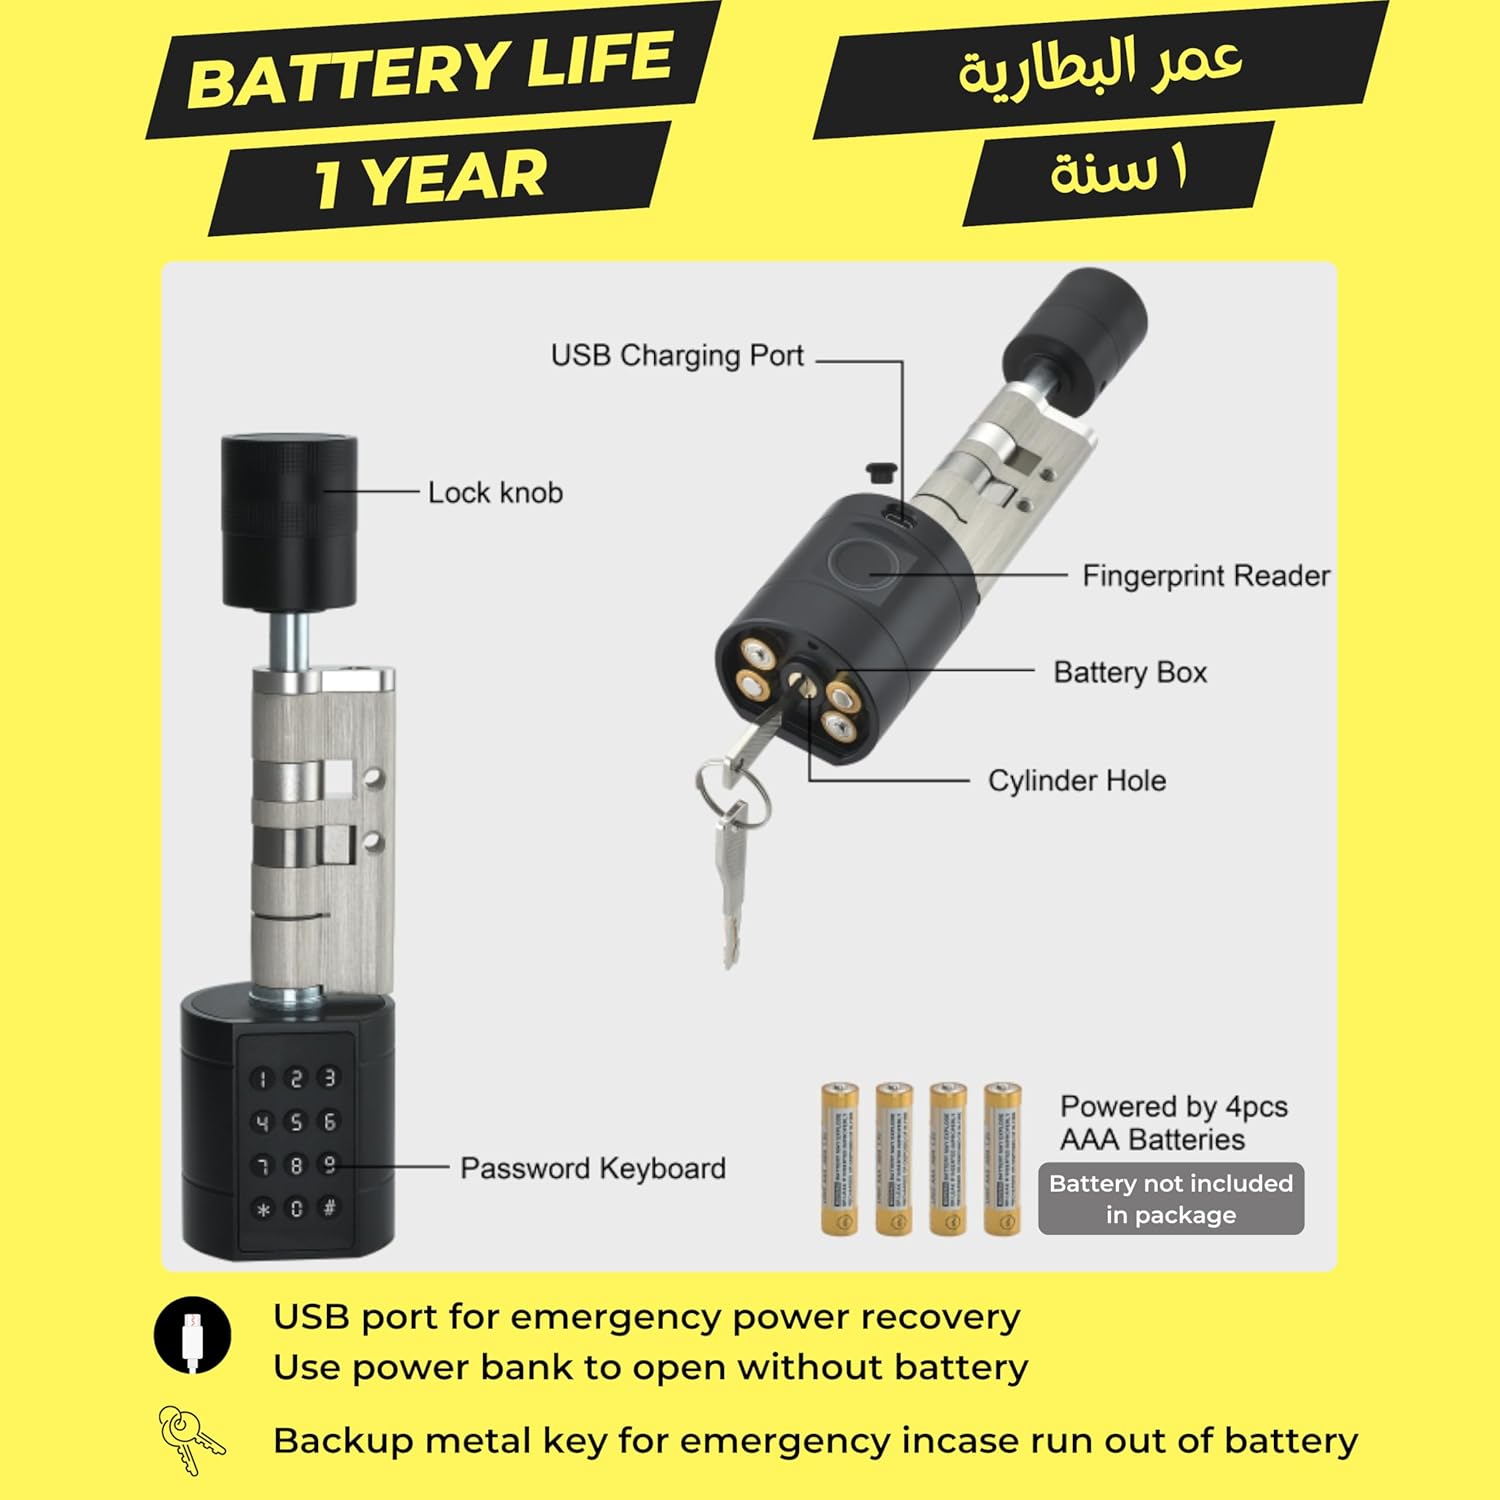
Image: Battery compartment and battery type (4x AAA) for the smart lock.
Cleaning
Wipe the lock surface with a soft, slightly damp cloth. Avoid using abrasive cleaners, solvents, or harsh chemicals that could damage the finish or electronic components. Ensure the fingerprint sensor and keypad are kept clean for optimal performance.
Troubleshooting
| Problem | Possible Cause | Solution |
|---|---|---|
| Lock not responding / No power | Dead batteries; Incorrect battery installation. | Replace batteries with new AAA batteries; Ensure correct polarity (+/-); Use metal key or power bank via USB port for emergency access. |
| Fingerprint not recognized | Finger dirty/wet; Finger not placed correctly; Fingerprint not registered or corrupted. | Clean finger and sensor surface; Reposition finger to cover the entire sensor; Register fingerprint again in the Tuya app. |
| Passcode not working | Incorrect passcode entered; Passcode expired (for temporary codes); Keypad malfunction. | Verify passcode accuracy; Check passcode validity in the Tuya app; Generate a new passcode if needed. |
| Cannot connect to Tuya App via Bluetooth | Bluetooth on phone is off; Lock not in pairing mode; App issues; Phone too far from lock. | Ensure Bluetooth is enabled on your phone; Restart the lock and phone; Reinstall the Tuya app if necessary; Move closer to the lock. |
| Remote unlock not working | Tuya Gateway not connected/configured; Internet connectivity issues; Gateway too far from lock. | Ensure Tuya Gateway is powered on and connected to your Wi-Fi network; Check your internet connection; Ensure the gateway is within range of the lock. |
Specifications
- Model: Altix CL3
- Dimensions: 17 x 5 x 5 cm (L x W x H)
- Weight: 600 g
- Material: Aluminum Alloy
- Door Thickness Compatibility: 35mm to 90mm
- Power Supply: 4 x AAA Batteries (not included)
- Battery Life: Up to 1 year (based on approx. 8 lock/unlock cycles per day)
- Waterproof Rating: IP64
- Connectivity: Bluetooth, Tuya App (requires Tuya Gateway for remote access)
- Fingerprint Capacity: 100+ unique fingerprints
- Unlock Methods: Fingerprint, Passcode, Smart Key Card, Bluetooth, Metal Key

Image: Product dimensions of the Altix CL3 smart lock.
Warranty and Support
For detailed warranty information and technical support, please refer to the official Altix website or contact your authorized retailer. It is recommended to keep your purchase receipt as proof of purchase for any warranty claims.
For further assistance or to explore other Altix products, you may visit the Altix Store on Amazon: Altix Store


