1. Important Safety Information
Please read all instructions carefully before installation and use. Retain this manual for future reference.
- Caution: This product contains glass which may break and cause injury. Always handle with care.
- Follow the provided instructions for safe installation and use.
- Ensure the main power supply is switched off at the circuit breaker before any electrical installation or maintenance. This operation should be performed by a certified electrician.
- Do not expose the mirror to excessive moisture or direct water spray beyond its IP54 rating.
- Keep children away from the installation area.

Image 1.1: The mirror features 5mm thick shatterproof tempered glass for enhanced durability.
2. Product Overview
The YITAHOME LED Bathroom Mirror (Model: MAYIHgKebp) is designed to enhance your bathroom experience with its advanced features. This 48"L x 32"W mirror includes front and backlit LED illumination, motion sensing, anti-fog functionality, a time and temperature display, and a 10X magnifying mirror accessory.
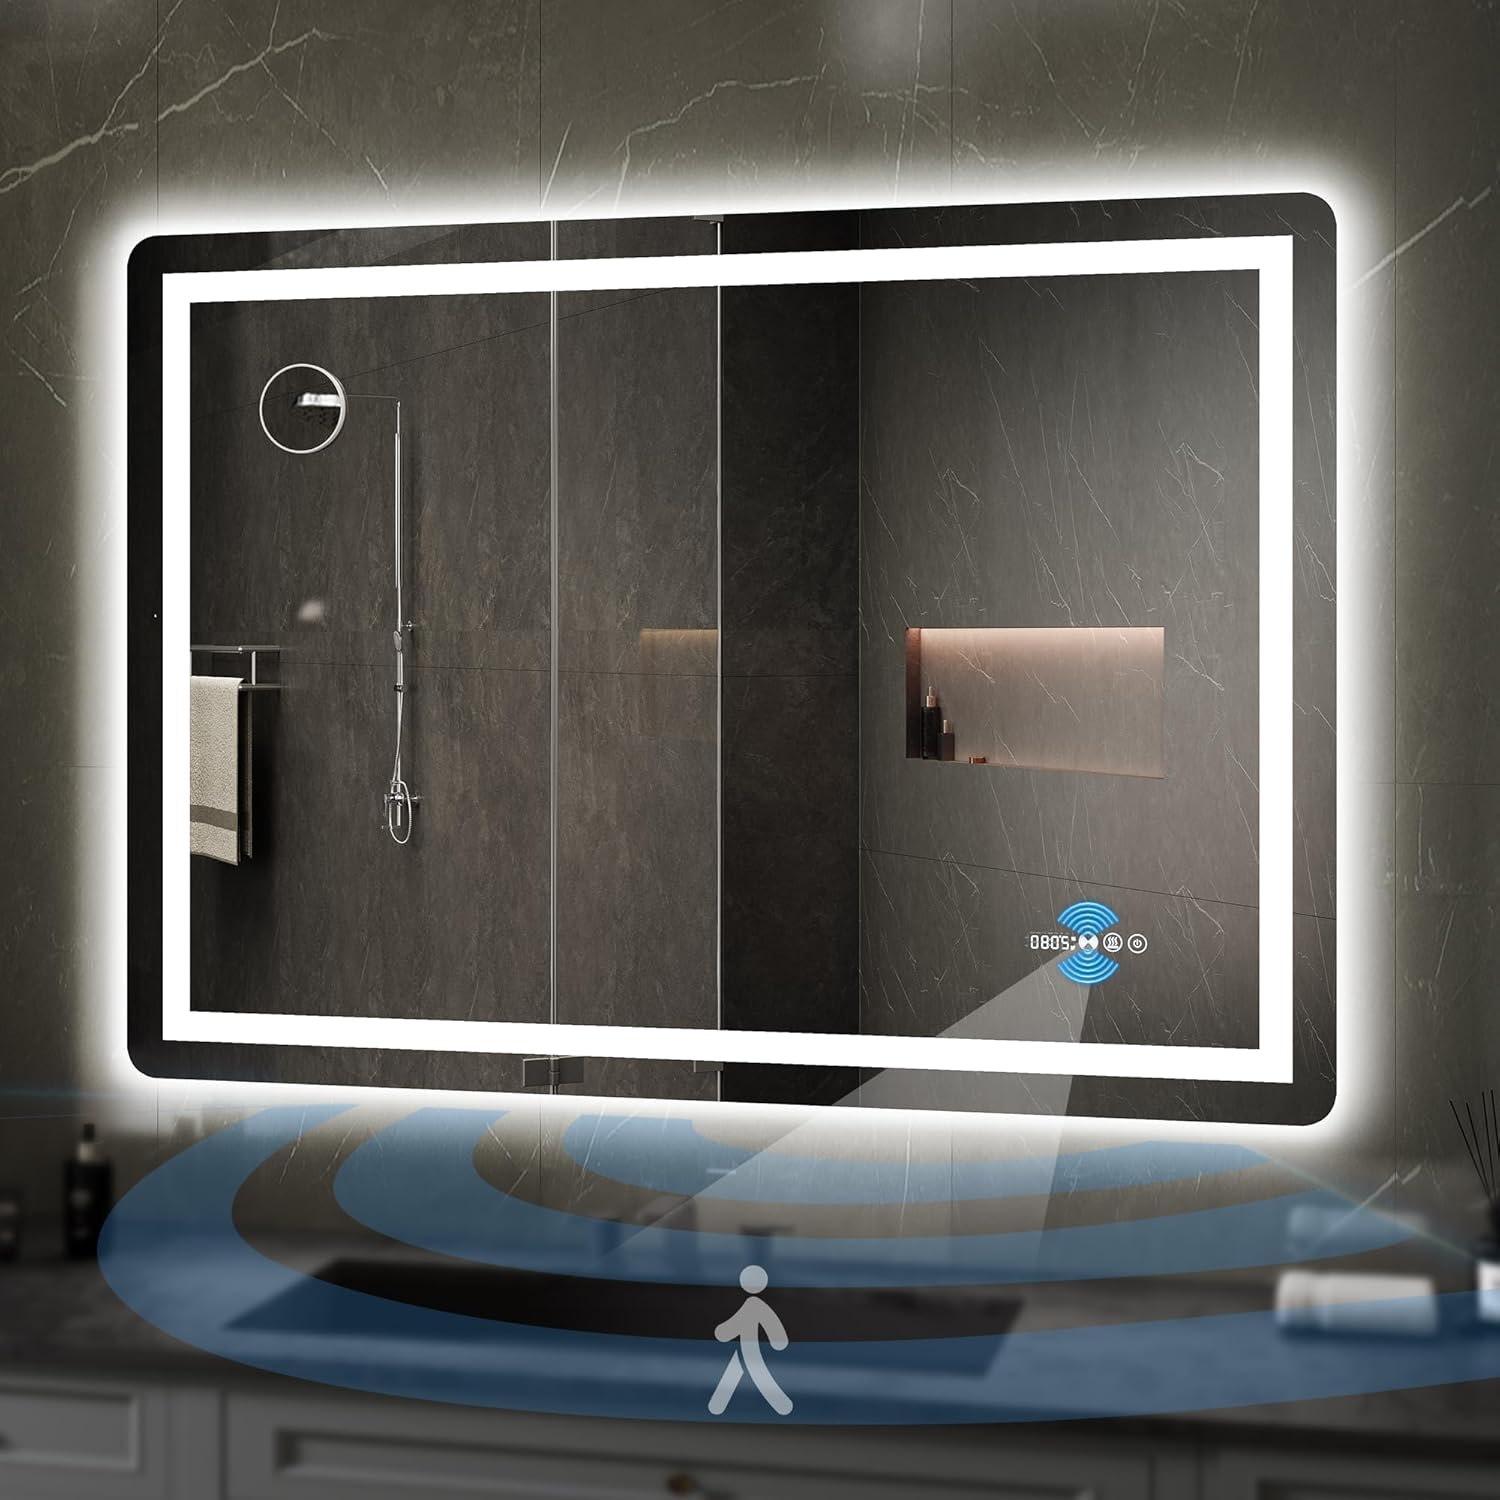
Image 2.1: YITAHOME 48x32 Inch LED Bathroom Mirror in a modern bathroom setting, showcasing its illuminated design.
3. Setup and Installation
This mirror is designed for wall-mounted horizontal installation only. Professional installation is recommended for direct wiring.
3.1. Before Installation
- Unpack the mirror carefully and inspect for any damage.
- Ensure all mounting hardware is present. The mirror typically includes hardware for installation.
- Choose a suitable location on a sturdy wall, away from direct water sources.
- Turn off the main power supply to the installation area at the circuit breaker.
3.2. Installation Options
The mirror offers two power connection methods:
- Mode A: Plug-in Installation
Simply plug the mirror's power cord into a standard electrical outlet. Ensure the outlet is within reach and properly grounded.
- Mode B: Direct Wire Installation (Hardwired)
For a seamless look, the power plug can be cut off, and the mirror's power cord can be directly connected to a power box. This requires electrical knowledge and should only be performed by a certified electrician to ensure safety and compliance with local electrical codes.
Safety Precaution: Ensure that the main power is switched off before conducting this operation.

Image 3.1: Illustration of the two power connection methods: plug-in and direct wiring.
4. Operating Instructions
The YITAHOME LED Bathroom Mirror features intuitive controls and smart functions.
4.1. Motion Sensor Activation
- The mirror is equipped with an infrared motion sensor.
- When motion is detected within 1 meter (3.28 feet), the mirror's lights will automatically turn on.
- The lights will remain on as long as motion is detected within a 20-100 cm sensing range.
- The lights will automatically turn off approximately 1 minute after no motion is detected within the range.
- The motion sensor feature can typically be toggled on or off via the mirror's settings, if available, or by a dedicated button. Refer to the on-screen icons for specific controls.

Image 4.1: Visual representation of the human body sensing function, showing auto-on and auto-off ranges.
4.2. Light Control (Touch Buttons)
The mirror features touch control buttons for adjusting illumination:
- Short Press: Tap the light control button to cycle through 3 different light colors (color temperatures): Warm White (3000K), Neutral White, and Cold White (6000K).
- Long Press: Press and hold the light control button to adjust the brightness level of the selected light color. Release when the desired brightness is achieved.
- The mirror includes a memory function, retaining your last brightness and color temperature setting.

Image 4.2: Detail of the touch control interface, showing options to enhance brightness, diminish brightness, and change light color.

Image 4.3: Illustration demonstrating the combined effect of frontlit and backlit illumination for brighter and clearer visibility.
4.3. Anti-Fog Function
- To activate the built-in defogger, locate the anti-fog touch button (often indicated by a steam icon).
- Tap the button to quickly clear fog from the mirror surface, ensuring a clear reflection even in steamy conditions.

Image 4.4: The anti-fog function in operation, providing a clear view despite steam.
4.4. Time and Temperature Display
- The mirror features an integrated display for time and ambient temperature.
- Setting Time and Date: Specific instructions for setting the time and date are typically found in the detailed manual provided with the product. Generally, this involves pressing and holding a specific button (often the power or a dedicated settings button) to enter setting mode, then using short presses to adjust values and long presses to confirm or move to the next setting.
- Adjusting Auto-Off Timer: If the mirror has an adjustable auto-off timer for the display or motion sensor, consult the product's specific instructions. This setting often requires navigating through a menu using the touch controls.

Image 4.5: Overview of the smart mirror features including time, temperature, motion sensing, and anti-fog.
4.5. 10X Magnifying Mirror
The mirror includes a separate 10X magnifying mirror accessory, designed to aid in detailed tasks such as makeup application or shaving. This accessory typically attaches to the main mirror surface via suction cups.

Image 4.6: A user utilizing the 10X magnifying mirror accessory for precise grooming.
5. Maintenance and Care
Proper maintenance ensures the longevity and optimal performance of your mirror.
- Cleaning the Mirror Surface: Use a soft, lint-free cloth and a non-abrasive glass cleaner. Spray the cleaner onto the cloth, not directly onto the mirror, to avoid liquid seeping into the electrical components.
- Cleaning the Frame: Wipe the frame with a soft, damp cloth. Avoid harsh chemicals or abrasive cleaners.
- Electrical Components: Ensure the mirror is unplugged or the power is off at the circuit breaker before cleaning any electrical parts. Do not spray water directly onto the mirror's edges or electrical connections.
- Regular Inspection: Periodically check the mounting hardware to ensure the mirror remains securely attached to the wall.
6. Troubleshooting
Refer to the following table for common issues and their solutions.
| Problem | Possible Cause | Solution |
|---|---|---|
| Mirror lights do not turn on. | No power supply; Motion sensor disabled or obstructed; Faulty wiring. | Check power connection (plugged in or circuit breaker on). Ensure motion sensor is enabled and clear. If hardwired, consult an electrician. |
| Anti-fog function not working. | Function not activated; Electrical issue. | Tap the anti-fog button to activate. Ensure mirror has power. |
| Difficulty setting time/date or auto-off timer. | Unfamiliarity with controls; Specific sequence required. | Refer to the detailed instruction manual provided with the product for specific button sequences. Experiment with long presses and short presses on the control buttons. |
| Motion sensor not responding or turning off too quickly. | Sensor obstructed; Sensitivity setting; Auto-off timer setting. | Ensure the sensor area is clear. Check if the motion sensor can be toggled or adjusted via settings. Consult the product manual for auto-off timer adjustments. |
7. Specifications
| Feature | Detail |
|---|---|
| Brand | YITAHOME |
| Model Number | MAYIHgKebp |
| Product Dimensions | 48"L x 32"W |
| Material | 5mm Tempered Glass |
| Mounting Type | Wall Mount (Horizontal Only) |
| Lighting | Front Light and Backlit LED |
| Color Temperature | 3000K (Warm White) to 6000K (Cold White) Dimmable |
| Special Features | Infrared Motion Sensor, Anti-Fog, Time & Temperature Display, 10X Magnifying Mirror (accessory) |
| Waterproof Rating | IP54 |
| Item Weight | 15 pounds |
| UPC | 197839114586 |
8. Warranty and Support
For warranty information, technical support, or any inquiries regarding your YITAHOME LED Bathroom Mirror, please refer to the warranty card included with your product or contact YITAHOME customer service directly. Contact details can typically be found on the manufacturer's official website or on the product packaging.


