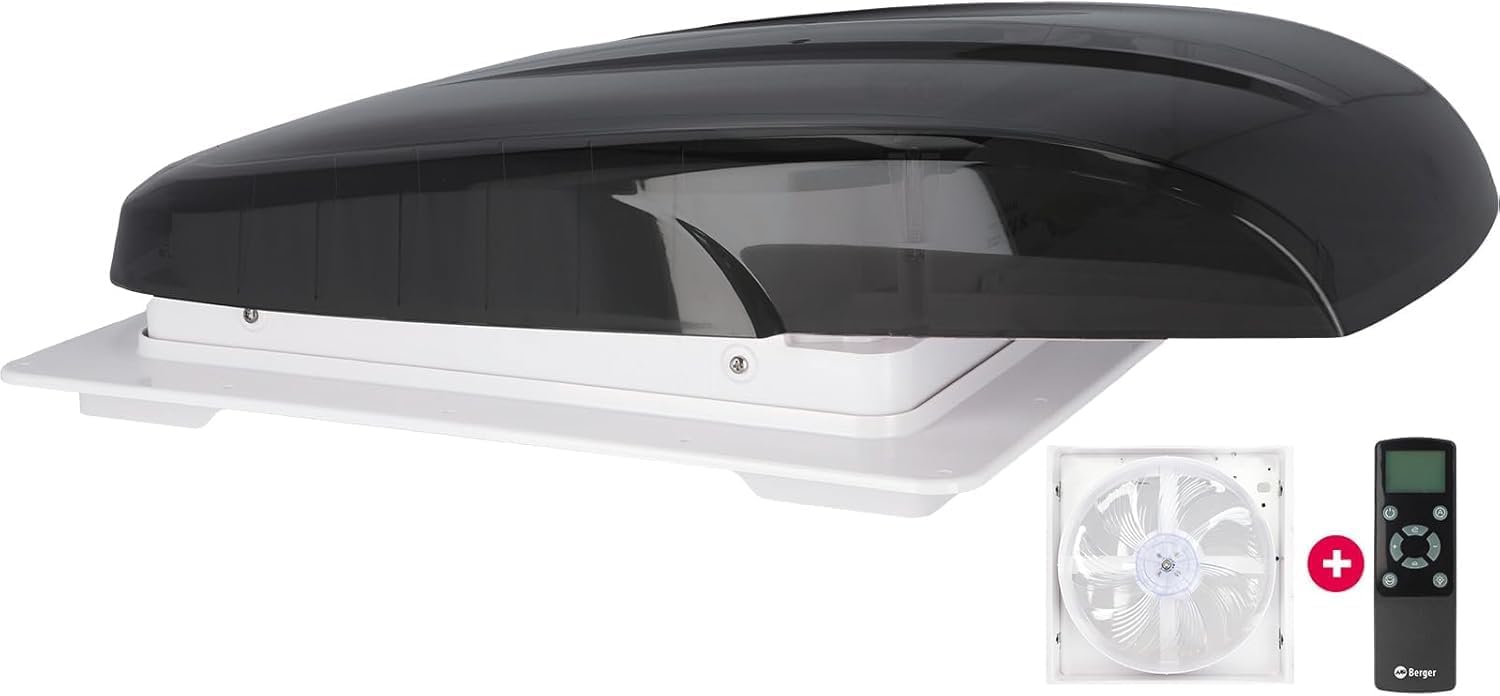
1. Introduction
Thank you for choosing the BERGER 40x40 Camper Roof Vent with 12V Fan. This product is designed to provide optimal ventilation, air exchange, and protection for your camper, van, or caravan. It features a powerful 4-speed fan, integrated mosquito net, blackout blind, and a convenient remote control for easy operation. This manual provides essential information for safe installation, operation, and maintenance of your new roof vent.
2. Safety Instructions
- Read all instructions carefully before installation and use.
- Ensure the power supply is disconnected before performing any installation or maintenance.
- Installation should be performed by a qualified professional if you are unsure about any steps.
- Use appropriate safety gear, including eye protection and gloves, during installation.
- Ensure proper sealing to prevent water leaks.
- Keep children away from the product during operation and maintenance.
- Do not insert objects into the fan blades.
3. Package Contents
Verify that all components are present in the package:
- BERGER 40x40 Camper Roof Vent Unit
- Remote Control
- User Manual
- Mounting Hardware (screws, seals)
4. Setup and Installation
The BERGER 40x40 Camper Roof Vent is designed for roofs with a thickness between 27mm and 80mm. Proper installation is crucial for optimal performance and to prevent leaks.
4.1. Preparation
- Choose Location: Select a flat area on your camper roof, ensuring it does not interfere with structural beams or other roof-mounted accessories. The ideal opening size is 40x40 cm.
- Clean Surface: Thoroughly clean the roof area where the vent will be installed. Remove any dirt, grease, or old sealant.
- Mark Opening: Carefully mark the 40x40 cm opening on the roof. Consider applying anti-scratch tape around the marked area to protect the paint during cutting.
4.2. Cutting the Opening
Using a hand drill, create pilot holes at the corners of your marked area. Then, use a jigsaw to carefully cut along the marked lines. Work at a low speed to minimize damage to the roof's paint.
Video: Camper Roof Vent Installation Guide
This video demonstrates the step-by-step process of installing a camper roof vent, including preparing the roof, cutting the opening, and securing the unit. It highlights important considerations like beam placement and sealing techniques.
4.3. Sealing and Mounting
- Paint Edges: Apply anti-rust paint to the cut edges of the roof opening to prevent corrosion.
- Apply Sealant: Apply a generous layer of waterproof sealant (e.g., Sikaflex 521 UV or butyl tape) around the perimeter of the roof opening. Ensure the sealant is thick enough to create a strong, watertight bond.
Side view of the BERGER 40x40 Camper Roof Vent, showing its low-profile design.
Technical diagram illustrating the dimensions and components of the roof vent.
Video: Sikaflex 521 UV Sealant Application
This video demonstrates the proper application of Sikaflex 521 UV sealant, a weather-resistant adhesive sealant suitable for various sealing needs, including roof vents.
Video: LLPT Butyl Seal Putty Tape Application
This video illustrates the use of butyl seal putty tape for leak-proof applications, including RV repair, window glass, and joint sealing, which can be used for roof vent installation.
- Position Vent: Carefully place the roof vent unit into the prepared opening, ensuring it sits flush with the roof surface.
- Secure Unit: Use the provided screws to secure the vent to the roof. Apply additional sealant over the screw heads for extra waterproofing.
- Install Interior Baffle: If applicable, cut the interior baffle to the desired size to fit your roof thickness and install it from inside the camper.
4.4. Wiring
Connect the 12V power cord from the roof vent to your camper's 12V power supply. Ensure correct polarity (red to positive, black to negative). Secure all wiring to prevent damage.
Interior view of the roof vent, showing the fan and integrated LED lighting.

A closer look at the fan blades and internal structure, highlighting the mosquito net.
5. Operating Instructions
The BERGER 40x40 Camper Roof Vent can be operated via the included remote control or the integrated control panel.
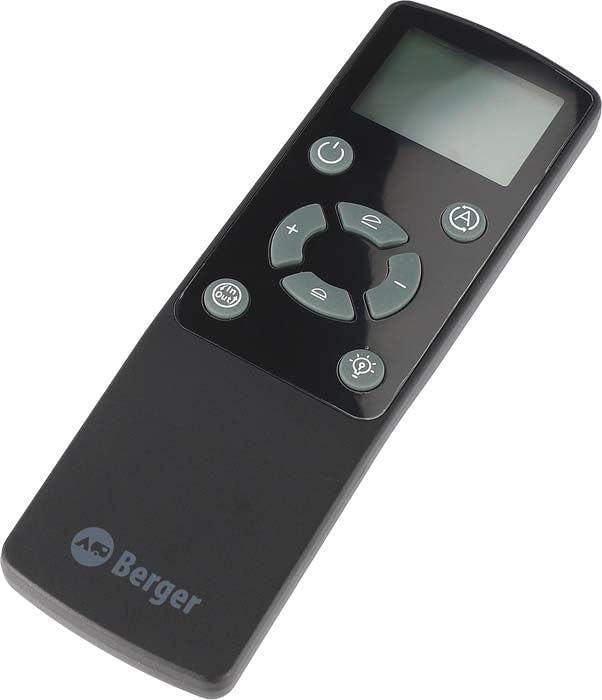
5.1. Remote Control Functions
The remote control allows for convenient adjustment of all vent functions:
- Power On/Off: Press the power button to turn the unit on or off.
- Fan Speed: Adjust the fan speed through 4 levels using the speed control buttons.
- Air Direction (In/Out): Switch between air intake and exhaust modes.
- Thermostat: Set your desired temperature. The fan will automatically adjust to maintain it.
- LED Light: Turn the internal LED light on or off.
- Rain Sensor: The unit features an automatic rain sensor that closes the vent cover when rain is detected.
The remote control provides easy access to all vent functions.
Detailed view of the remote control buttons and display.
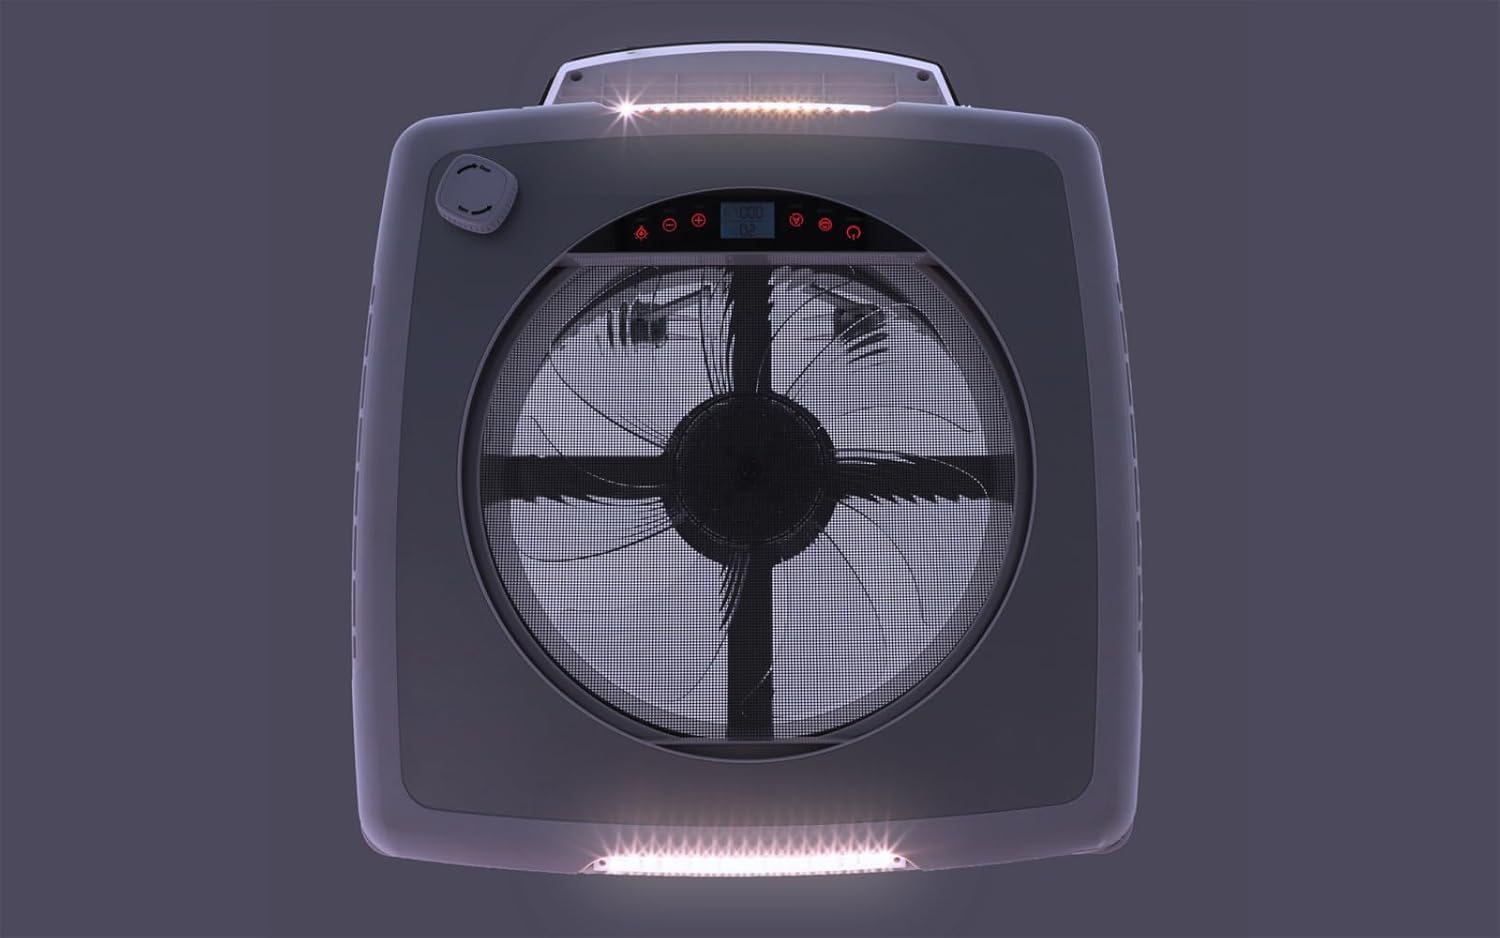
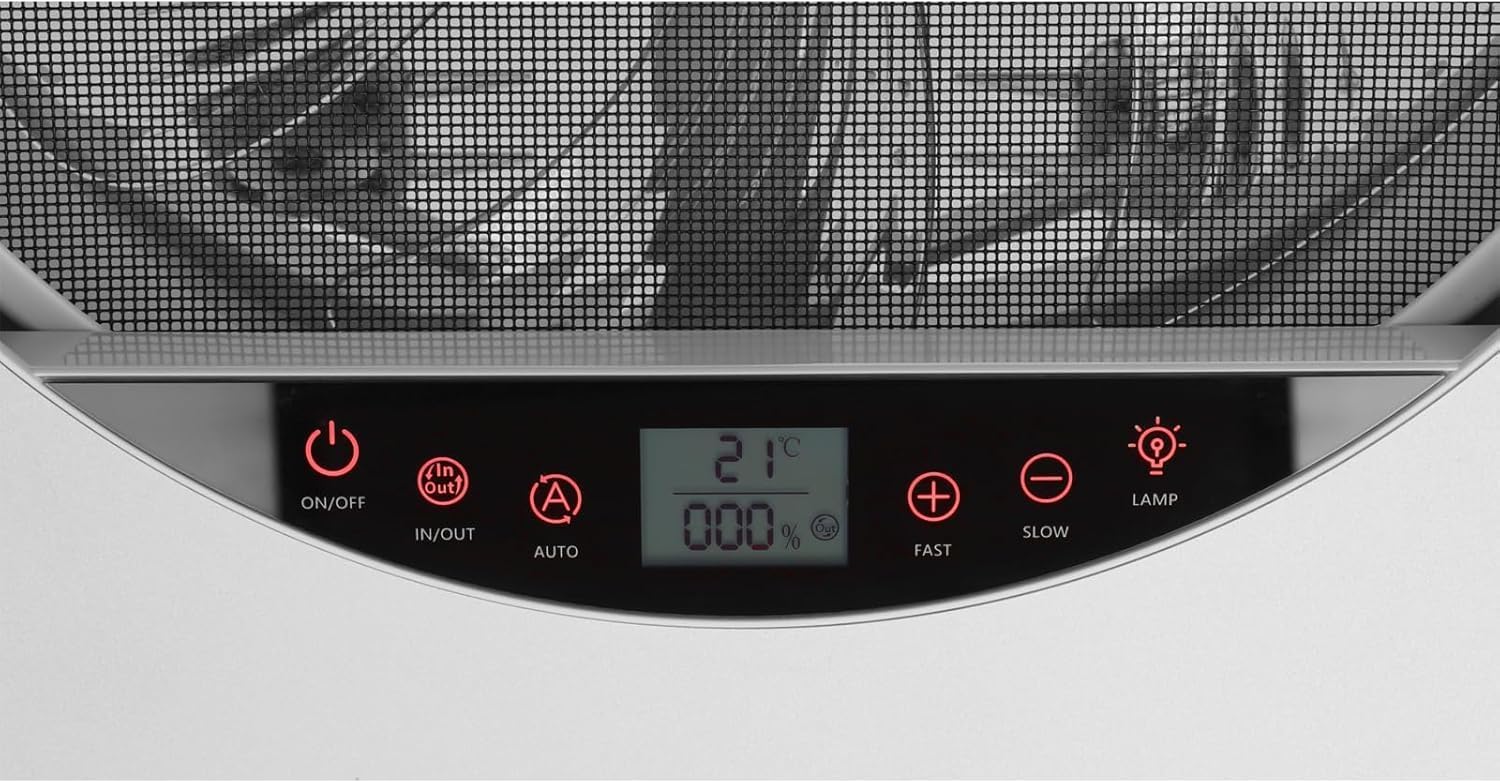
5.2. Control Panel Functions
The integrated control panel on the vent unit offers direct access to basic functions:
- Power Button: Turns the unit on/off.
- Speed Adjustment: Cycle through fan speeds.
- Air Direction: Toggle between intake and exhaust.
- LED Light: Activates the internal LED light.

The control panel on the vent unit for direct operation.

A close-up of the control panel, showing illuminated buttons and display.
5.3. Rain Protection
The vent features a flat design and a rain-resistant cover that prevents water ingress even during driving or adverse weather conditions. The integrated rain sensor automatically closes the vent when rain is detected, providing added convenience and protection.

The roof vent's design ensures protection against rain, even when open.
Video: Roof Vent Fan Functionality Demonstration
This video showcases the various functions of the roof vent fan, including air intake/exhaust, speed settings, and the rain sensor's automatic closing mechanism.
6. Maintenance
Regular maintenance ensures the longevity and efficient operation of your BERGER 40x40 Camper Roof Vent.
- Cleaning: Periodically clean the fan blades and the mosquito net to prevent dust buildup and maintain optimal airflow. The interior baffle can be removed for easier cleaning. Use a soft cloth and mild detergent.
- Exterior Cleaning: Clean the exterior cover with a soft cloth and water. Avoid abrasive cleaners that could damage the UV-resistant material.
- Check Seals: Annually inspect the sealant around the roof vent for any cracks or deterioration. Reapply sealant as needed to maintain a watertight seal.
- UV Resistance: The vent's cover is resistant to UV rays, ensuring durability and performance over time.
7. Troubleshooting
If you encounter issues with your roof vent, refer to the following common solutions:
7.1. Remote Control Not Responding
- Check Batteries: Ensure the remote control batteries are correctly installed and have sufficient charge.
- Re-pair Remote Control: If the remote control loses connection, you may need to re-pair it with the vent unit.
Remote Control Pairing Procedure:
- Disconnect and then reconnect the main power supply to the vent unit.
- On the vent's control panel, press and hold the 'POWER' button.
- Simultaneously, press and hold the 'RS' button on the remote control for 4 seconds.
- The signal indicator light on the vent will flash, and a Wi-Fi signal icon will appear on the remote control's display, indicating successful pairing.
Video: Remote Control Pairing and Functionality
This video demonstrates how to pair the remote control with the roof vent and showcases its various functions, including temperature switching and manual override.
7.2. Fan Not Operating
- Check Power: Ensure the 12V power supply is connected and functioning correctly.
- Check Fuse: Inspect the fuse on the vent unit. Replace if blown.
- Obstructions: Check for any obstructions preventing the fan blades from turning.
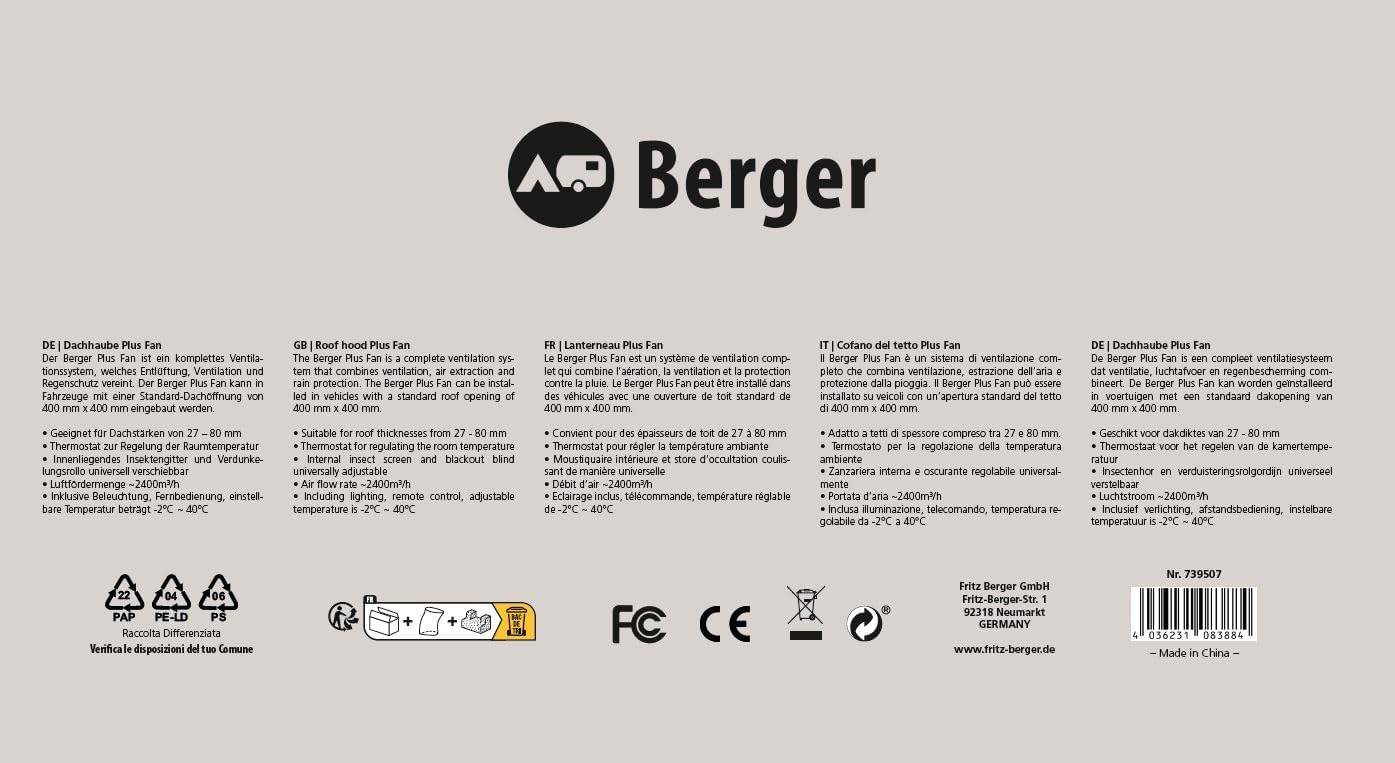
8. Specifications
| Feature | Detail |
|---|---|
| Brand | Berger |
| Model Number | 133006 |
| Product Dimensions | 40 x 35.5 x 10 cm |
| Color | Black |
| Material | Plastic, Smoked Glass |
| Style | Modern |
| Power Source | 12V Motor |
| Fan Speeds | 4 Adjustable Speeds |
| Noise Level | Max 32 dB |
| Roof Thickness Compatibility | 27-80mm |
| Light Type | LED |
| Special Features | Remote Control, Thermostat, Rain Sensor, Mosquito Net, Blackout Blind, UV Resistant |
9. Warranty & Support
For warranty information or technical support, please refer to the documentation provided with your purchase or contact the manufacturer directly. Keep your proof of purchase for any warranty claims.


