1. Introduction
Thank you for purchasing the GLOGLOW G11 Rechargeable Handheld Airbrush Kit. This compact and practical airbrush system is designed for various applications including art painting, model making, and other creative projects. Please read this manual thoroughly before use to ensure proper operation, maintenance, and safety.
2. Safety Instructions
- Always operate the airbrush in a well-ventilated area.
- Wear appropriate personal protective equipment, such as a respirator mask and safety glasses, especially when spraying paints or chemicals.
- Keep the device away from children and pets.
- Do not immerse the air compression machine in water or other liquids.
- Use only the provided charging cable and adapter to charge the device.
- Avoid spraying flammable materials near open flames or sparks.
- Ensure the nozzle is clear before and after each use to prevent blockages.
- Do not point the airbrush at people or animals.
3. Package Contents
Please check to ensure all items are present in your package:
- 1 x Airbrush
- 3 x Spraying Bottles (5cc, 20cc, 40cc)
- 1 Set of Brushes
- 1 x Dropper
- 1 x Wrench
- 1 x Data Cable (USB charging cable)
- 1 x Air Compression Machine
- 1 x Instruction Manual (this document)
4. Product Overview
Familiarize yourself with the components of your GLOGLOW G11 Airbrush Kit.

Image 4.1: The GLOGLOW G11 Airbrush Kit, illustrating the airbrush connected to the portable air compression machine. The power button is visible on the side of the compressor.

Image 4.2: A close-up view of the airbrush component, highlighting the nozzle and the paint cup attachment point.
The kit consists of a handheld airbrush and a compact, rechargeable air compression machine. The airbrush features a single-action design for efficient material usage.
5. Setup
5.1 Initial Charging
- Before first use, fully charge the air compression machine.
- Connect the provided data cable to the charging port on the air compression machine.
- Connect the other end of the data cable to a suitable USB power adapter (not included) or a computer USB port.
- The charging indicator light will illuminate during charging and typically turn off or change color when fully charged.
5.2 Assembly
- Screw the airbrush firmly onto the top of the air compression machine. Ensure a secure connection to prevent air leaks.
- Select the appropriate spraying bottle (5cc, 20cc, or 40cc) for your project.
- Attach the chosen spraying bottle to the airbrush.
- Use the dropper to carefully fill the spraying bottle with your desired paint or medium. Ensure the material is properly thinned for airbrush use.

Image 5.1: Proper grip for the GLOGLOW G11 Airbrush Kit, showing the airbrush and compressor assembled and ready for use.
6. Operating Instructions
- Ensure the airbrush is clean and assembled correctly, and the paint cup is filled with properly thinned material.
- Press the power button on the air compression machine to turn it on. The machine will start producing air.
- Hold the airbrush approximately 6-8 inches (15-20 cm) from your working surface.
- Press the trigger on the airbrush to release paint. The single-action design means air and paint flow simultaneously when the trigger is pressed.
- Adjust the distance and speed of movement to control the spray pattern and coverage.
- When finished, release the trigger and press the power button on the air compression machine to turn it off.
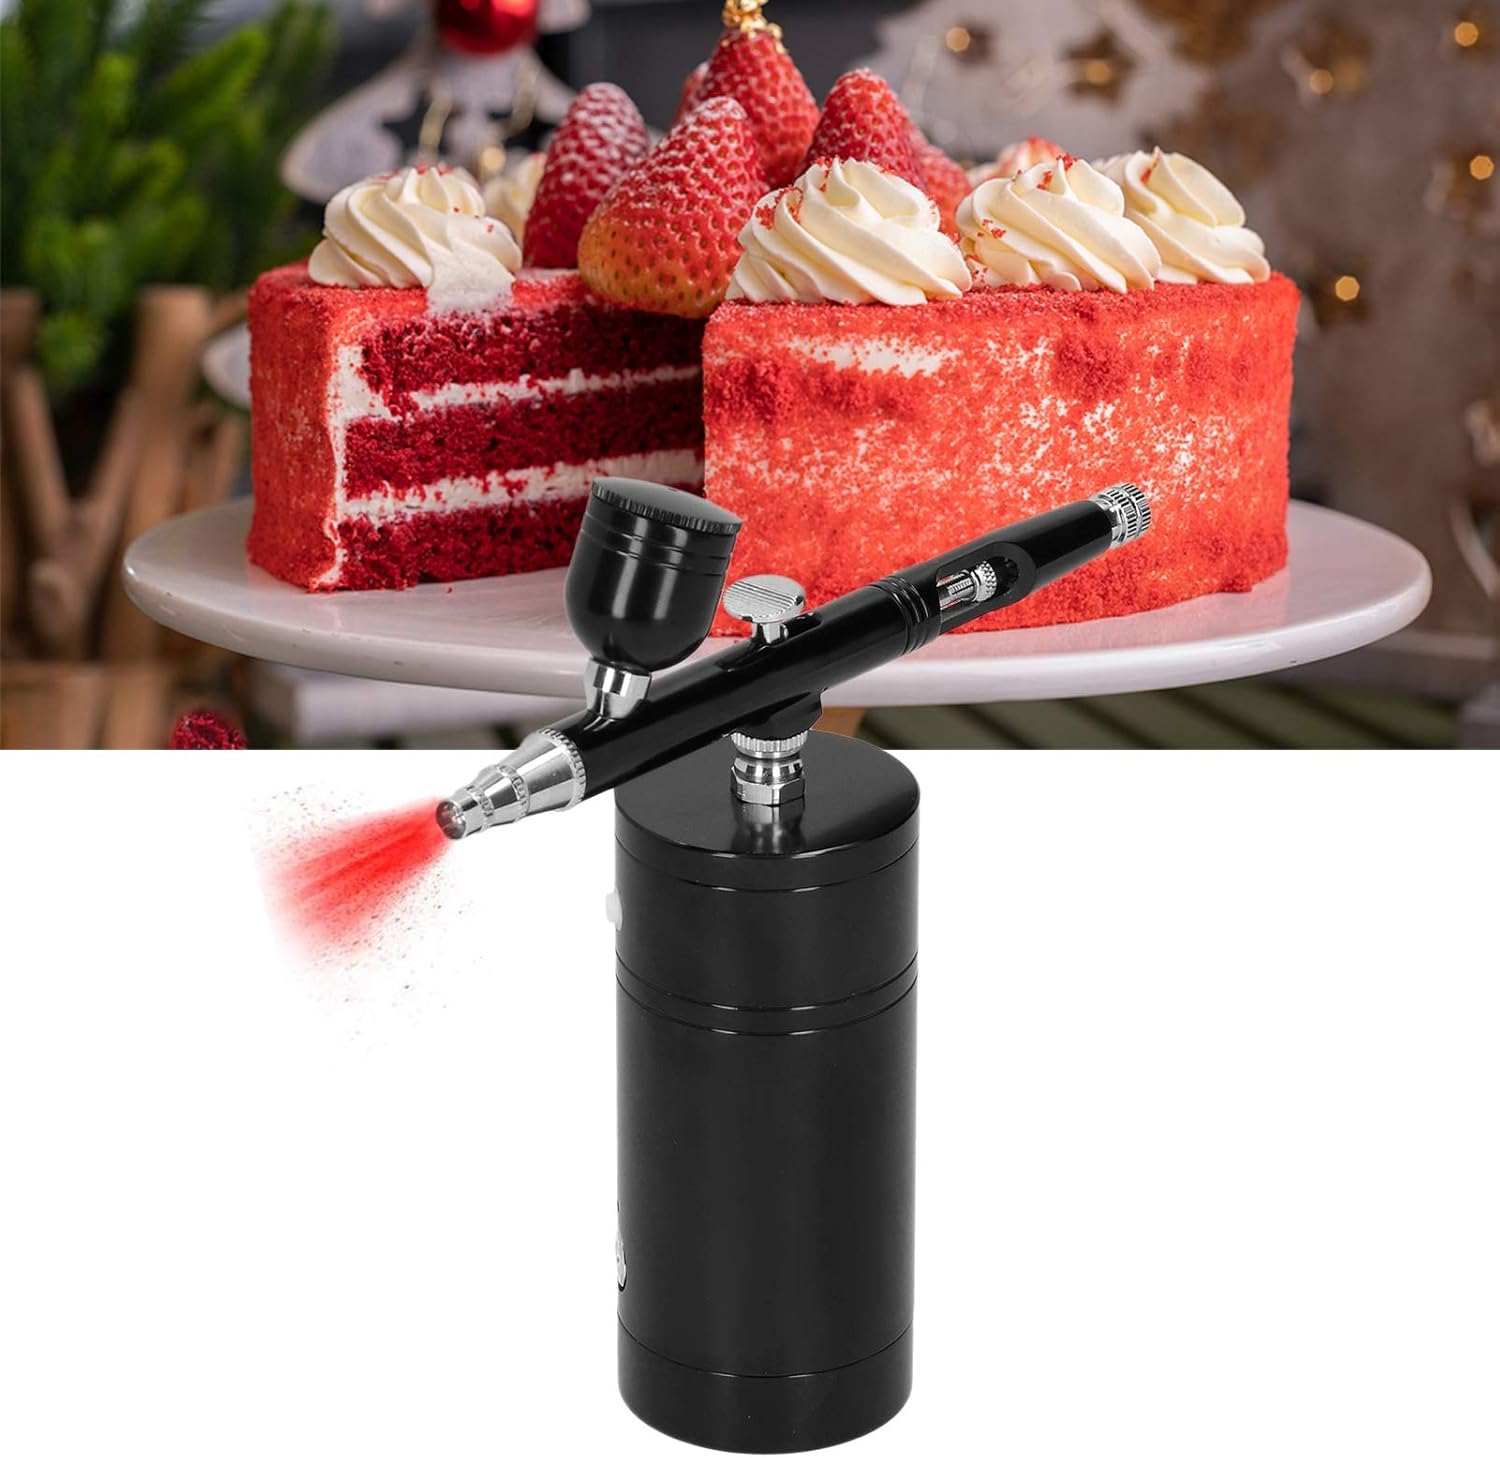
Image 6.1: The GLOGLOW G11 Airbrush Kit in action, illustrating its capability for detailed work, such as decorating a cake.
7. Maintenance and Cleaning
Proper cleaning after each use is crucial for maintaining the performance and longevity of your airbrush kit.
- Immediate Cleaning: After each use, empty any remaining paint from the cup. Add a small amount of appropriate cleaning solution (e.g., water for water-based paints, thinner for solvent-based paints) to the cup and spray it through the airbrush until clear.
- Disassembly: Carefully unscrew the airbrush from the compressor. Disassemble the airbrush components (nozzle, needle, paint cup) as needed for thorough cleaning. Refer to the diagram in Section 4 for component identification.
- Deep Cleaning: Use the provided brushes and cleaning solution to remove all paint residue from the internal parts of the airbrush, especially the nozzle and needle. Be gentle to avoid bending the needle.
- Rinsing: Rinse all components with clean water.
- Drying: Allow all parts to air dry completely before reassembly.
- Reassembly: Reassemble the airbrush carefully, ensuring all parts are correctly seated. Do not overtighten.
- Storage: Store the airbrush kit in a clean, dry place.
Note: The air compression machine itself does not require internal cleaning. Wipe its exterior with a damp cloth if needed.
8. Troubleshooting
| Problem | Possible Cause | Solution |
|---|---|---|
| No air flow | Compressor not turned on; Battery low; Airbrush not securely attached. | Press power button; Charge battery; Re-attach airbrush firmly. |
| No paint flow / Spluttering | Paint too thick; Nozzle clogged; Needle bent; Paint cup empty. | Thin paint; Clean nozzle/airbrush thoroughly; Replace needle if bent; Refill paint cup. |
| Uneven spray pattern | Nozzle partially clogged; Inconsistent paint consistency. | Clean nozzle; Ensure paint is uniformly thinned. |
| Air leak | Loose connection between airbrush and compressor. | Tighten the connection between the airbrush and the air compression machine. |
9. Specifications
- Model: G11 (GLOGLOWtnkose6avh)
- Material: Aluminum
- Air Compression Machine Size: Approx. 10.5 x 4.5 x 4.5 cm (4.1 x 1.8 x 1.8 in)
- Airbrush Length: Approx. 14.75 cm (5.8 in)
- Nozzle Diameter: Approx. 0.4 mm (0.02 in)
- Watering Can Capacity: 5cc, 20cc, 40cc
- Air Compression Machine Battery Model: 402929 500mAh 7.4V Rechargeable Lithium
- Output Voltage: 7.4V
- Working Pressure: 20Mpa
- Air Consumption: 7-7.5 L/min
- Product Color: Black
10. Warranty and Support
For warranty information or technical support, please refer to the contact details provided with your purchase or visit the official GLOGLOW website. Keep your purchase receipt as proof of purchase for any warranty claims.