
1. Introduction
Thank you for purchasing the ROCKBROS Bicycle Headlight. This manual provides important information regarding the safe operation, installation, and maintenance of your new headlight. Please read it thoroughly before use and retain it for future reference.
2. Safety Precautions
- Do not look directly into the light beam when the headlight is on, as it can cause temporary vision impairment.
- Keep out of reach of children.
- Ensure the headlight is securely mounted before riding.
- Do not use the product for extended periods in heavy sandstorms or immerse it in water.
- Always adhere to local traffic laws and regulations regarding bicycle lighting.
3. Package Contents
Please check that all items are present in your package:
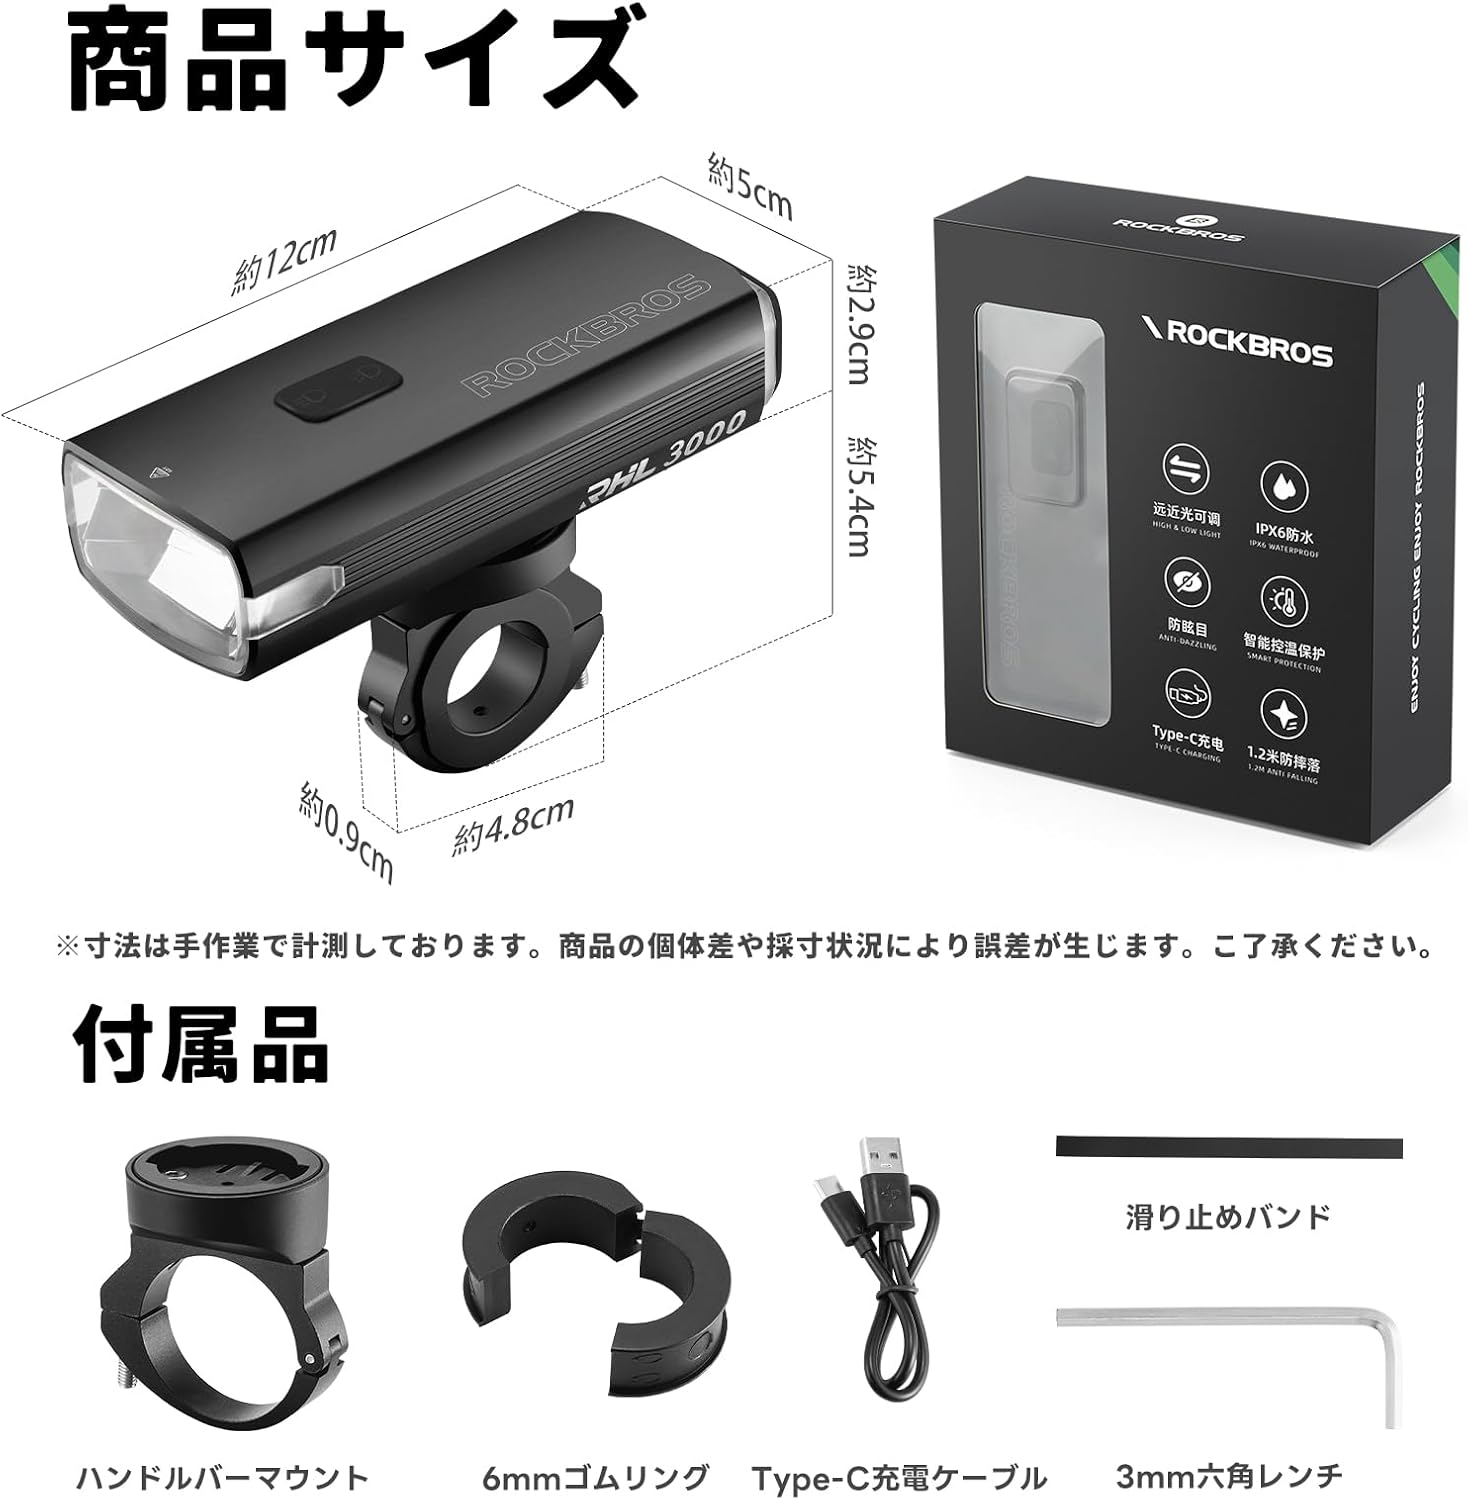
- Bicycle Headlight (1 unit)
- Handlebar Mount (1 unit)
- Type-C Charging Cable (1 unit)
- 6mm Rubber Ring (1 unit)
- Anti-slip Band (1 unit)
- 3mm Hex Wrench (1 unit)
4. Specifications
| Feature | Description |
|---|---|
| Brand | ROCKBROS |
| Model Number | 24710008001/3 |
| Material | Aluminum Alloy |
| Mounting Type | Handlebar Mount |
| Max Output | 3000 Lumens |
| Battery Capacity | 10000mAh |
| Charging Type | Type-C USB |
| Charging Time | Approx. 5.5 hours |
| Waterproof Rating | IPX6 |
| Number of Modes | 6 (4 Low Beam, 2 High Beam) + Flash |
| Color | White |
5. Setup
5.1 Mounting the Headlight
- Attach the handlebar mount to your bicycle handlebar using the provided hex wrench. Ensure it is tightened securely.
- Align the headlight with the mount.
- Insert the headlight into the mount and rotate it firmly until it clicks into place.

6. Operating Instructions
6.1 Initial Use and Unlocking
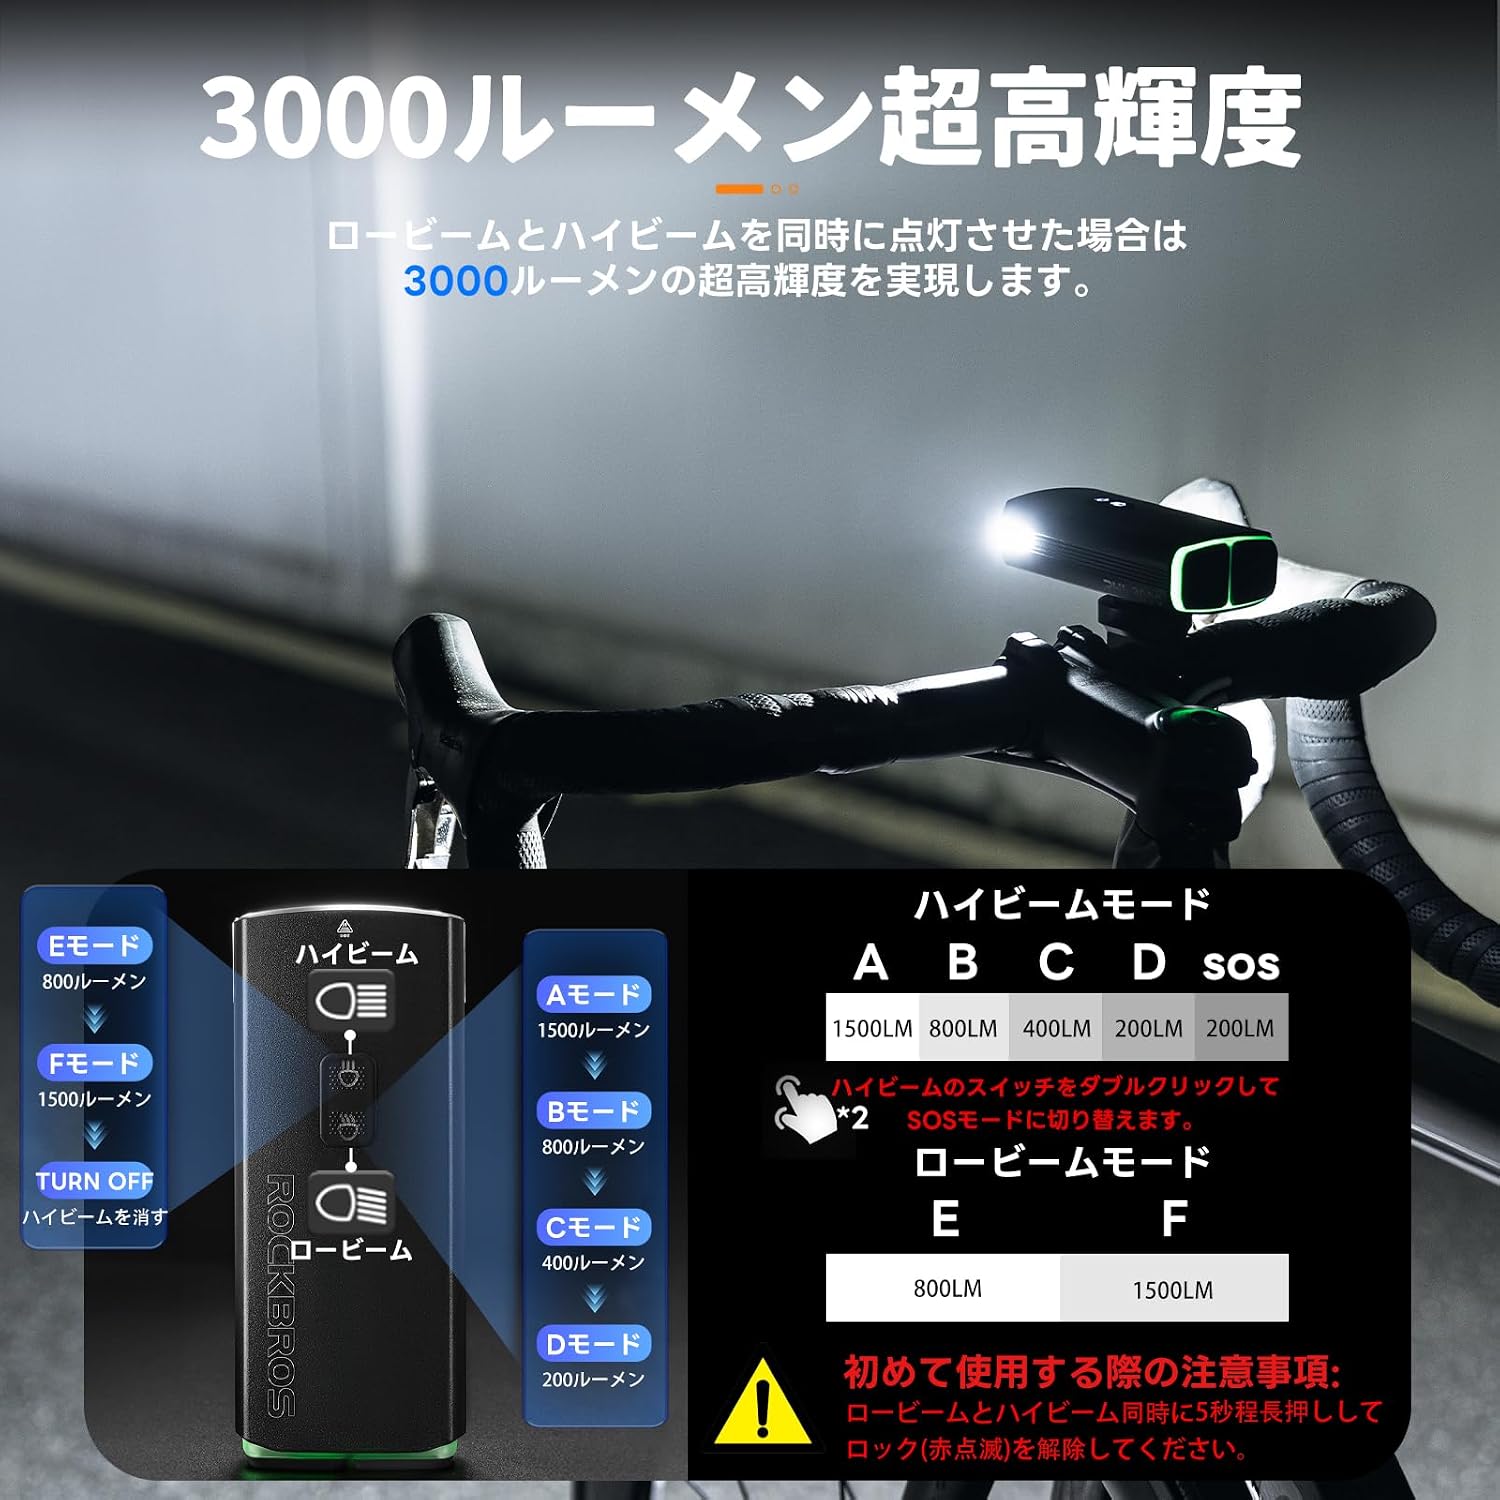
Important: For first-time use, simultaneously press and hold both the Low Beam and High Beam switches for approximately 5 seconds to unlock the device. The red indicator light will change to green upon successful unlocking.
6.2 Power On/Off and Mode Switching
The headlight features two independent switches for Low Beam and High Beam, allowing for flexible lighting combinations.
- Low Beam Modes: Press the Low Beam switch to cycle through 4 constant light modes (A: 1500LM, B: 800LM, C: 400LM, D: 200LM) and a Flash mode (200LM).
- High Beam Modes: Press the High Beam switch to cycle through 2 constant light modes (E: 800LM, F: 1500LM).
- Combined Mode: When both Low Beam and High Beam are activated simultaneously, the headlight achieves an ultra-high brightness of 3000 lumens.
- Memory Function: The Low Beam setting has a memory function. When reactivated, it will start in the last used Low Beam mode.
- SOS Mode: Double-click the High Beam switch to activate SOS mode.
- Power Off: Press and hold either switch for a few seconds to turn off the respective beam.

6.3 Battery Indicator and Charging
The headlight features a battery level indicator and is rechargeable via a Type-C port.
- Battery Level Indication (During Use):
- 50%-100%: Green light
- 15%-50%: Yellow light
- <15%: Red light
- Charging Indication:
- Charging: Red light flashes
- Fully Charged: Green light
- Charging Process: Connect the provided Type-C cable to the headlight's charging port and a suitable USB power source. A full charge takes approximately 5.5 hours.
- Power Bank Function: The 10000mAh battery can also be used as an emergency power source for other devices, such as smartphones, via its USB-A output port.


7. Features
- 3000 Lumens High Brightness: Equipped with two 30W LED lamp beads, providing powerful illumination for various riding conditions.
- 10000mAh Large Capacity Battery: Offers extended runtimes, from 2.3 hours up to 30 hours depending on the mode.
- Smart Temperature Control & Low Voltage Protection:
- An internal temperature sensor automatically downshifts the mode if the internal temperature exceeds 70°C.
- The light will shut down if the temperature exceeds 100°C or if the battery enters a low voltage state.
- When the battery level is below 15%, only 400LM and 200LM modes are available.

- Durable Aluminum Alloy Construction: Made from aluminum alloy, providing impact resistance, wear resistance, and corrosion resistance.
- Anti-Glare Function: The anti-glare lens cuts off the upper light distribution, preventing dazzling oncoming traffic and enhancing safety. The illumination distance is approximately 200m with an illumination angle of approximately 90 degrees.

- IPX6 Waterproof: Designed to withstand sudden heavy rain and harsh weather conditions.

8. Maintenance
- Cleaning: Wipe the headlight body with a soft, damp cloth. Do not use abrasive cleaners or solvents. Ensure the charging port cover is securely closed to maintain water resistance.
- Storage: Store the headlight in a cool, dry place when not in use. If storing for an extended period, charge the battery to approximately 50% every 3-6 months to prolong battery life.
- Battery Care: Avoid completely draining the battery frequently. Recharge promptly when the low battery indicator appears.
9. Troubleshooting
| Problem | Possible Cause | Solution |
|---|---|---|
| Light does not turn on. | Device is locked (first-time use). Battery is depleted. |
Simultaneously press and hold both switches for 5 seconds to unlock. Charge the headlight fully. |
| Light automatically switches to a lower mode or turns off. | Internal temperature too high. Battery is low. |
This is a safety feature. Allow the light to cool down. Charge the headlight. |
| Charging indicator light does not turn green after prolonged charging. | Charging cable or adapter issue. Battery over-discharge. |
Try a different Type-C cable and USB adapter. If the battery was completely drained for a long time, it might take longer to initiate charging or require a specific sequence (as mentioned in some user reviews, try discharging slightly via power bank function then recharging). If issues persist, contact support. |
| Headlight feels loose on the handlebar. | Mount not tightened sufficiently. Headlight not fully rotated into mount. |
Re-tighten the handlebar mount with the hex wrench. Ensure the headlight is fully inserted and rotated until it locks. |
10. Warranty and Support
If you encounter any issues with the product or have questions, please contact the seller directly through the product page. They will provide prompt assistance.
Please note that this product does not include a Japanese instruction manual (English and Chinese versions only). For any concerns, please reach out to the seller for support.


