1. Introduction
This manual provides detailed instructions for the safe and effective use of your AB AttaBoy Galaxy Aurora Projector MXS003. Please read this manual thoroughly before operating the device and retain it for future reference.
2. Safety Information
- Ensure the power supply voltage matches the device's requirements (5V DC).
- Do not expose the device to water or moisture. This product is for indoor use only.
- Avoid direct eye exposure to the projection light.
- Keep the device away from heat sources and open flames.
- Do not attempt to disassemble or repair the device yourself. Contact qualified service personnel for assistance.
- Keep out of reach of children and pets to prevent accidental damage or injury.
3. Package Contents
Verify that all items are present in the package:
- AB AttaBoy Galaxy Aurora Projector Unit
- Remote Control
- USB Power Cable
- User Manual (this document)
4. Product Overview
The AB AttaBoy Galaxy Aurora Projector MXS003 is a versatile device designed to project dynamic galaxy and aurora light effects, featuring an integrated Bluetooth speaker and white noise functions. Its astronaut design includes a magnetic head for adjustable projection angles.
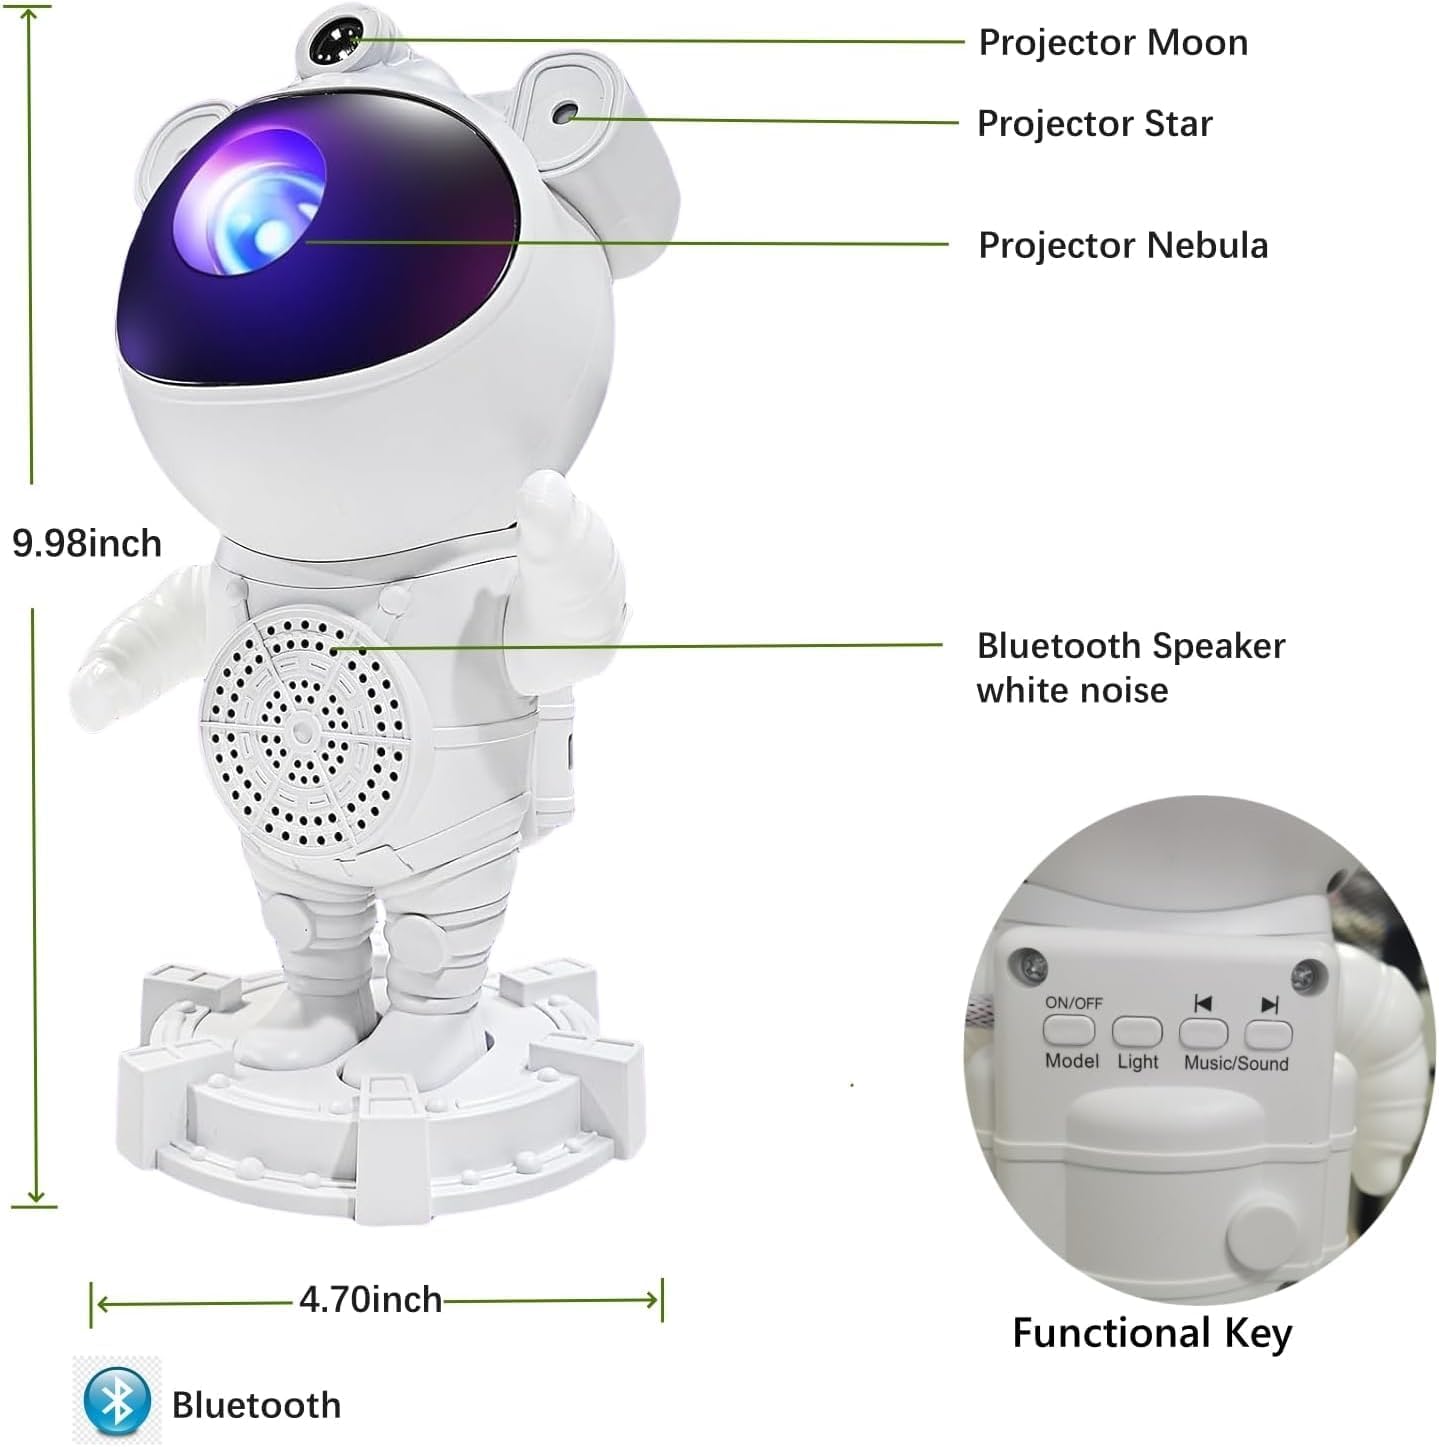
Image: Product overview with labeled components including projector lenses, Bluetooth speaker, and control buttons.
Key Features:
- 2-in-1 Projection Modes: Projects realistic galaxy and aurora effects with moon and star elements.
- Integrated Bluetooth Speaker: Connects to your device for audio playback.
- 8 White Noise Sounds: Includes 6 white noise options and 2 piano songs for relaxation.
- Adjustable Projection: 360-degree rotatable magnetic head and adjustable arms allow precise angle adjustment.
- Brightness Control: Multiple brightness levels (30%, 60%, 100%).
- Auto-Off Timer: Set a timer for 1, 2, or 4 hours.
- Remote Control: Convenient operation from a distance.
5. Setup
5.1 Power Connection
- Connect the provided USB power cable to the projector's power input port.
- Plug the other end of the USB cable into a compatible 5V/1A (minimum) USB power adapter (not included) or a USB port on a computer/power bank.
- Ensure the connection is secure.
5.2 Remote Control Setup
The remote control requires 2 AAA batteries (not included). Open the battery compartment on the back of the remote and insert the batteries, observing the correct polarity (+/-).
5.3 Placement
Place the projector on a stable, flat surface. For optimal projection, position it in a dark room and adjust the angle using the magnetic head and adjustable arms to achieve the desired coverage on your ceiling or wall.
6. Operating Instructions
6.1 Power On/Off
Press the 'ON/OFF' button on the projector or the remote control to turn the device on or off.
6.2 Projection Modes
The projector offers various light effects, including Galaxy, Aurora, and Moon. Use the 'Light' button on the projector or the corresponding buttons on the remote control to cycle through different projection modes and effects.

Image: Examples of Aurora and Galaxy projection modes.

Image: Two distinct projection modes: Galaxy Starry Projector with Moon and Aurora Starry Projector with Moon.
6.3 Brightness Adjustment
Adjust the projection brightness using the dedicated brightness buttons on the remote control. Available levels are 30%, 60%, and 100%.

Image: Brightness adjustment options and timer settings.
6.4 Timer Function
Set an automatic shut-off timer for 1, 2, or 4 hours using the timer buttons on the remote control. This feature is useful for sleep assistance.
6.5 Bluetooth Speaker Pairing
- Turn on the projector.
- Activate Bluetooth on your mobile device or computer.
- Search for the device named 'MXS003' (or similar) in your Bluetooth settings.
- Select 'MXS003' to pair. A confirmation sound will indicate successful pairing.
- You can now play audio through the projector's speaker.
6.6 White Noise and Music Playback
The projector includes 8 built-in sounds: 6 white noise options and 2 piano songs. Use the 'Music/Sound' button on the projector or the remote control to cycle through these sounds. When connected via Bluetooth, your device's audio will override the built-in sounds.

Image: White noise and piano song options for relaxation.
6.7 Adjusting Projection Angle
The projector features a magnetic head and adjustable arms, allowing for 360-degree rotation. Gently adjust the head and arms to direct the projection to your desired area on the wall or ceiling.

Image: Demonstrating the 360-degree rotation and adjustable features.
7. Maintenance
7.1 Cleaning
- Ensure the device is powered off and unplugged before cleaning.
- Use a soft, dry cloth to wipe the exterior of the projector.
- For the projection lens, use a lens cleaning cloth to gently wipe away dust or smudges. Avoid abrasive materials or harsh chemicals.
7.2 Storage
When not in use, store the projector in a cool, dry place, away from direct sunlight and extreme temperatures. Keep it in its original packaging or a protective case to prevent dust accumulation and damage.
8. Troubleshooting
| Problem | Possible Cause | Solution |
|---|---|---|
| Projector does not turn on. | No power, loose cable, faulty adapter. | Check power cable connection. Ensure USB adapter is working and provides 5V/1A. Try a different USB port or adapter. |
| No projection or dim projection. | Lens covered, brightness too low, room too bright. | Ensure lens is clear. Increase brightness using the remote. Operate in a darker environment. |
| Remote control not working. | Dead batteries, obstructed signal. | Replace remote control batteries. Ensure no obstacles between remote and projector. |
| Bluetooth not connecting. | Projector not in pairing mode, device too far, interference. | Ensure projector is on. Restart Bluetooth on your device. Move closer to the projector. Disconnect from other Bluetooth devices. |
| No sound from speaker. | Volume too low, not paired, incorrect source. | Increase volume on your connected device and/or projector. Ensure Bluetooth is successfully paired. Check if built-in white noise is playing instead. |
9. Specifications
| Feature | Detail |
|---|---|
| Model Number | MXS003 |
| Brand | AB AttaBoy |
| Manufacturer | MeixinSi |
| Dimensions (L x W x H) | 11.6 x 12 x 22.8 cm (4.57 x 4.72 x 8.98 inches) |
| Weight | 560 g (1.23 lbs) |
| Material | Plastic |
| Color | White |
| Power Input | 5 Volts (DC) |
| Power Consumption | 5 Watts |
| Light Source | LED |
| Luminous Flux | 200 lm |
| Special Features | Color Changing, Timer, Star Projector, Bluetooth Speaker, White Noise |
| Control Method | Remote Control |
10. Warranty and Support
Information regarding specific warranty details for the AB AttaBoy Galaxy Aurora Projector MXS003 is not available in the provided product data. For warranty claims or technical support, please refer to the retailer or manufacturer's official website for contact information.
Information on spare parts availability and guaranteed software updates is also not available.