1. Introduction
This manual provides detailed instructions for the assembly, operation, and maintenance of your VEVOR Full Size Horizontal Murphy Bed Mechanical Hardware Kit. This kit is designed to facilitate the construction of a space-saving wall bed, ideal for guest rooms or areas where maximizing floor space is essential. Please read all instructions carefully before beginning assembly to ensure safe and correct installation.
This image illustrates the space-saving design of the Murphy bed, showing it neatly folded into a cabinet and then extended for use.
2. Safety Information
WARNING: Failure to follow these safety guidelines may result in injury or product damage.
- This product must be properly assembled, used, and loaded within the recommended weight limit to prevent injury or damage.
- Always ensure the bed is securely fastened to a structural wall stud or appropriate anchoring system.
- Keep hands and fingers clear of moving parts during operation.
- Do not allow children to operate the bed mechanism unsupervised.
- Ensure the mattress weight is within the specified range (57-75 lbs) for proper pneumatic rod function.
- Use appropriate bedding materials. Avoid excessively heavy bedding that could interfere with the closing mechanism.
3. Package Contents
Carefully unpack all components and verify that all items listed below are present. If any parts are missing or damaged, please contact VEVOR customer support.

This diagram displays all components included in the VEVOR Murphy Bed Kit, each numbered for easy identification.
- Rotating Feet x2
- Large Metal Plates x2 (Left & Right)
- Bed Frame Connection Plates x2
- Pneumatic Rods x2
- Mattress Fixing Straps x2
- Door Panel Stops x2
- Rotating Bearings x4
- ST5x20 Screws x72
- ST4x20 Screws x8
- M8 Nuts x4
- Connection Plate Positioning Plate x1
- Large Metal Plate Positioning Plate x1
4. Tools Required for Assembly
The following tools are recommended for the assembly of your Murphy bed kit. Please note that the bed and bed cabinet materials are not included and must be provided by the user.

This image displays the essential tools needed for the assembly process, such as a wrench, ruler, level, Phillips screwdriver, impact drill, and electric drill.
- Wrench
- Ruler / Measuring Tape
- Level
- Phillips Screwdriver
- Impact Drill
- Electric Drill
Note: Suggested materials for wooden cabinets and bed frame include wooden sticks and plywood sheets. The manual includes a wood size list for users to purchase or make these materials.
5. Assembly Instructions
This kit features an integrated pivot board for simplified installation, reducing the need for complex measurements. However, precise measurements for your custom cabinet are still crucial.
5.1 Integrated Pivot Board

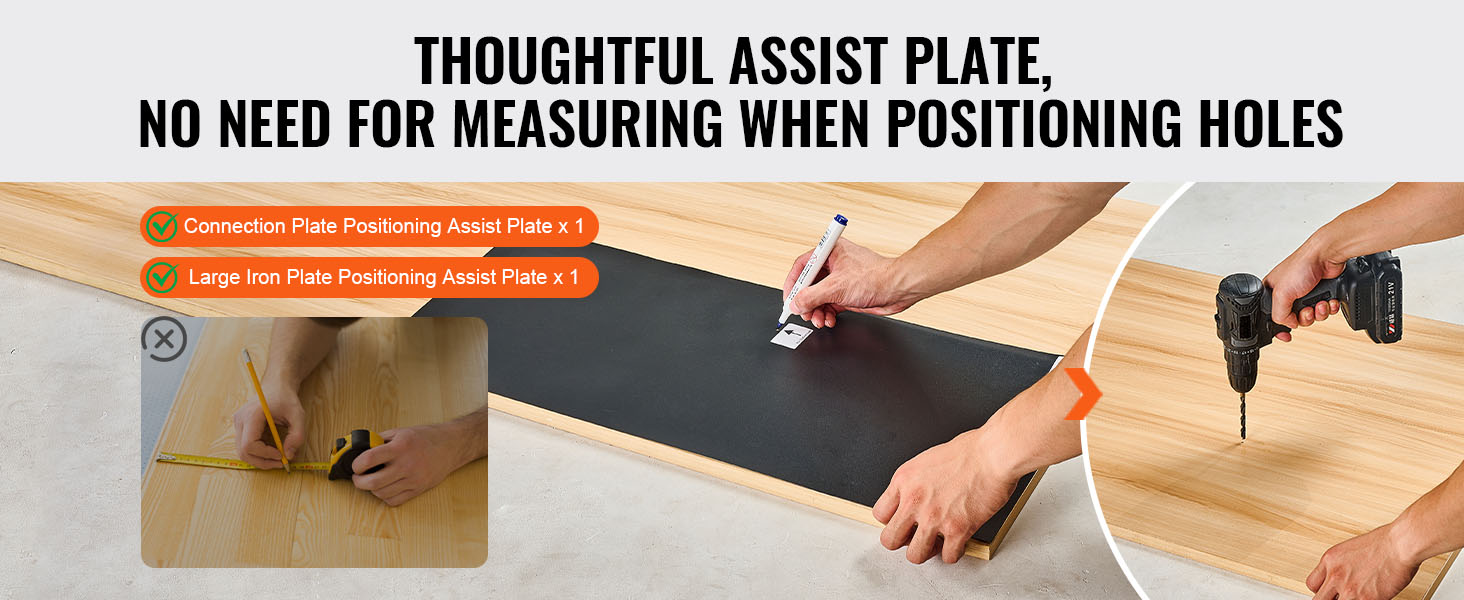
This image shows the integrated pivot board, designed for auto-lock and simplified installation by reducing the number of measurements required.
The integrated pivot board is designed to streamline the assembly process. It features an auto-lock mechanism and reduces the complexity of measurements typically associated with Murphy bed hardware. Utilize the provided Connection Plate Positioning Plate and Large Metal Plate Positioning Plate to accurately mark drilling locations.

This image illustrates how the thoughtful assist plates eliminate the need for manual measuring when positioning holes, ensuring accurate placement.
5.2 General Assembly Steps (Conceptual)
- Prepare Cabinet: Construct or acquire a cabinet suitable for a full-size horizontal Murphy bed. Ensure it meets the required dimensions for your mattress and the kit's hardware.
- Install Main Hardware: Attach the Large Metal Plates and Bed Frame Connection Plates to the cabinet and bed frame according to the detailed instructions and diagrams provided in your physical manual. Use the positioning plates for accuracy.
- Attach Bed Legs: Secure the Rotating Feet to the bed frame. These heavy-duty square tube legs provide stable support and are designed to protect your floors.
- Install Pneumatic Rods: Connect the Pneumatic Rods as instructed. These rods are crucial for the effortless opening and closing mechanism. Ensure they are installed correctly for smooth operation.
- Secure Mattress: Use the Mattress Fixing Straps to hold the mattress securely in place when the bed is in the closed position.
- Final Adjustments: Before permanently securing the cabinet to the wall, test the bed's operation. Make any necessary adjustments to ensure smooth movement and proper alignment.

This image highlights the robust design of the heavy-duty square tube bed legs, which provide stable support and protect flooring.
6. Operating Instructions
The VEVOR Murphy Bed Kit is designed for effortless opening and closing, thanks to its high-quality pneumatic levers.
6.1 Opening the Bed
- Ensure the area around the bed is clear of obstructions.
- Gently pull the bed frame downwards from the top edge. The pneumatic rods will assist in a smooth, controlled descent.
- Continue lowering until the bed legs fully extend and the bed rests securely on the floor.
6.2 Closing the Bed
- Remove all bedding and pillows that might obstruct the closing mechanism.
- Lift the bed frame upwards from the bottom edge. The pneumatic rods will assist in lifting the bed.
- Guide the bed frame smoothly back into the cabinet until it is fully closed and secured.

This image details the superior pneumatic lever system, ensuring effortless pull-down and smooth operation of the bed.

This image shows the VEVOR Murphy bed fully open and ready for use in a modern room setting.
7. Maintenance
Regular maintenance ensures the longevity and safe operation of your Murphy bed kit.
- Inspect Hardware: Periodically check all screws, bolts, and connections to ensure they are tight. Tighten any loose fasteners.
- Clean Components: Wipe down metal components with a dry cloth to prevent dust buildup. Avoid using harsh chemicals that could damage the finish.
- Pneumatic Rods: The pneumatic rods are designed for long-term use (over 50,000 cycles). If you notice any sticking or difficulty in operation, inspect for obstructions or contact support. Do not attempt to disassemble the rods.
- Lubrication: Moving parts, such as rotating bearings, may benefit from occasional lubrication with a silicone-based spray to maintain smooth operation.
8. Troubleshooting
If you encounter issues with your VEVOR Murphy Bed Kit, refer to the following common problems and solutions.
- Bed is difficult to open or close:
- Ensure the mattress weight is within the recommended range of 57-75 lbs. An incorrect mattress weight can affect pneumatic rod performance.
- Check for any obstructions in the mechanism or along the bed's path.
- Verify that the pneumatic rods are installed correctly and are not damaged. If rods are completely frozen or non-functional, contact customer service for replacement.
- Bed does not stay closed/open:
- Confirm that all hardware is securely fastened and properly aligned.
- Re-check mattress weight.
- Measurements in manual are metric:
- While the physical manual may use metric measurements, it is important to convert them accurately to imperial units if you are accustomed to inches. Use a reliable conversion tool or calculator.
- Double-check all converted measurements before cutting materials or drilling to avoid errors.
- Squeaking or grinding noises:
- Inspect all pivot points and rotating bearings for debris or lack of lubrication. Apply a silicone-based lubricant if necessary.
- Ensure all fasteners are tight.
9. Specifications
Detailed specifications for the VEVOR Full Size Horizontal Murphy Bed Kit.

This image provides a visual representation of the product dimensions and compatible mattress sizes for the full-size horizontal Murphy bed kit.
| Model Number | YFHFU243 |
| Size | Full |
| Product Dimensions (L x W x H) | 60" x 82.25" x 61" (1525 x 2090 x 1550 mm) |
| Compatible Mattress Dimensions (L x W x H) | 75" x 54" x (6-10)" (1905 x 1371 x (152-254) mm) |
| Recommended Mattress Weight | 57 lbs / 25.85 kg |
| Maximum Mattress Weight | 75 lbs / 34 kg |
| Max Weight Capacity (Bed & Nightstand) | 900+ lbs |
| Flip Mechanism | Side Flip |
| Power Mechanism | Pneumatic Rod |
| Material | Carbon Steel |
| Color | Black |
| Item Weight (Kit) | 14.77 lbs / 6.7 kg |
10. Warranty
This VEVOR product comes with a limited warranty. For specific details regarding warranty coverage, duration, and claims, please refer to the warranty information included with your purchase or contact VEVOR customer support directly.
11. Customer Support
For further assistance, technical support, or to inquire about replacement parts, please visit the official VEVOR store or contact their customer service department.
VEVOR Store: https://www.amazon.com/stores/VEVOR/