GROWNEER 7.38-147.5 Ft-lbs/10-200 Nm
GROWNEER 1/2'' Drive Digital Torque Wrench Set Instruction Manual
Model: 7.38-147.5 Ft-lbs/10-200 Nm
For precise torque applications in automotive and general repair.
1. Introduction
Thank you for choosing the GROWNEER Digital Torque Wrench Set. This advanced tool provides accurate torque measurement and application, essential for various tasks including motor car tires and auto repair. Featuring a digital display, audible buzzer, and LED indicators, this wrench ensures precise tightening to prevent under or over-tightening, enhancing safety and component longevity. Please read this manual thoroughly before use to ensure proper operation and maintenance.
2. Safety Information
- Always wear appropriate personal protective equipment, such as safety glasses, when using this tool.
- Do not overload the wrench. Exceeding 120% of the maximum torque value may cause damage to the tool and the fastener.
- Keep the wrench dry. If it accidentally gets wet, wipe it immediately with a dry towel. Avoid exposure to saltwater, which can cause corrosion.
- Ensure the correct socket or bit is securely attached before applying torque.
- Store the wrench in its protective case in a dry, clean environment when not in use.
- Keep out of reach of children.
3. Package Contents
Your GROWNEER Digital Torque Wrench Set includes the following items:
- Digital Torque Wrench (1/2'' Drive) x 1
- Universal Socket Plugs x 5 (17/19/21/22/24mm)
- 5-inch Extension Bar x 1
- 1/2" to 3/8" Adapter x 1
- AAA Batteries x 1 (for initial use)
- Storage Case x 1
- Calibration Certificate x 1

Figure 1: Overview of the 8-in-1 Digital Torque Wrench Set components.
4. Product Features
- High Accuracy: Features a no-delay digital display with ±2% accuracy for clockwise (CW) and ±3% for counter-clockwise (CCW) measurements.
- Wide Torque Range: Measures from 7.38-147.5 ft-lbs (10-200 Nm).
- Upgraded Colorful LCD Display: Provides clear, real-time torque data, even in low-light conditions.
- Intelligent Alerts: Buzzer and LED indicators provide dual warnings (sound and light flashes) when approaching and reaching the preset torque, preventing over-tightening.
- Multiple Measurement Units: Easily switch between 4 units: N·m, Ft·lb, In·lb, and Kg·cm.
- Dual Measurement Modes: Supports both Track Mode (real-time display) and Peak Mode (records maximum torque applied).
- 6 Preset Modes: Store up to 6 frequently used torque values for quick access, with memory for up to 500 sets of data.
- Quick Replacement Ratchet Head: 1/2-inch drive ratchet head allows for rapid socket changes.
- Ergonomic Design: Non-slip handle reduces hand fatigue during prolonged use.

Figure 2: Key features of the GROWNEER Digital Torque Wrench.

Figure 3: Colorful LCD Display and Buzzer Alarm for precise control.
5. Specifications
| Specification | Value |
|---|---|
| Brand | GROWNEER |
| Model | Nex TW1 Max |
| Torque Range | 10-200 Nm / 7.38-147.5 Ft-lbs |
| Accuracy | CW ±2%, CCW ±3% |
| Drive Size | 1/2 inch |
| Measurement Units | N·m, Ft·lb, In·lb, Kg·cm |
| Working Modes | Peak / Track |
| Material | Chrome Vanadium Steel |
| Item Length | 11.8 Inches (approx. 42cm) |
| Item Weight | 2.51 Kilograms / 5.52 pounds |
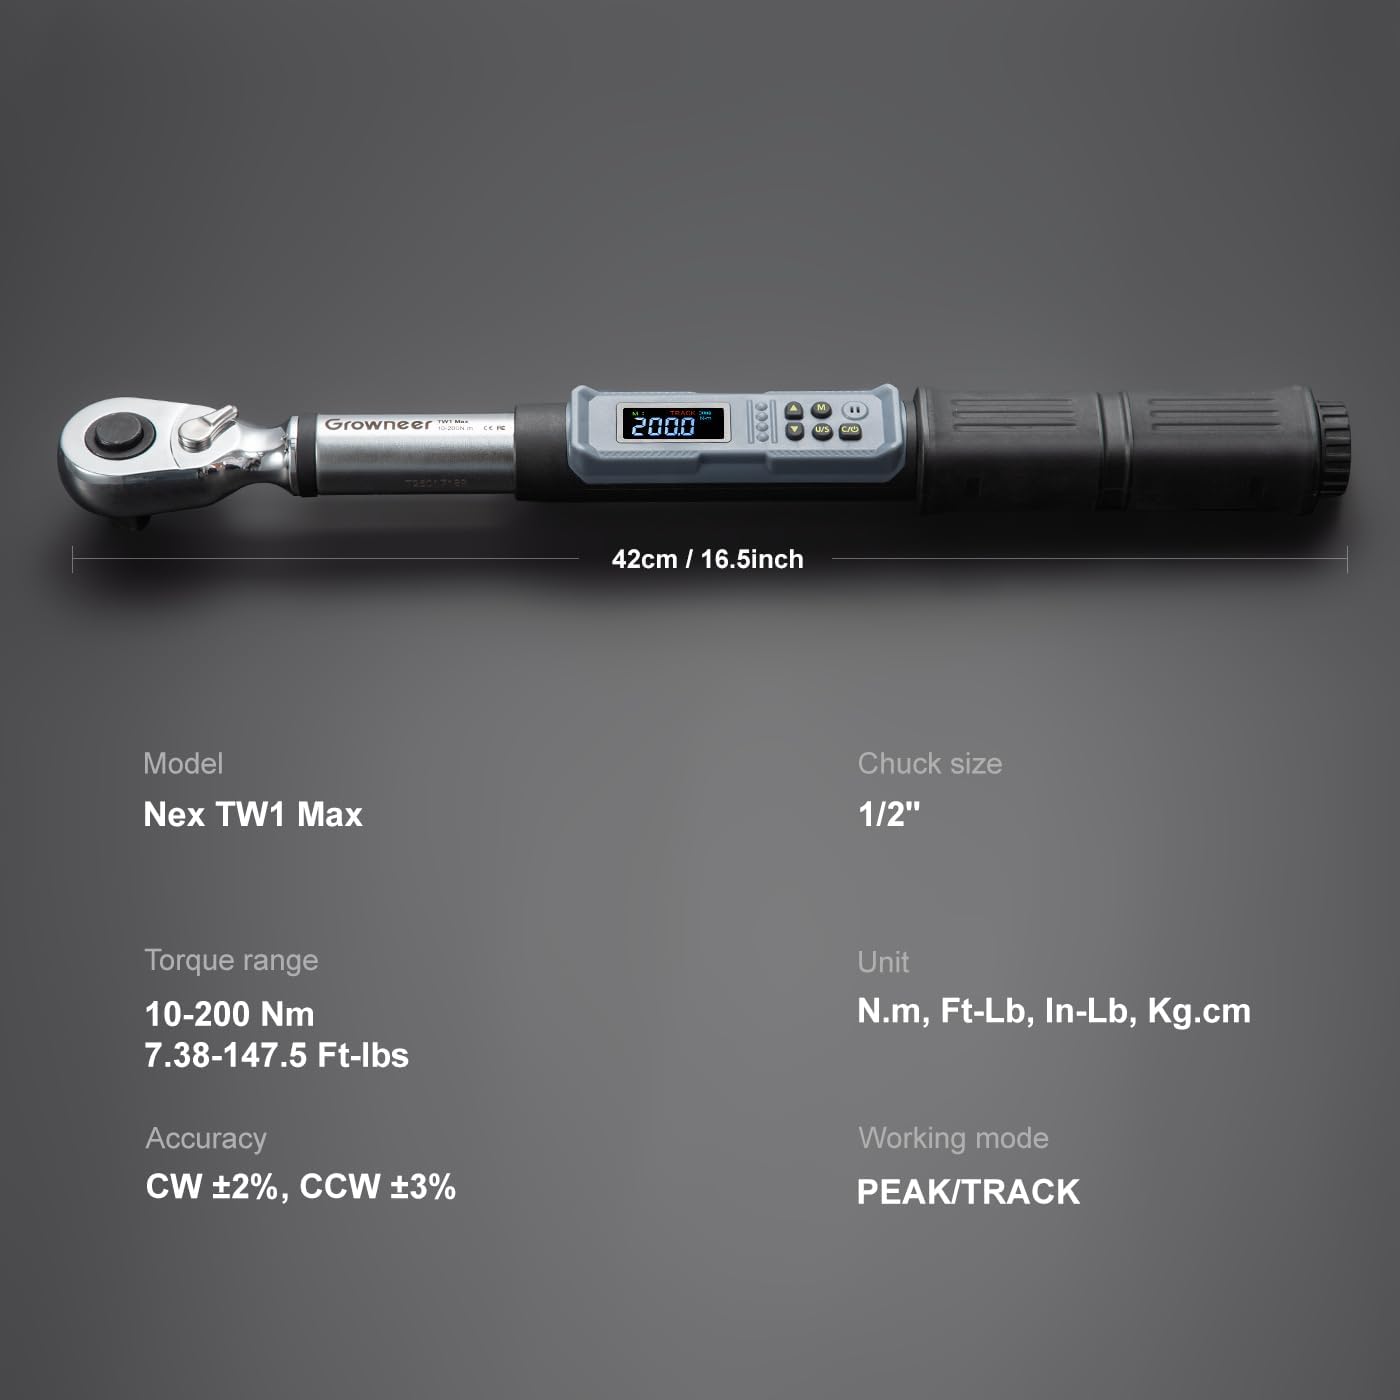
Figure 4: Detailed specifications and dimensions of the torque wrench.
6. Setup
- Battery Installation:
Locate the battery compartment at the end of the handle. Use the provided small screwdriver to open the cap. Insert the AAA batteries according to the polarity markings. Close the cap securely.

Figure 5: Tool-less battery cap for easy battery replacement.
- Attaching Sockets/Accessories:
Press the release button on the ratchet head and firmly insert the desired 1/2-inch socket or adapter. Ensure it clicks into place. For narrow spaces, attach the 5-inch extension bar before the socket.

Figure 6: Quick replacement of the 1/2-inch ratchet head.
7. Operating Instructions
- Power On/Off: Press the power button (usually 'C/O' or similar) to turn the wrench on. It will automatically power off after a period of inactivity to conserve battery.
- Selecting Measurement Units: Press the 'U/S' button to cycle through the available units: N·m, Ft·lb, In·lb, and Kg·cm.
- Setting Torque Value:
- Use the up and down arrow buttons to adjust the desired torque value. The value will be displayed on the LCD screen.
- For quick access, the wrench provides 6 preset modes (M1-M6). Press the 'M' button to cycle through and select a preset torque value.

Figure 7: Switching between 4 unit options using the 'U' button.

Figure 8: Utilizing 6 preset values for quick access to common torque settings.
- Applying Torque:
- Place the socket onto the fastener.
- Apply steady force to the wrench. The digital display will show the real-time torque value.
- As you approach the preset torque, the buzzer will emit intermittent beeps and the LED indicator lights will flash.
- Once the preset torque is reached, the buzzer will emit a continuous tone and the LED lights will remain solid, indicating that you should stop applying force.
Video 1: Demonstration of the GROWNEER digital torque wrench set in use, highlighting its features and operation.
8. Measurement Modes
- Track Mode: Displays the real-time torque value as it is being applied. This is useful for monitoring torque during continuous tightening.
- Peak Mode: Captures and displays the maximum torque value applied during a tightening operation. This is useful for verifying the highest torque achieved.

Figure 9: Illustration of Dual Measurement Modes: Track Mode and Peak Mode.
9. Maintenance
- Cleaning: Wipe the wrench with a soft, dry cloth after each use. Do not use abrasive cleaners or solvents.
- Storage: Store the wrench in its original protective case in a cool, dry place, away from direct sunlight and extreme temperatures.
- Battery Care: Remove batteries if the wrench will not be used for an extended period to prevent leakage and damage.
- Calibration: Digital torque wrenches require periodic calibration to maintain accuracy. Refer to the included calibration certificate for details or contact GROWNEER support for service.
10. Troubleshooting
| Problem | Possible Cause | Solution |
|---|---|---|
| Wrench does not power on. | Dead or incorrectly installed batteries. | Check battery polarity, replace with fresh AAA batteries. |
| Inaccurate torque readings. | Wrench needs calibration; improper use. | Ensure proper technique. If issues persist, contact support for calibration. |
| Buzzer/LED not activating. | Torque value not reached; alert function disabled. | Verify preset torque. Check user manual for alert settings. |
11. Warranty and Support
For warranty information, technical support, or service inquiries, please refer to the documentation included with your product or visit the official GROWNEER website. Keep your purchase receipt as proof of purchase.
For additional support, you may visit the GROWNEER Store on Amazon.