1. Introduction
The Sunhans SHFiEL62 is a portable 5G mobile hotspot router designed to provide high-speed internet connectivity for multiple devices. It supports both physical Nano SIM cards and eSIM technology, offering flexibility for various network providers and travel scenarios. This device features Wi-Fi 6 technology, tri-band Wi-Fi (2.4 GHz, 5.8 GHz, and 6 GHz), and a 2.4-inch touch panel for easy operation. It can connect up to 32 Wi-Fi terminals simultaneously.
2. Safety Information
- Use only the specified 5V/2A power adapter for charging.
- Ensure the device is charged within a temperature range of -10°C to 60°C.
- Avoid exposing the device to extreme temperatures, direct sunlight, or moisture.
- Do not attempt to disassemble or repair the device yourself. Contact qualified service personnel.
- Keep the device away from children and pets.
3. Package Contents
Verify that all items are present in your package:
- Sunhans SHFiEL62 5G Mobile Hotspot Router
- USB Type-C Cable
- User Manual (this document)
- Carrying Case (may vary by region/bundle)
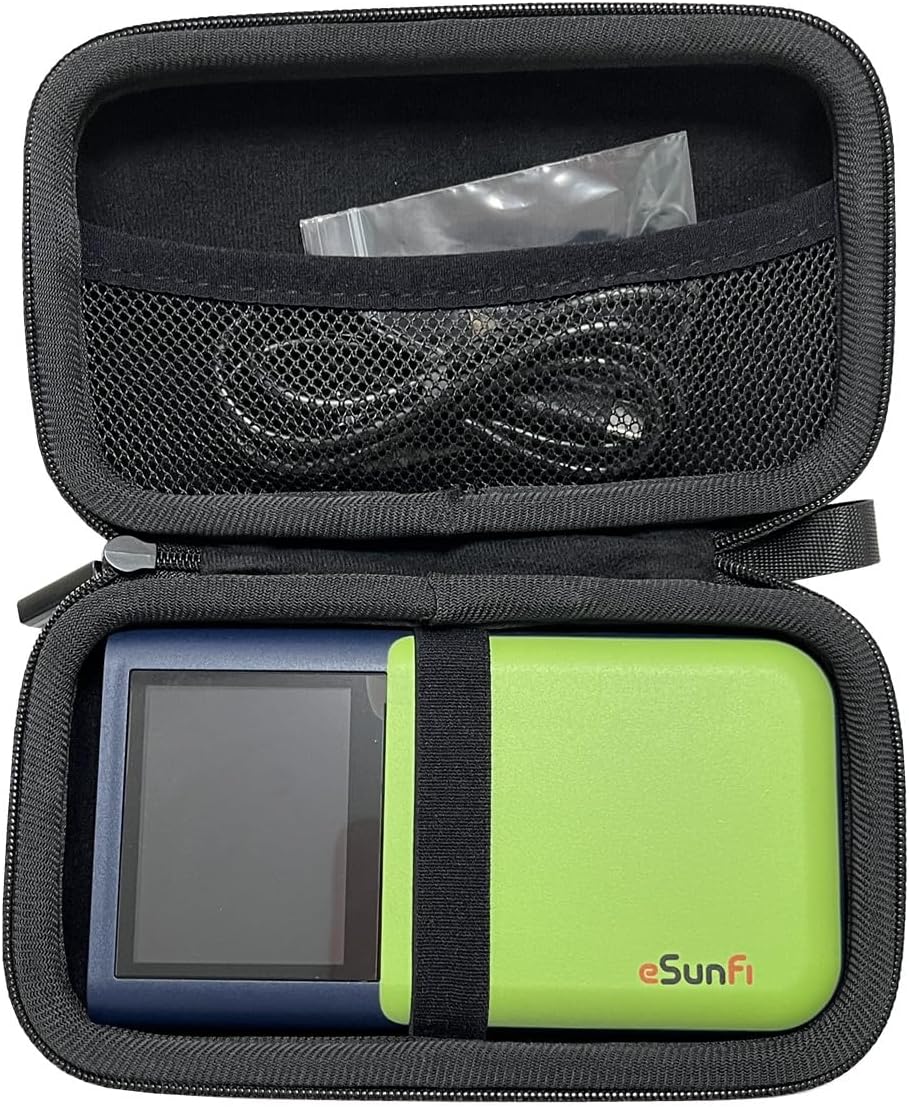
Figure 3.1: Sunhans SHFiEL62 router and its accessories, including a USB cable, neatly stored within a protective carrying case.
4. Device Overview
The SHFiEL62 features a compact design with a touch screen for easy interaction.

Figure 4.1: Front view of the SHFiEL62, displaying the main screen with network status, time, and date.
4.1. Physical Components
- 2.4-inch Touch Panel: For device interaction and status display.
- USB Type-C Port: For charging and data transfer (USB 3.0 compatible).
- SIM Card Slot: Supports one 4FF (Nano) UICC/USIM card.
- Power Button: Typically located on the side or top edge.
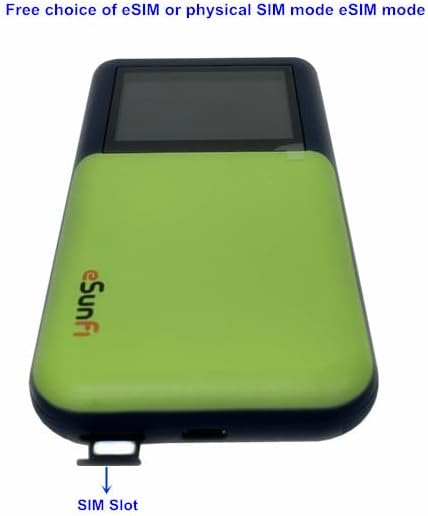
Figure 4.2: Bottom view of the SHFiEL62, highlighting the Nano SIM card slot.
5. Setup
5.1. Charging the Device
Before first use, fully charge the device using the provided USB Type-C cable and a 5V/2A power adapter. The charging indicator on the screen will show the charging status.
5.2. Inserting a Physical SIM Card
- Locate the SIM card slot on the device (refer to Figure 4.2).
- Gently insert a Nano SIM card into the slot with the gold contacts facing down and the notched corner aligned correctly.
- Push the SIM card in until it clicks into place.
- Power on the device. It will attempt to connect to the network automatically.
5.3. Activating eSIM
The SHFiEL62 supports eSIM functionality. To activate an eSIM profile:
- Ensure the device is connected to a Wi-Fi network or has an active physical SIM connection for initial setup.
- Download the "eSIM Manager" application on your smartphone.
- Use the eSIM Manager app to scan the QR code provided by your eSIM data plan provider.
- Follow the on-screen instructions in the app and on the device's touch panel to complete the eSIM activation.
- If the eSIM does not connect automatically, you may need to manually configure the Access Point Name (APN) via the device's web administration interface (see Section 6.3).
5.4. Initial Power-On
Press and hold the power button until the screen illuminates. The device will boot up and display network status information.
6. Operating Instructions
6.1. Navigating the Touch Panel
The 2.4-inch touch panel allows you to view device status and adjust basic settings. Swipe left or right to navigate through menus.

Figure 6.1: The main menu on the SHFiEL62 touch panel, showing options like Profile Management, Wi-Fi Connection, Data Count, and About.

Figure 6.2: The Network Setting menu on the SHFiEL62 touch panel, providing options for PIN Management, Ping reply setting, ESIM setting, and Network Mode.
6.2. Connecting Devices to Wi-Fi
- Ensure the SHFiEL62 is powered on and has an active internet connection (via SIM or eSIM).
- On your Wi-Fi enabled device (smartphone, tablet, laptop), search for available Wi-Fi networks.
- Select the Wi-Fi network name (SSID) displayed on the SHFiEL62's screen.
- Enter the Wi-Fi password (Key) shown on the SHFiEL62's screen.
- Your device should now be connected to the internet.
6.3. Accessing the Web Administration Interface
For advanced settings and configuration, access the web administration interface:
- Connect your computer or smartphone to the SHFiEL62's Wi-Fi network.
- Open a web browser and enter the default IP address: 192.168.100.1
- Log in using the default username and password (usually found on a sticker inside the device or in the quick start guide).
- From this interface, you can manage network settings, Wi-Fi passwords, APN settings, and more.
7. Maintenance
7.1. Battery Care
- To prolong battery life, avoid fully discharging the battery frequently.
- Store the device in a cool, dry place if not used for extended periods.
- If the battery is completely depleted, it may take up to 10 minutes for the device to become usable after connecting to power.
7.2. Cleaning
Wipe the device with a soft, dry cloth. Do not use liquid cleaners or abrasive materials.
7.3. Firmware Updates
Periodically check the web administration interface for available firmware updates to ensure optimal performance and security.
8. Troubleshooting
| Problem | Possible Solution |
|---|---|
| No internet connection |
|
| Cannot connect to Wi-Fi |
|
| Slow internet speed |
|
| eSIM activation failed |
|
| Touch screen misalignment |
|
9. Specifications
| Feature | Detail |
|---|---|
| Model | SHFiEL62 |
| Screen | 2.4 inches touch panel, 320*240 resolution |
| USB Port | Type-C, USB 3.0 (supports data transfer) |
| eSIM | Built-in Thales/Linksfield eSIM chip |
| SIM Card Slot | One 4FF (Nano) UICC/USIM, push slot |
| Battery | 4500mAh Li-ion (un-removable) |
| Charger Power | 5V 2A |
| Standard Compliant | 3GPP Release 16 (LTE and 5G) |
| NR Sub-6 Bands (EAU) | n1/3/5/7/8/20/28/38/40/41/75/76/77/78/79 |
| LTE Bands (EAU) | B1/3/5/7/8/20/28/32/38/40/41/42/43 |
| WCDMA Bands | B1/2/5/8 |
| Wi-Fi Standard | IEEE 802.11 a/b/g/n/ac/11ax (Wi-Fi 6) |
| Wi-Fi Bands | 2.4 GHz (2x2 MIMO) + 5.8 GHz (2x2 MIMO) + 6 GHz (2x2 MIMO) |
| Wi-Fi Rate | AX3600 |
| Wi-Fi AP Features | MU-MIMO |
| Max Wi-Fi Devices | Up to 32 |
| Dimensions | 135 x 75 x 20 mm |
| Weight | 195 g |
10. Warranty and Support
For warranty information and technical support, please refer to the documentation provided with your purchase or visit the official Sunhans website. Keep your proof of purchase for warranty claims.