1. Product Overview
The anydry Model 1209 is a wall-mounted automatic liquid soap dispenser designed for commercial and home use. It features a large 29 fl. oz (850ml) capacity, an automatic sensor for touch-free operation, and five adjustable dispensing levels to suit various needs. The dispenser is battery-powered and includes a low-battery indicator for convenience.

Figure 1: anydry Model 1209 Automatic Liquid Soap Dispenser.
2. Package Contents
Please ensure all items are present in the package before installation.
- 1x Liquid Dispenser (Model 1209)
- 1x Mounting Plate
- 2x Wall Anchors
- 2x Screws
- 1x Key (for opening the dispenser)
- 2x Safety Screws
- 1x User Manual
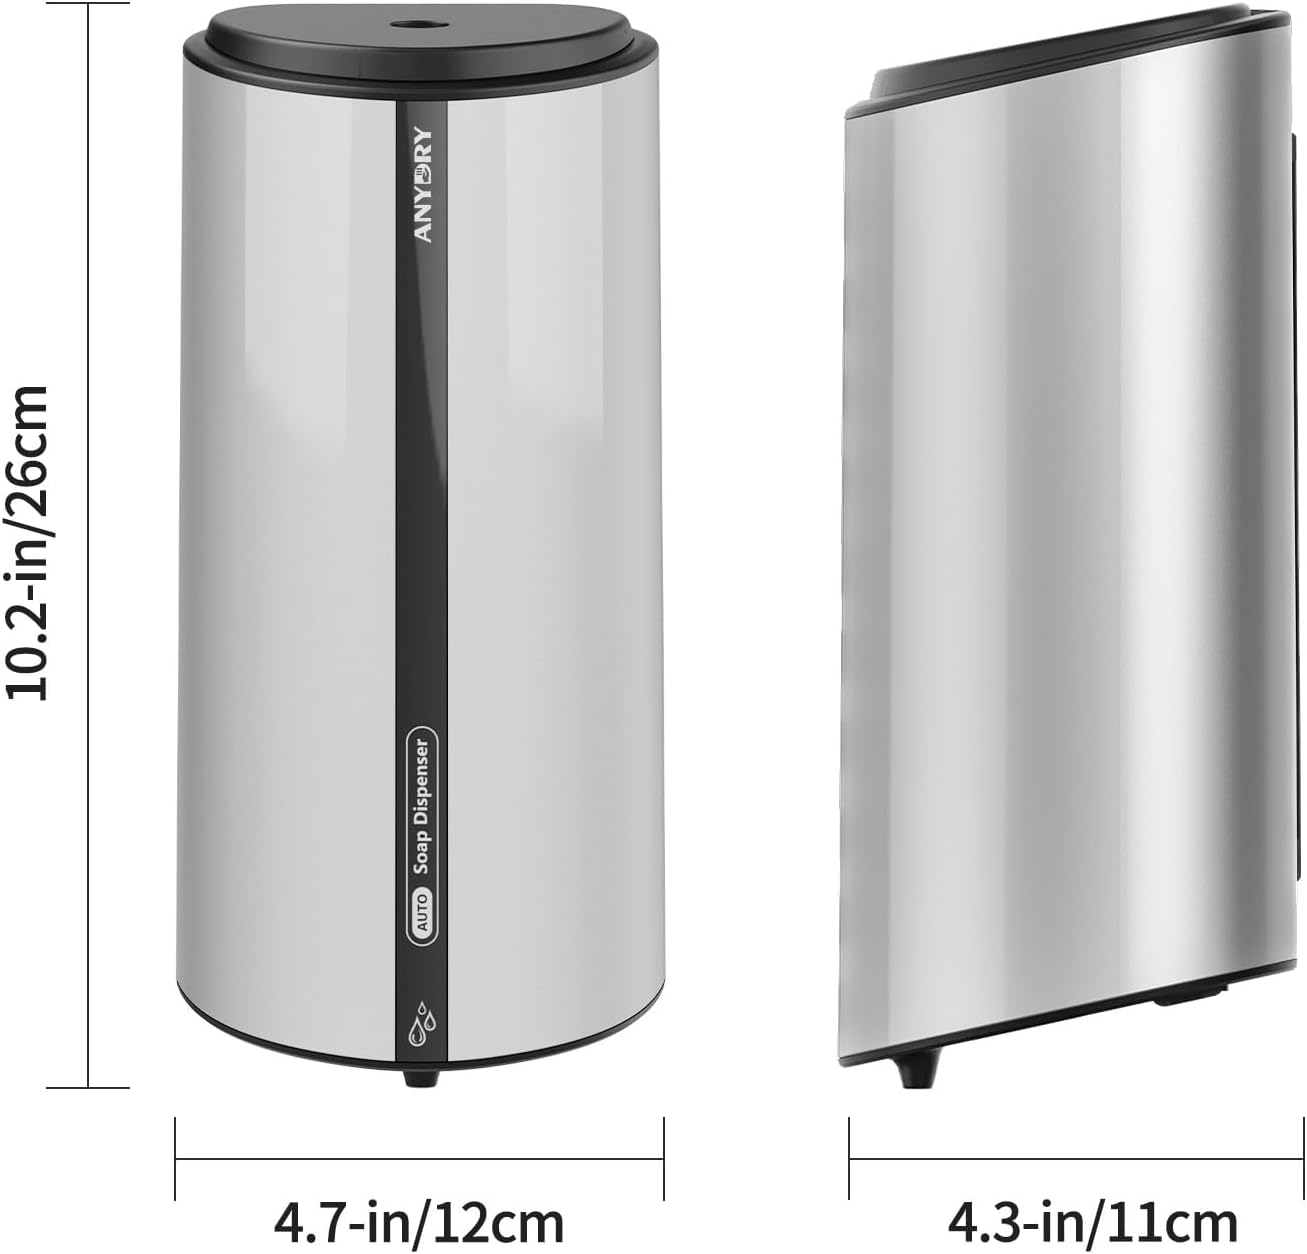
Figure 2: Complete set of items included with the dispenser.
Video 1: Unboxing the anydry Model 1209 Automatic Liquid Soap Dispenser. This video demonstrates the contents of the package and the initial appearance of the product.
3. Installation
3.1 Installation Clearance
Ensure adequate clearance for proper sensor function and dispensing. The dispenser requires:
- At least 10 inches (25cm) of space above regular countertops.
- At least 14 inches (35cm) of space above reflective surfaces to prevent false activations.

Figure 3: Recommended clearance distances for installation.
3.2 Mounting Options
The dispenser can be installed using either screws for robust mounting or adhesive for smooth, non-peeling surfaces.
Screw Mounting (Recommended for all surfaces)
- Mark Drill Holes: Place the mounting plate on the desired wall location and mark the positions for the 3 drill holes.
- Drill Holes: Drill holes at the marked positions and insert the wall anchors.
- Secure Mounting Plate: Align the mounting plate with the anchors and secure it firmly with screws.
- Hang Dispenser: Carefully hang the dispenser onto the secured mounting plate.
- Tighten Security Screw: Insert and tighten the security screw at the bottom of the dispenser to prevent accidental removal.

Figure 4: Secure and stable drill mount installation steps.

Figure 5: Robust metal plate for long-lasting stability with screw mounting.
Adhesive Installation (For smooth, dry, clean, and non-peeling surfaces only)
For surfaces like polished marble or tiles, a nail-free adhesive can be used. For added security on other surfaces, please use screw installation.
- Clean and Dry Wall: Wipe the wall clean and ensure it is completely dry for optimal adhesion.
- Mark Position: Use a level to mark the desired position for the mounting plate.
- Remove Protective Film: Peel off the protective film from the adhesive side of the mounting plate.
- Attach Mounting Plate: Align and firmly press the mounting plate against the wall.
- Hang Dispenser: Hang the dispenser onto the attached mounting plate.
- Secure with Safety Screw: Insert and tighten the safety screw at the bottom of the dispenser.
Video 2: Automatic Wall Soap Dispenser Installation Guide Model 1209. This video provides a visual guide for installing the dispenser.
4. Operation
4.1 Battery Installation
The dispenser is powered by 4 AA batteries (not included). Do not use rechargeable batteries, as they may degrade, causing low voltage and improper operation.
- Locate the battery compartment at the bottom of the dispenser.
- Open the compartment cover.
- Insert 4 AA batteries, ensuring correct polarity (+/-).
- Close the battery compartment cover securely.
4.2 Filling the Dispenser
The dispenser has a large 29 fl. oz (850ml) capacity.
- Use the provided key to unlock and open the top cover of the dispenser.
- Pour liquid soap into the reservoir. Ensure not to overfill.
- Close the top cover and lock it with the key.

Figure 6: Easy to refill and battery installation.
4.3 Adjusting Dispensing Volume
The dispenser offers 5 adjustable levels for precise liquid output control.
- Press the setting button (usually located on the side or top) to cycle through the dispensing levels.
- The indicator light will flash a corresponding number of times (1 to 5) to indicate the current level.
- Select the desired level for the amount of soap dispensed per activation.

Figure 7: Features including easy refill, battery compartment, and low battery reminder.

Figure 8: Personalized hygiene with 5 adjustable dispensing levels.
4.4 Dispensing Soap
Place your hand under the sensor at the bottom of the dispenser. The sensor will detect your hand and automatically dispense the set amount of liquid soap.
Video 3: Automatic Wall Soap Dispenser Use Guide Model 1209. This video demonstrates how to operate the dispenser and adjust settings.
5. Maintenance
5.1 Cleaning
Regular cleaning helps maintain hygiene and prolong the life of your dispenser.
- Wipe the exterior of the dispenser with a soft, damp cloth.
- Do not use abrasive cleaners or solvents.
- Avoid submerging the dispenser in water or allowing water to enter the battery compartment.
5.2 Refilling
Refill the dispenser with liquid soap as needed. The transparent window allows you to monitor soap levels.
5.3 Battery Replacement
When the low-battery indicator illuminates, replace all 4 AA batteries with new ones to ensure optimal performance.
6. Troubleshooting
| Problem | Possible Cause | Solution |
|---|---|---|
| No soap dispensed | Low battery; Soap reservoir empty; Sensor obstructed; Soap too thick. | Replace batteries; Refill soap; Clear sensor area; Dilute soap with water. |
| Low battery indicator on | Batteries are low. | Replace all 4 AA batteries. |
| Dispenser falls off wall | Improper adhesive installation; Wall surface not suitable for adhesive. | Ensure wall is clean and dry for adhesive. For non-smooth or painted walls, use screw mounting. |
7. Specifications
| Feature | Detail |
|---|---|
| Brand | anydry |
| Model | 1209 |
| Color | Silver |
| Material | Plastic (BPA Free) |
| Liquid Volume | 29 Fluid Ounces (850ml) |
| Product Dimensions | 4.7"L x 4.3"W x 10.2"H (12cm L x 11cm W x 26cm H) |
| Item Weight | 1.98 pounds |
| Power Source | 4 AA Batteries (not included) |
| Dispensing Levels | 5 Adjustable Levels |
| Installation | Wall-Mounted (Drill or Adhesive) |

Figure 9: Product dimensions of the dispenser.
8. Warranty and Support
The anydry Model 1209 Automatic Liquid Soap Dispenser is backed by a 1-year warranty for worry-free usage and support.
For technical assistance, troubleshooting, or warranty claims, please contact anydry customer support through the retailer's platform or visit the official anydry website.