1. Introduction
Thank you for choosing the Velamp Programmable Digital Chronothermostat. This device allows you to precisely control the temperature of your home, office, or shop, ensuring optimal comfort and energy efficiency. It is designed for easy installation and compatibility with most heating and air conditioning systems. This manual provides detailed instructions for installation, operation, and maintenance to help you get the most out of your chronothermostat.
2. Safety Information
Please read all safety instructions carefully before installation and operation. Failure to follow these instructions may result in property damage, personal injury, or death.
- Electrical Safety: Installation should only be performed by a qualified electrician or in accordance with local electrical codes. Ensure power is disconnected at the main circuit breaker before wiring.
- Battery Safety: Use only 2xAA 1.5V alkaline batteries. Do not mix old and new batteries, or different types of batteries. Dispose of used batteries responsibly.
- Placement: Install the thermostat away from direct sunlight, drafts, and heat sources (e.g., lamps, fireplaces) to ensure accurate temperature readings.
- Cleaning: Clean the device with a soft, dry cloth. Do not use abrasive cleaners or solvents.
3. Package Contents
Verify that all items are present in your package:
- Velamp Programmable Digital Chronothermostat Unit
- User Manual (this document)
- Mounting Screws and Wall Anchors
Note: 2xAA batteries are NOT included and must be purchased separately.

Figure 3.1: The chronothermostat unit, highlighting that 2xAA batteries are required but not included, and its compatibility with heating and cooling systems.
4. Product Overview
The Velamp chronothermostat features a clear digital display and intuitive controls for easy temperature management.
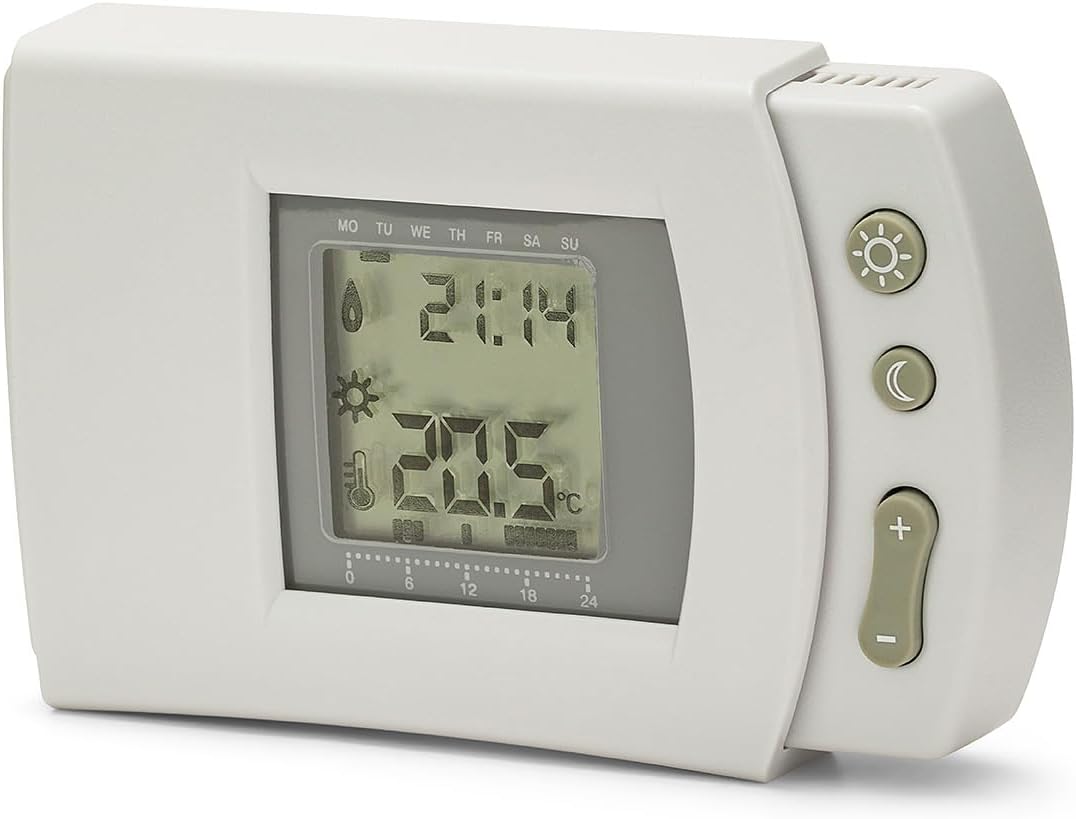
Figure 4.1: Front view of the chronothermostat, displaying the time, current temperature, and day of the week on its LCD screen, along with control buttons on the right side.

Figure 4.2: Physical dimensions of the chronothermostat, measuring 80mm in height, 130mm in width, and 30mm in depth, providing a clear understanding of its size.

Figure 4.3: Rear view of the chronothermostat, displaying the wiring terminals for connection to the heating/cooling system and the product label with model number (THERM506) and electrical specifications.
5. Setup and Installation
The chronothermostat is designed for straightforward installation, requiring only two wires to connect to your existing heating or cooling system.
5.1 Battery Installation
- Locate the battery compartment on the back of the chronothermostat.
- Insert two (2) new AA 1.5V alkaline batteries, ensuring correct polarity (+/-).
- Close the battery compartment securely.
5.2 Wiring Connection
Important: Ensure the main power supply to your heating/cooling system is turned OFF before proceeding with wiring.
- Identify the two control wires from your heating/cooling system.
- Connect these two wires to the designated terminals on the back of the chronothermostat (refer to Figure 4.3 for terminal location). The chronothermostat operates as a simple switch, so polarity for these two wires is generally not critical.
- Mount the chronothermostat securely to the wall using the provided screws and wall anchors.
- Once wiring and mounting are complete, restore power to your heating/cooling system.
5.3 Initial Power-On and Basic Settings
Upon first power-on or after battery replacement, the display will illuminate. You may need to set the current time and day of the week. Refer to Section 6 for detailed operating instructions.
6. Operating Instructions
The digital display provides comprehensive information, and the side buttons allow for easy programming and mode selection.
Figure 6.1: Detailed diagram illustrating the LCD display elements (Day of the week, Time, Heating ON, Air Conditioning ON, Comfort mode, Evening mode, ECO program, Battery level, Holiday mode, Room temperature, Program of the day, Active programs) and the corresponding functions of each button (Program, Temperature, CT, Timer, ET, Reset, ON/OFF, Increase, Decrease, Vacation mode, OK/Enter).
6.1 Display Indicators (Refer to Figure 6.1)
- Day of the week: MO, TU, WE, TH, FR, SA, SU
- Current Time: Displays in HH:MM format.
- Heating ON / Air Conditioning ON: Icons indicate active mode.
- Comfort Mode (CT) / Evening Mode (ET): Indicates programmed comfort or evening settings.
- ECO Program: Indicates energy-saving program is active.
- Battery Level: Icon shows battery status. Replace batteries when low.
- Holiday Mode: Indicates vacation settings are active.
- Room Temperature: Current ambient temperature.
- Program of the day / Active Programs (CT): Visual representation of the daily program schedule.
6.2 Button Functions (Refer to Figure 6.1)
- Program (P): Enters programming mode for setting daily schedules.
- Temperature (Sun/Moon icon): Toggles between day (comfort) and night (economy) temperature settings.
- CT / Timer / ET: Buttons for specific program settings or timer functions.
- Reset: Resets the thermostat to factory default settings.
- ON / OFF: Toggles the thermostat power.
- Increase (+): Increases temperature, time, or program values.
- Decrease (-): Decreases temperature, time, or program values.
- Vacation Mode (Suitcase icon): Activates holiday mode with a set temperature (e.g., anti-freeze).
- OK / Enter: Confirms selections in programming mode.
6.3 Setting Time and Day
Typically, after battery installation, the time and day will need to be set. Use the 'Program' button to navigate to time/day settings and the '+' / '-' buttons to adjust values, confirming with 'OK/Enter'. Consult the specific programming sequence in Figure 6.1 for detailed steps.
6.4 Programming Daily Schedule (7-Day Cycle)
The chronothermostat allows for a 7-day programmable cycle, enabling you to set different temperatures for each hour of every day.
- Press the 'Program' button to enter programming mode.
- Use the '+' / '-' buttons to select the day you wish to program (e.g., Monday).
- Press 'OK/Enter' to confirm the day.
- The display will show hourly segments. Use '+' / '-' to adjust the desired temperature for each hour.
- Confirm each hourly setting with 'OK/Enter' or move to the next hour.
- Repeat for all hours of the day, then proceed to the next day until all 7 days are programmed.
- Exit programming mode by pressing the 'Program' button again or waiting for the thermostat to automatically exit.
6.5 Antifreeze Function
The chronothermostat includes an antifreeze function, which automatically activates heating if the temperature drops below a certain threshold (typically around +5°C) to prevent pipes from freezing, even when the system is otherwise off or in holiday mode.
7. Maintenance
Regular maintenance ensures the longevity and optimal performance of your chronothermostat.
- Cleaning: Wipe the exterior of the thermostat with a soft, dry, lint-free cloth. Do not use liquid cleaners, sprays, or abrasive materials.
- Battery Replacement: Replace batteries annually or when the low battery indicator appears on the display. Always use new, high-quality AA 1.5V alkaline batteries.
- Avoid Obstructions: Ensure no objects block the thermostat's vents or sensors, as this can affect temperature accuracy.
8. Troubleshooting
If you encounter issues with your chronothermostat, refer to the following common problems and solutions:
| Problem | Possible Cause | Solution |
|---|---|---|
| Display is blank or dim. | Dead or low batteries. | Replace with new AA 1.5V alkaline batteries. |
| Heating/Cooling system not responding. | Incorrect wiring; System power off; Thermostat in wrong mode. | Check wiring connections (ensure main power is off first). Verify system power is on. Ensure thermostat is in Heating or Cooling mode as required. |
| Inaccurate temperature reading. | Thermostat placed near heat source/draft; Sensor obstructed. | Relocate thermostat if possible. Ensure no objects are blocking the sensor. |
| Programming not working. | Incorrect programming steps; Thermostat in manual override. | Review Section 6.4 for programming steps. Ensure thermostat is in programmed mode, not manual override. |
If the problem persists after trying these solutions, please contact Velamp customer support or a qualified technician.
9. Specifications
| Feature | Detail |
|---|---|
| Model Number | THERM506 |
| Dimensions (H x W x D) | 80mm x 130mm x 30mm |
| Weight | 152 g |
| Material | Shock-resistant ABS plastic |
| Power Supply | 2 x AA 1.5V batteries (not included) |
| Contact Capacity | 6A (resistive load), 2A (inductive load) / 250V |
| Temperature Control Range | +5°C to +30°C |
| Programming Cycle | 7-day programmable |
| Compatibility | Most heating systems (electric, gas, diesel) and air conditioning systems. |
| Manufacturer | Velamp |
| Country of Origin | China |
10. Warranty and Support
Velamp products are manufactured to high-quality standards and are backed by a standard manufacturer's warranty against defects in materials and workmanship. Please retain your proof of purchase for warranty claims.
For technical support, troubleshooting assistance, or warranty inquiries, please contact Velamp customer service through their official website or the retailer from whom you purchased the product. Contact information can typically be found on the product packaging or the manufacturer's website.
Website: www.velamp.com
Email: info@velamp.com


