1. Introduction
This manual provides essential instructions for the safe and efficient operation, maintenance, and troubleshooting of your VEVOR 750g Electric Grain Mill Grinder, Model HC-750. Please read this manual thoroughly before first use and retain it for future reference.

Image 1: VEVOR 750g Electric Grain Mill Grinder with included accessories.
2. Important Safety Instructions
To reduce the risk of fire, electric shock, or injury, always follow basic safety precautions when using electrical appliances.
- General Safety: Keep hands and utensils out of the grinding chamber during operation. Ensure the lid is securely fastened before starting the machine. Do not operate the grinder with a damaged cord or plug.
- Electrical Safety: Connect the appliance to a properly grounded outlet. Do not immerse the motor base in water or other liquids. Unplug from the outlet when not in use, before cleaning, or before changing parts.
- Operation Safety: This appliance is designed for grinding dry materials only. Do not grind wet, fresh, oily, or sticky materials, as this can damage the motor and blades. Allow the machine to rest for 5-10 minutes after every 5 minutes of continuous operation to prevent overheating.
- Cleaning Safety: Do not clean the grinding tank with water directly. Use a dry rag or brush for cleaning.
3. Product Components and Features
The VEVOR HC-750 Grain Mill Grinder is constructed from food-grade stainless steel, designed for durability and efficient grinding.

Image 2: Labeled components of the VEVOR Grain Grinder, including handle, upper cover, lockpin, blade, crush cabin, bearing set, carbon brush, power indicator, motor, overload protector, timer, and base.
Key Features:
- High-Speed Grinding: Equipped with a 2000W motor operating at 28000 r/min, capable of superfine milling (30-300 mesh).
- Triple Blade System: Features a three-layer blade design including a crushing blade, horn blade, and powder removal blade for efficient processing.
- Durable Construction: Made from food-grade stainless steel for longevity and hygiene.
- Enhanced Safety: Includes an automatic stop function when the lid is opened and an overload protector to prevent motor damage.
- User-Friendly Operation: Simple 0-5 minute timer control.
4. Technical Specifications
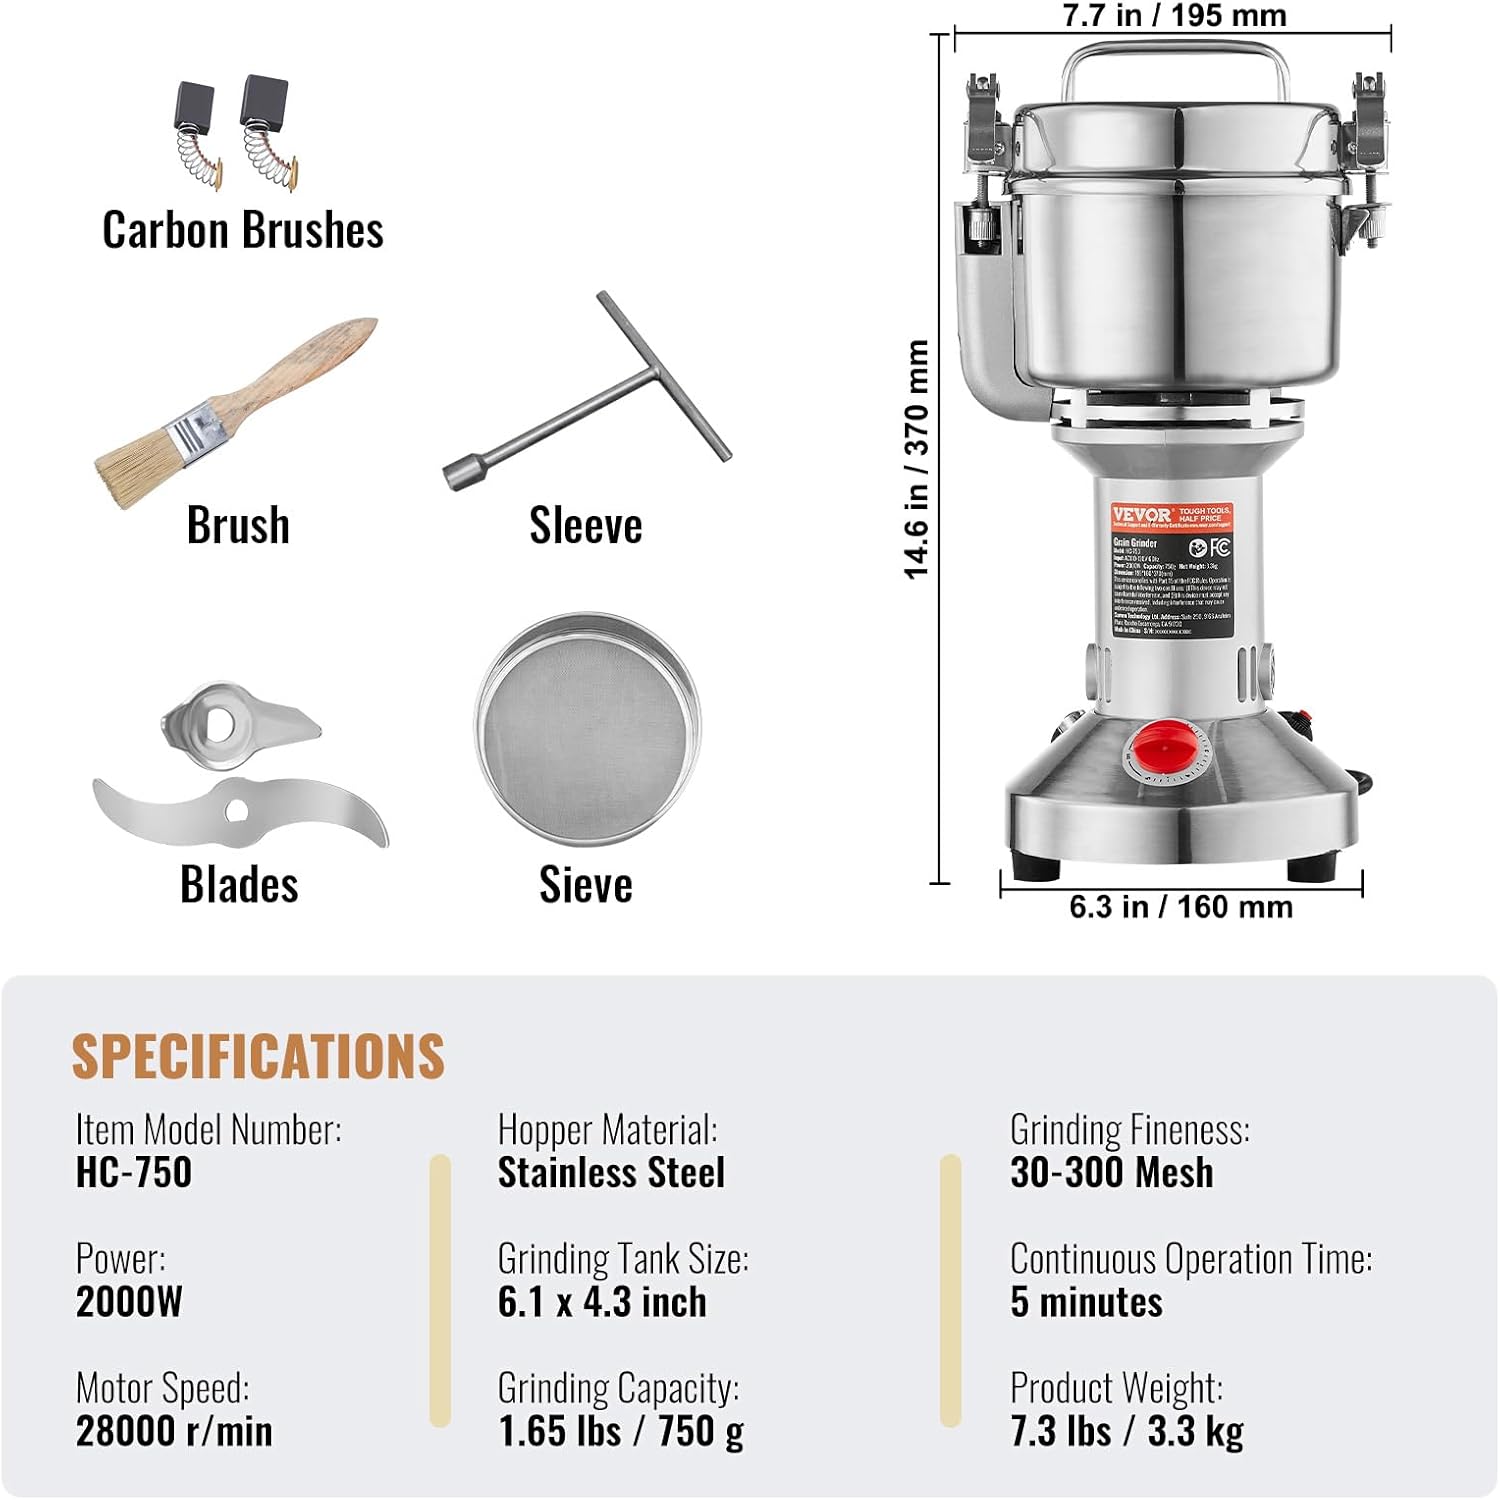
Image 3: Detailed specifications and dimensions of the VEVOR Grain Grinder.
| Specification | Value |
|---|---|
| Item Model Number | HC-750 |
| Power | 2000W |
| Motor Speed | 28000 r/min |
| Hopper Material | Stainless Steel |
| Grinding Tank Size | 6.1 x 4.3 inches |
| Grinding Capacity | 1.65 lbs / 750 g |
| Grinding Fineness | 30-300 Mesh |
| Continuous Operation Time | 5 minutes |
| Product Weight | 7.3 lbs / 3.3 kg |
| Product Dimensions (L x W x H) | 7.7" x 6.3" x 14.6" (195 x 160 x 370 mm) |
| Voltage | 110 Volts |
5. Package Contents
Verify that all items are present upon unpacking:

Image 4: Accessories included with the VEVOR Grain Grinder.
- VEVOR 750g Electric Grain Mill Grinder (HC-750)
- Carbon Brushes (set)
- Cleaning Brush
- Sleeve Wrench
- Replacement Blades (various types)
- Sieve
6. Setup and Assembly
- Unpacking: Carefully remove all components from the packaging. Inspect for any damage.
- Placement: Place the grinder on a stable, flat, and dry surface. Ensure adequate ventilation around the unit.
- Initial Cleaning: Before first use, wipe down the grinding chamber and blades with a dry cloth or brush to remove any manufacturing residues. Do not use water.
7. Operation Guide
Follow these steps for safe and effective grinding:

Image 5: Visual guide for operating the grinder.
- Prepare Materials: Ensure all materials to be ground are completely dry. For tough items, slice them into small pieces before grinding.
- Load Grinder: Open the upper cover. Pour the dry material into the grinding chamber. Ensure the material covers the long blade and does not exceed 2/3 of the jar's capacity.
- Secure Lid: Close the upper cover and securely fasten the lockpins on both sides. The machine will only operate when the lid is fully buckled and the internal induction switch is triggered.
- Set Timer and Start: Plug in the power cord. Rotate the timer knob to set the desired grinding duration (0-5 minutes). The machine will start automatically.
- Monitor and Rest: Observe the grinding process. For optimal results and to prevent overheating, operate the machine for a maximum of 5 minutes, then allow it to rest for 5-10 minutes before resuming.
- Empty Grinder: Once grinding is complete and the machine has stopped, unplug the unit. Carefully unfasten the lockpins and open the lid. Pour out the ground powder.
Grinding Time Guidelines:

Image 6: Approximate grinding times for common materials.
- Coffee Beans: 10s (coarse), 30s (medium), 55s (fine powder)
- Soybean: 6s (coarse), 40s (medium), 55s (fine powder)
- Corn: 8s (coarse), 12s (medium), 35s (fine powder)
- Pepper: 10s (coarse), 16s (medium), 44s (fine powder)
Note: These times are approximate and may vary based on material hardness and desired fineness.
8. Maintenance and Cleaning
Proper maintenance ensures the longevity and performance of your grinder.
- Cleaning the Grinding Chamber: After each use, unplug the machine. Use the provided cleaning brush or a dry cloth to remove residual powder from the grinding tank and blades. DO NOT rinse the grinding tank with water directly.
- Blade Replacement: If blades become dull or damaged, use the sleeve wrench to carefully remove and replace them with new ones from the accessory kit. Ensure new blades are securely fastened.
- Carbon Brush Replacement: The carbon brushes are wear parts. If the motor performance decreases or the machine stops working, the carbon brushes may need replacement. Refer to the product diagram (Image 2) for the location of the carbon brushes. Unplug the unit, unscrew the brush caps, remove old brushes, and insert new ones. Securely fasten the caps.
- Storage: Store the grinder in a dry, clean place when not in use.
9. Troubleshooting
Refer to this section for common issues and their solutions.
Image 7: Troubleshooting tip for the grinder not turning on.
- Grinder Does Not Turn On:
- Ensure the power cord is securely plugged into a working outlet.
- Verify that the lid is fully closed and the lockpins are securely fastened. The grinder has two induction switches in the buckles that must be engaged for operation. Rotate the lid to the end and ensure there is no gap among the rod, screw, and buckle to trigger the internal induction switch.
- Check if the timer knob is set to a grinding duration.
- Grinder Stops During Operation:
- The overload protector may have activated due to excessive load or prolonged use. Unplug the unit, remove some material if overloaded, and allow the machine to cool down for 10-15 minutes before restarting.
- Check if the lid has accidentally become unlatched.
- Material Not Grinding Finely:
- Ensure materials are completely dry.
- Increase grinding time or process in smaller batches.
- Check if blades are dull and require replacement.
10. Warranty and Customer Support
VEVOR products are designed for reliability and performance. For warranty information or technical assistance, please refer to the warranty card included with your product or contact VEVOR customer support through their official website or the retailer where the product was purchased. Please have your model number (HC-750) and purchase details ready when contacting support.