1. Introduction
Thank you for choosing the 5 Core 4-Channel Audio Mixer (Model MX 4CH ORG). This compact and versatile mixer is designed for various audio applications, including DJ setups, studio recording, karaoke, and live streaming. It features multiple input options, phantom power, Bluetooth connectivity, a USB audio interface, and built-in effects to enhance your sound. Please read this manual thoroughly to ensure proper setup, operation, and longevity of your device.
2. Important Safety Instructions
- Read these instructions carefully before operating the device.
- Keep this manual for future reference.
- Heed all warnings on the product and in the operating instructions.
- Follow all instructions.
- Do not use this apparatus near water.
- Clean only with a dry cloth.
- Do not block any ventilation openings. Install in accordance with the manufacturer's instructions.
- Do not install near any heat sources such as radiators, heat registers, stoves, or other apparatus (including amplifiers) that produce heat.
- Do not defeat the safety purpose of the polarized or grounding-type plug. A polarized plug has two blades with one wider than the other. A grounding-type plug has two blades and a third grounding prong. The wide blade or the third prong are provided for your safety. If the provided plug does not fit into your outlet, consult an electrician for replacement of the obsolete outlet.
- Protect the power cord from being walked on or pinched, particularly at plugs, convenience receptacles, and the point where they exit from the apparatus.
- Only use attachments/accessories specified by the manufacturer.
- Unplug this apparatus during lightning storms or when unused for long periods of time.
- Refer all servicing to qualified service personnel. Servicing is required when the apparatus has been damaged in any way, such as power-supply cord or plug is damaged, liquid has been spilled or objects have fallen into the apparatus, the apparatus has been exposed to rain or moisture, does not operate normally, or has been dropped.
3. Product Overview
The 5 Core 4-Channel Audio Mixer is a compact and powerful tool for audio enthusiasts. It features a user-friendly interface with clearly labeled controls for easy operation.
3.1 Key Features
- 4-Channel Mixing: Two mono channels and two stereo channels for versatile input options.
- XLR & 1/4" Inputs: Supports both balanced XLR and unbalanced 1/4" inputs.
- +48V Phantom Power: Provides power for condenser microphones on mono channels.
- Bluetooth 5.4 Connectivity: Seamless wireless audio streaming from compatible devices.
- USB Audio Interface: Connects to a computer for direct recording and playback.
- 2-Band Equalizer: High and Low frequency controls on each channel for sound shaping.
- Delay Effects: Built-in delay and repeat effects to add depth to your mix.
- Compact & Portable Design: Lightweight and easy to transport for various setups.
3.2 Mixer Layout and Controls
Familiarize yourself with the various inputs, outputs, and controls on your mixer. Refer to the diagram below for a visual guide.
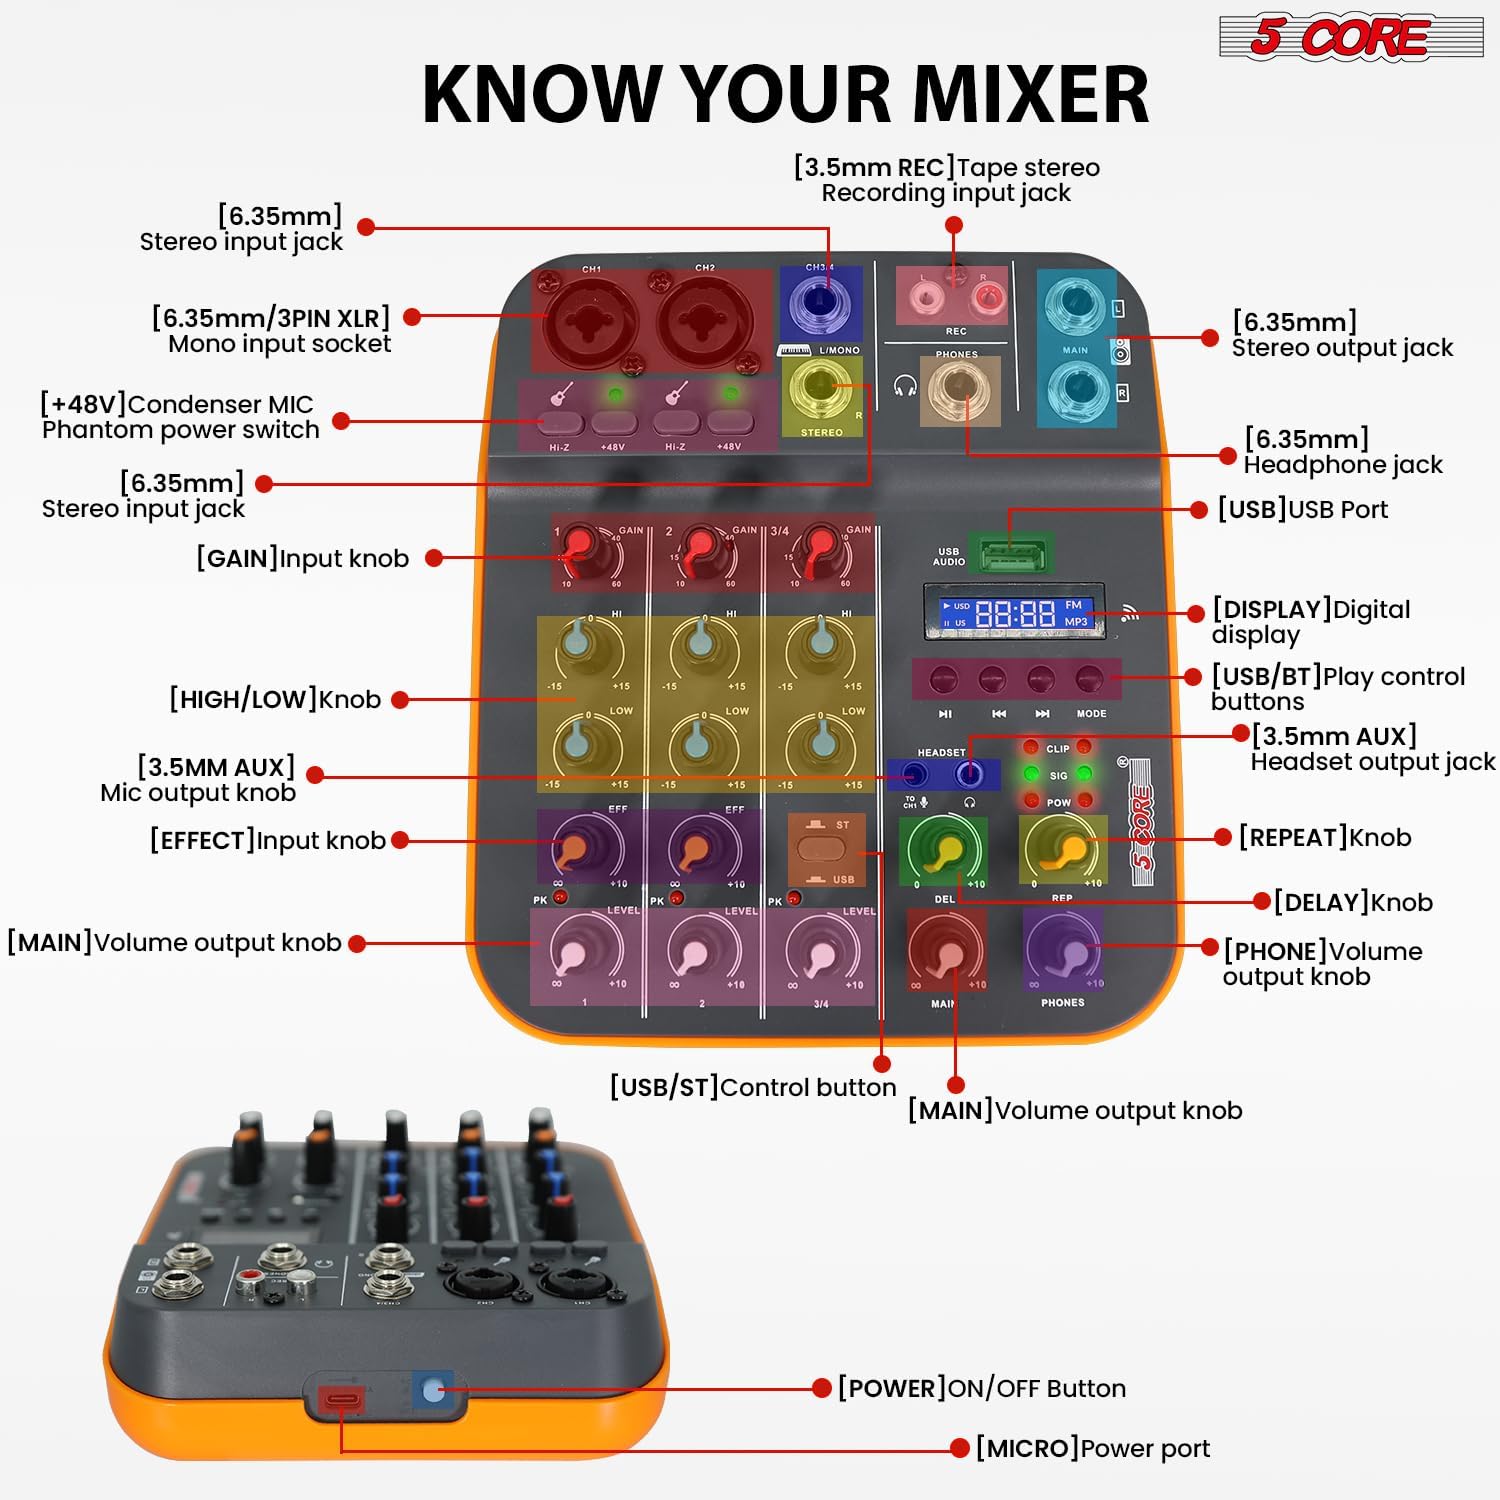
Figure 3.2.1: Front Panel Layout and Controls. This image displays the top view of the 5 Core 4-Channel Audio Mixer with various components labeled, including XLR/1/4" mono input sockets, stereo input jacks, REC output, MAIN output, PHONES output, USB port, digital display, and control knobs for GAIN, HIGH, LOW, EFF (Effect), LEVEL, DEL (Delay), REP (Repeat), MAIN, and PHONES volume. Also shown are the +48V phantom power switches and HI-Z switches.
- [6.35mm/3PIN XLR] Mono input socket: For connecting microphones or mono instruments.
- [HI-Z] Switch: For high impedance inputs, typically for guitars.
- [+48V] Condenser MIC Phantom power switch: Activates phantom power for condenser microphones.
- [6.35mm] Stereo input jack: For connecting stereo line-level devices.
- [GAIN] Input knob: Adjusts the input sensitivity for each channel.
- [HIGH/LOW] knob: 2-band equalizer for adjusting high and low frequencies.
- [EFF] Effect knob: Controls the amount of effect applied to the channel.
- [LEVEL] Main volume output knob: Adjusts the overall volume of each channel.
- [USB] USB Port: For connecting to a computer or USB drive.
- [DISPLAY] Digital display: Shows current mode and track information.
- [USB/BT] Play control buttons: Controls for USB/Bluetooth playback (Play/Pause, Skip, Mode).
- [HEADSET] Headset output jack: For connecting headphones.
- [DEL] Delay knob: Adjusts the delay time of the effect.
- [REP] Repeat knob: Adjusts the number of repetitions for the delay effect.
- [MAIN] Volume output knob: Controls the overall main output volume.
- [PHONES] Volume output knob: Controls the headphone output volume.
- [POWER] ON/OFF Button: Located on the side/rear for turning the unit on/off.
- [MICRO] Power port: USB power input.
4. Setup Guide
4.1 Powering the Mixer
The mixer can be powered in three ways:
- Computer: Connect the mixer to a computer's USB port using a USB cable.
- Power Adapter: Use a standard USB power adapter (not included) to connect to a wall outlet.
- Power Bank: For portable use, connect to a power bank (not included).
Ensure the power source provides sufficient voltage (5V/2A recommended). Once connected, press the [POWER] ON/OFF button to turn on the mixer.
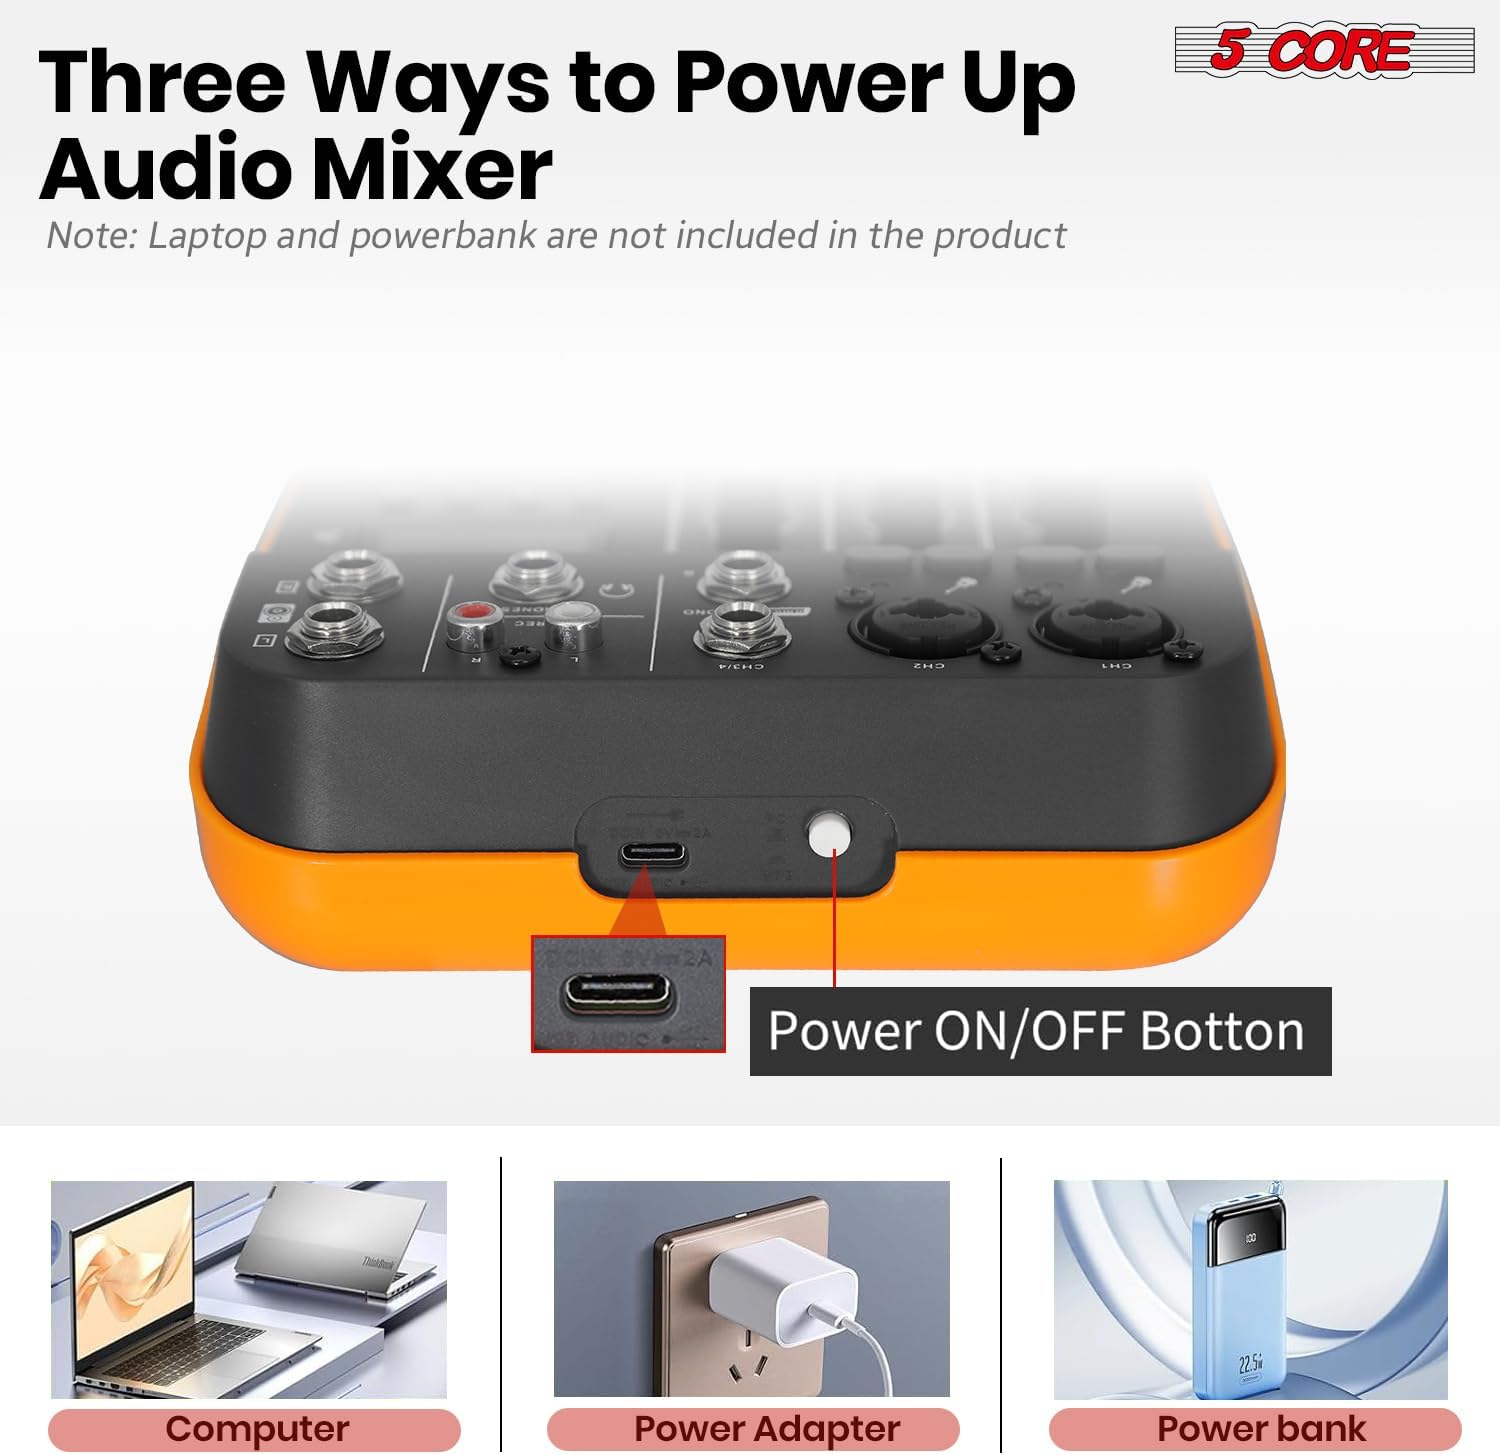
Figure 4.1.1: Powering Options for the Audio Mixer. This image illustrates connecting the mixer to a laptop, a wall adapter, and a power bank for power supply.
4.2 Connecting Microphones and Instruments
- Mono Inputs (CH1, CH2): Use XLR or 1/4" cables to connect microphones or mono instruments.
- Phantom Power: For condenser microphones, press the +48V switch on the respective channel. The indicator light will illuminate. Caution: Do not activate +48V phantom power for dynamic microphones or ribbon microphones unless specified by the manufacturer, as it may cause damage.
- High Impedance (HI-Z): If connecting a guitar or bass directly, press the HI-Z switch for optimal signal.
- Stereo Inputs (CH3/4): Use 1/4" cables to connect stereo line-level devices such as keyboards, media players, or other mixers.

Figure 4.2.1: Phantom Power and Input Connections. This image highlights the +48V phantom power switch and the XLR/1/4" combo inputs for microphones and instruments.
4.3 Connecting to a Computer for Recording (USB Audio Interface)
The mixer features a built-in USB audio interface for direct connection to your computer, enabling recording and playback.
- Connect the mixer's USB port to your computer using a USB cable.
- Your computer should automatically detect the mixer as an audio device. No special drivers are usually required for basic functionality.
- Open your preferred Digital Audio Workstation (DAW) software (e.g., Audacity, GarageBand, Ableton Live).
- In your DAW's audio settings, select the mixer as your input and output device.
- You can now record audio from the mixer into your computer and play back audio from your computer through the mixer.

Figure 4.3.1: USB Audio Interface for PC Recording. This image depicts the mixer connected to a laptop, demonstrating its use as an audio interface for music production.

Figure 4.3.2: Computer to Mixer Audio Signal Flow. This diagram shows how computer music signals can be sent to the audio mixer and how audio mixer signals can be recorded by a computer program, with an emphasis on switching to PC mode.
4.4 Bluetooth Connectivity
The mixer supports Bluetooth 5.4 for wireless audio streaming from your smartphone, tablet, or other Bluetooth-enabled devices.
- Press the MODE button on the mixer until "BT" appears on the digital display.
- On your Bluetooth device, search for available devices and select "5 CORE MIXER" (or similar name).
- Once paired, you can stream audio wirelessly to the mixer. Use the play control buttons (PLAY/PAUSE, SKIP) on the mixer to control playback.

Figure 4.4.1: Seamless Wireless Connectivity. This image illustrates the mixer's Bluetooth capability, showing it connected to a smartphone for wireless music streaming.
4.5 Output Connections
- Main Output (MAIN): Connect to your main speakers or amplifier using 1/4" cables.
- Headphone Output (PHONES): Connect your headphones to the 1/4" headphone jack for monitoring.
- REC Output (REC): Use for dedicated recording devices.

Figure 4.5.1: Versatile Compatibility. This image demonstrates the mixer's ability to connect with a wide range of audio equipment, including headphones, smartphones, power amplifiers, and wireless microphones.
5. Operating Instructions
5.1 Basic Mixing
- Set GAIN: Adjust the GAIN knob for each input channel to achieve an optimal input level. Avoid clipping (indicated by the PK/CLIP light).
- Adjust EQ: Use the HIGH and LOW knobs to shape the tone of each channel.
- Apply Effects: Turn the EFF knob to send a portion of the channel's signal to the built-in effects processor.
- Set Channel Level: Adjust the LEVEL knob for each channel to balance the mix.
- Master Volume: Control the overall output volume using the MAIN volume knob.
5.2 Using Delay Effects
The mixer includes built-in delay and repeat effects.
- DEL (Delay): Adjust this knob to control the delay time.
- REP (Repeat): Adjust this knob to control the number of repetitions for the delay effect.
- Ensure the EFF knob on the desired channel is turned up to send signal to the effects processor.
5.3 USB/MP3 Playback
Insert a USB drive containing MP3 files into the USB port. Use the play control buttons (PLAY/PAUSE, SKIP, MODE) to navigate and play tracks. The digital display will show track information.
5.4 Monitoring
Connect headphones to the PHONES jack and adjust the PHONES volume knob to monitor your mix without affecting the main output.
6. Maintenance
- Cleaning: Use a soft, dry cloth to clean the mixer's surface. Do not use liquid cleaners or solvents.
- Storage: Store the mixer in a cool, dry place away from direct sunlight and extreme temperatures.
- Handling: Avoid dropping or subjecting the mixer to strong impacts.
- Ventilation: Ensure ventilation openings are not blocked to prevent overheating.
7. Troubleshooting
7.1 No Sound Output
- Check if the mixer is powered on.
- Ensure all cables are securely connected to the correct inputs and outputs.
- Verify that the MAIN volume and individual channel LEVEL knobs are turned up.
- Check the volume levels on your connected speakers or amplifier.
- If using headphones, ensure the PHONES volume knob is turned up.
7.2 Microphone Not Working / Low Volume
- Ensure the microphone is connected to a mono input (CH1 or CH2).
- Adjust the GAIN knob for the microphone channel.
- If using a condenser microphone, ensure +48V phantom power is activated for that channel.
- Test the microphone with another device to confirm it is functional.
7.3 Bluetooth Connection Issues
- Ensure the mixer is in Bluetooth mode (display shows "BT").
- Make sure your Bluetooth device is within range and Bluetooth is enabled.
- Try unpairing and re-pairing the device.
- Ensure no other devices are actively connected to the mixer via Bluetooth.
7.4 Recording Issues via USB
- Verify the USB cable is properly connected between the mixer and your computer.
- Check your computer's sound settings and your DAW's audio preferences to ensure the mixer is selected as the input device.
- Adjust the MAIN output level on the mixer, as this often controls the signal sent to the USB output.
8. Specifications
| Feature | Detail |
|---|---|
| Brand | 5 CORE |
| Model | MX 4CH ORG |
| Channel No. | 4 (2 Mono, 2 Stereo) |
| Material Type | Plastic |
| Voltage | 100-240V (Input), 5V (Operating) |
| Bluetooth Version | 5.4 |
| PC Recording | Yes (via USB) |
| Equalizer | 2-Band EQ (High, Low) per channel |
| Phantom Power | +48V |
| USB Connectivity | Yes (Audio Interface, MP3 Playback) |
| Effects | Delay, Repeat |
| Frequency Response | 20Hz - 20KHz |
| Product Dimensions | 3"D x 8"W x 9"H |
| UPC | 810144135113 |
9. Warranty & Support
This product comes with a 1-month warranty from the date of purchase. For warranty claims or technical support, please contact 5 Core customer service through the retailer where the product was purchased or visit the official 5 Core website for contact information.
Please retain your proof of purchase for warranty validation.
10. Product Videos
10.1 5 Core Audio Mixer 4 Channel DJ Soundboard Overview
This video provides a quick overview of the 5 Core 4-Channel Audio Mixer, highlighting its key features such as 2 mono and 2 stereo channels, Bluetooth 5.4, USB connectivity, MP3 playback, +48V phantom power, 2-band EQ, and delay effects. It demonstrates the mixer's suitability for recording, mixing, and performance.
10.2 Audio Mixer USB Interface XLR Mixing Console 4 Channel Features
This video showcases the 5 Core 4-Channel Audio Mixer, emphasizing its 2 mono and 2 stereo channels, Bluetooth 5.4, USB and MP3 capabilities, +48V phantom power for studio microphones, 20Hz to 20kHz frequency range, delay effects, and 2-band EQ. It highlights the mixer's lightweight and orange design, suitable for various audio production needs.