
1. Introduction
This manual provides essential instructions for the safe and effective operation of your ASOFTY Digital Temperature and Humidity Controller. Please read this manual thoroughly before use and retain it for future reference. This device is designed to precisely monitor and control environmental temperature and humidity in various applications such as indoor spaces, greenhouses, and aquariums.
2. Safety Information
- Ensure the power supply voltage matches the device's specifications (100~250VAC 50/60Hz).
- Do not disassemble or modify the device. Unauthorized modifications may cause damage or electric shock.
- Keep the device away from water and high humidity environments unless specifically designed for such use (the sensor is for humidity, but the main unit should be protected).
- Avoid exposing the device to direct sunlight or extreme temperatures.
- Always unplug the device from the power outlet before cleaning or performing any maintenance.
- If the sensor is not connected, or if measured data exceeds the thermostat range or if a short circuit occurs, the device will alarm. Address these issues promptly.
3. Product Overview
The ASOFTY Digital Temperature and Humidity Controller is a compact device designed for precise environmental control. It features a digital display, control buttons, and an external sensor.

Figure 3.1: Overall view of the ASOFTY Digital Temperature and Humidity Controller and its external sensor.
3.1 Key Features

Figure 3.2: Key features of the controller, including monitoring, timing, intelligent control, LCD, and safety materials.
- Real-time temperature and humidity monitoring.
- Multiple operating modes (humidification/dehumidification, heating/cooling).
- Alarm function for out-of-range conditions.
- Data storage function retains settings after power failure.
- High-sensitivity external sensor for accurate readings.
- Constructed from high-quality fireproof PC material.
3.2 Components and Display

Figure 3.3: Labeled diagram of the controller's display and buttons.
The device features a clear digital display showing measured values and set parameters. Control buttons allow for easy navigation and setting adjustments.
- MODE Button: Used to switch between different operating modes.
- SET Button: Used to enter setting mode and confirm selections.
- UP/CLK Button: Used to increase values or set clock (if applicable).
- DOWN Button: Used to decrease values.
- Display: Shows Measured Humidity/Temperature, Start Humidity/Temperature, Stop Humidity/Temperature.
- Work Indicators: LEDs indicating operational status.
3.3 Dimensions
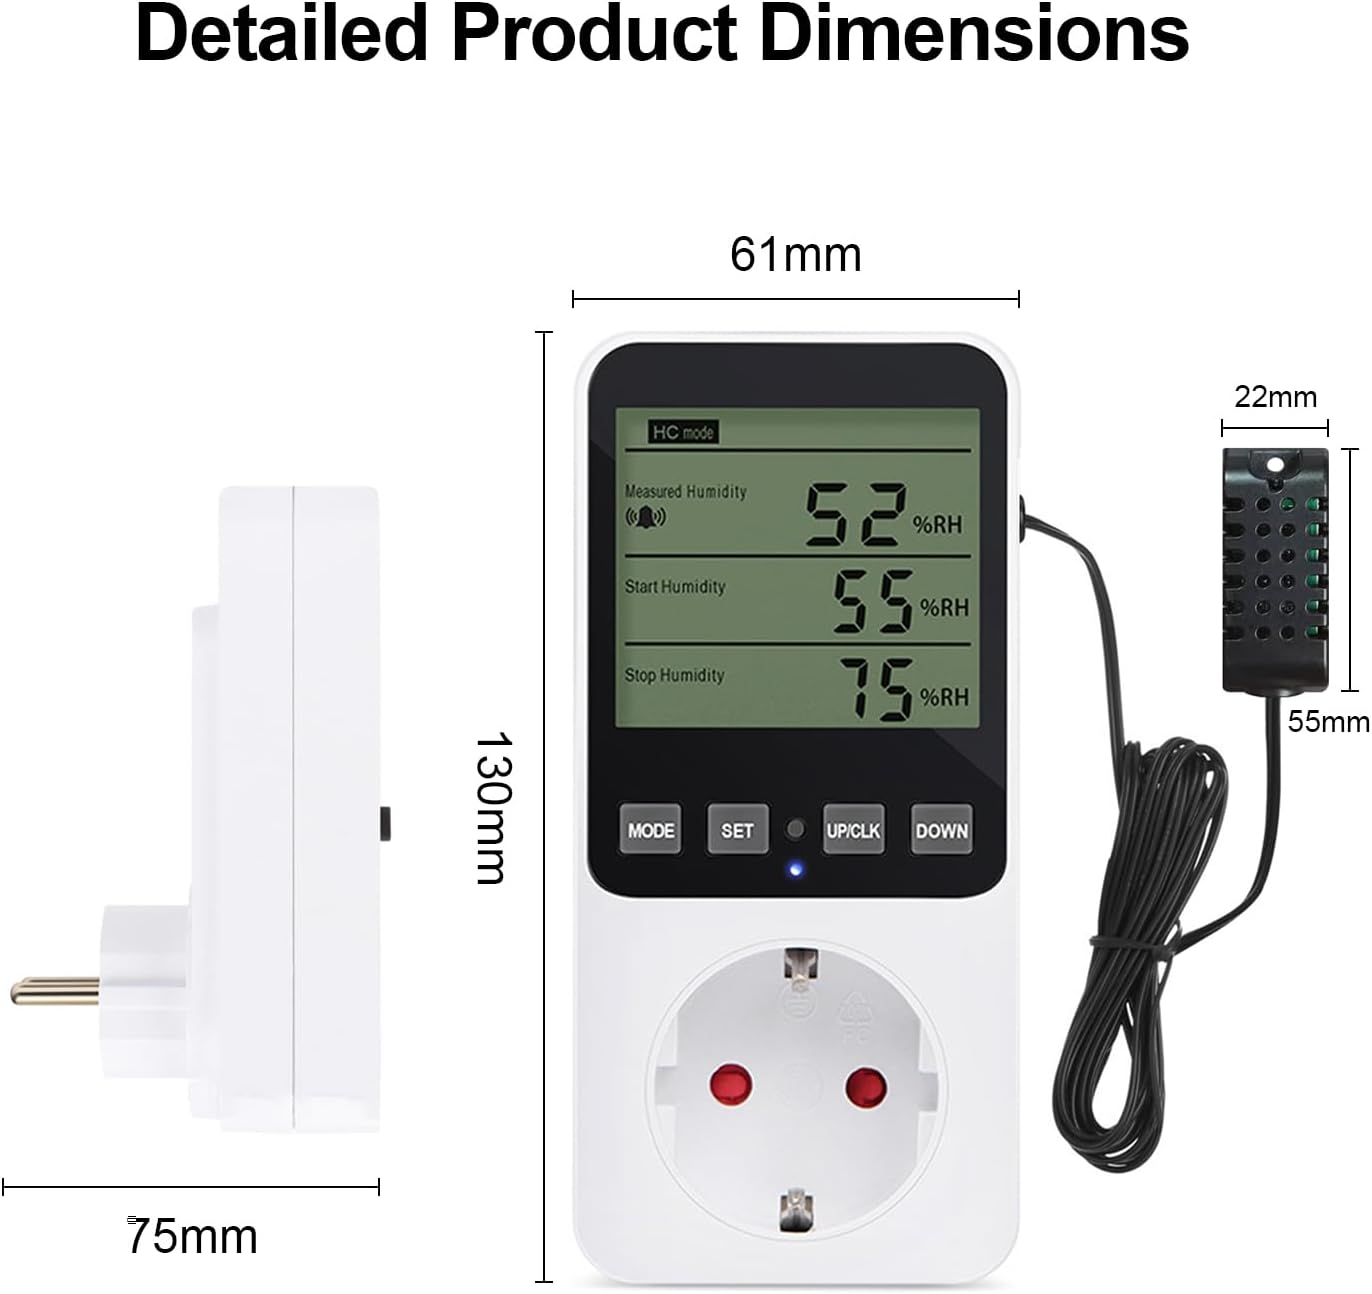
Figure 3.4: Physical dimensions of the controller and its sensor.
The main unit measures approximately 130mm (height) x 61mm (width) x 75mm (depth including plug). The sensor measures approximately 55mm (height) x 22mm (width).
4. Setup
- Unpack: Carefully remove the controller and sensor from its packaging.
- Connect Sensor: Plug the external temperature and humidity sensor into the designated port on the controller.
- Placement: Position the sensor in the area where temperature and humidity need to be monitored and controlled. Ensure it is not obstructed and has good air circulation.
- Power On: Plug the controller into a standard electrical outlet (100~250VAC 50/60Hz). The display will illuminate.
- Connect Device: Plug the appliance you wish to control (e.g., humidifier, dehumidifier, heater, fan) into the socket on the controller.
5. Operating Instructions
5.1 Switching Temperature Units (℃/℉)
In the non-setting state (normal display mode), press and hold the "SET" button for 3 seconds to switch between Celsius (℃) and Fahrenheit (℉).
5.2 Setting Temperature/Humidity Parameters
The controller supports both temperature and humidity control modes. The general procedure for setting parameters is as follows:
- Enter Setting Mode: Press the "SET" button once. The "Start" value will begin to flash.
- Adjust Start Value: Use the "UP/CLK" and "DOWN" buttons to adjust the desired starting temperature or humidity value.
- Confirm Start Value: Press "SET" again to confirm the "Start" value. The "Stop" value will then flash.
- Adjust Stop Value: Use the "UP/CLK" and "DOWN" buttons to adjust the desired stopping temperature or humidity value.
- Confirm Stop Value: Press "SET" again to confirm the "Stop" value and exit the setting mode. The device will save the settings automatically.
The controller will automatically activate or deactivate the connected appliance based on these set "Start" and "Stop" values to maintain the desired environmental conditions.
5.3 Operating Modes (Humidification/Dehumidification, Heating/Cooling)
The controller automatically determines the operating mode based on the relationship between the "Start" and "Stop" values you set.
- Humidity Control:
- Humidification Mode: If "Start Humidity" < "Stop Humidity", the controller will activate the connected device (e.g., humidifier) when the measured humidity drops below "Start Humidity" and turn it off when it reaches "Stop Humidity".
- Dehumidification Mode: If "Start Humidity" > "Stop Humidity", the controller will activate the connected device (e.g., dehumidifier) when the measured humidity rises above "Start Humidity" and turn it off when it reaches "Stop Humidity".
- Temperature Control:
- Heating Mode: If "Start Temperature" < "Stop Temperature", the controller will activate the connected device (e.g., heater) when the measured temperature drops below "Start Temperature" and turn it off when it reaches "Stop Temperature".
- Cooling Mode: If "Start Temperature" > "Stop Temperature", the controller will activate the connected device (e.g., fan, cooler) when the measured temperature rises above "Start Temperature" and turn it off when it reaches "Stop Temperature".
5.4 Alarm Function
The controller is equipped with an alarm function to alert you when conditions exceed set parameters or in case of sensor issues.
- An alarm will sound if the measured humidity/temperature exceeds the set "Stop" value significantly.
- An alarm will sound if the sensor is disconnected or faulty.
- An alarm will sound if the measured data falls outside the device's operational range.
Address the cause of the alarm promptly to ensure proper operation and safety.
6. Maintenance
- Cleaning: Disconnect the power before cleaning. Wipe the device with a soft, dry cloth. Do not use abrasive cleaners or solvents.
- Sensor Care: Keep the sensor clean and free from dust or debris. Avoid physical damage to the sensor probe.
- Storage: If storing the device for an extended period, unplug it and store it in a cool, dry place.
7. Troubleshooting
| Problem | Possible Cause | Solution |
|---|---|---|
| Device does not power on. | No power supply; faulty outlet. | Check power connection; test outlet with another device. |
| Inaccurate readings. | Sensor dirty or damaged; sensor not properly connected. | Clean sensor; ensure sensor is securely plugged in. |
| Connected appliance not activating. | Incorrect settings; appliance faulty; controller in wrong mode. | Verify "Start" and "Stop" settings; check appliance functionality; ensure correct operating mode (heating/cooling, humidification/dehumidification). |
| Alarm sounds continuously. | Measured value outside set range; sensor error. | Check environmental conditions; verify sensor connection and integrity. |
8. Specifications
- Model: B0DHZV43K7 (Product ID: X002550D3F)
- Material: PC (Fireproof)
- Output: Maximum 16A/230V
- Power Supply: 100~250VAC 50/60Hz
- Humidity Control Range: 20%RH ~ 95%RH
- Temperature Control Range: -10℃ ~ 50℃ (14℉ ~ 122℉)
- Control Accuracy: ±5%RH / ±1℃
- Item Weight: Approximately 250g (8.8 ounces)
- Display Type: Digital
- Included Components: 1 x Temperature and Humidity Regulator
- Manufacturer: SHEN ZHEN SHI XIN HONG JU KE JI YOU XIAN GONG SI
9. Warranty and Support
For warranty information or technical support, please contact your retailer or the manufacturer directly. The manufacturer information is provided on the product packaging:
- Manufacturer: SHEN ZHEN SHI XIN HONG JU KE JI YOU XIAN GONG SI
- Address: LONG HUA QU, SHEN ZHEN SHI, GUANG DONG SHENG, 518110, CN
- Email: amzdeu@asochy.com
Please retain your purchase receipt as proof of purchase for warranty claims.