Savior 14" 50DL 3/8"LP .050"*3 Chain+ 1 Bar
Savior 14 Inch Chainsaw Bar and S50 Chain Combo User Manual
Model: 14" 50DL 3/8"LP .050"*3 Chain+ 1 Bar
Introduction
This manual provides essential information for the proper installation, operation, and maintenance of your Savior 14 Inch Chainsaw Bar and S50 Chain Combo. Designed for durability and performance, this combo is compatible with various chainsaw models, including Stihl MS170, MS180, and MS180C. Adhering to the guidelines in this manual will ensure safe and efficient use of your chainsaw accessories.

Image: The complete Savior 14 Inch Chainsaw Bar and S50 Chain Combo, including the guide bar, three saw chains, storage bags, gloves, and Velcro straps.
Product Specifications
| Parameter | Value |
|---|---|
| Guide Bar Length | 14 inches (35cm) |
| Chain Pitch | 3/8"LP (Low Profile) |
| Chain Gauge | .050" (1.3mm) |
| Drive Links | 50 |
| Tail Mount | A074 |
| Sprocket Nose Tooth Count | 7 |
| Material | Steel |
| Weight | 2.75 pounds (approx.) |
| Replaces Oregon Part No. | 105667 |
| Compatible OEM Part No. | 140SDEA074, 3005 000 4809 |

Image: Diagram illustrating key specifications of the chainsaw bar and chain, including pitch, gauge, drive links, and tail mount type.
Setup and Installation
Before installing the new bar and chain, ensure your chainsaw is turned off and the spark plug cap is disconnected to prevent accidental starting. Always wear appropriate safety gear, including gloves and eye protection.
Checking Compatibility
To ensure proper fitment, verify the length, gauge, tooth count, and tail mount of your existing bar and chain against the specifications provided. Refer to the following methods:
- Check the guide plate embossing: Many guide bars have specifications embossed directly on them.
- Consult your chainsaw manual: Your chainsaw's user manual will list compatible bar and chain specifications.
- Measure existing components:
- Measure the cutting length of the guide bar.
- Measure the thickness of the old bar connecting piece (common values: 0.043", 0.050", 0.058", 0.063").
- Check the sprocket nose tooth count.
- Measure the tail mounting hole size and hole spacing, tensioner sliding slot length, and width.

Image: Visual guide on how to measure and verify chainsaw bar and chain dimensions for correct fitment.
Installation Steps
- Remove Old Bar and Chain: Loosen the bar nuts and remove the clutch cover. Carefully remove the old chain and guide bar.
- Clean Components: Clean any sawdust or debris from the clutch area, bar groove, and oil holes.
- Install New Bar: Place the new Savior guide bar onto the bar studs.
- Install New Chain: Orient the chain so the cutters face forward on the top of the bar. Loop the chain around the drive sprocket and fit the drive links into the guide bar groove.
- Replace Clutch Cover: Reinstall the clutch cover, ensuring the chain tensioner pin engages with the hole in the guide bar. Lightly tighten the bar nuts, allowing the bar to move for tension adjustment.
- Adjust Chain Tension: Using the chain tensioning screw, adjust the chain tension. The chain should be snug against the bottom of the bar, but still able to be pulled freely by hand. There should be no sag on the underside of the bar.
- Tighten Bar Nuts: Once tension is correct, fully tighten the bar nuts.
- Check Lubrication: Ensure the chainsaw's oil reservoir is filled with appropriate bar and chain oil.

Image: A chainsaw with the Savior bar and chain installed, ready for operation.
Operating Guidelines
Always refer to your chainsaw's primary user manual for complete operating instructions and safety precautions. The Savior bar and chain are designed for optimal cutting performance when used correctly.
Safety First
- Wear appropriate personal protective equipment (PPE), including a helmet with face shield, hearing protection, safety glasses, heavy-duty gloves (like the included pair), chainsaw chaps, and steel-toed boots.
- Ensure the work area is clear of obstructions and bystanders.
- Never operate a chainsaw when fatigued or under the influence of alcohol or drugs.
- Be aware of kickback potential. Always maintain a firm grip with both hands and avoid cutting with the tip of the bar.

Image: A chainsaw equipped with the Savior bar and chain effectively cutting through a log, demonstrating its cutting capability.
Cutting Techniques
- Proper Stance: Maintain a balanced stance with feet shoulder-width apart.
- Chain Lubrication: Ensure the automatic oiler is functioning and providing adequate lubrication to the bar and chain during operation.
- Cutting Angle: Allow the chain to do the work. Do not force the saw. Apply steady, even pressure.
- Avoid Pinching: Be mindful of the wood's tension to prevent the bar from getting pinched.
Maintenance
Regular maintenance extends the life of your Savior bar and chain and ensures safe operation. Always disconnect the spark plug before performing any maintenance.
Chain Sharpening
A sharp chain is crucial for efficient and safe cutting. The Savior S50 chain is a semi-chisel, low-kickback design. Sharpening should be done regularly, ideally after every few hours of use or when cutting performance decreases.
- Use a round file of the correct diameter for your chain's pitch (typically 5/32" for 3/8"LP chains).
- File each cutter at the correct angle (usually 25-30 degrees) with consistent strokes.
- Check and file the depth gauges (rakers) as needed to maintain proper cutting depth.
Bar Maintenance
- Clean the Bar Groove: Regularly clean the guide bar groove to remove sawdust and debris that can impede chain movement and oil flow.
- Lubricate Sprocket Nose: If your guide bar has a sprocket nose, lubricate it regularly using a grease gun designed for chainsaw bars.
- Flip the Bar: Periodically flip the guide bar to ensure even wear on both sides, extending its lifespan.
- Check for Burrs: Remove any burrs that form on the bar rails using a flat file.
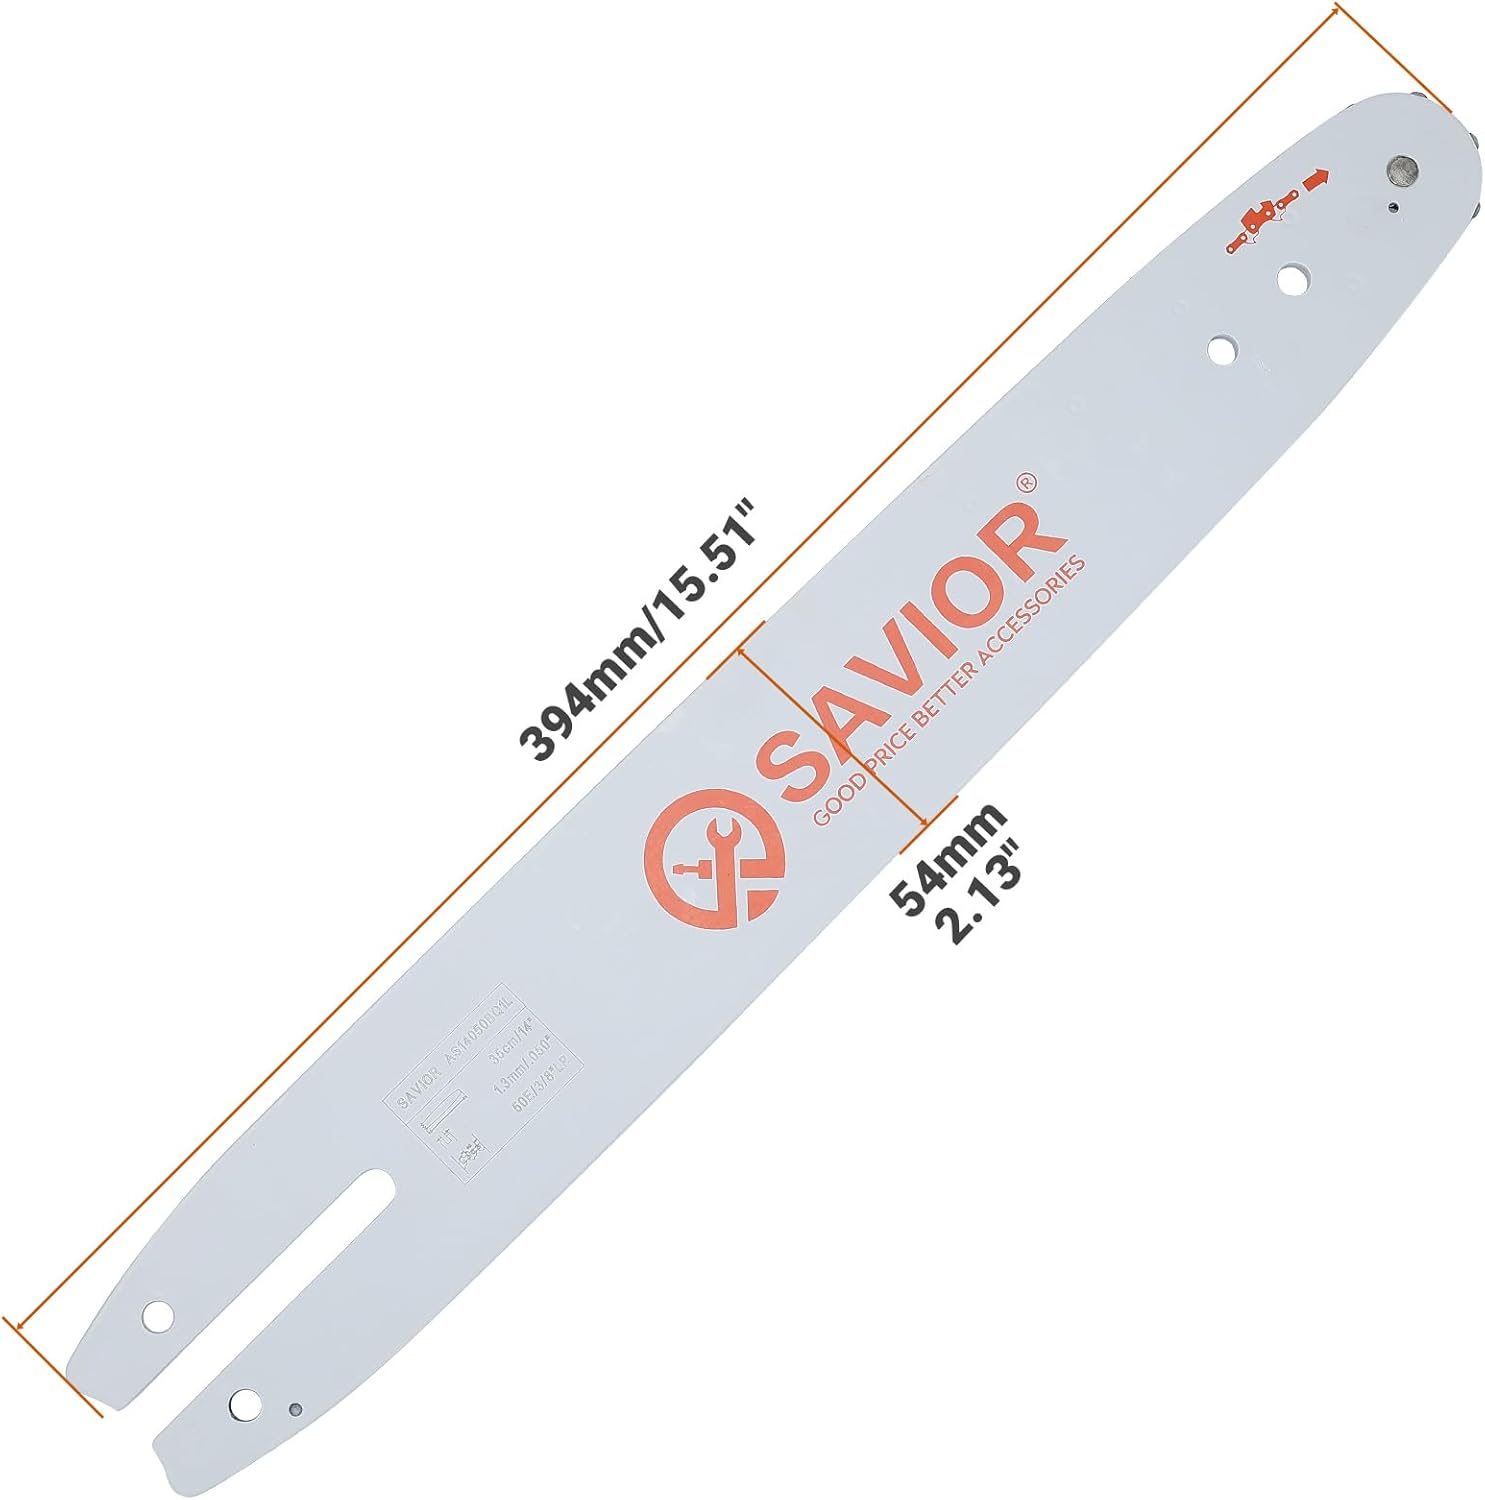
Image: Detailed view of the Savior chain, highlighting its low-vibration, low-kickback, anti-fracture, and wear-resistant features, which contribute to its durability.
Storage
When not in use, store the bar and chain in a clean, dry place. Use the provided chainsaw bar cover to protect the bar and chain from damage and corrosion. The included storage bags for the chains help keep them protected and organized.

Image: The red chainsaw bar protection cover and the included safety work gloves, emphasizing dustproof protection and hand safety.
Troubleshooting
This section addresses common issues you might encounter with your chainsaw bar and chain. For chainsaw-specific problems, consult your chainsaw's user manual.
| Problem | Possible Cause | Solution |
|---|---|---|
| Chain not cutting efficiently or producing fine dust | Dull chain | Sharpen the chain cutters and check depth gauges. |
| Chain smoking or overheating | Insufficient lubrication; improper chain tension; dull chain; dirty bar groove | Check oil reservoir and oiler function; adjust chain tension; sharpen chain; clean bar groove. |
| Chain jumping off the bar | Loose chain tension; worn sprocket nose; damaged drive links; incorrect chain/bar size | Adjust chain tension; inspect sprocket nose for wear; check chain for damage; verify correct bar/chain compatibility. |
| Bar wearing unevenly | Consistent cutting on one side; burrs on rails | Flip the guide bar periodically; file off any burrs from the bar rails. |
Warranty and Support
Savior products are manufactured to high-quality standards. For any questions regarding your product, please contact Savior customer support through the retailer where the product was purchased. Please retain your proof of purchase for warranty claims.
The package includes a 1* chain saw bar, 3* saw chains, 3* storage bags, 1* pair of gloves (XL/10; not anti-cut), 3* Velcro straps (can bear about 33lb/15KG weight), and 1* Chainsaw Bar Cover.