
Introduction
This manual provides detailed instructions for the installation, operation, and maintenance of your NUZEZCJG AHC30A Din Rail Digital Timer Switch. This device is a weekly programmable electronic microcomputer timer designed for precise control of electrical circuits, offering reliable scheduling for various applications. Please read this manual thoroughly before use to ensure safe and correct operation.
Safety Information
- Electrical Hazard: Installation and wiring must be performed by a qualified electrician or competent person. Ensure power is disconnected before any installation or maintenance.
- Do not operate the device in wet or humid conditions.
- Ensure the voltage and current ratings of the timer switch match your application requirements.
- Do not disassemble or modify the device. Refer all servicing to qualified personnel.
- Keep out of reach of children.
Product Overview
The AHC30A is a digital timer switch designed for DIN rail mounting. It features a clear LCD display and intuitive buttons for programming weekly schedules. The AHC30A model includes 1 Normally Open (NO) and 1 Normally Closed (NC) contact for versatile control applications.

Figure 1: Front view of the NUZEZCJG AHC30A Digital Timer Switch. This image shows the LCD display, control buttons, and terminal connections.
Components and Controls:
- LCD Display: Shows current time, day, and program status.
- P Button: Program setting.
- D+ Button: Day adjustment.
- H+ Button: Hour adjustment.
- M+ Button: Minute adjustment.
- Manual Button: Manual override for ON/OFF status.
- Reset Button: Resets all settings to factory defaults.
- Terminals: Input (L, N) and Output (NO, NC, Common).
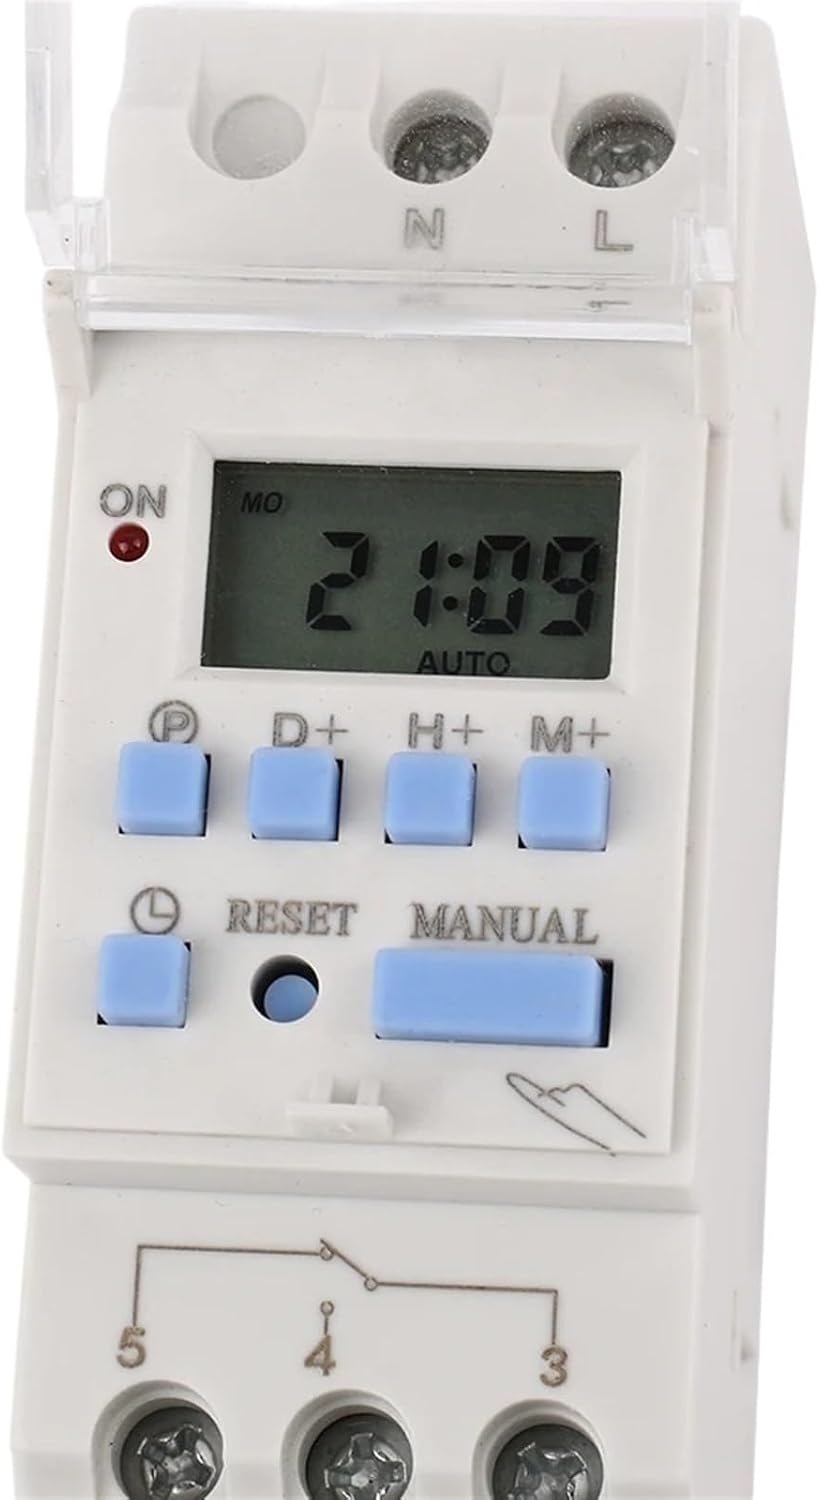
Figure 2: Close-up view of the AHC30A timer switch display and control buttons. This image highlights the 'P', 'D+', 'H+', 'M+', 'Manual', and 'Reset' buttons.
Setup
1. Mounting
The AHC30A timer switch is designed for standard 35mm DIN rail mounting. Ensure the DIN rail is securely installed in a suitable enclosure.
- Align the timer switch with the DIN rail.
- Press the timer switch firmly onto the rail until it clicks into place.
- To remove, pull down the orange tab at the bottom of the timer and lift it off the rail.

Figure 3: AHC30A timer switch shown with DIN rail for mounting. This image illustrates how the timer attaches to a standard DIN rail.
2. Wiring
WARNING: Ensure all power is disconnected before performing any wiring.
Refer to the wiring diagram provided on the device and in Figure 4. The AHC30A model has input terminals for power supply and output terminals for controlling a load.
- Input Power (220V AC):
- Connect the Live (L) wire to the terminal marked 'L' (Input).
- Connect the Neutral (N) wire to the terminal marked 'N' (Input).
- Output Contacts (1NO1NC):
- Terminal 4: Common (COM)
- Terminal 3: Normally Open (NO) - Contact closes when the timer is ON.
- Terminal 5: Normally Closed (NC) - Contact opens when the timer is ON.
Connect your load circuit to the appropriate output terminals (e.g., connect one side of the load to the power supply and the other side to terminal 3 (NO) and terminal 4 (COM) to complete the circuit when the timer is ON).

Figure 4: Wiring diagram for the AHC30A Timer Switch. This diagram illustrates the connections for Live (L), Neutral (N), and the Normally Open (NO), Normally Closed (NC), and Common (COM) output terminals.
Operating Instructions
1. Initial Setup (Setting Current Time and Day)
- Press the P button once. The display will show the current time setting.
- Press D+ to set the current day of the week.
- Press H+ to set the current hour.
- Press M+ to set the current minute.
- Press the P button again to confirm and exit time setting mode.
2. Programming ON/OFF Events
The timer supports multiple ON/OFF programs. Follow these steps to set a program:
- Press the P button repeatedly until "1 ON" appears on the display. This is for the first ON event.
- Press D+ to select the day(s) for this ON event (e.g., MO, TU, WE, TH, FR, SA, SU, or combinations like MO-FR, SA-SU, MO-SA, etc.).
- Press H+ to set the hour for the ON event.
- Press M+ to set the minute for the ON event.
- Press P again. "1 OFF" will appear. This is for the first OFF event.
- Repeat steps 2-4 to set the day(s), hour, and minute for the OFF event.
- Continue pressing P to cycle through "2 ON", "2 OFF", and so on, to set additional programs.
- After setting all desired programs, press the P button until the display returns to the current time. The programs are now saved.
3. Manual Override
The MANUAL button allows you to temporarily override the programmed schedule.
- Press MANUAL once to change the output status (e.g., from AUTO OFF to ON, or AUTO ON to OFF).
- The display will show "ON", "OFF", or "AUTO" to indicate the current mode.
- Pressing MANUAL repeatedly cycles through these modes. "AUTO" mode means the timer will follow the programmed schedule.
4. Reset Function
To clear all programmed settings and reset the timer to its factory default state:
- Use a pointed object (like a pen tip) to press the recessed RESET button.
- The display will clear, and all settings will be erased. You will need to set the current time and reprogram any desired ON/OFF events.
Maintenance
- Cleaning: Wipe the exterior of the timer with a soft, dry cloth. Do not use abrasive cleaners or solvents.
- Battery: The timer typically contains an internal battery to retain settings during power outages. This battery is usually not user-replaceable and has a long lifespan. If the timer consistently loses settings after power interruptions, the internal battery may need professional servicing.
- Inspection: Periodically check wiring connections to ensure they are secure and free from corrosion.
Troubleshooting
| Problem | Possible Cause | Solution |
|---|---|---|
| Timer display is blank. | No power supply; internal battery depleted. | Check input power connections (L, N). If power is present, the internal battery might be fully discharged or faulty. Allow time for charging or seek professional service. |
| Programs are not executing. | Timer is in Manual ON/OFF mode; incorrect program settings; current time/day incorrect. | Press the MANUAL button until "AUTO" is displayed. Verify program settings (ON/OFF times, days). Ensure the current time and day are set correctly. |
| Load does not turn ON/OFF. | Incorrect wiring; faulty load; timer output contacts not switching. | Double-check wiring according to Figure 4. Test the load directly to ensure it is functional. Use the MANUAL button to cycle the output and check if the contacts switch. |
| Timer loses settings after power outage. | Internal backup battery is weak or depleted. | The internal battery may need replacement. This typically requires professional service. |
Specifications
| Feature | Specification |
|---|---|
| Model | AHC30A |
| Brand | NUZEZCJG |
| Input Voltage | 220V AC (for this variant) |
| Max Current Rating | 30A |
| Contact Configuration | 1 Normally Open (NO), 1 Normally Closed (NC) |
| Programmability | Weekly, Digital |
| Mounting Type | 35mm DIN Rail |
| Dimensions (approx.) | 1.18 x 0.79 x 0.39 inches (Package Dimensions) |
| Item Weight | 1.76 ounces (50 Grams) |
| Material | Plastic |
Warranty and Support
Warranty: The product information does not specify a warranty period. Please refer to your purchase documentation or contact the seller for details regarding warranty coverage.
Support: For technical assistance, troubleshooting beyond this manual, or inquiries regarding your NUZEZCJG AHC30A Din Rail Digital Timer Switch, please contact the manufacturer, NUZEZCJG, or the seller, LJMAMNM, through your purchase platform.