1. Introduction
Thank you for choosing the HITWAY BK10S PRO Electric Bicycle. This manual provides essential information for the safe assembly, operation, and maintenance of your new e-bike. Please read it thoroughly before your first ride and keep it for future reference.
2. Safety Information
Your safety is paramount. Always wear a helmet and appropriate safety gear when riding. Adhere to all local traffic laws and regulations. Regular maintenance is crucial for safe operation.
- Pre-Ride Check: Always inspect your e-bike before each ride. Check tire pressure, brake function, and ensure all bolts are tightened.
- Helmet Use: A helmet is mandatory for your safety.
- Traffic Laws: Obey all local traffic laws, signs, and signals.
- Weather Conditions: Exercise caution when riding in wet or slippery conditions.
- Weight Limit: Do not exceed the maximum load capacity of 120 kg.
- Battery Care: Use only the provided charger. Do not expose the battery to extreme temperatures or puncture it.
3. Package Contents
Upon opening the box, please verify that all the following items are included:
- 1 x HITWAY BK10S PRO Electric Bicycle (partially assembled)
- 1 x Charger
- 1 x Pump
- 1 x Code Lock
- 1 x User Manual
- Necessary assembly tools and accessories
4. Assembly Instructions
Follow these steps to assemble your HITWAY BK10S PRO Electric Bicycle:
- Unboxing and Inspection: Carefully open the outer carton and remove all packaging materials. Lift the electric bicycle out of the box. Remove all protective foam and zip ties securing the components. Inspect all parts for any damage.
- Install the Front Wheel:
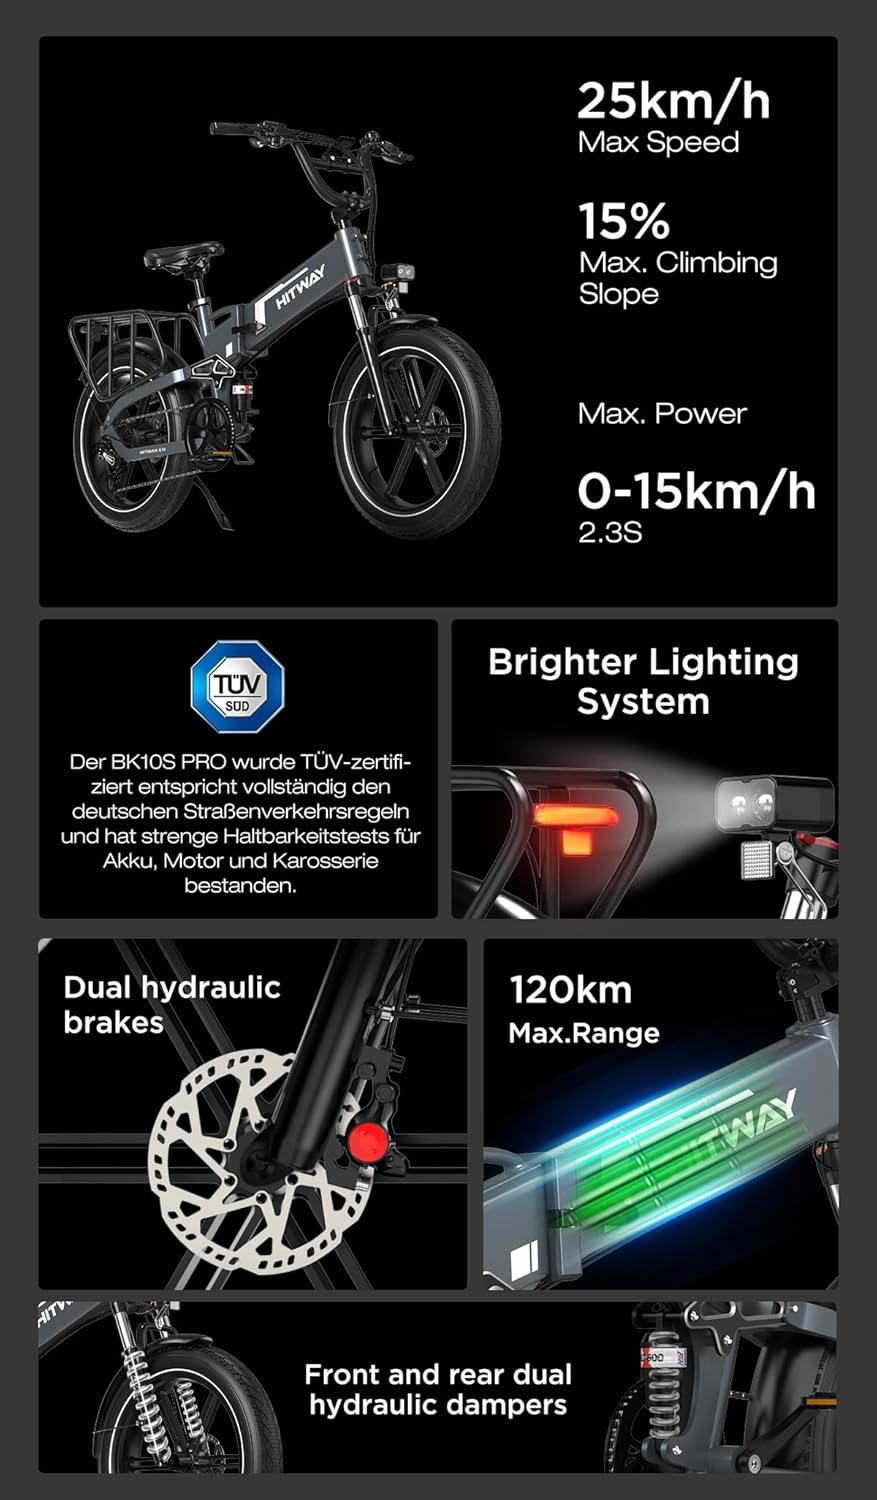
Image: The front wheel of the HITWAY BK10S PRO electric bicycle, showing the disc brake and fat tire.
Remove the protective rod from the front fork. Align the front wheel with the fork, ensuring the disc brake rotor slides correctly into the caliper. Secure the wheel using the quick-release skewer or axle nuts provided. Tighten firmly. - Install the Kickstand:

Image: The HITWAY BK10S PRO electric bicycle with its kickstand extended, showcasing the overall design.
Locate the mounting points for the kickstand near the rear wheel. Attach the kickstand using the provided bolts and tighten them securely with an Allen key. - Install the Handlebar:

Image: Close-up of the handlebar and display unit of the HITWAY BK10S PRO electric bicycle.
Insert the handlebar stem into the head tube of the frame. Adjust the height to your preference and tighten the quick-release lever or bolts. Ensure the handlebar is straight and secure. - Install the Seatpost and Saddle:

Image: The comfortable saddle and adjustable seatpost of the HITWAY BK10S PRO electric bicycle.
Insert the seatpost with the saddle attached into the seat tube. Adjust the height for comfortable pedaling and secure it with the quick-release clamp. - Install the Pedals: The pedals are marked 'L' for left and 'R' for right. Screw the 'R' pedal clockwise into the right crank arm and the 'L' pedal counter-clockwise into the left crank arm. Tighten them firmly with a wrench.
- Install the Front Fender and Headlight:

Image: The 4.6W high-brightness dual LED headlight and front fender of the HITWAY BK10S PRO electric bicycle.
Attach the front fender to the fork using the provided screws. Mount the headlight to the designated bracket on the front fork or handlebar and connect its cable. - Power-On Test: Insert the key into the battery lock and turn it to the 'ON' position. Press the power button on the display to turn on the e-bike. Check if the display lights up and all functions are responsive.
5. Components Overview
Familiarize yourself with the key components of your HITWAY BK10S PRO:
- Battery: 48V 15Ah (720Wh) lithium-ion battery, providing 70-120 km range.
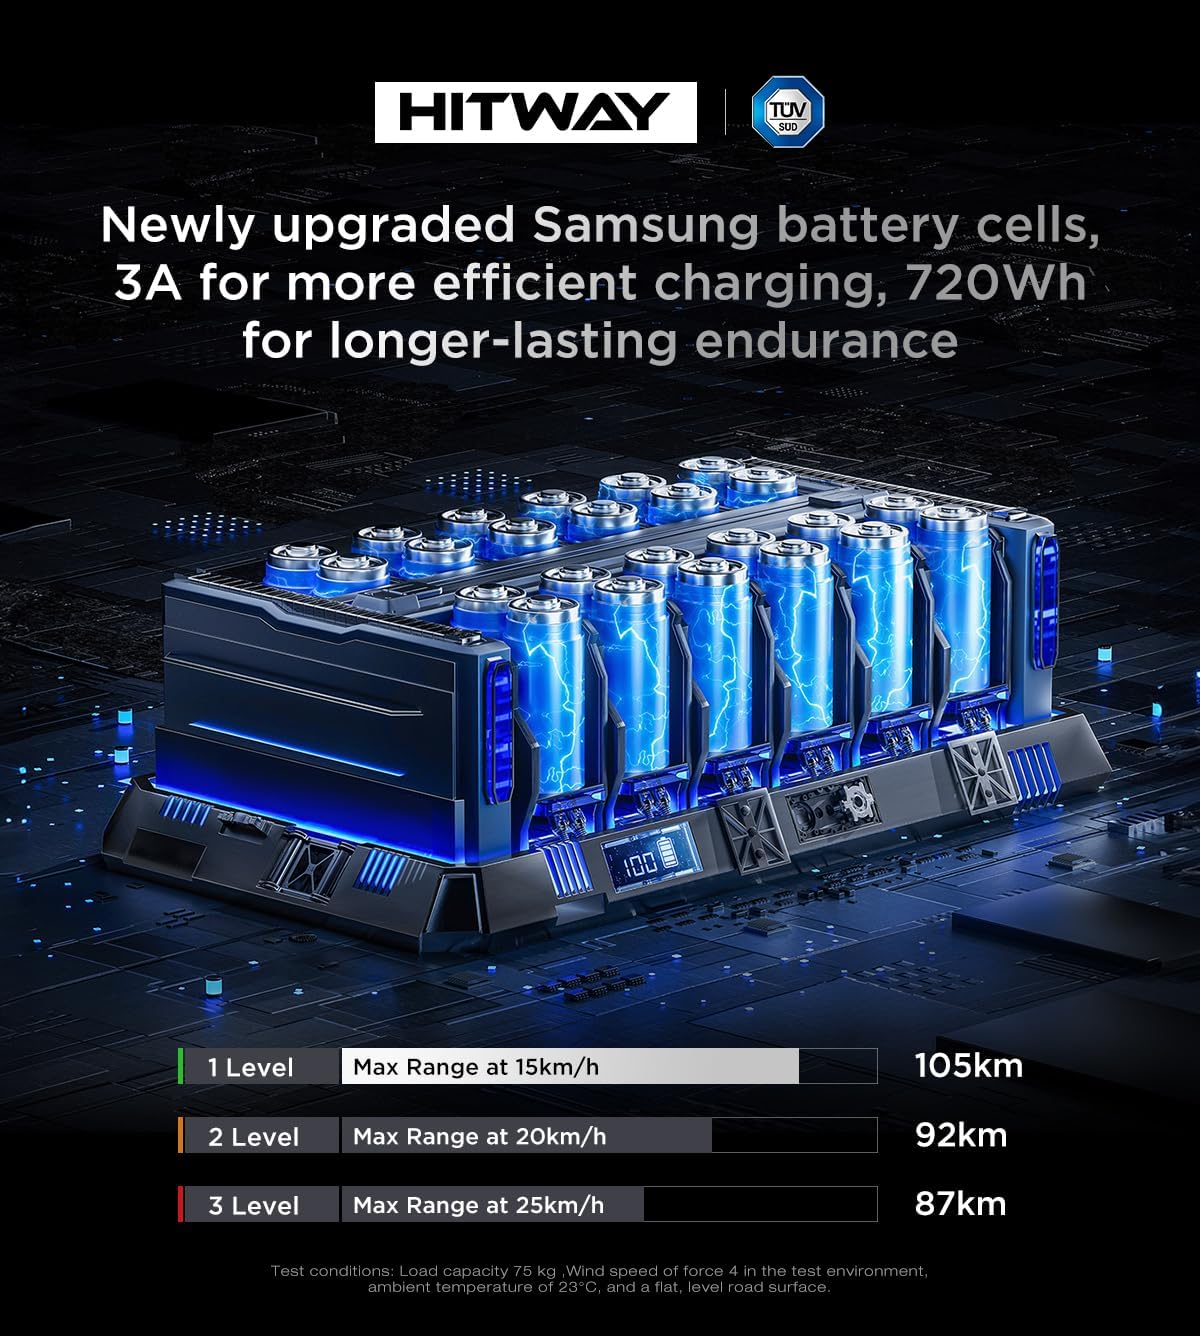
Image: Detailed view of the 48V 15Ah (720Wh) lithium-ion battery cells, designed for efficient charging and long endurance.
- Motor: 250W high-speed brushless motor.
- Tires: 20" x 4.0" fat tires, puncture-resistant for enhanced stability and comfort.

Image: Close-up of the 20x4.0 inch explosion-proof fat tires, designed for durability and safety on various terrains.
- Frame: Lightweight aluminum alloy folding frame.

Image: The newly designed aluminum alloy frame of the HITWAY BK10S PRO, offering a lighter and higher-strength body for agile handling.
- Brakes: Front and rear hydraulic disc brakes with power-cut sensors for enhanced safety.
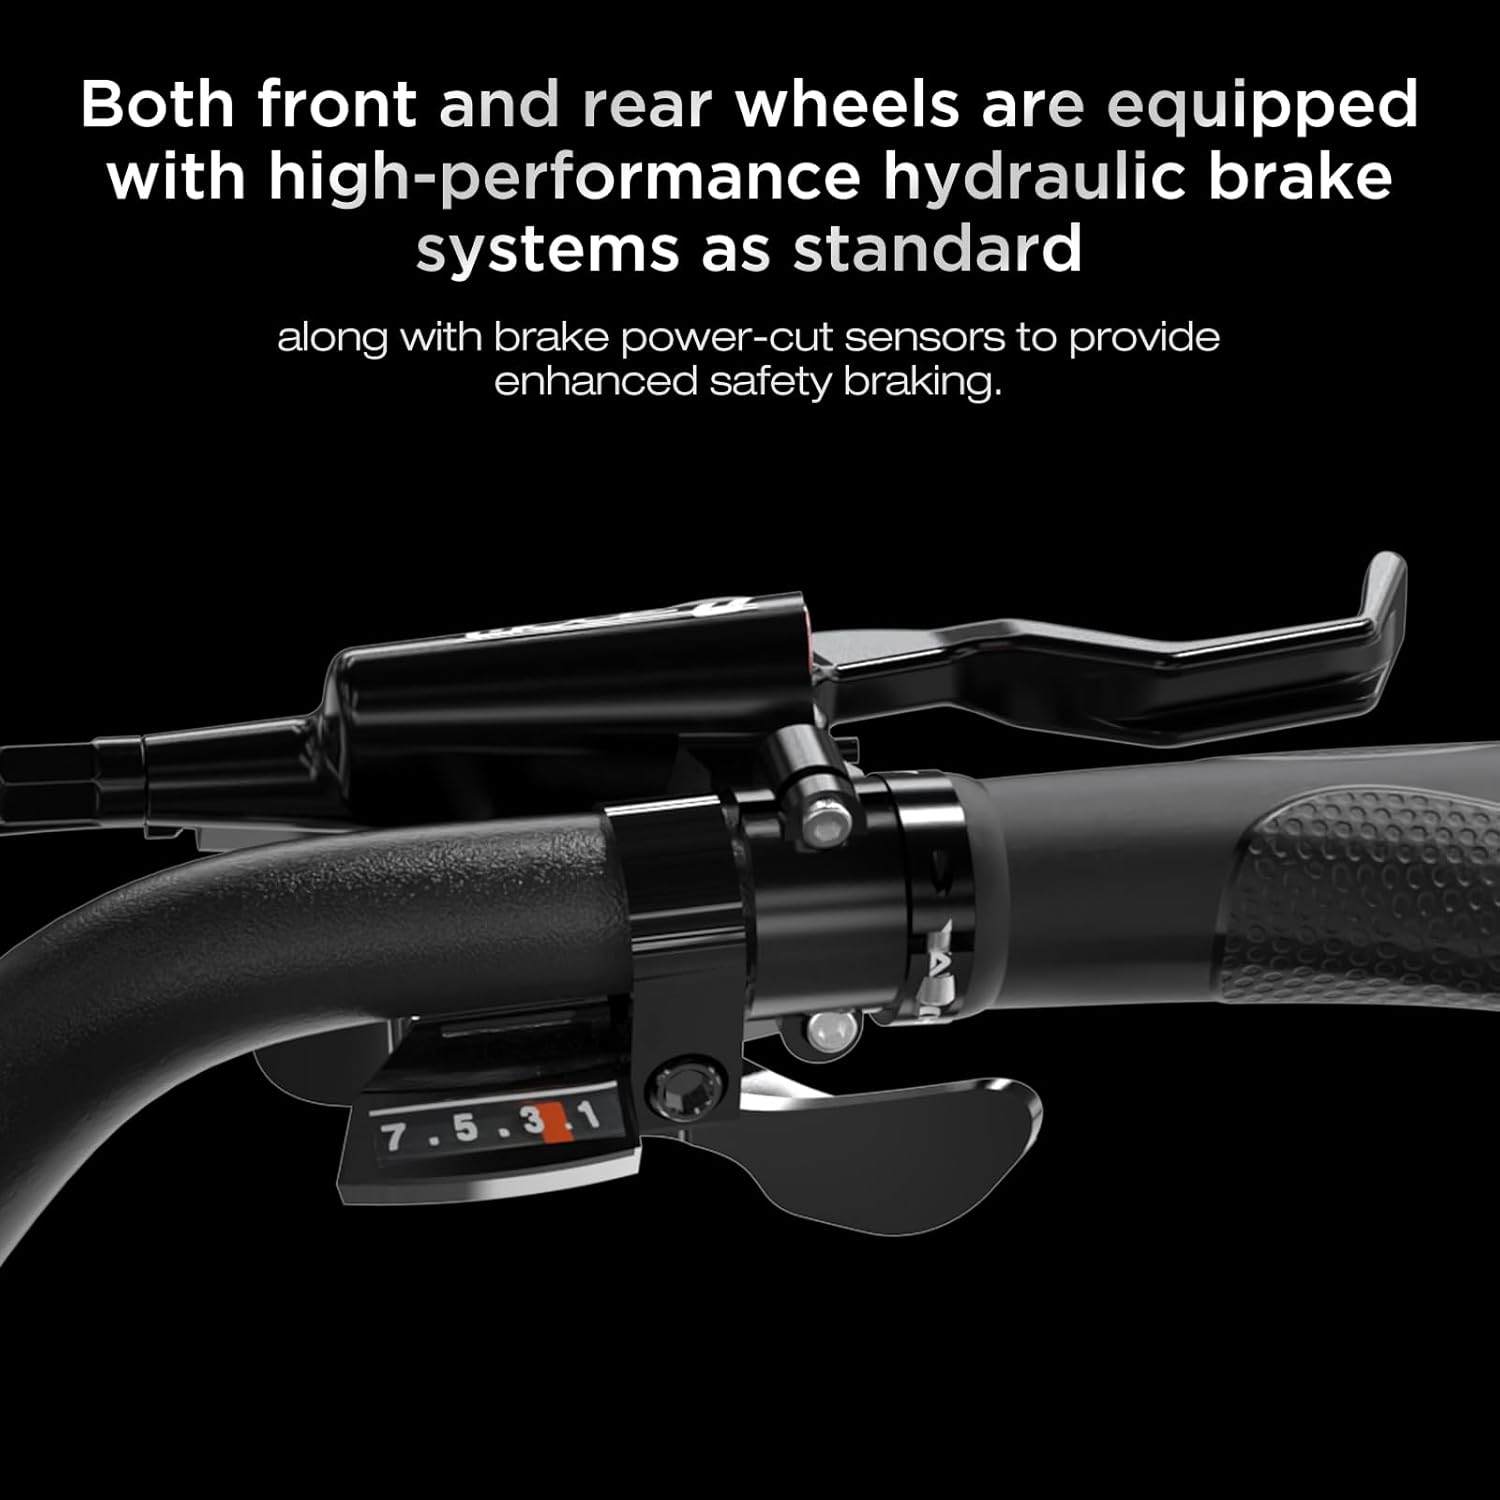
Image: Both front and rear wheels are equipped with high-performance hydraulic brake systems as standard, along with brake power-cut sensors.
- Suspension: Front fork suspension and comfortable center-mounted suspension.

Image: The front fork is equipped with a higher-level suspension system with adjustable stiffness, which can be turned on or off.

Image: The comfortable center-mounted suspension effectively absorbs road bumps and enhances performance on off-road terrains.
- Lighting: 4.6W high-brightness dual LED headlight and taillight.
Image: The 4.6W high-brightness dual LED headlight illuminates the road effectively at night. Its on/off function can be controlled via the handlebar button or the smart app.
- Display & App Control: Multifunction LCD screen and smartphone app connectivity for monitoring and customization.

Image: The smart app allows users to control the vehicle's gear settings, switch the headlights on or off, and view all vehicle information and status. The map feature enables users to check the last parked location of the vehicle.
6. Operating Instructions
Learn how to operate your HITWAY BK10S PRO Electric Bicycle:
- Power On/Off: Turn the key to the 'ON' position, then press and hold the power button on the LCD display to turn the e-bike on. Repeat to turn off.
- Riding Modes: The e-bike offers multiple riding modes (e.g., pedal-assist, pure electric). Use the controls on the handlebar to switch between modes and adjust assist levels.
- Gear Shifting: Use the 7-speed gear shifter on the handlebar to change gears according to terrain and desired speed.
- Braking: Apply both front and rear brakes simultaneously for effective and safe stopping.
- App Control: Download the dedicated smartphone app to connect to your e-bike. The app allows for advanced settings, ride tracking, and diagnostics.
7. Maintenance
Regular maintenance ensures the longevity and safe operation of your e-bike:
- Cleaning: Clean your e-bike regularly with a damp cloth. Avoid high-pressure washing directly on electrical components.
- Tire Pressure: Maintain recommended tire pressure (check tire sidewall for details) for optimal performance and safety.
- Brake Check: Periodically check brake pads for wear and brake levers for proper tension. Adjust or replace as needed.
- Chain Lubrication: Keep the chain clean and lubricated to ensure smooth gear changes and prevent rust.
- Battery Charging: Charge the battery fully after each ride and at least once a month if not in use to prolong its lifespan.
- Fasteners: Regularly check and tighten all bolts and screws on the frame, wheels, and components.
8. Troubleshooting
Here are some common issues and their potential solutions:
| Problem | Possible Cause | Solution |
|---|---|---|
| E-bike does not power on | Battery not charged, key not in 'ON' position, loose battery connection | Charge battery, turn key to 'ON', check battery connection |
| Motor not assisting | Low battery, assist level set to zero, brake lever engaged | Charge battery, increase assist level, ensure brake levers are released |
| Brakes feel weak | Worn brake pads, loose cable, air in hydraulic system | Inspect/replace pads, adjust cable tension, consult a professional for hydraulic issues |
| Unusual noises | Loose components, dry chain, brake rub | Check all fasteners, lubricate chain, adjust brake caliper |
9. Specifications
Key technical specifications for the HITWAY BK10S PRO Electric Bicycle:
| Feature | Specification |
|---|---|
| Battery Type | 21700 Lithium-ion |
| Battery Capacity | 48V 15Ah (720Wh) |
| Motor Power | 250W High-Speed Brushless |
| Charging Time | 5-6 hours |
| Display | Multifunction LCD Screen |
| Brakes | Front and Rear Hydraulic Disc Brakes |
| Tires | 20" x 4.0" Pneumatic Fat Tires |
| Suspension | Front Fork Suspension, Center-Mounted Suspension |
| Gears | 7-Speed |
| Frame Material | Lightweight Aluminum Alloy |
| Net Weight | 35 kg |
| Maximum Load | 120 kg |
| Maximum Speed | 25 km/h (EU Compliant) |
| Range | 70-120 km (load, terrain, and mode dependent) |
| Climbing Angle | 25° |
| Waterproof Rating | IP54 |
| Folded Dimensions | 1500 x 300 x 750 mm |
10. Warranty and Support
Your HITWAY BK10S PRO Electric Bicycle comes with a product warranty. Please review the following terms:
- Quality-Related Failures: For failures caused by product quality, we provide free accessories and repairs. Free returns are supported within 30 days of purchase.
- Battery Warranty: The battery is covered by a six-month warranty.
- Non-Quality Issues: The seller is not responsible for costs incurred due to non-quality reasons or unauthorized returns.
- After-Sales Support: For any after-sales failures, please contact the seller and provide photos or videos of the issue. Warranty service can only be utilized after confirmation by the seller.
For further assistance or inquiries, please contact HITWAY customer support.