1. Introduction
This manual provides detailed instructions for the assembly, operation, and maintenance of your ABCCANOPY 8x5 Grill Gazebo. Designed for outdoor grilling, this gazebo offers a dedicated shaded area for your BBQ activities, featuring integrated LED lighting and convenient side shelves. Please read this manual thoroughly before use to ensure safe and correct operation.
Video: ABCCANOPY 8x5 Grill Gazebo Product Overview
This video provides a visual overview of the ABCCANOPY 8x5 Grill Gazebo, highlighting its features and intended use in an outdoor BBQ setting.
2. Safety Information
Always prioritize safety during assembly and use. Failure to follow these instructions may result in injury or damage to the product.
- Always assemble and disassemble the gazebo on a stable, flat surface.
- Secure the gazebo to a stable foundation to prevent it from tipping over in windy conditions.
- Keep children and pets away from the gazebo during assembly and disassembly to prevent injury.
- Do not use the gazebo in extreme weather conditions such as heavy winds, torrential rain, or snow accumulation. Disassemble and store the canopy during such conditions.
- Ensure proper ventilation when grilling under the gazebo to prevent smoke buildup.
- Keep flammable materials away from the grill and heat sources.
3. Parts List
Before beginning assembly, verify that all components listed below are present and undamaged. Refer to the provided diagrams for visual identification of each part.
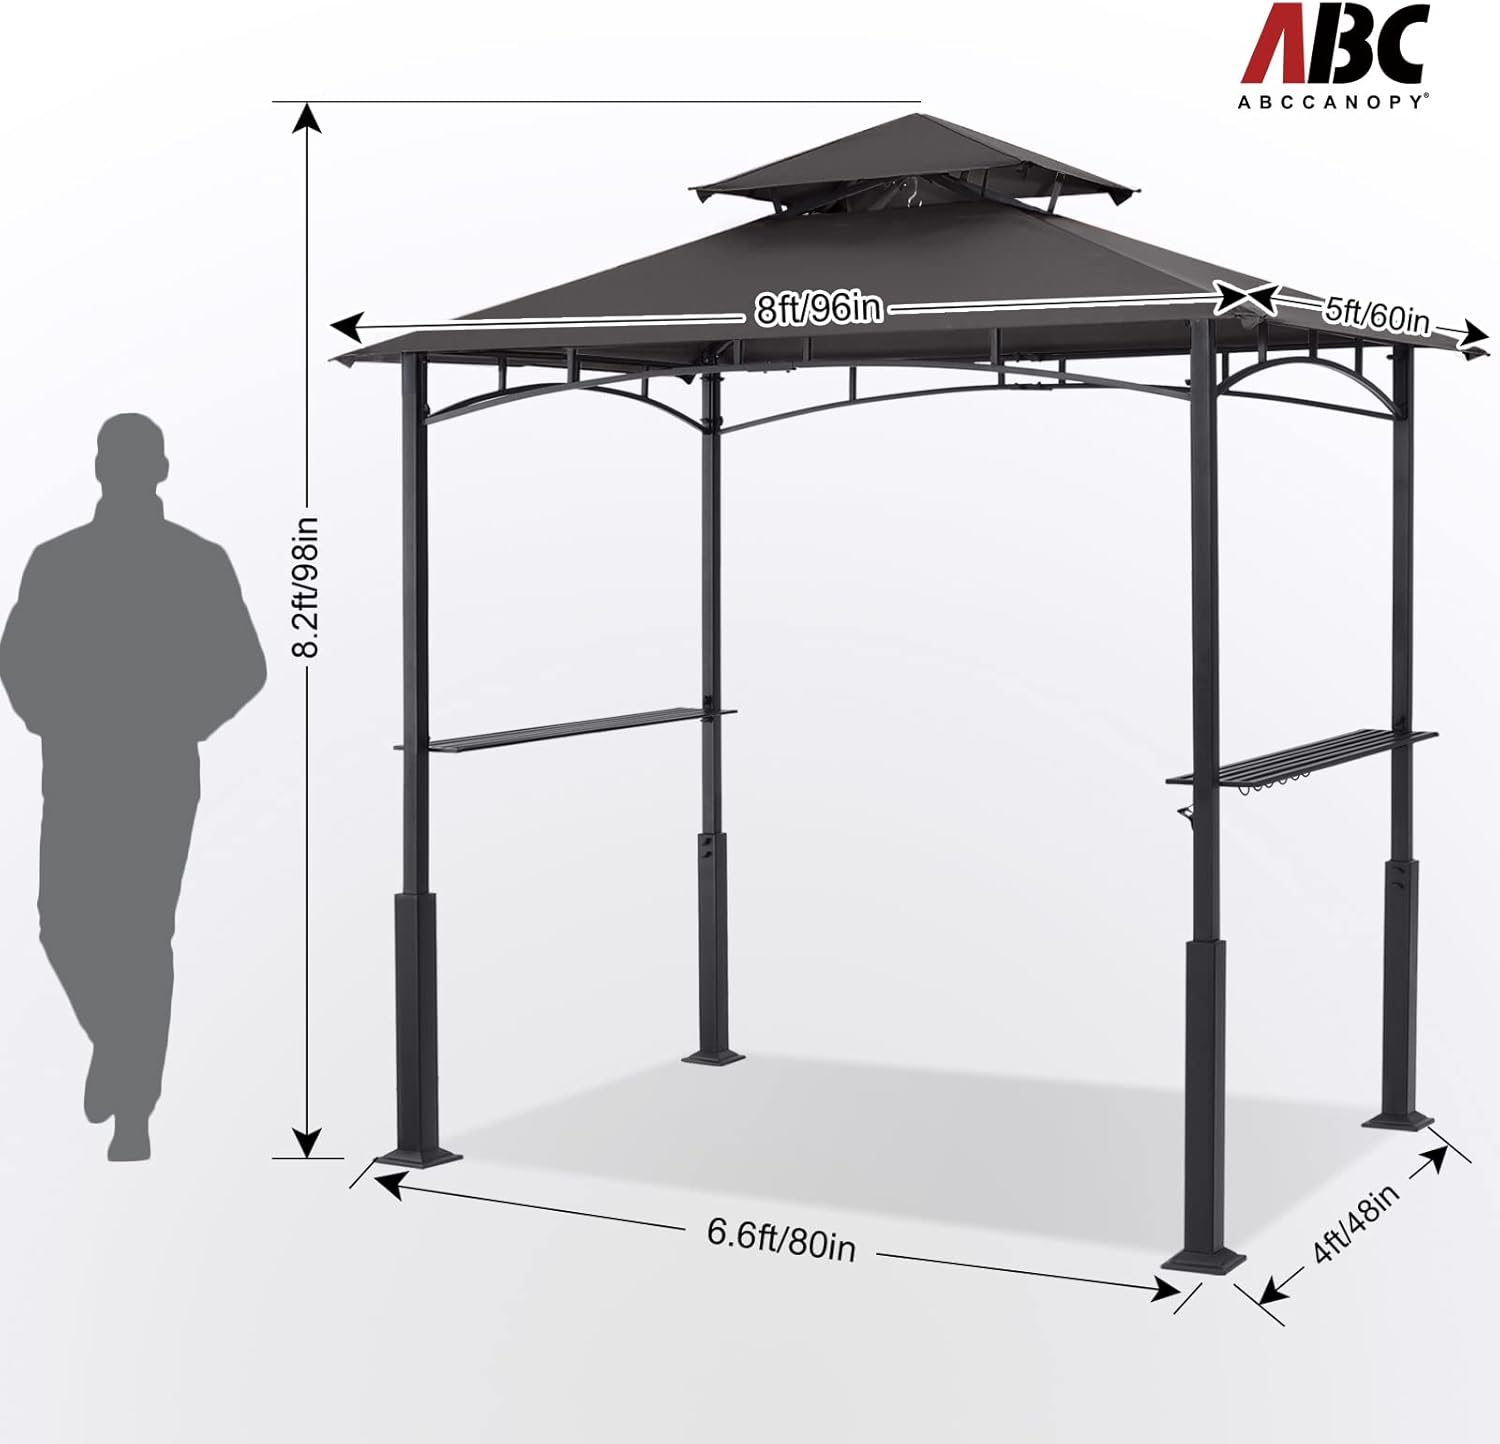
Image: Gazebo Dimensions and Structure
This image illustrates the overall dimensions and structural components of the gazebo, including the main frame and canopy.
- Steel Frame Components (legs, crossbars, roof supports)
- Canopy Fabric (main canopy, top tier)
- Side Shelves (2 units)
- Grill Tool Hooks
- Integrated Bottle Opener
- LED Lights
- Assembly Hardware (screws, nuts, bolts)
4. Setup and Assembly
Assembly typically requires two or more people. Follow the steps carefully to ensure correct and stable construction.
Video: ABCCANOPY Grill Gazebo Installation Guide
This video demonstrates the step-by-step assembly process for the gazebo, from frame construction to canopy installation.
- Assemble the Base Frame: Connect the horizontal base bars using the provided hardware. Ensure all connections are secure.
- Attach Vertical Supports: Securely attach the four vertical leg posts to the assembled base frame.
- Construct the Roof Frame: Assemble the upper roof frame components, ensuring all joints are properly aligned and fastened.
- Install the Canopy: Carefully place the main canopy fabric over the roof frame. Then, attach the smaller top-tier canopy. Ensure the canopy is taut and secured to the frame using the integrated fasteners.
- Install Side Shelves and Accessories: Attach the two side shelves to the vertical leg posts. Install the grill tool hooks and the integrated bottle opener onto the shelves or designated areas.
- Secure LED Lights: Attach the LED lights to the underside of the canopy frame as shown in the diagrams.
- Final Check: Verify all connections are tight and the gazebo is stable. Anchor the gazebo to the ground using appropriate stakes or weights (not included) for added stability, especially in windy conditions.
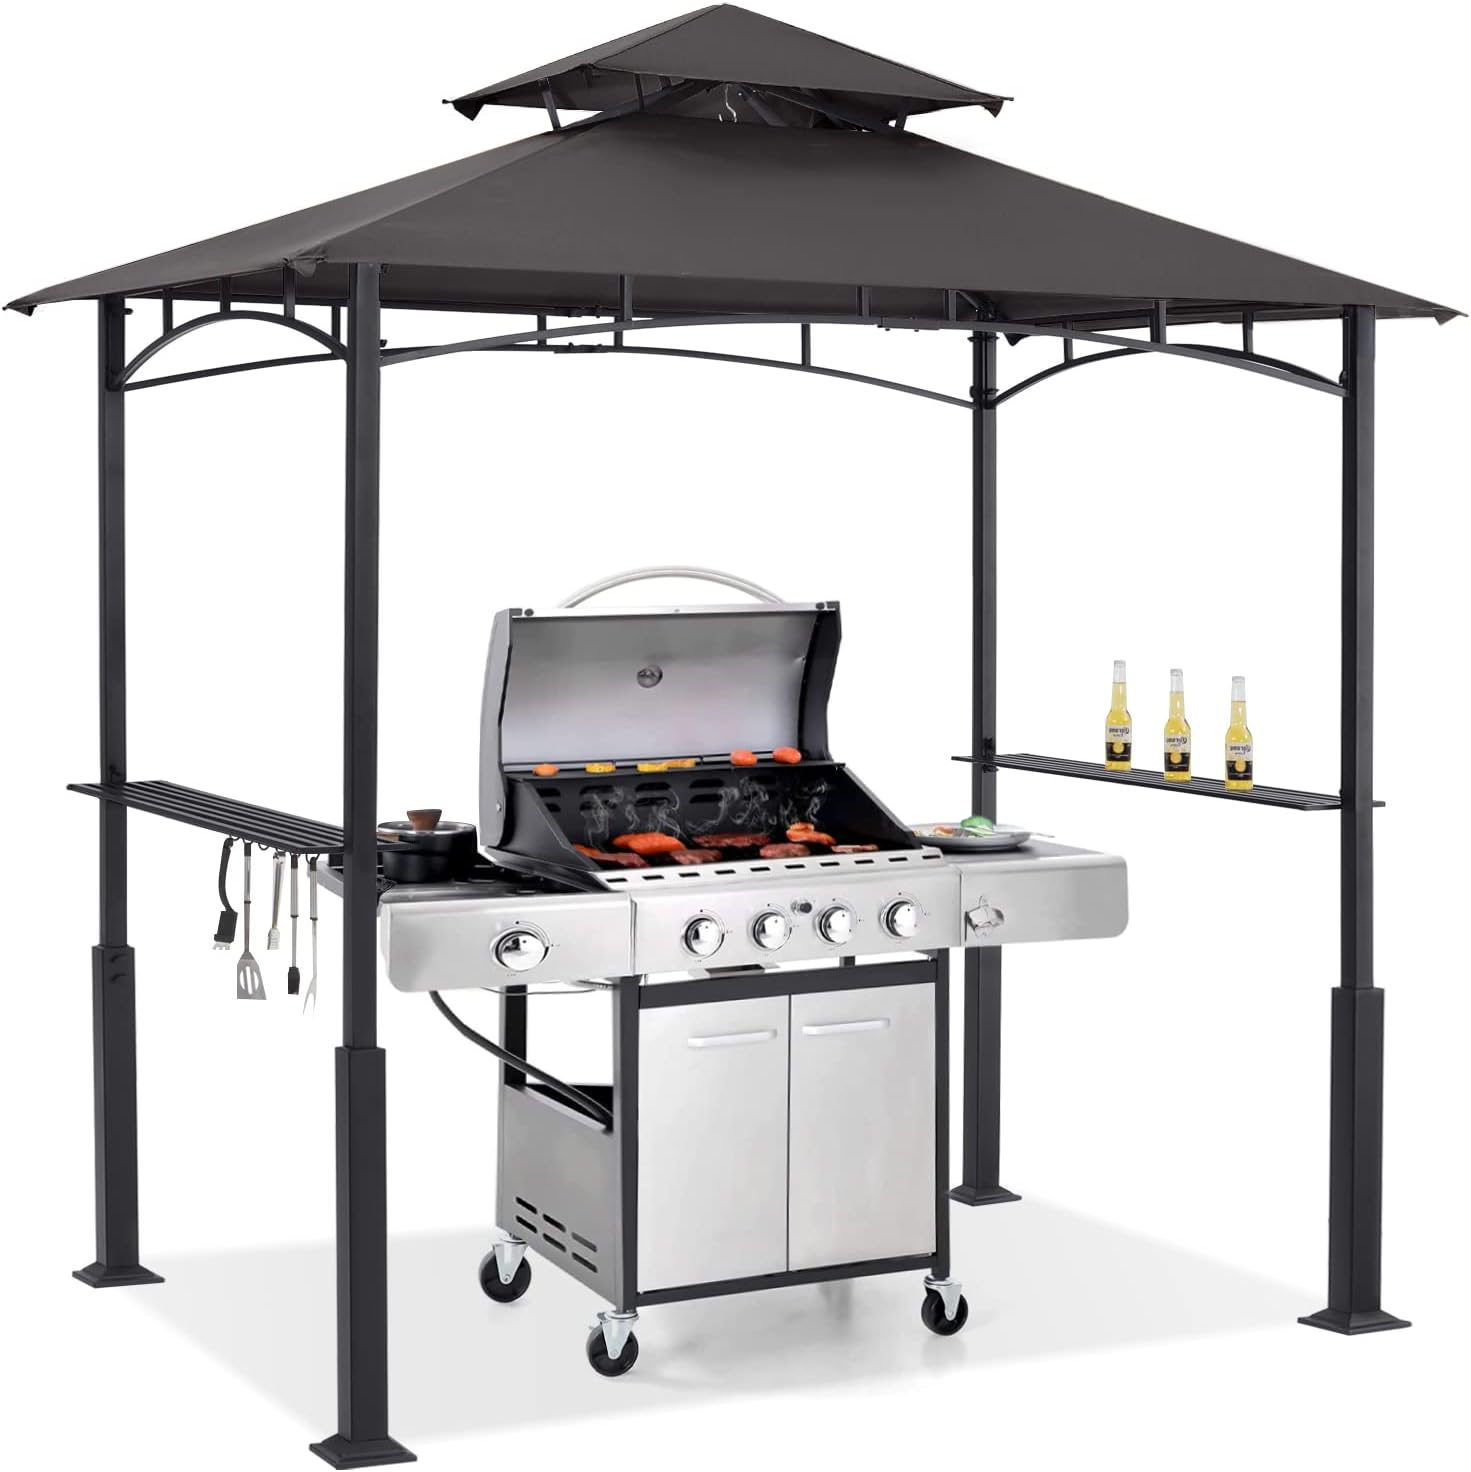
Image: Fully Assembled Grill Gazebo
This image displays the complete gazebo setup, ready for use with a grill positioned underneath.
5. Operating Instructions
Your grill gazebo is designed for convenience and functionality during outdoor cooking.
5.1. LED Lighting
The gazebo is equipped with energy-efficient LED lights to illuminate your grilling area during evening hours. Locate the power switch on the LED light unit to turn them on or off. Ensure batteries are installed correctly if applicable.

Image: Gazebo with LED Lights at Night
This image shows the gazebo illuminated by its integrated LED lights, providing visibility for evening grilling.
5.2. Side Shelves and Hooks
Utilize the two handy side shelves for placing grill accessories, beverages, food, or other items. The integrated hooks are ideal for hanging grilling tools, keeping them within easy reach.
5.3. Integrated Bottle Opener
A built-in bottle opener is provided on one of the leg posts for convenient access to bottled beverages.
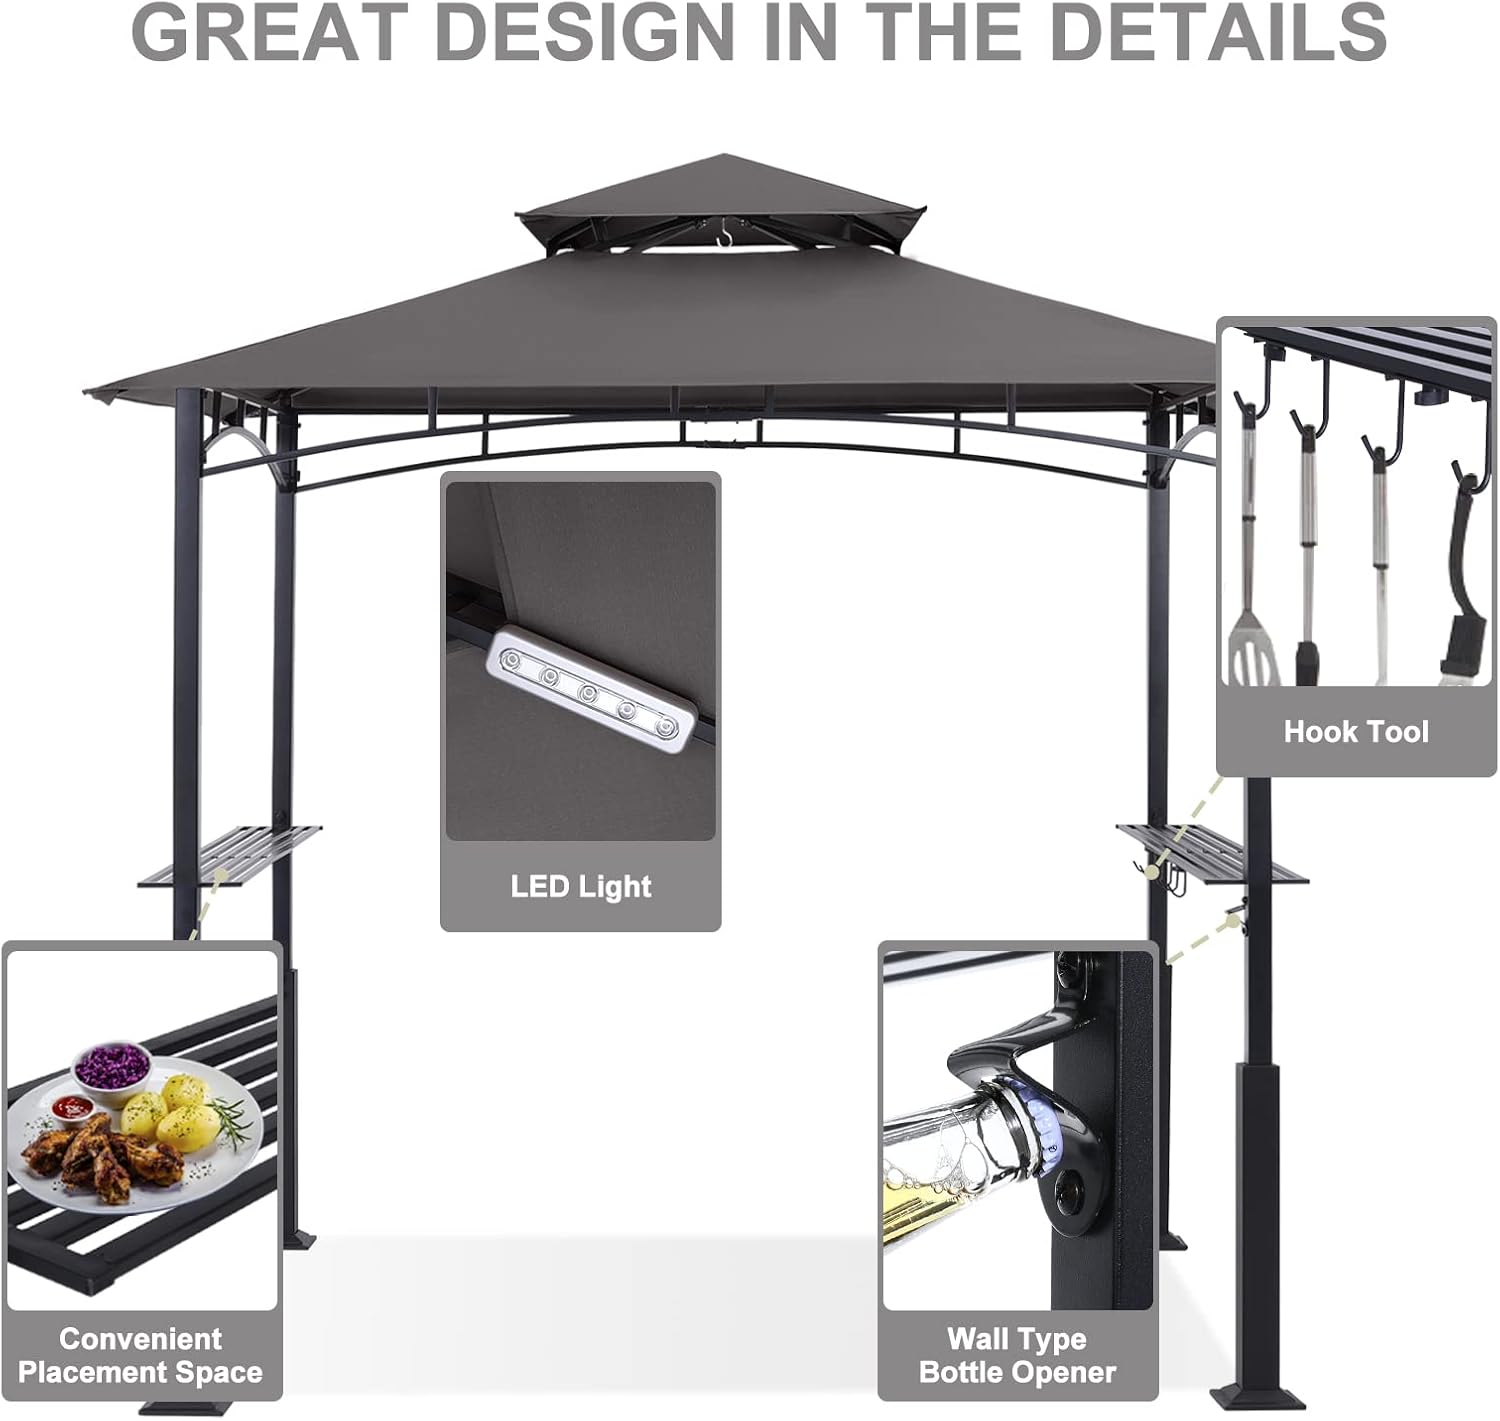
Image: Detailed Features of the Gazebo
This image highlights the LED light, grill tool hooks, and the integrated bottle opener for user convenience.
6. Maintenance
Regular maintenance will extend the life and appearance of your grill gazebo.
- Canopy Care: Regularly check the condition of the canopy fabric for any tears or damage. Promptly clear accumulated rainwater or snow from the roof to prevent pooling and potential damage, especially in severe weather conditions. Clean the canopy with mild soap and water, then rinse thoroughly and allow to air dry.
- Frame Care: The powder-coated steel frame is designed to resist rust and corrosion. However, inspect the frame periodically for any signs of wear or rust. Clean with a damp cloth and mild detergent.
- Stability: Ensure the gazebo remains securely anchored to the ground at all times. In anticipation of strong winds or heavy precipitation, it is recommended to remove the canopy or disassemble the gazebo to prevent structural damage.
Video: ABCCANOPY Grill Gazebo Weather Test
This video demonstrates the gazebo's performance under simulated wind and rain conditions, emphasizing the importance of proper anchoring and roof design for drainage.
7. Troubleshooting
Here are solutions to common issues you might encounter:
- Water Pooling on Canopy: Ensure the canopy is installed tightly and evenly across the frame. The double-tiered design aids in air circulation and smoke release, but regular checks are needed. If pooling occurs, gently push the water off from underneath.
- Gazebo Instability in Wind: Confirm that the gazebo is properly anchored to the ground. Use heavy-duty sandbags or secure it to a deck/patio for increased stability. Consider disassembling the canopy during severe weather.
- LED Lights Not Working: Check the battery compartment for proper battery insertion and charge level. Ensure the power switch is in the 'on' position.
- Canopy Fit Issues: Double-check that you have the correct canopy size for your gazebo model. Ensure all frame components are fully extended and locked into place before attempting to attach the canopy.

Image: Double-Tiered Canopy for Ventilation
This image illustrates the double-tiered canopy design, which promotes air circulation and helps release grill smoke, contributing to stability in windy conditions.
8. Specifications
| Feature | Specification |
|---|---|
| Brand | ABCCANOPY |
| Model Number | 1USAZ0126A22SK02DGFA |
| Product Dimensions | 94.5"L x 59"W x 96.5"H |
| Material | Alloy Steel (Frame) |
| Item Weight | 51 Pounds |
| Water Resistance Level | Water Resistant |
| Ultraviolet Light Protection | Yes |
| Assembly Required | Yes |
| Floor Area | 40 Square Feet |
9. Warranty and Support
For warranty information, replacement parts, or any product-related inquiries, please contact ABCCANOPY customer service. Refer to your purchase documentation for specific warranty terms and contact details.