1. Introduction
This manual provides detailed instructions for the setup, operation, and maintenance of your Bonvoisin BVS-121 Label Printing Scale. Please read this manual thoroughly before using the device to ensure proper function and safety. This scale is designed for retail environments requiring accurate weighing and label/receipt printing.
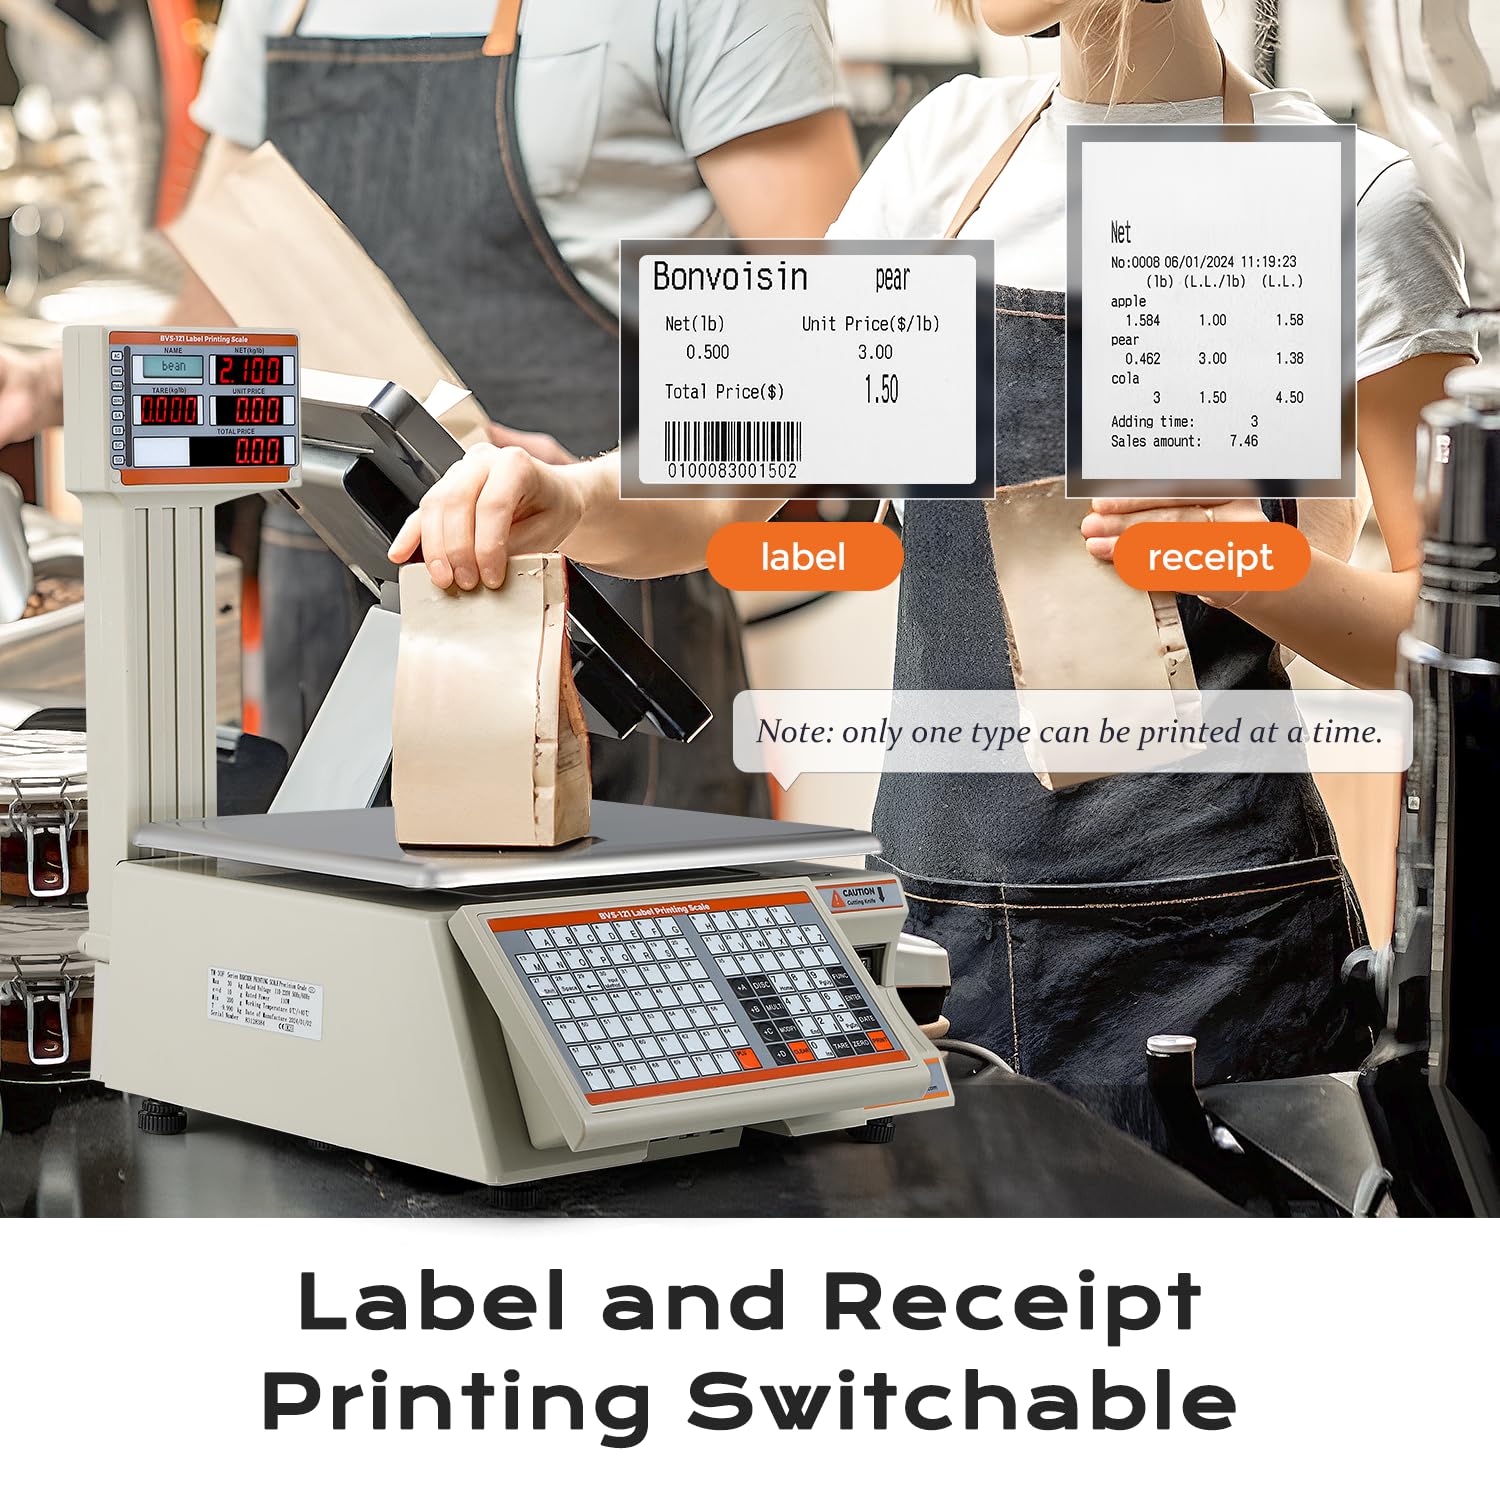
Image: Bonvoisin BVS-121 Label Printing Scale with pole display.
2. Safety Information
- Ensure the scale is placed on a stable, level surface to guarantee accurate readings.
- Do not expose the scale to excessive moisture or extreme temperatures.
- Avoid dropping or subjecting the scale to strong impacts.
- Use only the provided power adapter.
- The price scale does not possess an NTEP certificate.
- Exercise caution when handling the cutting knife for label paper.
3. Setup
3.1 Unboxing and Components
Carefully unpack all items from the box. Verify that all components are present:
- Bonvoisin BVS-121 Label Printing Scale
- User Manual (this document)
- USB drive (includes computer software and video tutorials)
- Power adapter
- Ethernet cable
- Two rolls of 56x40mm label paper (one pre-installed)

Image: Visual representation of the items included in the package.
3.2 Physical Setup
The scale features a foldable pole design, requiring no complex installation. Simply pull out the positioning lever and raise the pole display to its upright position. To fold it down, pull out the lever and push the display to the bottom.

Image: Demonstrates the foldable pole design for easy setup and storage.
3.3 Connecting Interfaces
The scale is equipped with multiple interfaces for connectivity:
- RS232 Interface: For serial communication.
- Ethernet Interface: For network connectivity (Ethernet cable included).
- Cash Drawer Interface: For connecting to a cash drawer.
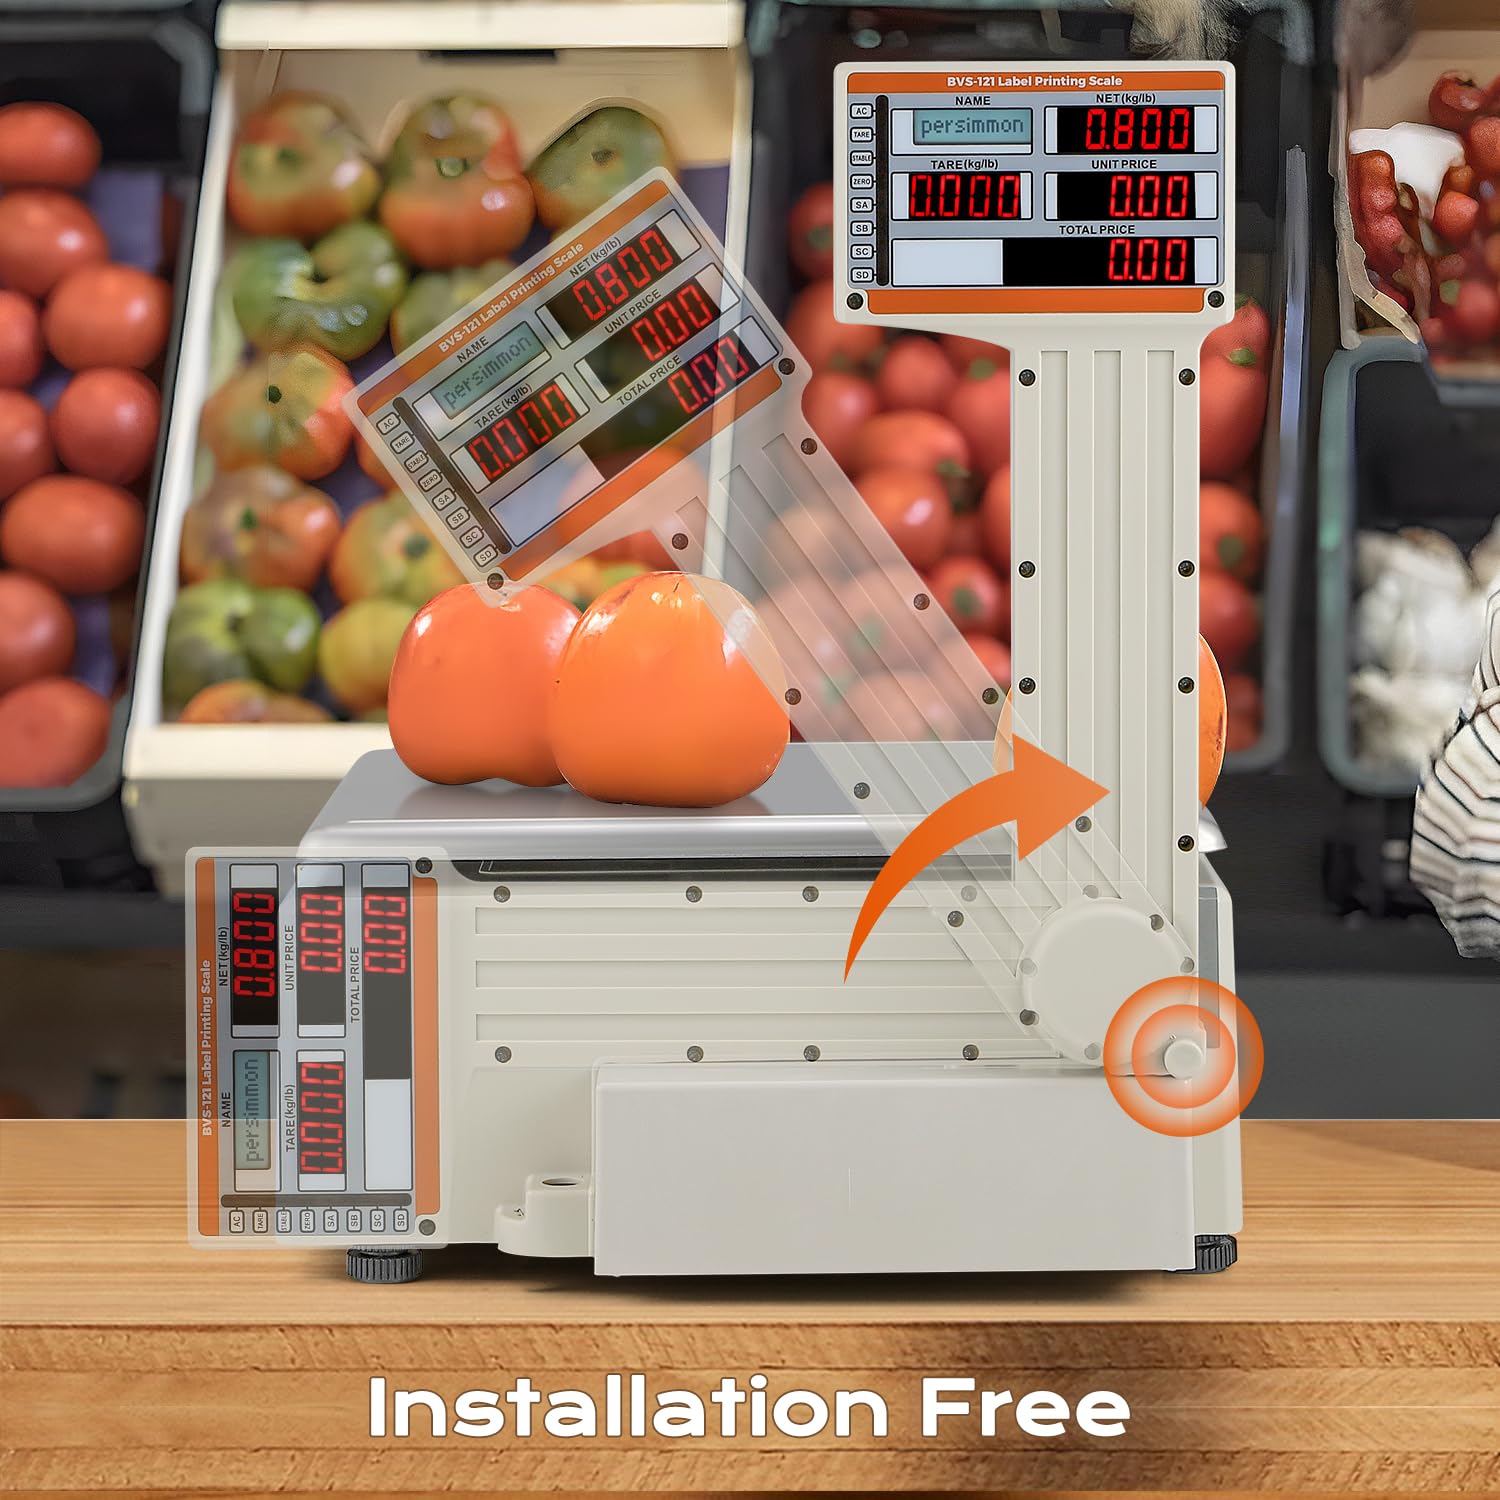
Image: Close-up view of the RS232, Ethernet, and cash drawer interfaces on the scale.
3.4 Software Installation
The included USB drive contains the necessary computer software and video tutorials for managing PLU information and customizing labels. Install the software on your computer to access these features.
Video: Demonstrates how to customize labels using the provided software, including changing font size and adding store names.
3.5 Loading Label Paper
The scale comes with two rolls of 56x40mm label paper, with one already installed. To replace or load new paper:
- Open the magnetic door on the side of the scale where the printer is located.
- Insert the label roll, ensuring the paper feeds correctly into the printer mechanism.
- Close the door securely.
- If changing to a different label paper size, edit the label size settings in the computer application to match the new paper dimensions (width 30-56mm, length >15mm).
Video: Provides an overview of the scale's package contents, function panel, and interfaces, including how to access the label paper compartment.
4. Operating Instructions
4.1 Basic Weighing and Unit Switch
The scale supports weighing in both kilograms (kg) and pounds (lb). The minimum weighing capacity is 10g (0.02lb) with an increment of 10g (0.02lb), up to a maximum of 30kg (66lb).
- Place the item on the weighing platter. The weight will be displayed.
- To switch units (kg/lb): Press the FUNC key, then enter 39706, and press ENTER.
- Keep pressing TARE until the upper right display shows '8'.
- Next, press 00 for kilograms or 06 for pounds, then press ENTER to confirm.
Video: Demonstrates accurate weighing and how to switch between kilogram and pound units on the scale.
4.2 Tare Function
To subtract the weight of a container:
- Place the empty container on the scale.
- Press the TARE key. The display will reset to zero.
- Add the product to the container; only the product's weight will be measured.
4.3 Label and Receipt Printing
The scale can print both labels and receipts. Only one type can be printed at a time. Labels between 30-56mm in width and longer than 15mm are supported.

Image: Illustrates the capability of the scale to print both labels and receipts. Example barcode: 0100083001502.
4.3.1 Printing Receipts
- Ensure receipt printing mode is selected (refer to software instructions for mode switching).
- Place the first item on the scale, calculate its price, and press the A key to add it to the transaction.
- Repeat for all items.
- Press the PRINT key to print the receipt.
Video: Step-by-step guide on how to print receipts using the scale, including adding multiple items to a transaction.
4.3.2 Printing Labels (Weight-based and Piece-based Billing)
The scale supports both weight-based and piece-based billing for labels.
- Ensure label printing mode is selected.
- For Weight-based billing: Place the product on the scale. Press the corresponding PLU (Price Look-Up) key, then press the PRINT key to print its label.
- For Piece-based billing: Press the corresponding PLU key, then press the number of pieces (e.g., 2), followed by the MULTI key to enter the quantity. Press the PRINT key to print the label.
Video: Illustrates the process of printing labels for both weight-based and piece-based billing, showing how to apply labels to products.

Image: Demonstrates how the scale calculates prices based on weight or number of pieces. Example barcode: 0100085007502.
4.4 Shortcut Keys and PLU Management
The scale features 71 shortcut keys and can store up to 4000 commodity PLU (Price Look-Up) information. PLU information can be added or modified directly using the computer application.

Image: Close-up of the scale's keyboard highlighting the 71 shortcut keys for quick access to PLU information.
4.5 Label Customization
You can customize the style and text of labels using the provided computer software. This includes adding your store name, changing font sizes, and adjusting other label elements to suit your preferences.

Image: Displays various customizable label templates. Example barcode: 0100084002003.
5. Maintenance
5.1 Cleaning
Regularly clean the weighing platter and the scale's body with a soft, damp cloth. Avoid using abrasive cleaners or solvents that could damage the surface or electronic components.
5.2 Label Paper Replacement
When the label paper runs out, follow the instructions in Section 3.5 to replace the roll. Ensure the new roll meets the specified dimensions (width 30-56mm, length >15mm) and update software settings if the size changes.
6. Troubleshooting
If you encounter issues with your Bonvoisin BVS-121 Label Printing Scale, refer to the following common problems and solutions:
- Scale does not turn on: Check the power connection and ensure the power adapter is securely plugged into both the scale and a working power outlet.
- Inaccurate readings: Ensure the scale is on a flat, stable surface. Remove any objects from the platter before weighing. Recalibration might be necessary if the issue persists (refer to the software manual for calibration procedures).
- Labels not printing correctly: Verify that the label paper is loaded correctly and that the paper size settings in the software match the physical labels. Check for any paper jams in the printer mechanism.
- Software connectivity issues: Ensure the Ethernet or RS232 cable is properly connected. Check network settings if using Ethernet.
For further assistance, consult the video tutorials on the provided USB drive or contact Bonvoisin customer support.
7. Specifications

Image: Detailed specifications table for the Bonvoisin BVS-121 Label Printing Scale.
| Feature | Detail |
|---|---|
| Model | BVS-121 Label Printing Scale |
| Capacity | 30kg / 66lb |
| Minimum Weighing | 10g |
| Minimum Increment | 10g |
| Voltage | 100-220V |
| Printing | Labels and Receipts |
| Applicable Paper Rolls | Width: 30-56mm, Length: >15mm |
| Display Type | Digital, Dual-sided LCD |
| Interfaces | RS232, Ethernet, Cash Drawer |
| PLU Storage | Up to 4000 commodity PLU information |
| Form Factor | Foldable pole design |
| Item Weight | 9.68 kg (21.3 lbs) |
8. Warranty and Support
For warranty information and technical support, please refer to the documentation included with your purchase or visit the official Bonvoisin website. You may also contact Bonvoisin customer service directly via email at bonvoisin2020us@hotmail.com.