B0DHX8GPLC
8K Dual-Camera GPS Drone User Manual
Model: B0DHX8GPLC
1. Introduction
This manual provides essential information for the safe operation and maintenance of your 8K Dual-Camera GPS Drone. Please read this manual thoroughly before operating the drone to ensure proper usage and to prevent damage or injury. This drone features dual 8K cameras, GPS positioning, obstacle avoidance, and brushless motors for stable and high-quality aerial photography and videography.
2. Safety Guidelines
Adherence to these safety guidelines is crucial for safe operation and to prevent damage to the drone or personal injury.
- Pre-Flight Check: Always inspect the drone, remote control, and battery before each flight. Ensure propellers are securely attached and undamaged.
- Environmental Conditions: Do not fly in strong winds, rain, snow, or fog. Avoid flying near power lines, buildings, or crowded areas.
- Battery Safety: Use only the original battery and charger. Do not overcharge or short-circuit the battery. Discontinue use if the battery is damaged or swollen.
- Propeller Safety: Keep hands, face, and loose clothing away from rotating propellers. Always power off the drone before handling propellers.
- Line of Sight: Maintain visual line of sight with the drone at all times during flight.
- Responsible Operation: Do not operate the drone under the influence of alcohol or drugs. Respect privacy and local regulations regarding drone operation.
3. Package Contents
Verify that all items are present in your package:
- 8K Dual-Camera GPS Drone (1)
- Remote Control (1)
- Intelligent Flight Battery (1)
- Spare Propellers (4)
- USB Charging Cable (1)
- Screwdriver (1)
- User Manual (1)
4. Product Overview
Familiarize yourself with the components of your drone and remote control.
4.1 Drone Components
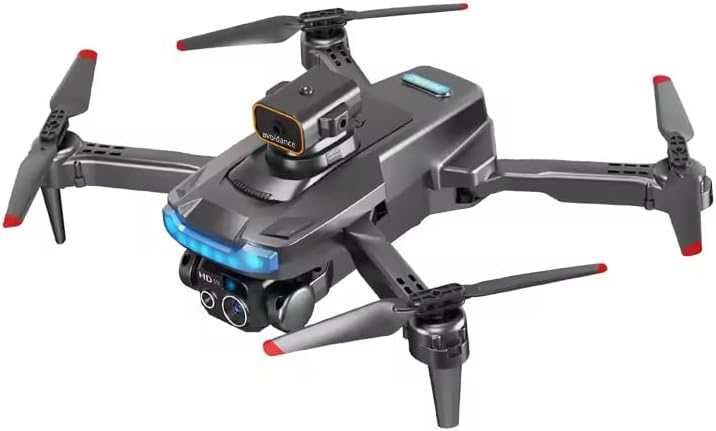
- Front Camera: 8K resolution camera for high-quality photo and video capture.
- Bottom Camera: Optical flow positioning camera for stable hovering.
- Obstacle Avoidance Sensor: Provides 360-degree induction for collision prevention.
- Brushless Motors: Ensures powerful and stable flight performance.
- Propellers: Four foldable propellers for flight.
- Intelligent Flight Battery: Powers the drone, located at the rear.
- LED Indicators: Provide status information during flight and charging.
4.2 Remote Control Layout

- Left Joystick: Controls altitude (up/down) and rotation (left/right).
- Right Joystick: Controls forward/backward and left/right movement.
- Power Switch: Turns the remote control on/off.
- Take Pictures Button: Captures a still image.
- Video Recording Button: Starts/stops video recording.
- Speed Switching Button: Toggles between different flight speeds.
- Obstacle Avoidance Switch: Activates/deactivates the obstacle avoidance system.
- Headless Mode Button: Engages headless flight mode.
- One-Key Return Button: Initiates automatic return to home.
- Calibration Button: Used for gyroscope and compass calibration.
- Phone Holder: Securely holds your smartphone for FPV viewing and app control.
5. Setup
Follow these steps to prepare your drone for its first flight.
5.1 Charging the Battery
- Remove the intelligent flight battery from the drone.
- Connect the USB charging cable to the battery's charging port.
- Plug the other end of the USB cable into a 5V/2A USB power adapter (not included).
- The battery indicator lights will show charging status. Charging is complete when all lights are solid.
Note: A full charge typically takes approximately 90-120 minutes.
5.2 Installing Propellers
Ensure propellers are installed correctly. Each propeller is marked with 'A' or 'B' and must match the corresponding motor arm.
- Identify the 'A' and 'B' markings on the propellers and motor arms.
- Attach 'A' propellers to 'A' motor arms and 'B' propellers to 'B' motor arms.
- Secure each propeller with the provided screws using the screwdriver.
5.3 Unfolding the Drone

- Gently unfold the front arms of the drone until they click into place.
- Then, unfold the rear arms.
- Ensure all arms are fully extended and locked before flight.
5.4 Remote Control Setup

- Install 3 AA batteries (not included) into the remote control's battery compartment.
- Extend the phone holder and securely place your smartphone.
5.5 App Installation
Download the official drone control app from your smartphone's app store (iOS App Store or Google Play Store). Search for "[App Name, if available, otherwise generic instruction]" or scan the QR code provided in the quick start guide.
6. Operating Instructions
This section details how to operate your drone for optimal performance.
6.1 Powering On and Pairing
- Place the drone on a flat, level surface.
- Press and hold the power button on the drone until the LED indicators light up.
- Turn on the remote control by pressing its power switch.
- Push the left joystick up then down to pair the remote with the drone. The drone's lights will become solid once paired.
- Connect your smartphone to the drone's Wi-Fi network (usually named "DRONE-XXXXXX") and open the control app.
6.2 Calibration
Calibration is essential for stable flight and accurate GPS positioning.
6.2.1 Gyroscope Calibration
- After pairing, place the drone on a flat surface.
- Push both joysticks down and to the right simultaneously. The drone's lights will flash rapidly, indicating calibration.
- Wait for the lights to become solid, indicating successful calibration.
6.2.2 Compass Calibration (for GPS models)
- After gyroscope calibration, press the calibration button on the remote (refer to Figure 4.2).
- Hold the drone horizontally and rotate it 360 degrees until the lights change.
- Then, hold the drone vertically with the camera facing down and rotate it 360 degrees until the lights become solid.
6.3 Take-off and Landing
- Manual Take-off: Push both joysticks down and outwards to start the motors. Then, slowly push the left joystick up to ascend.
- One-Key Take-off: Press the one-key take-off button (if available). The drone will automatically ascend to a safe height.
- Manual Landing: Slowly pull the left joystick down to descend. Once landed, hold the joystick down for 2-3 seconds to stop the motors.
- One-Key Landing: Press the one-key landing button (if available). The drone will automatically descend and land.
6.4 Flight Controls
- Altitude: Left joystick up/down.
- Rotation (Yaw): Left joystick left/right.
- Forward/Backward: Right joystick up/down.
- Left/Right (Strafe): Right joystick left/right.
6.5 Advanced Features
6.5.1 Obstacle Avoidance
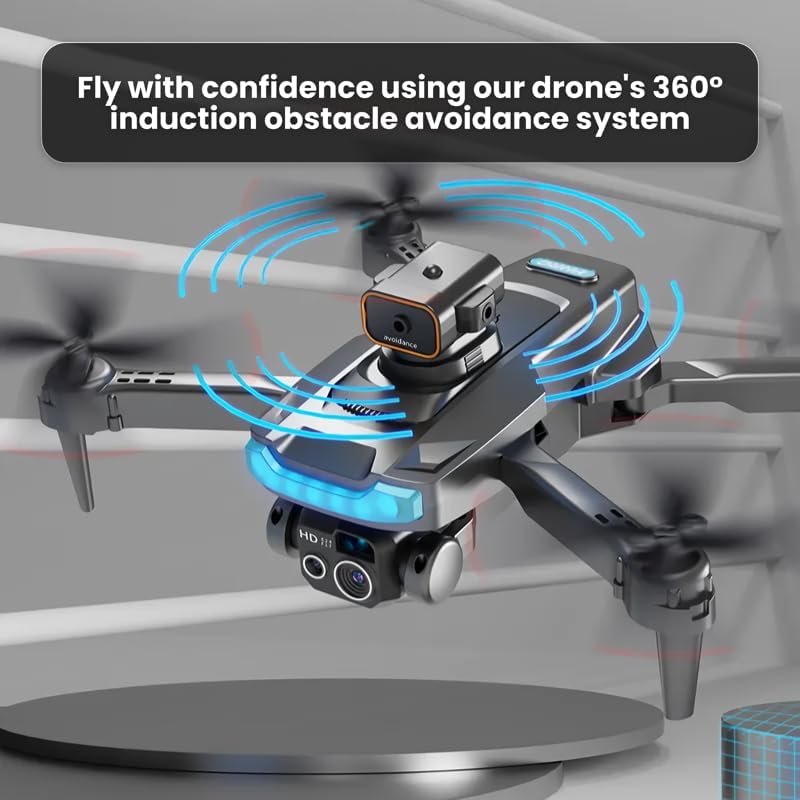
The drone is equipped with a 360-degree induction obstacle avoidance system. Activate this feature using the dedicated switch on the remote control (refer to Figure 4.2). When active, the drone will automatically detect and avoid obstacles within its sensing range, enhancing flight safety.
6.5.2 GPS Positioning
With GPS enabled, the drone can maintain its position stably, even in light winds. It also enables features like One-Key Return to Home and precise waypoint navigation via the app.
6.5.3 Camera Operation
- Taking Photos: Press the "Take Pictures" button on the remote control or tap the camera icon in the app.
- Recording Video: Press the "Video Recording" button on the remote control or tap the video icon in the app to start/stop recording.
- Viewing Footage: All captured photos and videos are saved to the drone's SD card (if installed) and can be viewed through the app's album section.
7. Maintenance
Proper maintenance ensures the longevity and performance of your drone.
- Cleaning: Use a soft, dry cloth to clean the drone body and camera lenses. Avoid using harsh chemicals.
- Battery Care: Store batteries in a cool, dry place. Do not fully discharge batteries before storing for extended periods. Charge them to about 50-60% for long-term storage.
- Propeller Replacement: If propellers are damaged or bent, replace them immediately with spare propellers. Ensure correct 'A' and 'B' propeller placement.
- Motor Inspection: Periodically check motors for any debris or obstructions.
8. Troubleshooting
Refer to this section for solutions to common issues.
| Problem | Possible Cause | Solution |
|---|---|---|
| Drone does not power on. | Battery is not charged or not inserted correctly. | Ensure battery is fully charged and properly inserted. |
| Drone cannot pair with remote. | Remote control batteries are low; pairing sequence not followed. | Replace remote batteries. Repeat pairing steps (Section 6.1). |
| Drone drifts during flight. | Gyroscope not calibrated; strong winds. | Perform gyroscope calibration (Section 6.2.1). Avoid flying in strong winds. |
| App cannot connect to drone Wi-Fi. | Incorrect Wi-Fi network selected; drone not powered on. | Ensure drone is on and connect to the correct Wi-Fi network. Restart app and drone. |
| Poor image/video quality. | Dirty camera lens; insufficient lighting; drone vibration. | Clean camera lens. Fly in well-lit conditions. Check for loose propellers. |
9. Specifications
Detailed technical specifications for the 8K Dual-Camera GPS Drone.

| Feature | Detail |
|---|---|
| Model | B0DHX8GPLC |
| Dimensions (Folded) | 2.16"L x 3.14"W x 4.92"H |
| Dimensions (Unfolded) | 8.4"L x 6.6"W x 3.1"H (approximate based on image) |
| Weight | 16 ounces (1 pound) |
| Camera Resolution | 8K (Dual Cameras) |
| Video Capture Resolution | 1080p (as per specifications, though product title says 8K) |
| Effective Still Resolution | 12.00 MP |
| Flight Time | Up to 48 minutes |
| Control Range | Up to 330 Feet |
| Battery Type | Lithium Ion |
| Connectivity | USB, Wi-Fi (for app control) |
| Special Features | Beginner-Friendly, App-Controlled, Long Battery Life, Obstacle Avoidance, GPS |
Note: While the product title mentions "8K dual-camera", the specifications list "Video Capture Resolution: 1080p" and "Effective Still Resolution: 12.00". Please refer to the product packaging for the most accurate resolution details.
10. Warranty and Support
For warranty information and technical support, please refer to the contact details provided on the product packaging or the official brand website. Keep your purchase receipt as proof of purchase for warranty claims.
Return Policy: The buybox winner indicates a 30-day return policy for refund/replacement.
Manufacturer: Sellvia
Related Documents - B0DHX8GPLC
 |
RG 101 PRO Drone User Guide and Specifications Comprehensive guide and specifications for the RG 101 PRO aerial drone, featuring 4K dual cameras, 360-degree obstacle avoidance, GPS tracking, and brushless motor technology. |
 |
SG603 PRO Drone User Guide and Specifications Official user guide for the SG603 PRO Drone, covering specifications, flight functions, troubleshooting, and shipping information. |
 |
Lenovo M6 Drone User Manual: Features, Operation, and Safety Comprehensive user manual for the Lenovo M6 remote control aerial drone. Learn about its features, how to prepare for flight, basic and advanced operations, camera functions, battery maintenance, and troubleshooting tips. |
 |
HYTOBP S166 Drone User Guide Comprehensive user guide for the HYTOBP S166 Drone, covering setup, operation, charging, flight modes, and safety instructions. |
 |
S185 GPS Obstacle Avoidance Drone User Manual User manual for the S185 GPS Obstacle Avoidance Aerial Photography Drone, covering setup, flight instructions, calibration, and troubleshooting. |
 |
L600 Pro MAX Drone 4K Professional HD Camera Quadcopter Manual User manual and technical specifications for the LYZRC L600 Pro MAX drone, featuring 3-axis gimbal, 4K camera, and 360° laser obstacle avoidance. |
Ask a question about this manual
Ask about setup, troubleshooting, compatibility, parts, safety, or missing instructions. Manuals+ will review the question and use this page’s manual context to help answer it.