ERLEJIA SZT
ERLEJIA Vanity Desk with Mirror and Lights & Foldable Desk (Model SZT) - User Manual
Model: SZT | Brand: ERLEJIA
1. Introduction
This manual provides detailed instructions for the assembly, operation, and maintenance of your ERLEJIA Vanity Desk with Mirror and Lights. Please read this manual thoroughly before assembly and use to ensure safe and correct operation. Keep this manual for future reference.
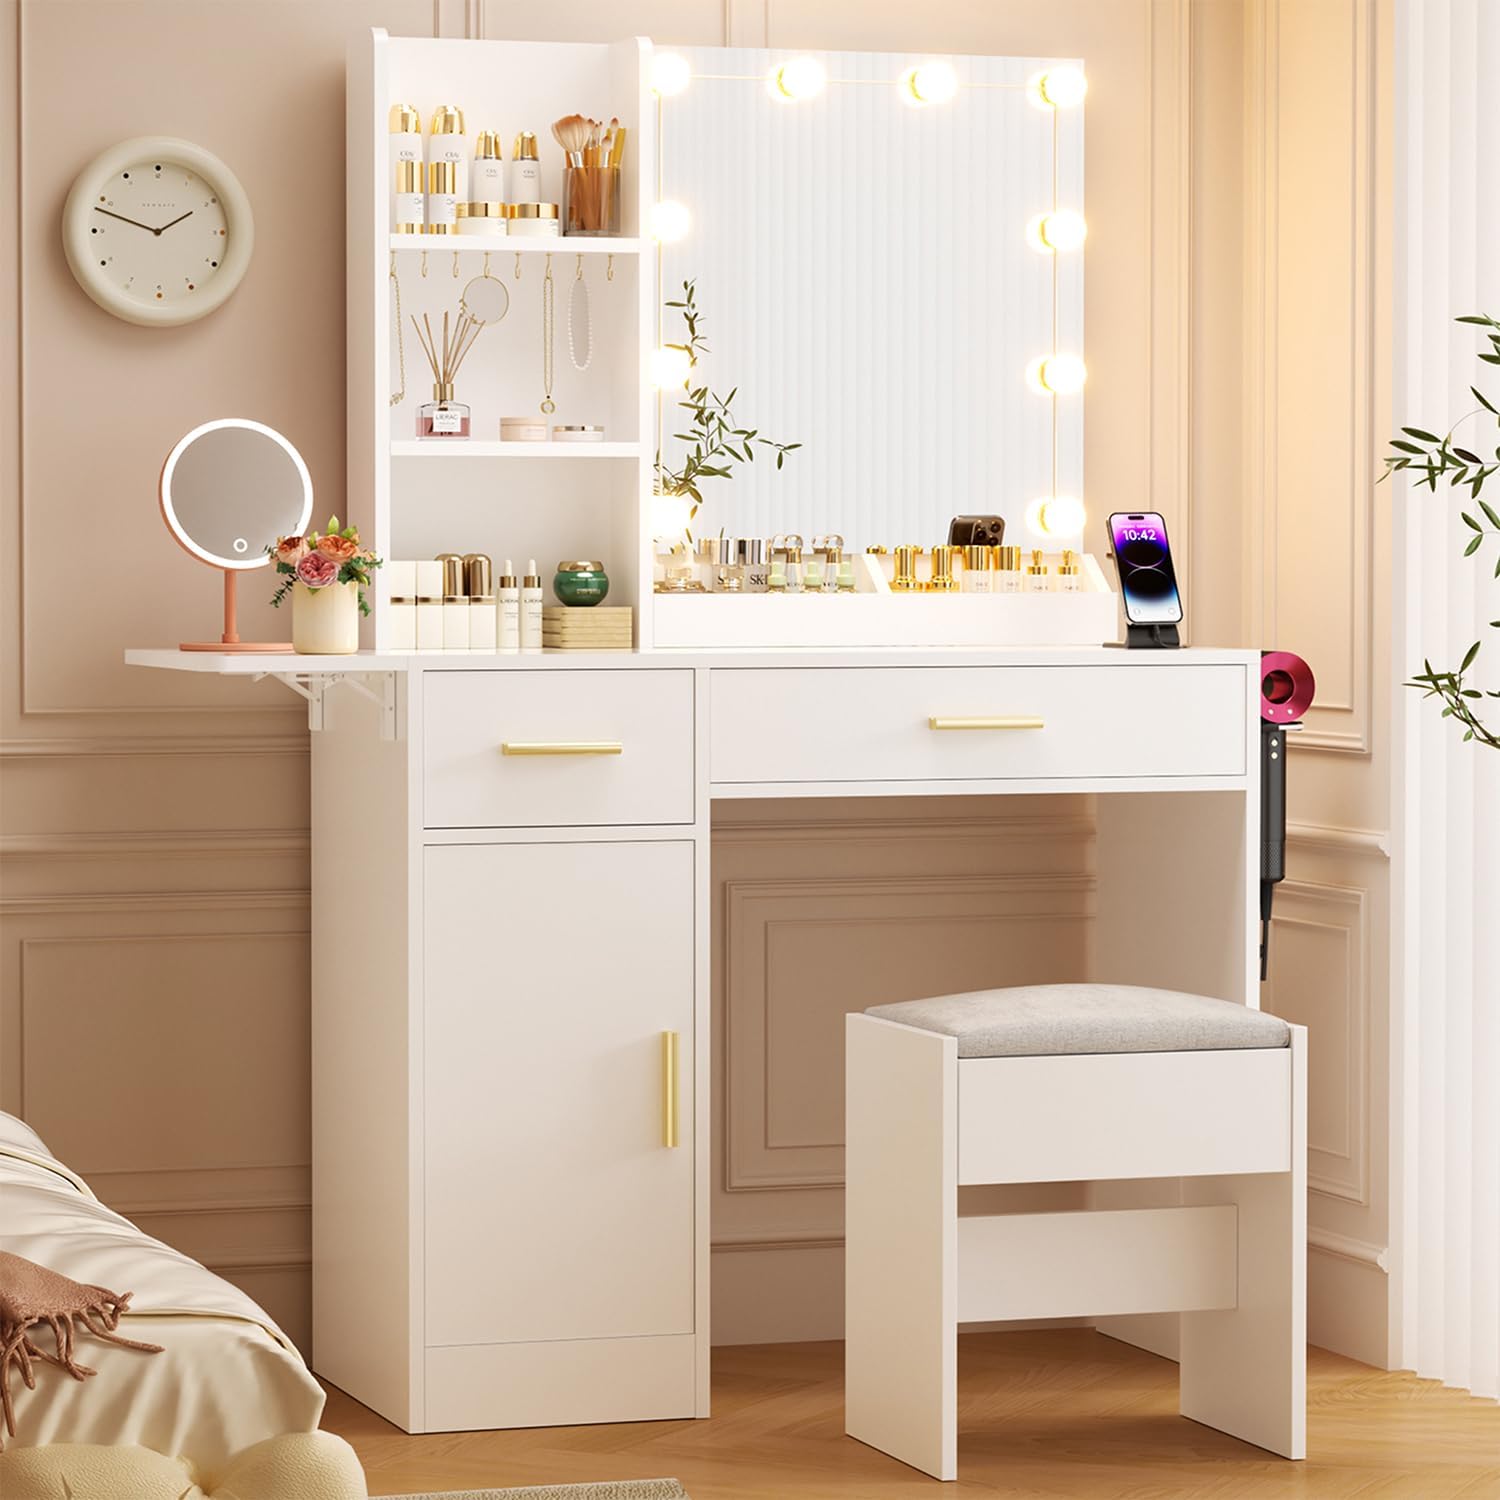
Image 1.1: The ERLEJIA Vanity Desk, showcasing its mirror with lights, foldable side desk, and integrated storage solutions, accompanied by a matching stool.
2. Safety Information
- Ensure all parts are present and undamaged before assembly. Do not proceed with assembly if any parts are missing or damaged.
- Assemble the vanity desk on a soft, clean surface to prevent scratches.
- Use only the provided hardware for assembly. Using incorrect hardware may compromise the stability of the desk.
- Do not overtighten screws during assembly to avoid damaging the material.
- Keep small parts and packaging materials away from children and pets to prevent choking hazards.
- Ensure the vanity desk is placed on a stable, level surface to prevent tipping.
- For electrical components (lights, power strip), ensure proper connection to a grounded outlet. Do not overload the power strip.
- Unplug the vanity desk from the power source before cleaning or performing any maintenance.
- Do not expose the vanity desk to excessive moisture or direct sunlight.
3. Package Contents
Before beginning assembly, verify that all components listed below are present in your package. Refer to the assembly diagram for visual identification of parts.
- Vanity Desk Frame Components
- Mirror with LED Lights
- Foldable Desk Extension
- Drawers (5 total: 1 large with compartments, 1 small, 3 standard)
- Open Shelves
- Stool
- Power Strip (2 AC outlets + 2 USB ports)
- Hair Dryer Holder
- Assembly Hardware (screws, dowels, cam locks, etc.)
- Assembly Tools (e.g., Allen wrench, screwdriver - may not be included)

Image 3.1: Overview of vanity desk components and dimensions, including the main desk, mirror, storage, and accompanying stool.

Image 3.2: Detail of the integrated jewelry hooks and open shelving for organized storage of accessories and beauty products.
4. Assembly Instructions
Follow these steps carefully for proper assembly. It is recommended to have two people for certain steps.
4.1. Prepare the Workspace
- Clear a spacious area for assembly.
- Lay out all parts and hardware, organizing them by their labels (if provided).
- Keep the instruction manual handy for reference.
4.2. Assemble the Main Desk Frame
- Attach the side panels to the bottom and back panels using the designated screws and dowels.
- Secure the middle support beams.
- Ensure all connections are snug but do not overtighten.
4.3. Install Drawers and Shelves
- Assemble each drawer according to the individual drawer instructions.
- Install drawer slides onto the desk frame and the assembled drawers.
- Insert the drawers into their respective slots.
- Place the open shelves into their designated positions.

Image 4.3.1: The vanity desk with various storage options, including drawers and open shelves, demonstrating its organizational capacity.
4.4. Attach the Mirror and Lighting System
- Carefully attach the mirror unit to the top of the desk frame using the provided brackets and screws.
- Affix the LED light bulbs around the mirror frame. The bulbs typically have adhesive backs. Ensure even spacing.
- Connect the light string to the power adapter and route the cable neatly.
4.5. Install the Foldable Desk Extension
- Attach the foldable desk extension to the side of the main desk using the hinge mechanism.
- Ensure the hinges are securely fastened and the extension can fold and unfold smoothly.

Image 4.5.1: The foldable desk extension in both expanded and folded positions, illustrating its space-saving design.
4.6. Mount the Power Strip and Hair Dryer Holder
- Secure the power strip to the designated area on the desk (usually the side or back) using the provided screws.
- Attach the hair dryer holder to the side of the desk.
- Plug the power strip into a wall outlet.
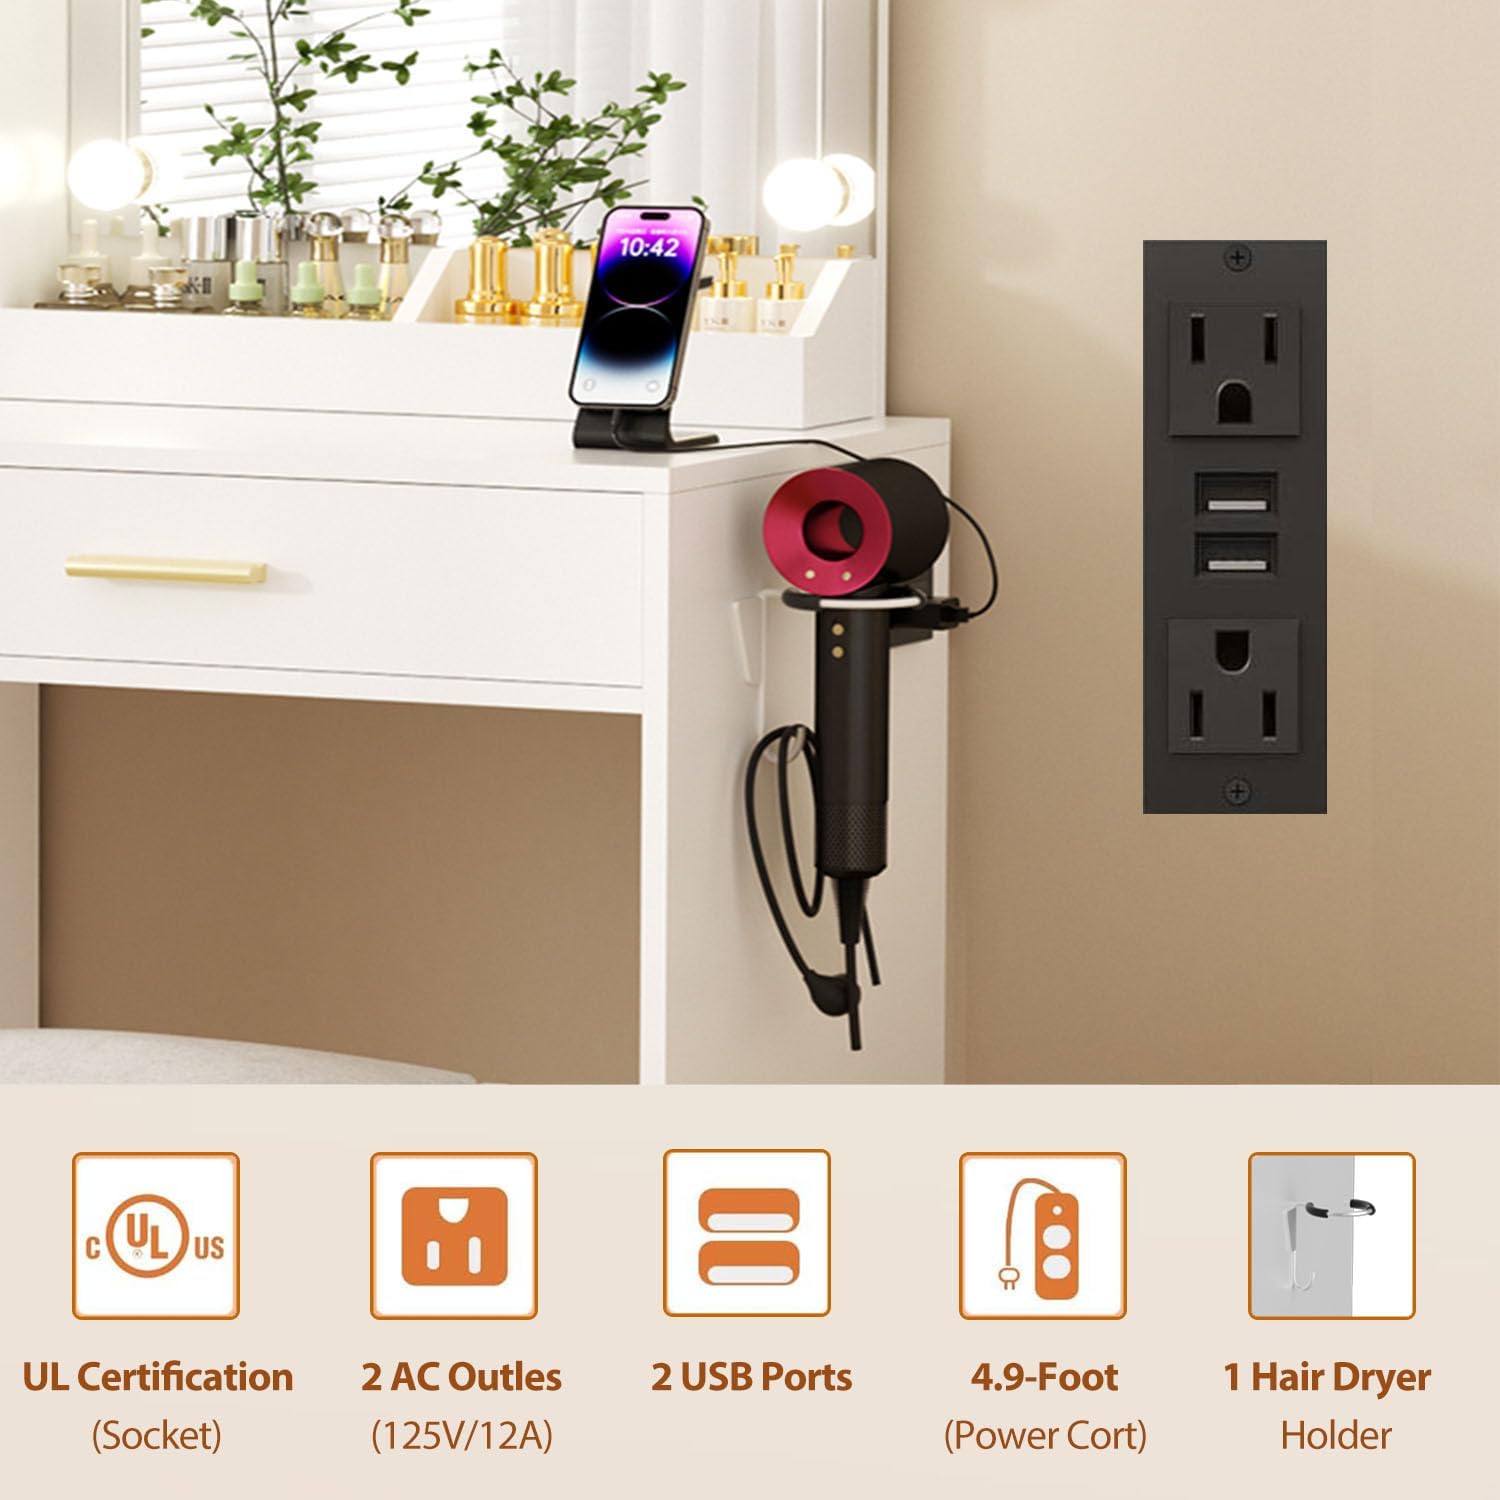
Image 4.6.1: The integrated power strip and hair dryer holder, highlighting their convenience for managing electronic devices and styling tools.
4.7. Assemble the Stool
- Attach the legs to the stool seat using the provided hardware.
- Ensure all connections are stable.
5. Operating Instructions
5.1. Using the LED Mirror Lights
- Power On/Off: Press the power button on the mirror to turn the lights on or off.
- Adjust Color Temperature: Press the "C" button to cycle through 3 light color modes: Cold Light (6000K), Cool Light (5000K), and Warm Light (4000K).
- Adjust Brightness: Use the "+" and "-" buttons to adjust the brightness level. There are 10 levels of brightness available.

Image 5.1.1: Controls for adjusting the mirror's LED lights, including color temperature and brightness levels.
5.2. Utilizing the Foldable Desk Extension
- To Expand: Gently pull the extension table outwards until it locks into place, creating additional workspace.
- To Fold: Release the locking mechanism (if present) and push the extension table inwards until it is flush with the main desk, saving space.
5.3. Using the Integrated Power Strip
- Plug your electronic devices into the 2 AC outlets or charge via the 2 USB ports.
- Ensure the total power consumption of connected devices does not exceed the power strip's rating.
6. Maintenance
6.1. Cleaning
- Desk Surface: Wipe with a dry, soft cloth. For stubborn marks, use a slightly damp cloth with mild soap, then dry immediately. Avoid abrasive cleaners or harsh chemicals.
- Mirror: Clean with a glass cleaner and a lint-free cloth. Do not spray cleaner directly onto the mirror; apply it to the cloth first.
- Stool Cushion: Spot clean with a mild fabric cleaner as needed.
- Electrical Components: Ensure the desk is unplugged before cleaning. Wipe the power strip and light bulbs with a dry cloth only.
6.2. General Care
- Periodically check all screws and fasteners to ensure they remain tight. Retighten if necessary.
- Avoid placing hot items directly on the desk surface. Use coasters or protective pads.
- Do not drag the desk when moving it; lift it to prevent damage to the legs and floor.
7. Troubleshooting
| Problem | Possible Cause | Solution |
|---|---|---|
| Lights not turning on. |
|
|
| Power strip not working. |
|
|
| Desk feels wobbly. |
|
|
| Drawers stick or don't slide smoothly. |
|
|
8. Specifications
| Feature | Detail |
|---|---|
| Model Number | SZT |
| Brand | ERLEJIA |
| Product Dimensions (Overall) | 35"D x 15.74"W x 55.12"H (approx. 89cm D x 40cm W x 140cm H) |
| Foldable Desk Extension Length | Expands from 35.43" to 43.3" (approx. 90cm to 110cm) |
| Item Weight | 77.8 pounds (approx. 35.3 kg) |
| Frame Material | Engineered Wood |
| Seat Material Type (Stool) | Linen |
| Seat Height (Stool) | 16.53 Inches (approx. 42cm) |
| Mirror Lights | 10 LED bulbs, 3 color modes (Cold, Cool, Warm), 10 brightness levels |
| Power Strip | 2 AC Outlets (125V/12A), 2 USB Ports, 4.9-Foot Power Cord, UL Certified |
| Storage | 5 Drawers (1 large with 2 hidden compartments, 1 small, 3 standard), 3 Open Shelves, 3-tier divided cabinet with 2 open compartments, Hair Dryer Holder |
| Assembly Required | Yes |
| Product Care Instructions | Wipe with Dry Cloth |
9. Warranty and Support
ERLEJIA is committed to providing quality products. For any questions, missing parts, or issues with your vanity desk, please contact our customer support team.
- Returns: This product is eligible for 30-day easy returns. Please refer to your purchase platform's return policy for details.
- Customer Support: For assistance, please visit the ERLEJIA store on Amazon or contact the seller directly through your order details.
- Protection Plans: Extended protection plans may be available for purchase separately. Refer to your purchase options for details on 2-Year or 3-Year Protection Plans.
Ask a question about this manual
Ask about setup, troubleshooting, compatibility, parts, safety, or missing instructions. Manuals+ will review the question and use this page’s manual context to help answer it.