1. Introduction
This manual provides essential instructions for the safe and efficient operation of your Generic Mini DLP Projector. Please read this manual thoroughly before using the device and retain it for future reference. This portable projector is designed for versatile use, offering features like 5G WiFi, Bluetooth, and Android OS 9.0 for an enhanced viewing experience.
2. Package Contents
Verify that all items listed below are present in your package. If any items are missing or damaged, please contact customer support.

Image: The complete package contents, including the projector, remote, mini tripod, power adapter, USB cable, and user manual.
- Mini DLP Projector
- Remote Control
- Mini Tripod
- Power Adapter
- USB Cable
- User Manual
- Storage Pouch
3. Product Overview
Familiarize yourself with the projector's physical features, ports, and controls.

Image: Top view of the projector, highlighting the integrated touchpad and control buttons.

Image: Side view of the projector, detailing the HDMI, DC IN, USB, USB 3.0 ports, and the power switch.
3.1 Ports and Controls
- HDMI IN: Connect external devices such as laptops, gaming consoles, or media players.
- DC IN: Power input for the projector.
- USB / USB 3.0: Connect USB flash drives or other USB devices for media playback.
- Power ON/OFF: Main power switch.
- Touchpad: Navigate the Android OS interface directly on the projector.
- Focus Wheel: Adjust image clarity manually.
4. Setup
4.1 Powering On
- Connect the power adapter to the DC IN port on the projector and then to a power outlet.
- Slide the Power ON/OFF switch to the 'ON' position. The projector will start up.
4.2 Placement and Focus
- Place the projector on a stable, flat surface or mount it on the included mini tripod.
- Position the projector at the desired distance from the projection surface. The projection size can range from 30 to 120 inches depending on the distance.
- Rotate the focus wheel until the projected image is clear and sharp.
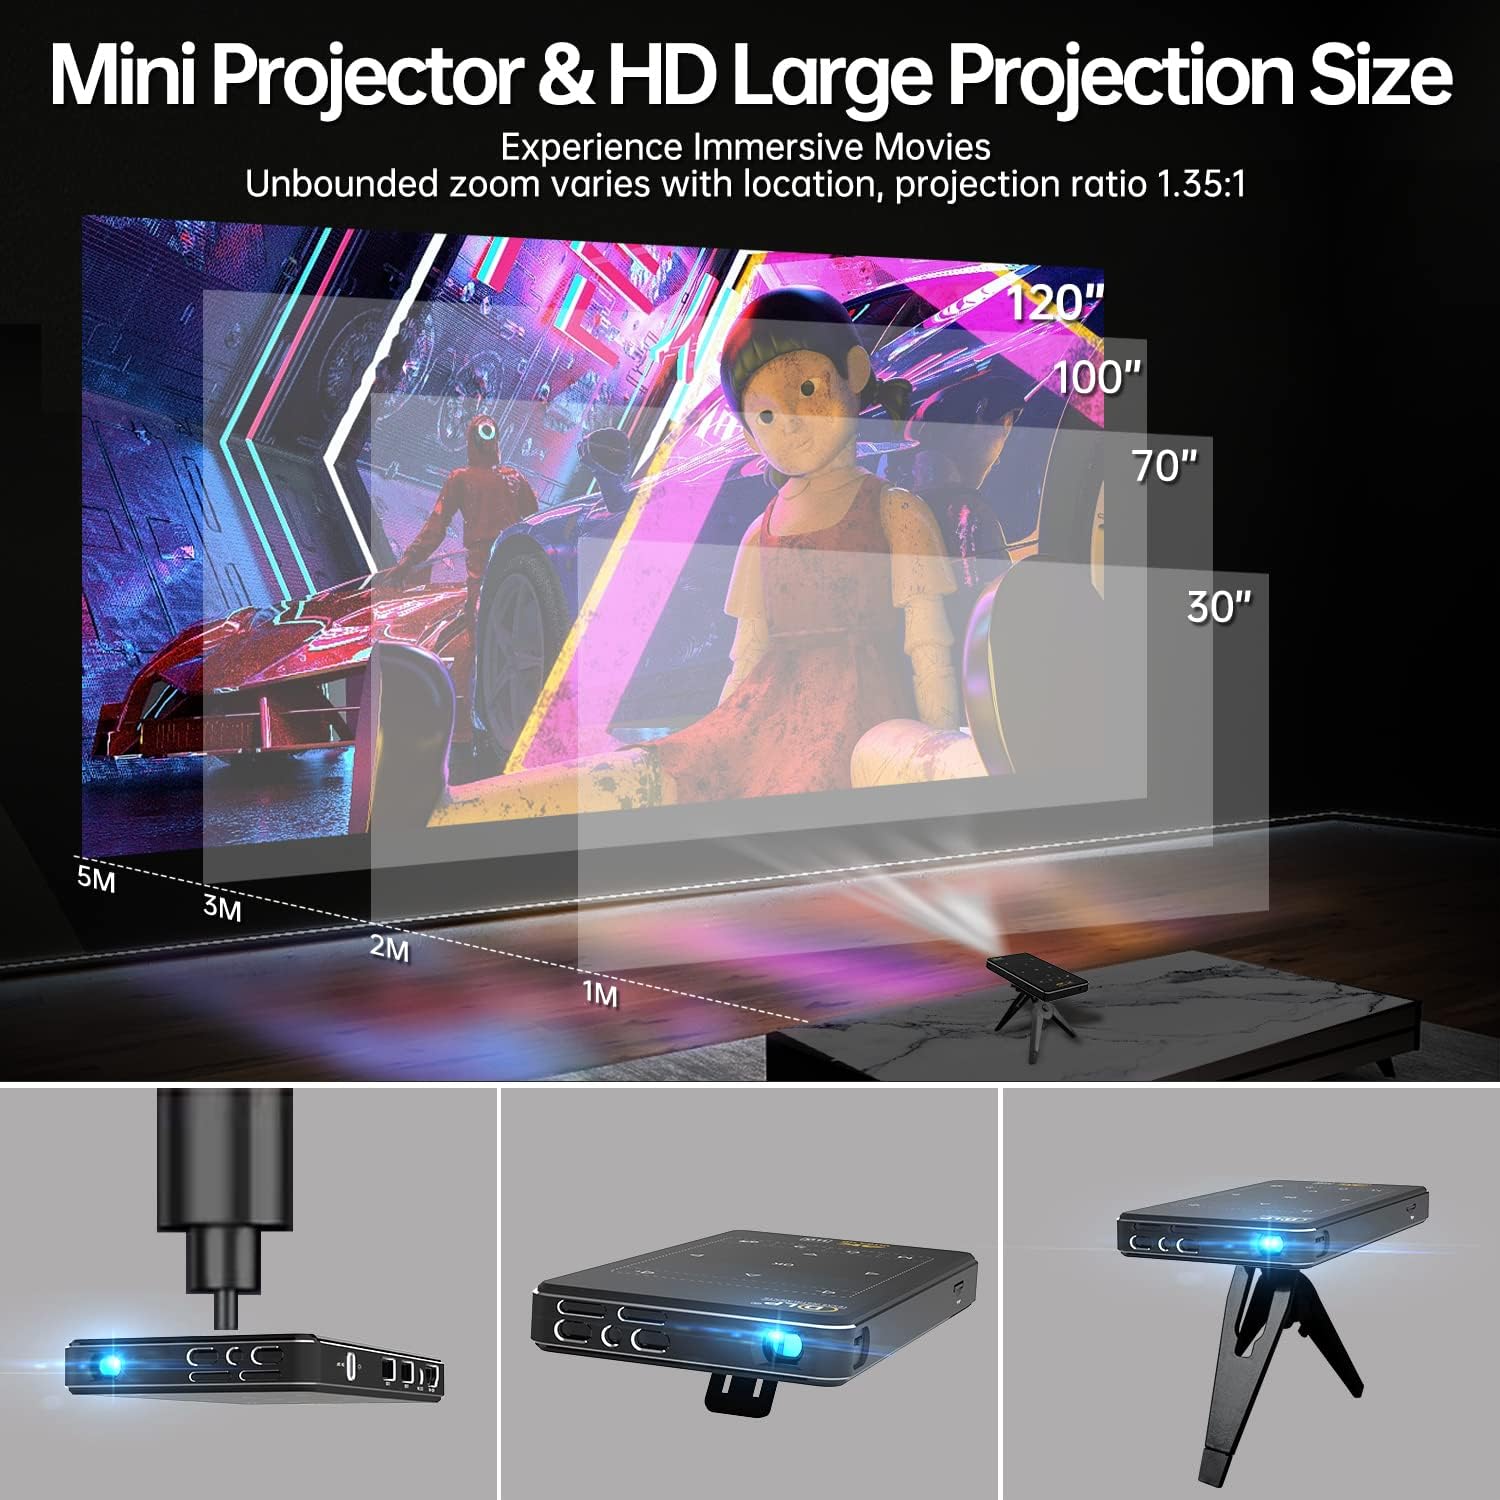
Image: Illustration of projection distances and corresponding screen sizes, demonstrating the projector's flexibility.
5. Operating Instructions
5.1 Navigation
Use the remote control or the integrated touchpad to navigate the Android OS interface. The remote control offers directional buttons, an 'OK' button for selection, and dedicated buttons for volume, menu, and home.
5.2 Android OS 9.0 System
Your projector comes pre-installed with Android OS 9.0. This allows you to:
- Download applications directly from the Google Play Store.
- Access streaming services and other apps without needing an external device.
6. Connectivity
6.1 Wi-Fi Connection (5G/2.4G)
- Go to 'Settings' on the projector's home screen.
- Select 'Network & Internet'.
- Turn on Wi-Fi and select your desired network from the list.
- Enter the password if prompted and connect.
6.2 Bluetooth Connection
- Go to 'Settings' on the projector's home screen.
- Select 'Connected Devices' or 'Bluetooth'.
- Turn on Bluetooth and search for available devices.
- Select your Bluetooth speaker or headphones from the list to pair.
6.3 HDMI Input
Connect an external device (e.g., laptop, game console) to the projector's HDMI IN port using an HDMI cable. The projector will automatically switch to the HDMI input or you may need to select it manually from the input source menu.
6.4 USB Media Playback
Insert a USB flash drive into the USB or USB 3.0 port. The projector's file manager will typically open automatically, allowing you to browse and play media files.
6.5 Screen Mirroring (iOS/Android)
The projector supports screen mirroring from iOS and Android devices. Access the 'Screen Mirroring' application on the projector's home screen and follow the on-screen instructions to connect your mobile device.
Note: Due to copyright restrictions, direct mirroring of content from certain streaming services like Netflix from your phone to the projector is not supported. For such content, please download the Netflix app directly onto the projector via the Google Play Store.
7. Keystone Correction
The projector features both automatic vertical and manual horizontal keystone correction to ensure a perfectly rectangular image, even when the projector is not perfectly aligned with the screen.

Image: Visual demonstration of automatic keystone correction, transforming a trapezoidal image into a rectangular one.
- Automatic Vertical Keystone: The projector automatically corrects vertical distortion up to ±45°.
- Manual Horizontal Keystone: Adjust horizontal distortion up to ±40° via the settings menu.
8. Maintenance
8.1 Cleaning
- Ensure the projector is powered off and unplugged before cleaning.
- Use a soft, dry cloth to wipe the exterior of the projector.
- For the lens, use a lens cleaning cloth and specialized lens cleaning solution. Do not use abrasive materials.
- Keep the ventilation openings clear of dust and debris.
8.2 Storage
When not in use, store the projector in a cool, dry place, away from direct sunlight and extreme temperatures. Use the provided storage pouch to protect it from dust and scratches.
9. Troubleshooting
- No Power: Ensure the power adapter is securely connected to both the projector and a working power outlet. Check the power switch is in the 'ON' position.
- No Image: Verify the input source is correctly selected. Check all cable connections (HDMI, USB). Adjust focus.
- Blurred Image: Adjust the focus wheel. Ensure the projection surface is flat and the projector is stable. Use keystone correction if the image is trapezoidal.
- No Sound: Check the volume settings on the projector and any connected external audio devices. Ensure Bluetooth audio is correctly paired if using external speakers.
- Screen Mirroring Issues: Ensure both devices are on the same Wi-Fi network. Some apps (e.g., Netflix) do not support screen mirroring due to copyright; use the app directly on the projector.
- Remote Control Not Working: Check the batteries in the remote control. Ensure there are no obstructions between the remote and the projector's IR receiver.
10. Specifications
The following table outlines the technical specifications of your Mini DLP Projector.
| Feature | Specification |
|---|---|
| Brand | Generic |
| Model | B0DHVJSZB4 |
| Projection Technology | DLP (Digital Light Processing) |
| Native Resolution | 854 x 480 |
| Supported Resolution | Up to 1080P |
| Brightness | 120 ANSI Lumens |
| Light Source Life | Up to 20,000 hours |
| Operating System | Android OS 9.0 |
| Connectivity | 5G/2.4G Wi-Fi, Bluetooth, HDMI, USB, 3.5mm Jack |
| Keystone Correction | Vertical ±45° (Auto), Horizontal ±40° (Manual) |
| Max Projection Size | 120 inches |
| Dimensions | 5.7 x 3 x 0.67 inches |
| Weight | 7.1 ounces |
| Special Feature | 3D-Ready |
11. Safety Information
- Do not look directly into the projector lens when the lamp is on.
- Keep the projector away from water or other liquids.
- Do not block the ventilation openings.
- Avoid placing the projector in extremely hot or cold environments.
- Use only the provided power adapter.
- Do not attempt to disassemble or repair the projector yourself. Contact qualified service personnel.
12. Warranty and Support
This product comes with a satisfaction guarantee. If you encounter any issues or have questions regarding your projector, please contact our customer support team. As a local American company, we aim to respond quickly, and your inquiries will typically be addressed within 24 hours.
For support, please refer to the contact information provided with your purchase or visit the official product support website.