Podazz EV-160
Podazz Automatic Aquarium Fish Feeder User Manual
Model: EV-160
Introduction
Thank you for choosing the Podazz Automatic Aquarium Fish Feeder. This device is designed to provide precise and timed feeding for your aquarium fish, ensuring they are well-fed even when you are away. Its moisture-proof design and USB rechargeable battery offer convenience and reliability for daily use or during vacations.

Image: The Podazz Automatic Aquarium Fish Feeder, showing its main unit with a clear food compartment, LCD display, control buttons, and a USB charging cable. Three goldfish are depicted below, illustrating the feeder's purpose.
Safety Information
- Ensure the feeder is securely installed to prevent it from falling into the aquarium.
- Do not immerse the main unit of the feeder in water. It is moisture-proof for food, but not waterproof for submersion.
- Keep the USB charging port dry.
- Use only the provided USB cable for charging.
- Keep out of reach of children and pets.
- Do not attempt to disassemble or repair the device yourself. Contact customer support if issues arise.
Package Contents
Please check the package to ensure all items are present:
- 1 x Podazz Automatic Aquarium Fish Feeder (Model EV-160)
- 1 x USB Charging Cable
- 1 x Adjustable Clamp Base for mounting
- 4 x Suction Cups for installation
- 1 x Small Funnel (for specific tank setups, if included)
Product Overview
Familiarize yourself with the components of your new fish feeder:
- Food Compartment: Circular drum with 16 individual grids, providing 15 usable feeding portions.
- LCD Display: Shows current time, feeding schedule, and settings.
- Control Buttons:
- MODE Button: Used to cycle through different setting modes (Time, Volume, Interval).
- SET Button: Used to confirm settings or enter setting adjustment mode.
- "+" Button: Increases values or advances through options.
- "-" Button: Decreases values or goes back through options.
- USB Charging Port: Located on the side for recharging the internal battery.
- Outlet Port: The opening through which food is dispensed.
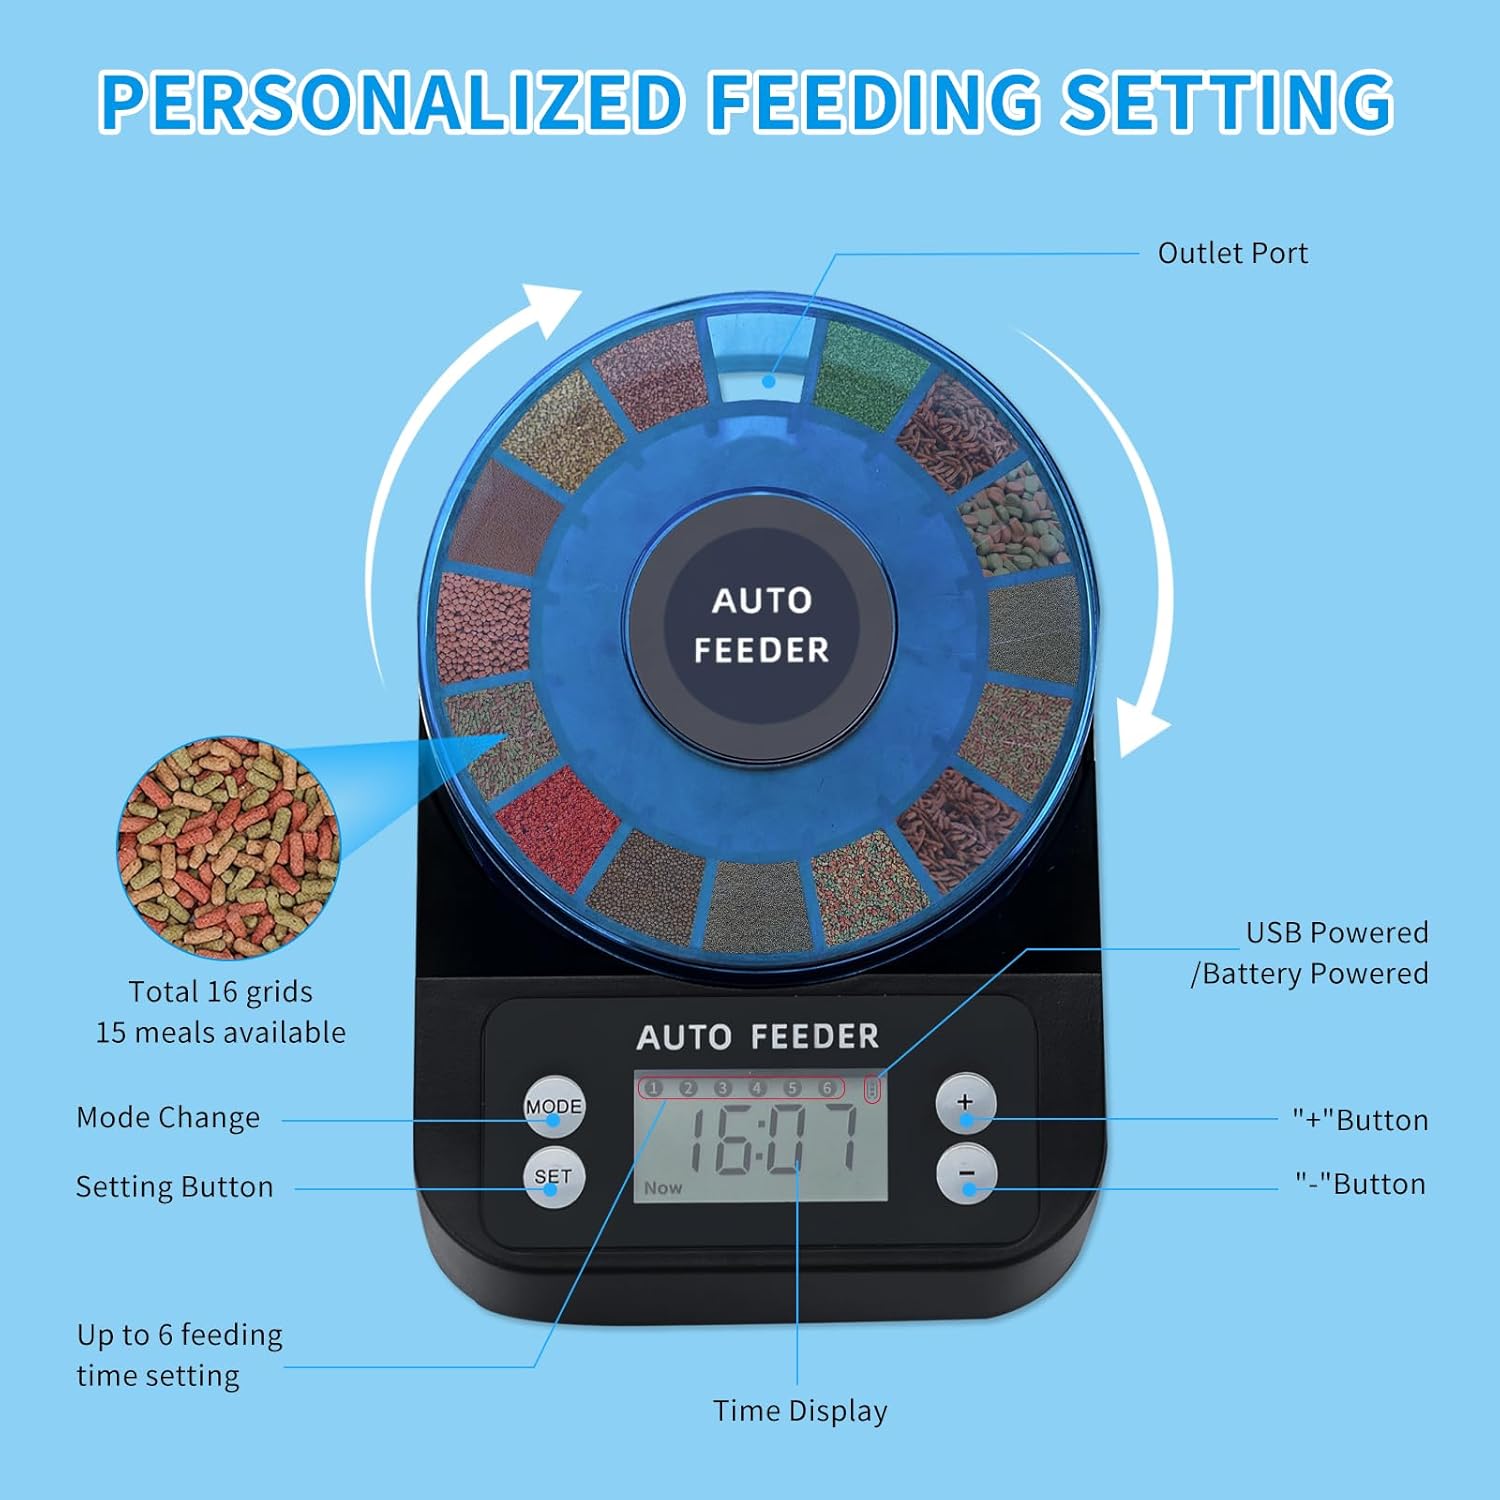
Image: A detailed view of the feeder's control panel, highlighting the MODE, SET, +, and - buttons, along with the LCD display and the food outlet port.
Setup
1. Charging the Feeder
The feeder has a built-in 700mAh rechargeable battery. For optimal performance, fully charge the device before first use (recommended 3 hours charging, or 10+ hours for initial charge). A full charge can last 1 to 3 months (approximately 200 feedings).
- Connect the provided USB charging cable to the feeder's charging port.
- Plug the other end of the USB cable into a standard USB power adapter (not included) or a computer USB port.
- The LCD display may indicate charging status.
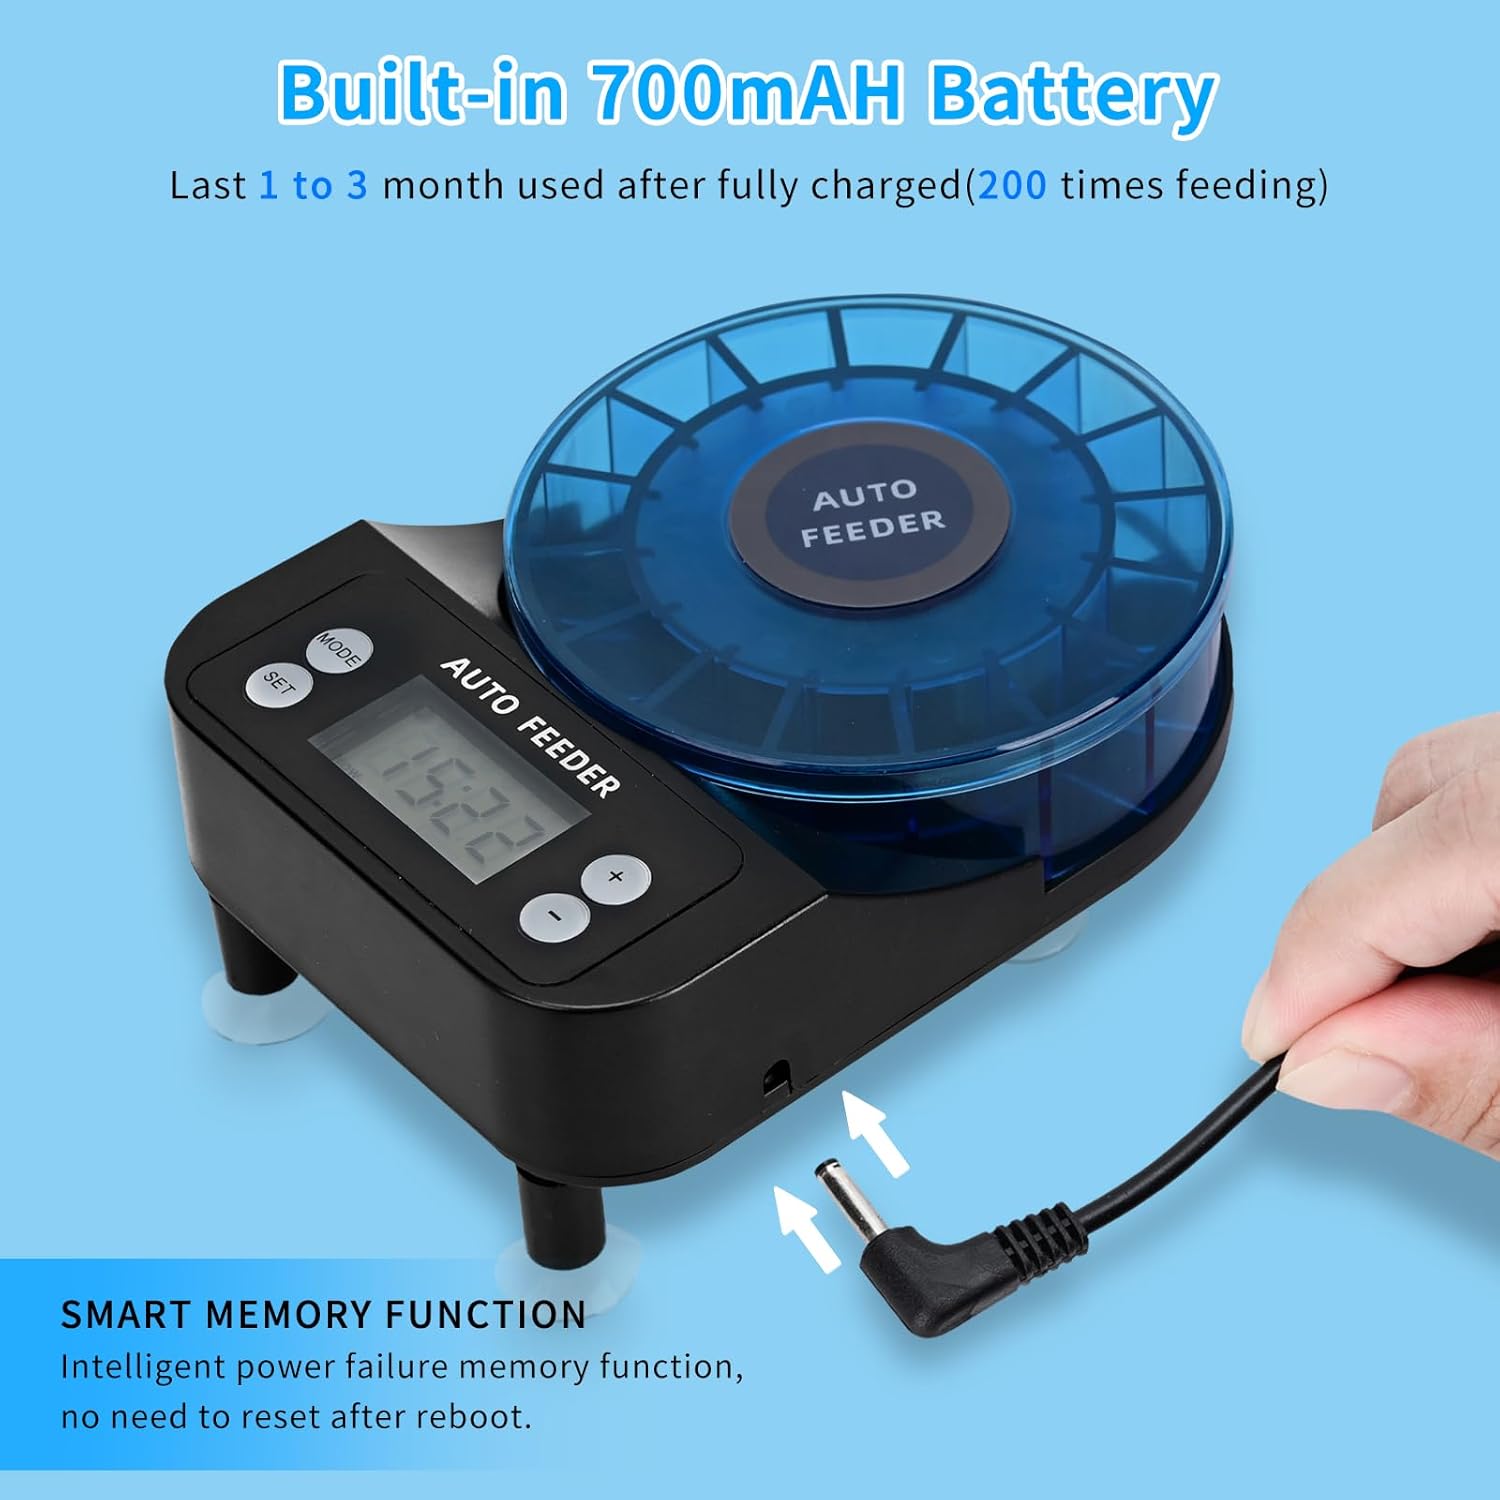
Image: The automatic fish feeder with its USB charging cable connected, illustrating the charging process.
2. Filling the Food Compartment
The feeder has 16 total grids, with 15 available for individual meals (one is the initial outlet compartment). Each grid can hold up to 2g of food.
- Open the top lid of the food compartment.
- Carefully fill each desired grid with fish food.
- Important Note: This feeder is suitable for particle feed, pellets, powders, and small strips. It is NOT recommended for shrimps, large pellets, mealworms, or flake food, as these may absorb moisture and clog the dispenser.
- Close the lid securely to maintain the moisture-proof seal.

Image: An overhead view of the feeder's food compartment, illustrating the 16 grids for customized food amounts. A warning indicates that flakes or shrimps should not be used.

Image: A visual guide detailing which types of fish food (pellet, round flat, strip) are suitable and which (shrimps, large pellets, mealworm, flake) are not. It also shows examples of small fish suitable for this feeder.
3. Installation Options
The Podazz feeder offers two installation methods to fit various aquarium types:
Mount Installation (for open-top tanks)
Use the adjustable clamp base for aquariums with open tops or rims.
- Attach the clamp base to the feeder.
- Securely fasten the clamp to the edge of your aquarium.
- Ensure the feeder is stable and the outlet port is positioned correctly over the feeding area.
Suction Cup Installation (for closed-top tanks)
Use the suction cups for aquariums with closed tops or lids, where the feeder can sit directly on the surface.
- Attach the suction cups to the designated spots on the bottom of the feeder.
- Place the feeder on a clean, dry, flat surface of your aquarium lid, ensuring the outlet port aligns with a feeding hole.
- Press down firmly on the feeder to create a strong suction.

Image: A visual representation of the two installation options: mount installation for open-top tanks and suction cup installation for closed-top tanks.
The recommended distance between the fish feeder and the fish tank is about 10cm to allow for proper food dispensing and prevent moisture issues.
Operating Instructions
1. Setting the Current Time
It is crucial to set the correct current time for accurate feeding schedules.
- Press the MODE button until "Now" appears on the LCD display.
- Press the SET button. The hour digit will start blinking.
- Use the + and - buttons to adjust the hour.
- Press SET again to move to the minute digit, then adjust with + and -.
- Press SET to confirm and exit time setting.

Image: A visual four-step guide demonstrating how to set the time, feeding meal quantity, specific feeding times, and feeding interval on the feeder's display.
2. Setting Feeding Meals (Quantity)
This setting determines how many rotations the feeder makes for each scheduled feeding, corresponding to the number of food grids dispensed.
- Press the MODE button until "Vol" (Volume) appears on the display.
- Press the SET button. The current meal quantity will blink.
- Use the + and - buttons to adjust the number of meals (1-15).
- Press SET to confirm.
3. Setting Feeding Times
You can set up to four different feeding times per day.
- Press the MODE button until the first feeding time (e.g., "01") appears.
- Press the SET button. The hour digit will blink.
- Adjust the hour using + and -.
- Press SET to move to the minute digit, then adjust.
- Press SET to confirm this feeding time.
- Repeat steps for additional feeding times (02, 03, 04) if desired. If a feeding time is not set, it will be skipped.
4. Setting Feeding Interval (Optional)
This feature allows you to set the feeder to dispense food every other day if needed.
- Press the MODE button until "Int" (Interval) appears on the display.
- Press the SET button. The interval setting will blink.
- Use the + and - buttons to select:
- "0" for daily feeding.
- "1" for feeding every other day.
- Press SET to confirm.
The feeder has a smart memory function, meaning your settings will be retained even after a power failure or if the battery runs out and is recharged.
Maintenance
- Cleaning the Feeder: After using up all 16 feeding grids, it is recommended to wipe the grids inside to keep them dry and prevent fish food from getting damp or caking. Use a dry cloth or slightly damp cloth (ensure no water enters electronic components).
- Food Storage: Always ensure the food compartment lid is securely closed to maintain the moisture-proof environment.
- Battery Care: Recharge the feeder when the battery indicator is low. Avoid completely draining the battery frequently to prolong its lifespan.

Image: A cutaway view of the feeder's food compartment, emphasizing the moisture-proof lid and fully sealed design that protects the food from water vapor, with only the outlet grid exposed.
Troubleshooting
| Problem | Possible Cause | Solution |
|---|---|---|
| Food not dispensing / Clogged |
|
|
| Feeder not turning on / LCD blank |
|
|
| Incorrect feeding times |
|
|
| Feeder is noisy during operation |
|
|
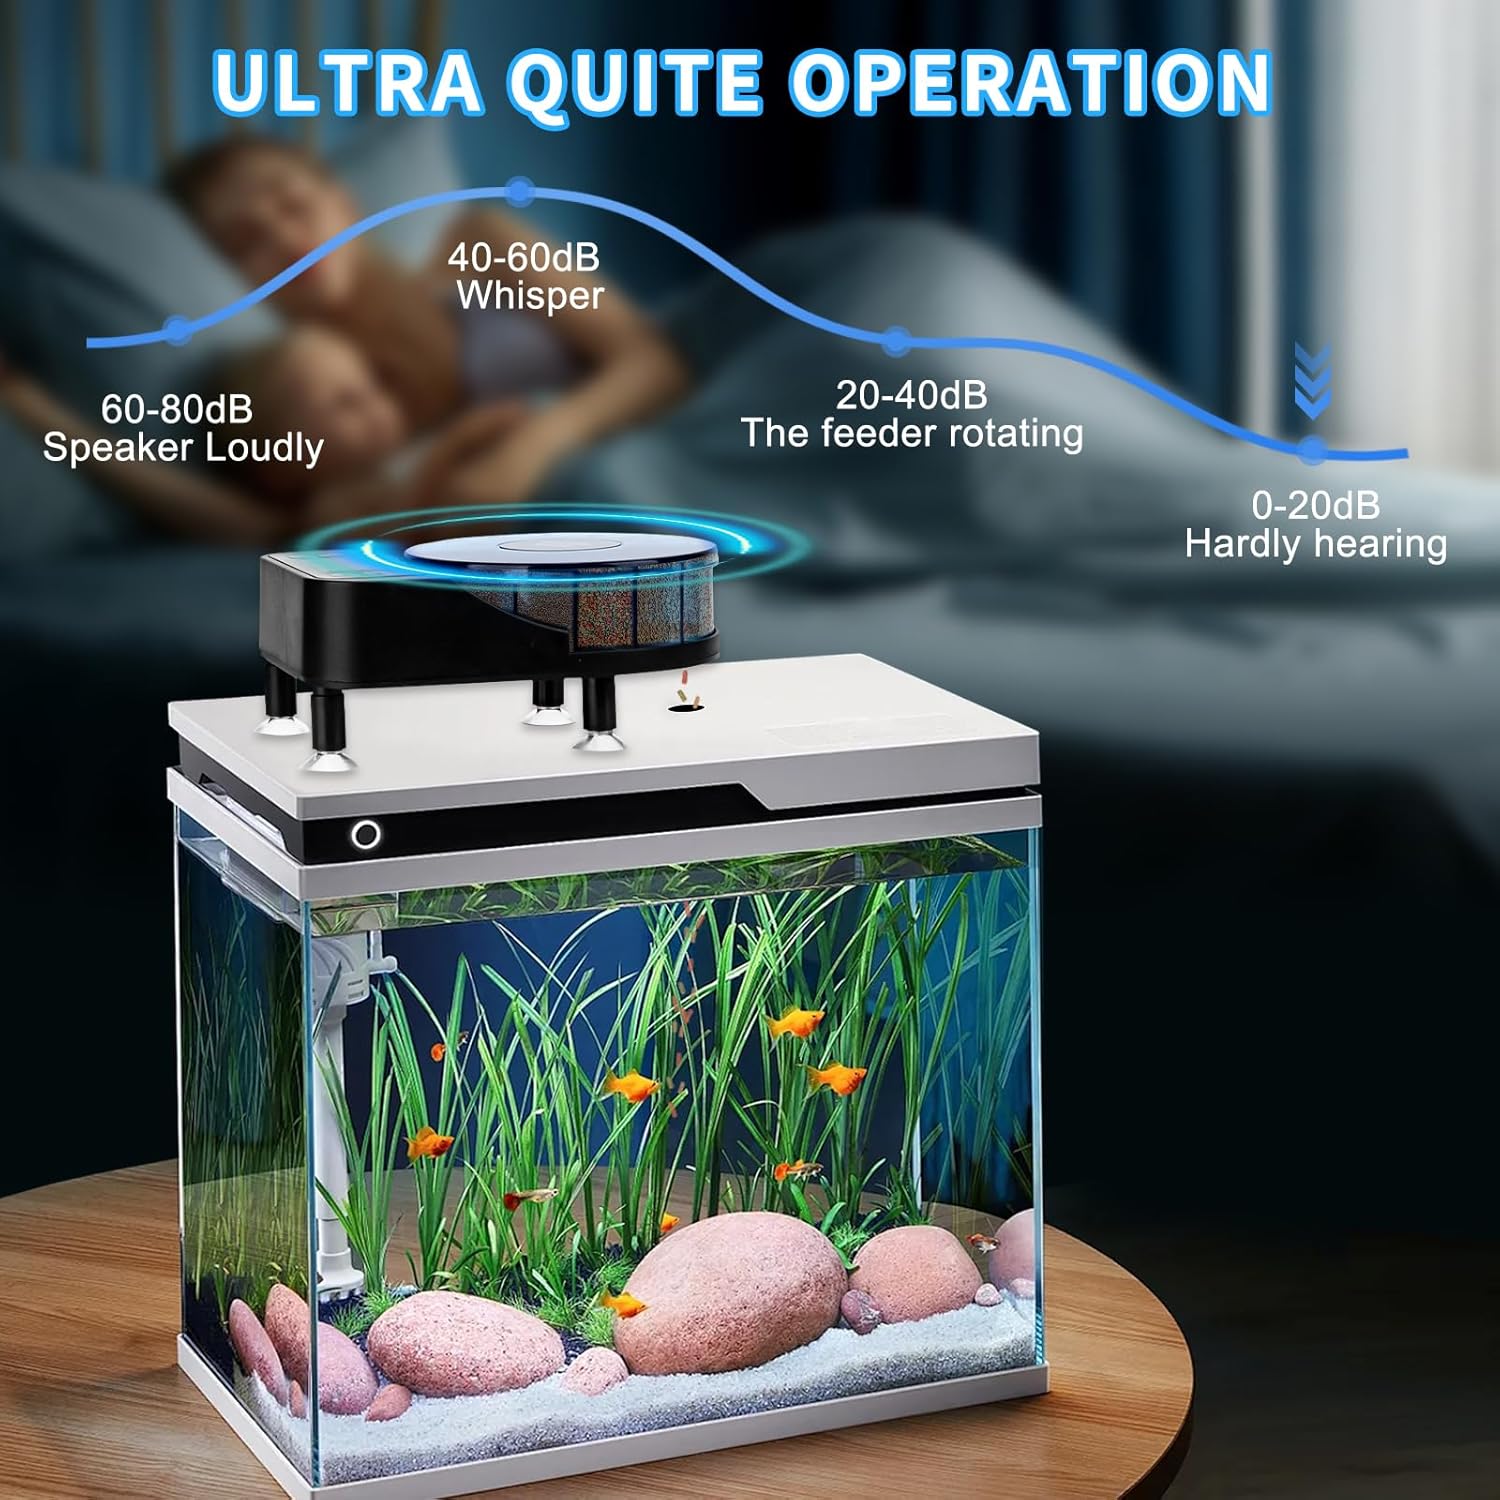
Image: A graphic demonstrating the low noise level of the feeder during operation, comparing it to common sounds.
Specifications
| Feature | Detail |
|---|---|
| Model Number | EV-160 |
| Dimensions (LxWxH) | 5.9 x 3.93 x 1.37 inches |
| Item Weight | 14.4 ounces (approx. 408 grams) |
| Battery | Built-in 700mAh Lithium Ion (USB Rechargeable) |
| Feeding Grids | 16 total (15 individual meals) |
| Max Food per Grid | Up to 2g |
| Feeding Times | Up to 4 times per day |
| Operation Mode | Automatic |
| Display | LCD |
| Manufacturer | Podazz |
Warranty and Support
Podazz is committed to providing high-quality products and excellent customer service.
- Warranty: This product comes with a 12-month extra long warranty from the date of purchase.
- Return Policy: Enjoy a 30-day no-reason return policy.
- Customer Service: For any product usage, installation questions, or technical support, please contact Podazz customer service. We aim to provide quick replies within 24 hours.
- Lifetime Support: Podazz offers lifetime after-sales and technical support for this product.
For further assistance, please visit the official Podazz store or contact their support channels.
Ask a question about this manual
Ask about setup, troubleshooting, compatibility, parts, safety, or missing instructions. Manuals+ will review the question and use this page’s manual context to help answer it.