MIZISNR EQ-215S
Instruction Manual
MIZISNR Graphic Equalizer EQ-215S
Model: EQ-215S | Brand: MIZISNR
1. Product Overview
The MIZISNR EQ-215S is a professional dual-channel stereo graphic equalizer designed for precise audio control in home audio, live applications, audio installations, and studio environments. It features a 15-band design per channel, allowing for detailed frequency adjustments to optimize sound quality and eliminate unwanted noise.
- Professional Dual Channel Stereo Graphic Equalizer: Delivers exceptional audio quality for audiophiles and professionals.
- 15-Band Design: Each channel features a 15-band design with an adjustable range of ±12dB per band. Gain and decay values can be adjusted from ±6dB to ±12dB for precise control.
- Effective Elimination of Low Frequency Noise: Equipped with a LOW-CUT switch to attenuate unwanted sounds such as wind noise, floor rumble, and electrical hum, resulting in clear, dynamic output.
- Convenient Machine Debugging: A BYPASS switch simplifies debugging. Its standard 1U rack-mount design ensures straightforward installation.
- Versatile Input & Output Options: Supports XLR balanced and 1/4" TRS unbalanced inputs and outputs for compatibility with a wide range of audio setups.
2. Safety Information
- Ensure the unit is connected to a power source with the correct voltage (110V AC).
- Do not expose the unit to water or excessive moisture.
- Avoid placing the unit in direct sunlight or near heat sources.
- Do not attempt to open or service the unit yourself. Refer all servicing to qualified personnel.
- Ensure proper ventilation when rack-mounting the unit.
3. Product Features and Controls
The MIZISNR EQ-215S features intuitive controls for precise audio shaping. Below are detailed descriptions of its key components and functions.
Front and Rear Panel Overview
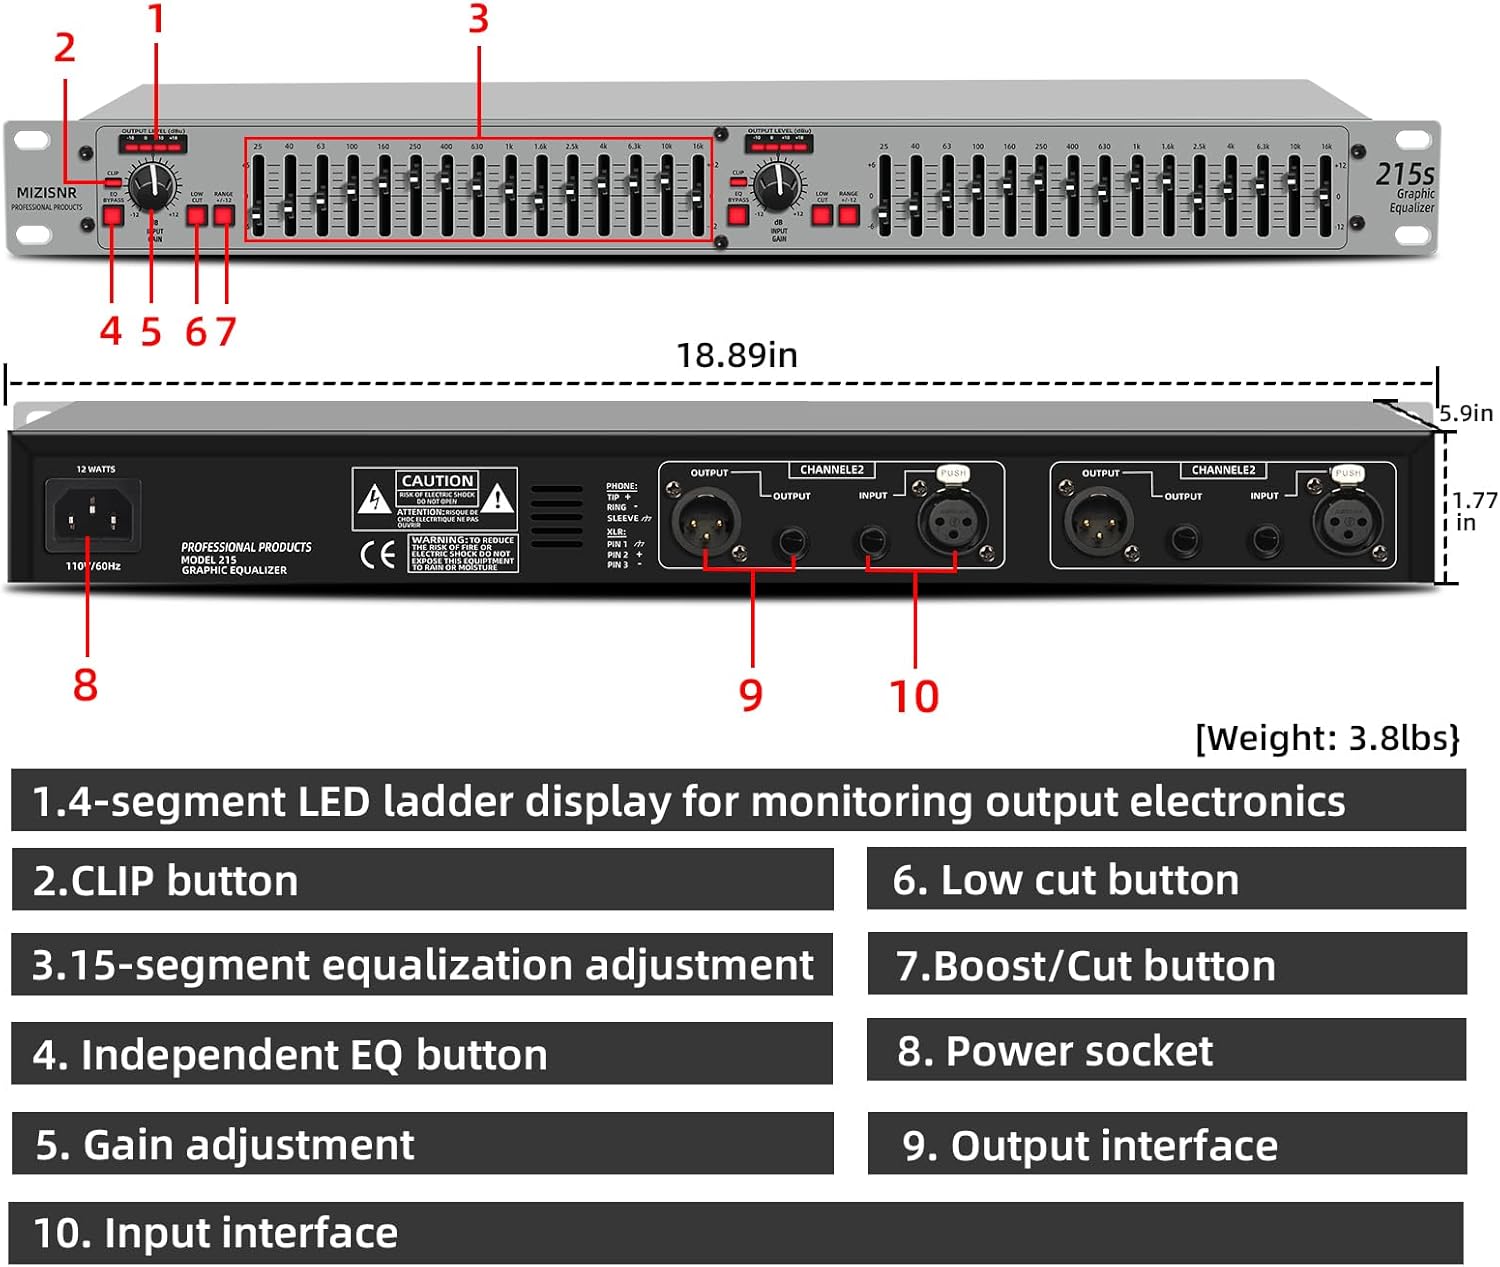
This image displays the front and rear panels of the EQ-215S, highlighting key components with numbered labels for easy identification. The front panel shows the dual 15-band EQ sliders, input gain knobs, and various control buttons. The rear panel illustrates the power input and the versatile XLR and 1/4" TRS input/output connections for both channels.
| No. | Component | Description |
|---|---|---|
| 1. | 4-segment LED ladder display | Monitors output electronics level. |
| 2. | CLIP button | Indicates signal clipping. |
| 3. | 15-segment equalization adjustment | Sliders for precise frequency control. |
| 4. | Independent EQ button | Activates/deactivates the EQ function for normal use. |
| 5. | Gain adjustment | Adjusts the input gain level. |
| 6. | Low cut button | Activates the low-cut filter to remove low-frequency noise. |
| 7. | Boost/Cut button | Selects the operating range of the individual equalization faders between ±12dB and ±6dB. |
| 8. | Power socket | Connects to the AC power supply. |
| 9. | Output interface | XLR and 1/4" TRS outputs for connecting to amplifiers or other audio equipment. |
| 10. | Input interface | XLR and 1/4" TRS inputs for connecting audio sources. |
Built-in Limiter

The EQ-215S includes a built-in limiter feature. This function is designed to cut off interference at the peaks or troughs of the output waveform, effectively preventing signal clipping and offering crucial overload protection for your audio system.
Dual Channel 15-Band EQ Adjustment

Each of the two channels on the EQ-215S features 15 frequency bands, allowing for precise and detailed adjustment of your audio. This enables you to fine-tune the music effects to your specific preferences, enhancing clarity and impact.
Bypass and Low-Cut Switch

The EQ-215S includes a BYPASS switch for simplifying machine debugging by allowing the signal to pass through without equalization. The LOW-CUT switch effectively attenuates unwanted low-frequency sounds such as wind noise, floor rumble, and electrical hum, improving overall audio clarity.
Gain Adjustment

The input gain knob allows for precise adjustment of the input signal level. You can adjust gain values from ±6dB to ±12dB, ensuring optimal signal strength before equalization.
4. Setup Guide
4.1 Unpacking
Carefully remove the Graphic Equalizer from its packaging. Inspect the unit for any signs of damage during transit. Retain the packaging for future storage or transport.
4.2 Physical Installation
The EQ-215S is designed for standard 1U rack-mount installation. Secure the unit into a standard 19-inch equipment rack using appropriate rack screws. Ensure adequate ventilation around the unit to prevent overheating.
4.3 Connecting Your Devices
The EQ-215S offers versatile input and output options, including XLR balanced and 1/4" TRS unbalanced connections. Follow the diagrams and video below for proper connection to your audio system.
Connection Diagram

This diagram shows a typical setup for the EQ-215S, demonstrating how to integrate it into an audio chain. Audio sources (e.g., microphone system, DVD player, audio mixing console) connect to the EQ's inputs, and the EQ's outputs connect to a power amplifier, which then drives the speakers. This setup allows the equalizer to process the audio signal before it reaches the amplification stage.
Connection Demonstration Video
This video provides a visual guide on how to connect the MIZISNR EQ-215S to your audio equipment. It demonstrates connecting cables to the equalizer's output ports, then to the power amplifier outputs, and finally connecting the equalizer's inputs to the mixer inputs. The video concludes by showing the effect of these connections on the audio signal, illustrating the integration of the equalizer into a complete audio system.
- Power Connection: Connect the supplied power cable to the power socket (8) on the rear panel and then to a suitable 110V AC power outlet. Note that this model does not have a dedicated on/off switch; it is designed to remain on when connected to power.
- Input Connections: Connect your audio source (e.g., mixer, DVD player, microphone system) to the Input interfaces (10) on the rear panel using either XLR or 1/4" TRS cables. Ensure you connect Channel 1 inputs to Channel 1 and Channel 2 inputs to Channel 2.
- Output Connections: Connect the Output interfaces (9) on the rear panel to your power amplifier or other audio processing equipment using either XLR or 1/4" TRS cables. Maintain correct channel assignments (Channel 1 to Channel 1, Channel 2 to Channel 2).
5. Operating Instructions
Once connected, the EQ-215S is ready for operation. Follow these steps to adjust your audio.
- Power On: The unit powers on automatically when connected to an active power outlet.
- Input Gain Adjustment (5): Use the Input Gain knob to set the overall input level for each channel. Adjust this to ensure the signal is strong but not clipping. The 4-segment LED ladder display (1) will help monitor the output level.
- EQ Adjustment (3): Use the 15 individual sliders for each channel to boost or cut specific frequency bands. Move a slider up to boost that frequency or down to cut it. The center position (0dB) indicates no change.
- Range Switch (7): Press the Boost/Cut button (7) to select the operating range of the EQ faders. You can choose between ±12dB (for wider adjustments) and ±6dB (for finer, more subtle adjustments).
- Low Cut Switch (6): Press the Low Cut button (6) to activate the low-cut filter. This will remove unwanted low-frequency rumble and noise from the signal.
- EQ Bypass Switch (4): Press the Independent EQ button (4) to bypass the equalizer circuit. This allows you to compare the processed sound with the original, unprocessed sound. When bypassed, the EQ function is deactivated.
- Monitoring Output Level (1): Observe the 4-segment LED ladder display (1) to monitor the output level. If the CLIP LED (2) illuminates frequently, reduce the input gain or adjust EQ settings to prevent distortion.
6. Maintenance
- Cleaning: Use a soft, dry cloth to clean the exterior of the unit. Do not use liquid cleaners or aerosols.
- Ventilation: Ensure that the ventilation openings are not blocked. Dust accumulation can affect performance and lifespan.
- Storage: If storing the unit for an extended period, disconnect it from power and store it in a cool, dry place, ideally in its original packaging.
7. Troubleshooting
| Problem | Possible Cause | Solution |
|---|---|---|
| No sound output. | Incorrect connections, power off, EQ bypassed. | Check all audio cable connections. Ensure power is supplied. Check if the EQ Bypass button (4) is engaged. |
| Distorted sound. | Input gain too high, output clipping. | Reduce the Input Gain (5). Check the CLIP LED (2) and adjust levels to prevent it from illuminating constantly. |
| Excessive low-frequency hum/noise. | Ground loop, external interference, low-cut filter off. | Engage the Low Cut button (6). Check for proper grounding of all equipment. Use balanced cables where possible. |
| EQ adjustments have no effect. | EQ bypassed. | Ensure the Independent EQ button (4) is disengaged (EQ function active). |
8. Specifications
- Model: EQ-215S
- Channels: Dual 15-Band Stereo
- Frequency Bands: 15 per channel
- Adjustment Range: ±12dB per band (switchable to ±6dB)
- Input/Output Connectors: XLR balanced, 1/4" TRS unbalanced
- Power Source: Corded Electric
- Voltage: 110 Volts (AC)
- Power Consumption: 12 Watts
- Item Weight: 4.79 pounds
- Product Dimensions: 18.89 x 5.9 x 1.77 inches (1U Rack Mount)
- Color: Silver
9. Warranty and Support
For warranty information and technical support, please refer to the contact details provided with your purchase or visit the official MIZISNR website. Keep your proof of purchase for any warranty claims.
Related Documents - EQ-215S
 |
ART 442 EQ & 452 EQ Graphic Equalizer User's Guide User's guide for the ART 442 Dual Channel 15 Band and 452 Single Channel 31 Band Graphic Equalizers, covering features, installation, operation, controls, specifications, applications, warranty, and service. |
 |
ART HQ-231 Dual Channel 31-Band Graphic Equalizer User's Guide Comprehensive user's guide for the ART HQ-231 Dual Channel 31-Band 1/3 Octave Graphic Equalizer with FDC™ (Feedback Detection Circuit). Learn about features, installation, operation, troubleshooting, and specifications. |
 |
Rockville REQ231 Dual Channel 62 Band Rack Mountable EQ Owner's Manual Owner's manual for the Rockville REQ231 Dual Channel 62 Band Rack Mountable EQ, detailing its functions, features, specifications, and safety instructions. This guide provides information on operating and maintaining the audio equalizer. |
 |
Citronic CEQ215 / CEQ231 Graphic Equalizers User Manual User manual for the Citronic CEQ215 (dual 15-band) and CEQ231 (dual 31-band) graphic equalizers, detailing features, specifications, connection, operation, and troubleshooting. Includes information on equalization principles and unit overview. |
 |
Audiolab EQ-2231 User Manual: 2 x 31-Band Graphic Equalizer User manual for the Audiolab EQ-2231, a 2 x 31-band graphic equalizer featuring a 4-LED bar graph indicator for gain reduction and output levels, noise reduction, limiter, and a 40Hz low cut button. Includes specifications, safety instructions, operating controls, connection details, rear panel descriptions, and installation considerations. |
 |
Rockville REQ231 Dual Channel 62 Band Rack Mountable EQ Owner's Manual Owner's manual for the Rockville REQ231 Dual Channel 62 Band Rack Mountable EQ, detailing its functions, safety instructions, and technical specifications for professional audio applications. |
Ask a question about this manual
Ask about setup, troubleshooting, compatibility, parts, safety, or missing instructions. Manuals+ will review the question and use this page’s manual context to help answer it.