1. Introduction and Overview
This user manual provides essential information for the installation, maintenance, and troubleshooting of your CauYien replacement parts kit for Shark AI Robot Vacuum Cleaners. Regular replacement of these components is crucial for maintaining the optimal cleaning performance and extending the lifespan of your robot vacuum.
The kit includes a comprehensive set of parts designed to be fully compatible and easy to install, ensuring your vacuum operates efficiently.
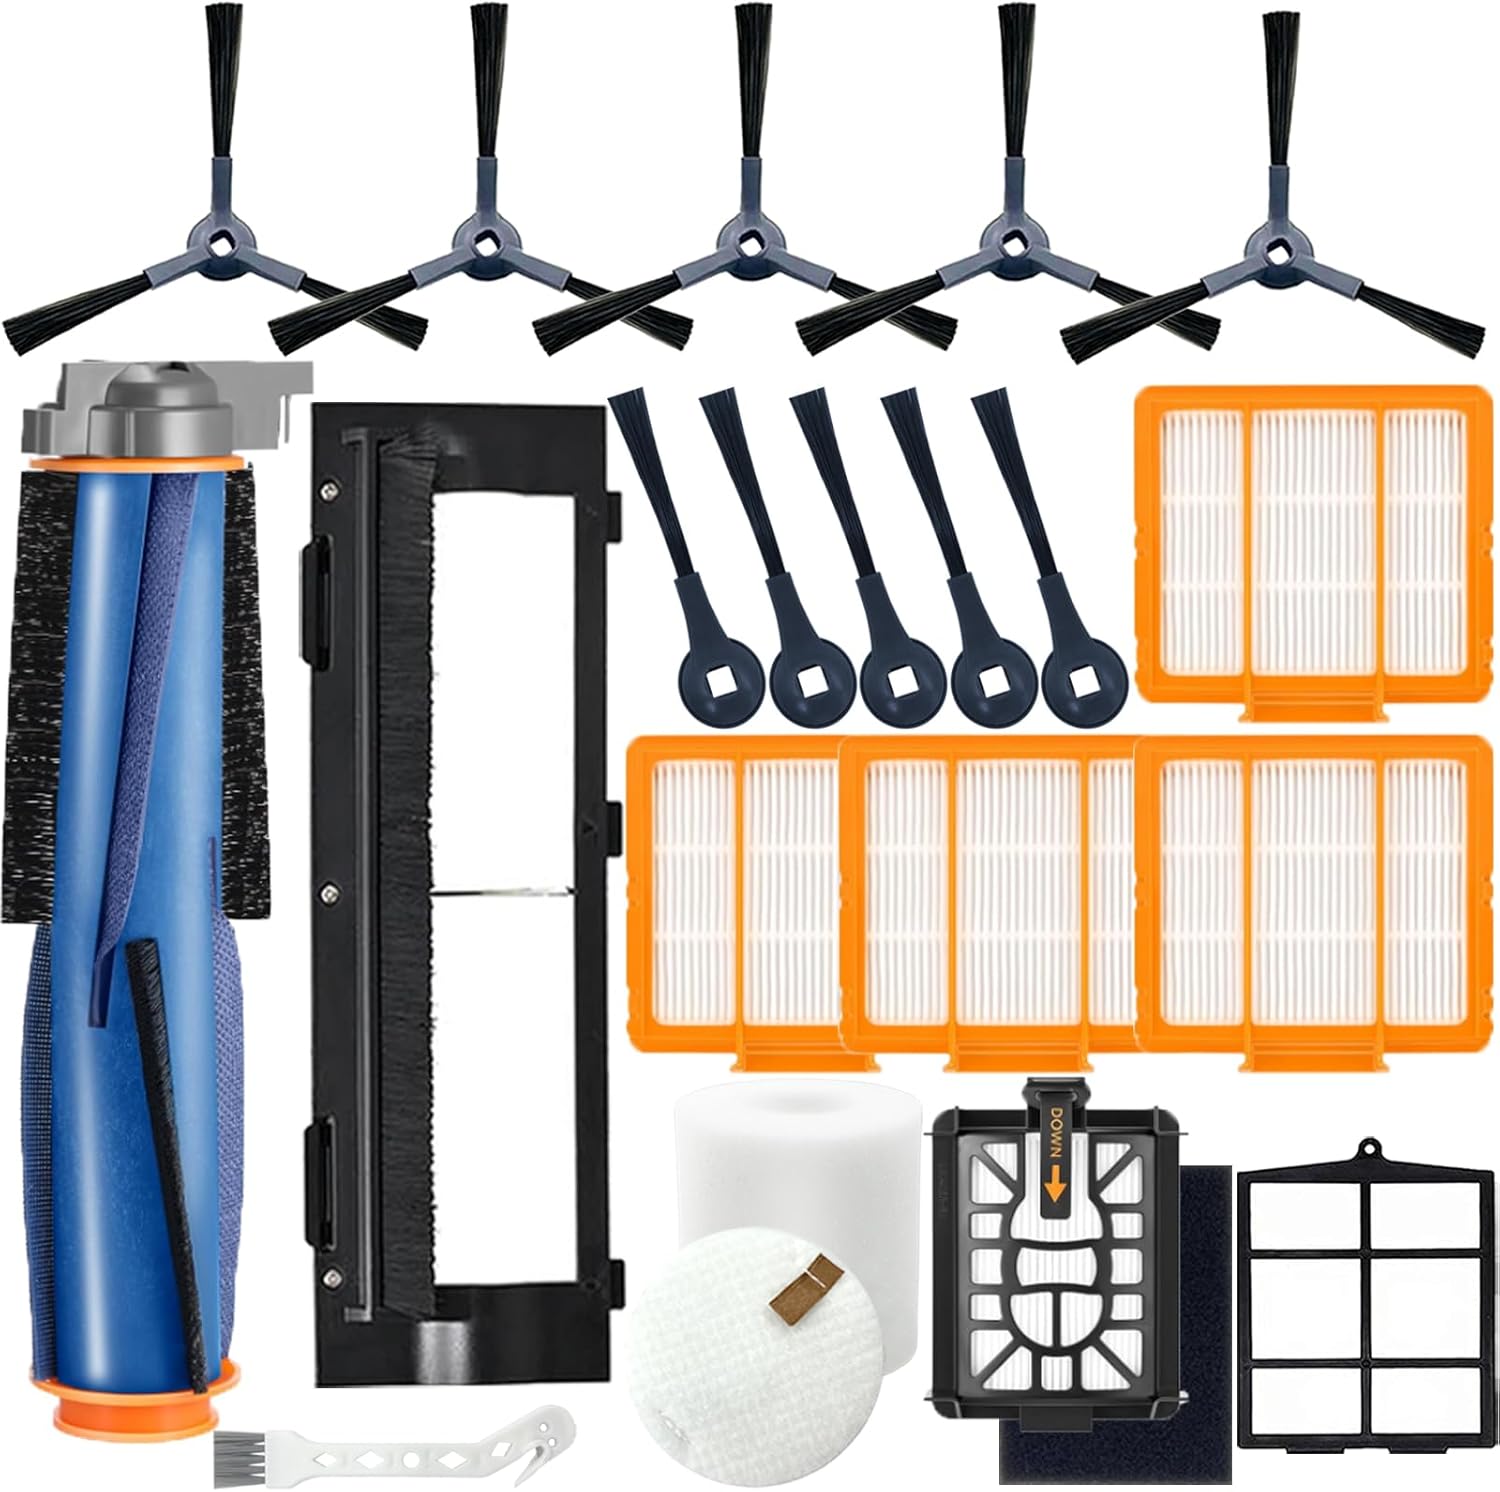
Image 1.1: Overview of the complete CauYien replacement parts kit.
2. Compatible Models
This replacement parts kit is 100% compatible with the following Shark AI Robot Vacuum Cleaner models:
- Shark AI AV2511AE
- Shark AI AV2501S
- Shark AI AV2610WA
- Shark AI AV2501AE
- Shark AI RV2502AE
- Shark AI RV2610WA
- Shark AI UR2500SR
- Shark AI RV2520AOUS
- Shark AI AV2510AOUS
- Shark AI AV2510SOUS
- Shark AI RV2520AFUS
- Shark AI AV2610BFUS
- Shark AI RV2610WD
- Shark AI UR250BEOUS
- Shark AI UR250BEYUS
- Shark AI UR250BEXUS
- Shark AI AV251WAXUS
- Shark AI AV251WAOUS
- Shark AI RV2610BFUS
- Shark AI RV2520
- Shark AI RV2510
Note: This kit is NOT compatible with models such as AV1010AE, R101AE, RV1001AE, AV911S, AV993RV912S, AV992, AV1002AE, RV100AE, RV1000, UR1000SR.
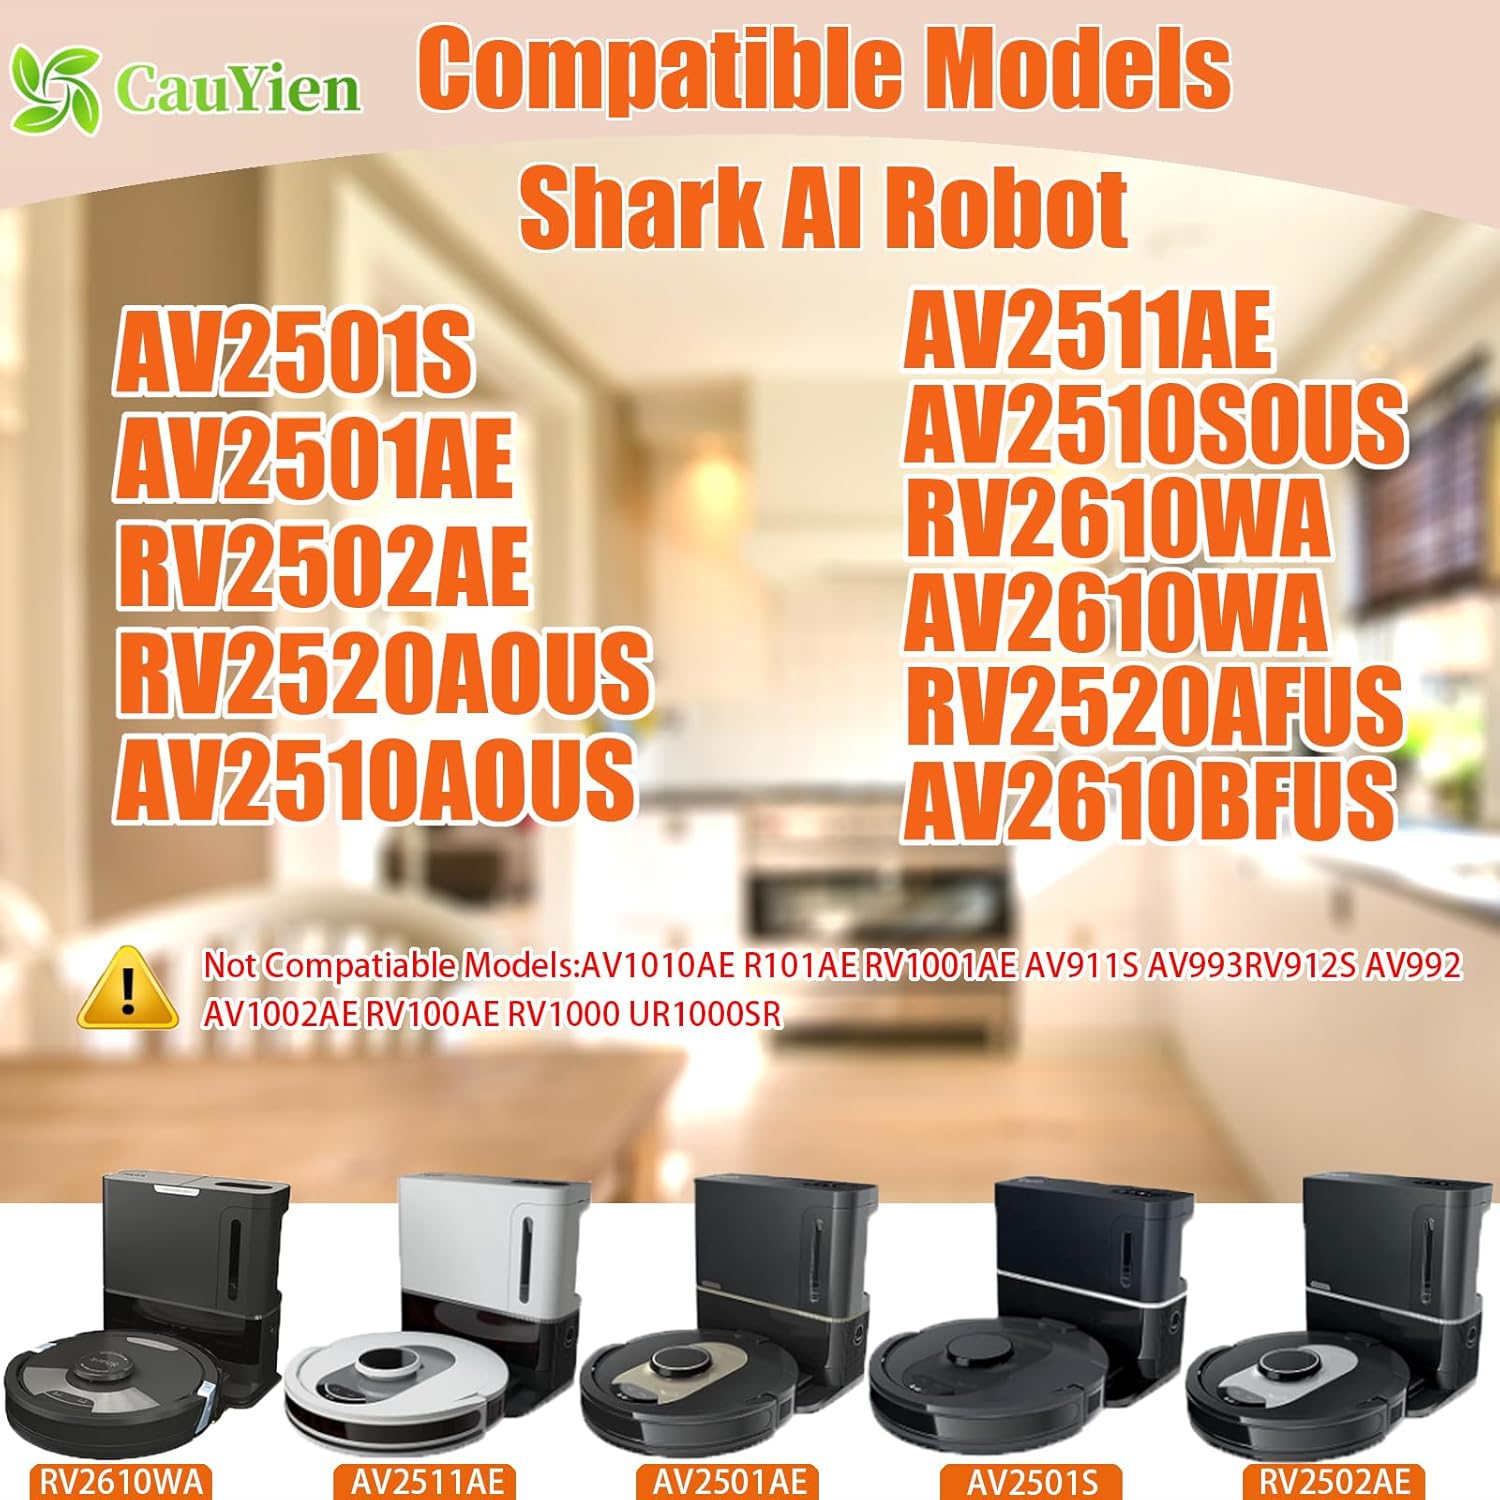
Image 2.1: Visual representation of compatible Shark AI Robot Vacuum Cleaner models.
3. Included Components
Your CauYien AI KIT(1+5+5+4) includes a total of 21 pieces:
- 1 x Drum Brush (Main Brush)
- 1 x Roller Brush Cover
- 4 x HEPA Filters
- 5 x Upgraded Triangular Side Brushes
- 5 x Standard Side Brushes
- 1 x Foam Filter
- 1 x Felt Filter
- 1 x Pre-Filter
- 1 x Self-Emptying Base Filter
- 1 x Cleaning Black Cotton
4. Setup and Installation
Follow these steps to replace the components in your Shark AI Robot Vacuum Cleaner. Always ensure the vacuum is powered off and unplugged before performing any maintenance.
4.1. Main Brush (Drum Brush) and Roller Brush Cover Installation
- Turn the robot vacuum upside down on a flat surface.
- Locate the main brush cover, usually secured by tabs or screws. Release the tabs or unscrew to remove the cover.
- Carefully lift out the old main brush. Remove any hair or debris tangled around the brush ends or within the brush compartment.
- Insert the new main brush into the compartment, ensuring the ends align with the slots.
- Replace the roller brush cover, pressing down until it clicks securely into place.

Image 4.1: Detailed view of the main brush and its components.
4.2. Side Brush Installation
- Turn the robot vacuum upside down.
- Locate the side brushes. They are typically held in place by a single screw or can be pulled off directly depending on the model.
- Remove the old side brush.
- Align the new side brush with the post on the vacuum and press it down firmly until it clicks into place, or secure it with the screw if applicable.

Image 4.2: Illustration of side brush design and its sweeping action.
4.3. Filter Installation (HEPA, Foam, Felt, Pre-Filter, Self-Emptying Base Filter)
- Open the dust bin compartment on your robot vacuum.
- Remove the dust bin.
- Locate the filter assembly within the dust bin. This usually includes the HEPA filter, foam filter, and felt filter.
- Remove the old filters. Dispose of them properly.
- Insert the new foam and felt filters first, followed by the new HEPA filter, ensuring they are seated correctly.
- For the Pre-Filter and Self-Emptying Base Filter, refer to your specific vacuum model's manual for their exact location and replacement procedure, as these can vary.
- Close the dust bin and reinsert it into the vacuum until it clicks into place.

Image 4.3: Close-up of the H13 True HEPA filter and its filtration capabilities.
5. Usage Recommendations
To ensure your Shark AI Robot Vacuum Cleaner continues to perform at its best, adhere to the following recommendations:
- Regular Replacement: It is recommended to replace the main brush, side brushes, and filters every 2-3 months. For households with heavy usage, pets, or high dust levels, more frequent replacement may be necessary.
- Visual Inspection: Periodically inspect all parts for signs of wear, damage, or excessive debris accumulation.
- Optimal Performance: Replacing parts as recommended helps maintain strong suction, efficient debris collection, and effective air filtration, preventing strain on the vacuum's motor.
6. Maintenance
Proper maintenance of your replacement parts will extend their effectiveness and the overall life of your vacuum cleaner.
6.1. Cleaning the Main Brush
- Remove the main brush as described in Section 4.1.
- Use the included cleaning tool or a pair of scissors to cut and remove any hair or string wrapped around the brush bristles and ends.
- Wipe the brush with a dry cloth. Do not wash the main brush with water.
6.2. Cleaning the Side Brushes
- Remove the side brushes as described in Section 4.2.
- Remove any hair or debris tangled around the brush arms.
- Wipe the brushes with a dry cloth. If heavily soiled, they can be gently rinsed with water, but ensure they are completely dry before reinstallation.
6.3. Cleaning the Filters
- Remove the filters from the dust bin as described in Section 4.3.
- Tap the HEPA filter gently over a trash can to remove loose dust and debris. Do not wash HEPA filters with water.
- The foam and felt filters can be rinsed with lukewarm water. Ensure they are completely air-dried for at least 24 hours before reinserting them into the dust bin.
7. Troubleshooting
If you encounter issues after replacing parts, consider the following common solutions:
7.1. Reduced Suction Power
- Check Filters: Ensure all filters (HEPA, foam, felt) are clean and properly installed. Clogged filters are a primary cause of reduced suction.
- Dust Bin: Verify the dust bin is empty and correctly seated in the vacuum.
- Main Brush: Inspect the main brush for any remaining tangles or blockages. Ensure it spins freely.
7.2. Side Brushes Not Spinning or Spinning Slowly
- Check for Obstructions: Remove the side brushes and clear any hair or debris wrapped around the brush post or the brush itself.
- Proper Installation: Ensure the side brushes are securely attached and fully seated.
- Wear and Tear: If brushes are bent or heavily worn, replacement is necessary.
7.3. Unusual Noises
- Main Brush: Remove and inspect the main brush for any foreign objects, damage, or improper installation. Ensure the brush ends are clean and rotate smoothly.
- Filter Seating: Ensure all filters and the dust bin are correctly seated, as loose components can cause rattling.
8. Specifications
| Attribute | Detail |
|---|---|
| Brand | CauYien |
| Model | AI KIT(1+5+5+4) |
| Material | Plastic |
| Number of Pieces | 21 |
| Item Weight | 13.7 ounces |
| Product Dimensions (Approximate) | 0.01 x 0.01 x 0.01 inches (Packaging dimensions may vary) |

Image 8.1: Approximate dimensions of various replacement parts.
9. Warranty and Support
CauYien is committed to providing high-quality products and customer satisfaction. While specific warranty details are not provided, we offer dedicated customer support.
If you experience any product model compatibility issues or quality problems with your CauYien replacement parts, please contact us immediately. We are dedicated to resolving any issues and will provide you with the best solution within 24 hours.
For support, please refer to the contact information provided with your purchase or visit the official CauYien store on Amazon.