1. Introduction
Welcome to your Generic CAMW-WDB Model VX1 Video Doorbell. This manual provides comprehensive instructions for the installation, operation, and maintenance of your video doorbell to ensure optimal performance and security for your home. Please read this manual thoroughly before installation and retain it for future reference.
2. Package Contents
Verify that all components listed below are included in your package:
- VX1 Doorbell with gray trim
- Chime Adapter unit (Required)
- Mounting hardware (screws, anchors)
- Mounting brackets (flat and angled options)

Image: All components included in the VX1 Video Doorbell package, showing the doorbell, chime adapter, screws, anchors, and two types of mounting brackets.
3. Product Overview
The VX1 Video Doorbell features a sleek design integrating a high-resolution camera, interactive audio components, and smart lighting for enhanced security.
Front View

Image: Front view of the VX1 Video Doorbell, highlighting the camera at the top, a small indicator light, a larger circular doorbell button, and an LED spotlight at the bottom.
Rear View
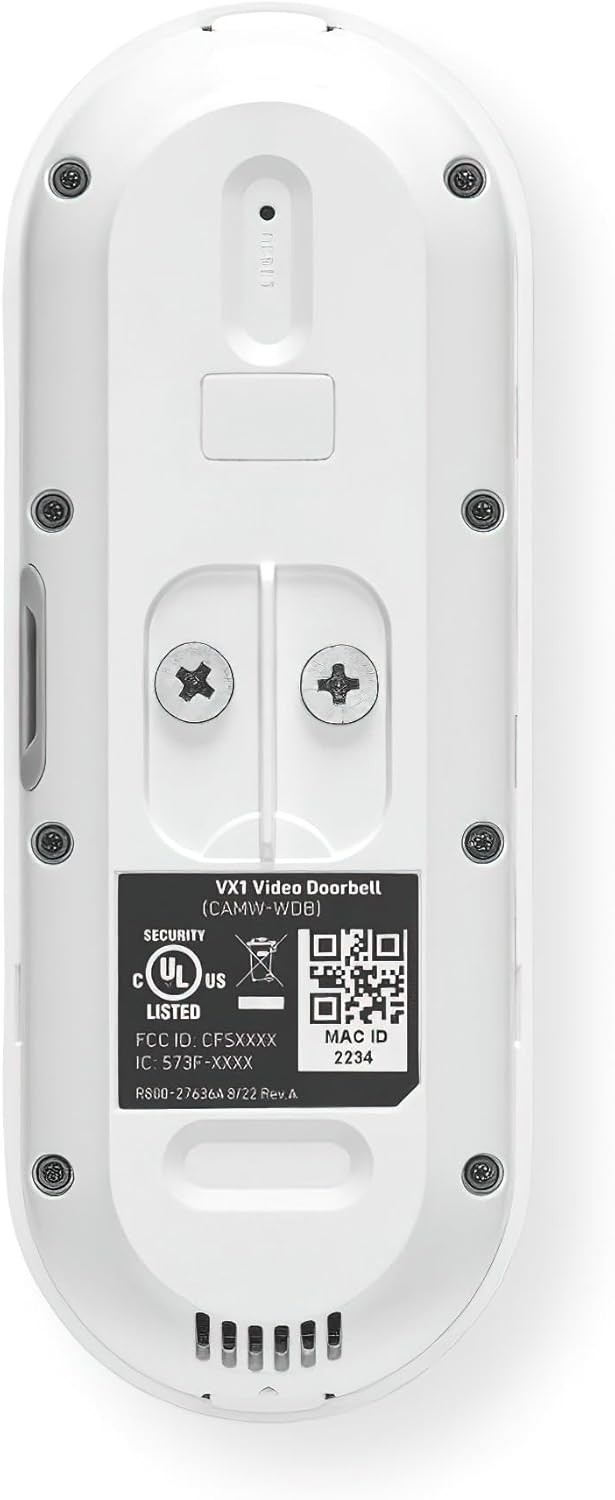
Image: Rear view of the VX1 Video Doorbell, showing the mounting screw holes, wiring terminals, a reset button, and a label with model information, security certifications, and QR codes.
4. Installation Guide
Careful installation ensures optimal performance and longevity of your video doorbell.
4.1 Pre-Installation Checklist
- Power Requirements: Ensure your existing doorbell wiring provides 16 VAC to 24 VAC, 10 VA minimum.
- Wi-Fi Connectivity: Confirm strong 2.4GHz or 5GHz Wi-Fi signal at the installation location.
- Tools Needed: Screwdriver, drill, drill bits, wire strippers (if necessary).
- Chime Compatibility: The included chime adapter is required for mechanical chimes and compatible digital chimes.
4.2 Wiring the Chime Adapter
- Turn off power: At your circuit breaker, turn off the power to your existing doorbell and chime.
- Locate chime: Find your indoor doorbell chime.
- Connect adapter: Wire the chime adapter to your existing chime unit according to the diagram provided in the separate chime adapter instructions. This typically involves connecting it in parallel with the chime's transformer and front doorbell terminals.
- Secure adapter: Mount the chime adapter inside your chime box or a suitable location.
4.3 Mounting the Doorbell
- Remove old doorbell: Disconnect and remove your existing doorbell button.
- Choose mounting bracket: Select either the flat mounting bracket or an angled bracket (if needed for better viewing angle).
- Mark drill holes: Place the chosen mounting bracket against the wall where you want to install the doorbell. Mark the drill holes.
- Drill holes: Drill pilot holes if necessary, and insert wall anchors if mounting into stucco, brick, or concrete.
- Route wires: Pull the existing doorbell wires through the center hole of the mounting bracket.
- Secure bracket: Screw the mounting bracket to the wall using the provided screws.
- Connect doorbell wires: Connect the doorbell wires to the terminals on the back of the VX1 doorbell. Ensure a secure connection.
- Mount doorbell: Align the VX1 doorbell with the mounting bracket and push it firmly into place until it clicks.
- Restore power: Turn the power back on at the circuit breaker. The doorbell should power on and indicate readiness for setup.

Image: Two flat gray mounting brackets, showing the front and back sides with screw holes and a central opening for wiring.

Image: Two gray angled mounting brackets, designed to adjust the doorbell's viewing angle, shown from a perspective that highlights their wedge shape.
5. Initial Setup and App Connection
After physical installation, connect your doorbell to your home network and mobile application.
5.1 Downloading the App
The VX1 Video Doorbell is compatible with specific applications for homeowners and dealers:
- For Homeowners: Download the Resideo Total Connect 2.0 App from your device's app store.
- For Dealers: Download the AlarmNet 360 app from your device's app store.
5.2 Connecting to Wi-Fi
- Open App: Launch the appropriate app (Resideo Total Connect 2.0 or AlarmNet 360) on your smartphone or tablet.
- Create Account/Log In: Follow the in-app instructions to create a new account or log in to an existing one.
- Add Device: Select the option to add a new device and choose 'Video Doorbell' or similar.
- Scan QR Code: The app may prompt you to scan a QR code located on the back of the doorbell or in the packaging.
- Connect to Wi-Fi: Follow the app's instructions to connect the doorbell to your home's dual-band 2.4GHz or 5GHz Wi-Fi network. Enter your Wi-Fi password when prompted.
- Complete Setup: Once connected, the app will guide you through naming your doorbell and configuring initial settings.
6. Operating Instructions
Familiarize yourself with the key features and functions of your VX1 Video Doorbell.
6.1 Two-Way Interactive Audio
When a visitor presses the doorbell or motion is detected, you will receive a notification on your smartphone. Open the app to view live video and engage in two-way conversation with the visitor using the built-in microphone and speaker.
6.2 Advanced Event Detection
The VX1 Video Doorbell utilizes advanced algorithms to differentiate between people, vehicles, packages, and animals. Configure your notification preferences within the app to receive alerts for specific types of events. Note that some advanced detection features may require a subscription.
6.3 Built-in LED Spotlight and Siren
The integrated LED spotlight can be configured to illuminate automatically upon motion detection or manually activated via the app. The built-in siren can also be triggered remotely through the app to deter unwanted activity.
6.4 Night Vision
The doorbell features both IR Night Vision (up to 23ft/7m) and Color Night Vision On-Event (up to 10ft/3m) to provide clear visibility in low-light conditions. Color Night Vision activates automatically during specific events to enhance detail.
7. Maintenance
Regular maintenance helps ensure the optimal performance and longevity of your video doorbell.
7.1 Cleaning
Periodically clean the camera lens and the doorbell's exterior with a soft, damp cloth. Avoid using harsh chemicals or abrasive materials that could damage the finish or lens.
7.2 Firmware Updates
Ensure your doorbell's firmware is always up to date. The companion app will typically notify you of available updates and guide you through the process. Firmware updates often include performance improvements, new features, and security enhancements.
8. Troubleshooting
If you encounter issues with your VX1 Video Doorbell, refer to the following table for common problems and solutions.
| Problem | Possible Cause | Solution |
|---|---|---|
| Doorbell not powering on | No power from existing wiring; circuit breaker tripped; incorrect wiring. | Check circuit breaker. Verify wiring connections at the doorbell and chime adapter. Ensure power supply meets 16-24 VAC, 10 VA minimum. |
| Cannot connect to Wi-Fi | Incorrect Wi-Fi password; weak Wi-Fi signal; incorrect network (e.g., public Wi-Fi). | Double-check Wi-Fi password. Move router closer or install a Wi-Fi extender. Ensure you are connecting to a private 2.4GHz or 5GHz network. Reset doorbell and try again. |
| Poor video quality | Weak Wi-Fi signal; dirty camera lens; network congestion. | Improve Wi-Fi signal strength. Clean the camera lens. Reduce other network activity. |
| No chime sound | Chime adapter not installed correctly; chime not compatible; chime volume too low. | Verify chime adapter wiring. Check chime compatibility. Adjust chime volume. |
| Motion detection not working | Motion detection settings disabled; incorrect sensitivity; obstruction. | Check motion detection settings in the app. Adjust sensitivity. Ensure no physical obstructions block the sensor. |
9. Specifications
Detailed technical specifications for the Generic CAMW-WDB Model VX1 Video Doorbell:
| Feature | Specification |
|---|---|
| Model Name | VX1 Video Doorbell |
| Indoor/Outdoor Usage | Outdoor (IP65 Weather Resistance) |
| Power Source | Corded Electric (16 VAC to 24 VAC, 10 VA minimum) |
| Connectivity Protocol | Wi-Fi (Dual-band 2.4GHz and 5GHz) |
| Mounting Type | Wall Mount |
| Video Capture Resolution | 5MP sensor, 2592 x 1944 pixels maximum |
| Video Format | H.264 |
| Wide Dynamic Range (WDR) | Yes |
| Diagonal Field of View | 180 degrees |
| Speaker | 93dBA at 0.1m |
| Microphone Range | 10ft (3m) |
| Chime Compatibility | Mechanical chimes with included chime adapter, and compatible digital chimes |
| Spotlight and LED Range | Up to 10ft (3m) |
| IR Night Vision Range | Up to 23ft (7m) |
| Color Night Vision On-Event Range | Up to 10ft (3m) |
| Overall Dimensions (L x W x H) | 4.8 x 1.8 x 1.1 inches |
| Item Weight | 5 ounces |
| Batteries Required | No |
10. Warranty and Support
For information regarding the product warranty, please refer to the warranty card included in your product packaging or contact the manufacturer directly. For technical support, troubleshooting assistance beyond this manual, or service inquiries, please visit the manufacturer's official website or contact their customer support line.


